数据结构开发(10):Linux内核链表
0.目录
1.老生常谈的两个宏(Linux)
- 1.1 offsetof
- 1.2 container_of
2.Linux内核链表剖析
3.小结
1.老生常谈的两个宏(Linux)
Linux 内核中常用的两个宏定义:

1.1 offsetof
见招拆招——第一式:编译器做了什么?
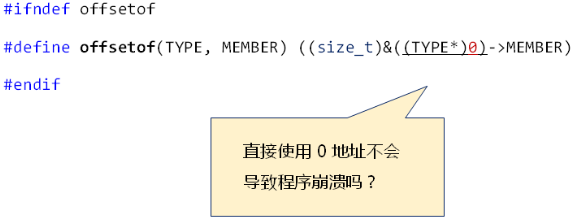
- offsetof 用于计算 TYPE 结构体中 MEMBER 成员的偏移位置。

- 编译器清楚的知道结构体成员变量的偏移位置
- 通过结构体变量首地址与偏移量定位成员变量

示例——offsetof:
#include <stdio.h>

#ifndef offsetof

#define offsetof(TYPE, MEMBER) ((size_t)&((TYPE*)0)->MEMBER)

#endif

struct ST

{

    int i;   //  0

    int j;   //  4

    char c;  //  8

};

void func(struct ST* pst)

{

    int* pi = &(pst->i);   //  (unsigned int)pst + 0

    int* pj = &(pst->j);   //  (unsigned int)pst + 4

    char* pc = &(pst->c);  //  (unsigned int)pst + 8

    printf("pst = %p\n", pst);

    printf("pi = %p\n", pi);

    printf("pj = %p\n", pj);

    printf("pc = %p\n", pc);

}

int main()

{

    struct ST s = {0};

    func(&s);

    func(NULL);

    printf("offset i: %d\n", offsetof(struct ST, i));

    printf("offset j: %d\n", offsetof(struct ST, j));

    printf("offset c: %d\n", offsetof(struct ST, c));

    return 0;

}
运行结果为:
pst = 0000008D8575FA60

pi = 0000008D8575FA60

pj = 0000008D8575FA64

pc = 0000008D8575FA68

pst = 0000000000000000

pi = 0000000000000000

pj = 0000000000000004

pc = 0000000000000008

offset i: 0

offset j: 4

offset c: 8
1.2 container_of
见招拆招——第二式:( { } )是何方神圣?
- ( { } ) 是 GNU C 编译器的语法扩展
- ( { } ) 与逗号表达式类似,结果为最后一个语句的值

示例——( { } ):
#include <stdio.h>

void method_1()

{

    int a = 0;

    int b = 0;

    int r = (

           a = 1,

           b = 2,

           a + b

                );

    printf("r = %d\n", r);

}

void method_2()

{

    int r = ( {

                  int a = 1;

                  int b = 2;

                  a + b;

              } );

    printf("r = %d\n", r);

}

int main()

{

    method_1();

    method_2();

    return 0;

}
运行结果为:
r = 3

r = 3
见招拆招——第三式:typeof是一个关键字吗?
- typeof 是 GNU C 编译器的特有关键字
- typeof 只在编译器生效,用于得到变量的类型

示例——typeof:
#include <stdio.h>

void type_of()

{

    int i = 100;

    typeof(i) j = i;

    const typeof(j)* p = &j;

    printf("sizeof(j) = %d\n", sizeof(j));

    printf("j = %d\n", j);

    printf("*p = %d\n", *p);

}

int main()

{

    type_of();

    return 0;

}
运行结果为:
sizeof(j) = 4

j = 100

*p = 100
见招拆招——第四式:最后的原理

示例——container_of:
#include <stdio.h>

#ifndef offsetof

#define offsetof(TYPE, MEMBER) ((size_t)&((TYPE*)0)->MEMBER)

#endif

#ifndef container_of

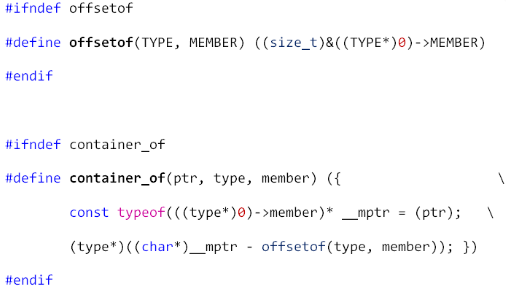
#define container_of(ptr, type, member) ({		         \

        const typeof(((type*)0)->member)* __mptr = (ptr);   \

        (type*)((char*)__mptr - offsetof(type, member)); })

#endif

#ifndef container_of_new

#define container_of_new(ptr, type, member) ((type*)((char*)(ptr) - offsetof(type, member)))

#endif

struct ST

{

    int i;   //  0

    int j;   //  4

    char c;  //  8

};

int main()

{

    struct ST s = {0};

    char* pc = &s.c;

    struct ST* pst = container_of(pc, struct ST, c);

    struct ST* pst_new = container_of_new(pc, struct ST, c);

    printf("&s = %p\n", &s);

    printf("pst = %p\n", pst);

    printf("pst_new = %p\n", pst_new);

    return 0;

}
运行结果为:
&s = 0061FF14

pst = 0061FF14

pst_new = 0061FF14
(container_of与container_of_new的区别在于container_of在宏中加入了类型检查,如果传入的不是一个结构体,编译的时候就会发生一个警告!)
2.Linux内核链表剖析
本节目标:
- 移植 Linux 内核链表,使其适用于非 GNU 编译器
- 分析 Linux 内核中链表的基本实现
Linux内核链表的位置及依赖:
- 位置
{linux-2.6.39}\\indude\linux\list.h
- 依赖
#include <linux/types.h>#include <linux/stddef.h>#include <linux/poison.h>#include <linux/prefetch.h>
移植时的注意事项:
- 清除文件间的依赖
- 剥离依赖文件中与链表实现相关的代码
- 清除平台相关代码( GNU C )
( { } )typeof__builtin_prefetchstatic inline
移植后的 Linux.h(代码过长,请下载后查看):Linux.h(4KB)
Linux内核链表的实现:
- 带头节点的双向循环链表,且头节点为表中成员
- 头结点的 next 指针指向首结点
- 头节点的 prev 指针指向尾结点

Linux内核链表的结点定义:

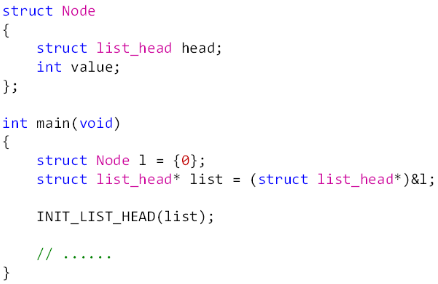
使用 struct list_head 自定义链表结点:

Linux内核链表的创建及初始化:

Linux内核链表的插入操作:
- 在链表头部插入:list_add(new, head)
- 在链表尾部插入:list_add_tail(new, head)
next->prev = new;

new->next = next;

new->prev = prev;

prev->next = new;
Linux内核链表的删除操作:

Linux内核链表的遍历:
- 正向遍历:list_for_each(pos, head)
- 逆向遍历:list_for_each_prev(pos, head)

示例1——使用Linux内核链表测试插入删除:
#include <stdio.h>

#include "LinuxList.h"

void list_demo_1()

{

    struct Node

    {

        struct list_head head;

        int value;

    };

    struct Node l = {0};

    struct list_head* list = (struct list_head*)&l;

    struct list_head* slider = NULL;

    int i = 0;

    INIT_LIST_HEAD(list);

    printf("Insert begin ...\n");

    for(i=0; i<5; i++)

    {

        struct Node* n = (struct Node*)malloc(sizeof(struct Node));

        n->value = i;

        list_add_tail((struct list_head*)n, list);

    }

    list_for_each(slider, list)

    {

        printf("%d\n", ((struct Node*)slider)->value);

    }

    printf("Insert end ...\n");

    printf("Delete begin ...\n");

    list_for_each(slider, list)

    {

        if( ((struct Node*)slider)->value == 3 )

        {

            list_del(slider);

            free(slider);

            break;

        }

    }

    list_for_each(slider, list)

    {

        printf("%d\n", ((struct Node*)slider)->value);

    }

    printf("Delete end ...\n");

}

int main()

{

    list_demo_1();

    return 0;

}
运行结果为:
Insert begin ...

0

1

2

3

4

Insert end ...

Delete begin ...

0

1

2

4

Delete end ...
示例2——改变Node结点的自定义顺序后的测试list_entry:
#include <stdio.h>

#include "LinuxList.h"

void list_demo_2()

{

    struct Node

    {

        int value;

        struct list_head head;

    };

    struct Node l = {0};

    struct list_head* list = &l.head;

    struct list_head* slider = NULL;

    int i = 0;

    INIT_LIST_HEAD(list);

    printf("Insert begin ...\n");

    for(i=0; i<5; i++)

    {

        struct Node* n = (struct Node*)malloc(sizeof(struct Node));

        n->value = i;

        list_add(&n->head, list);

    }

    list_for_each(slider, list)

    {

        printf("%d\n", list_entry(slider, struct Node, head)->value);

    }

    printf("Insert end ...\n");

    printf("Delete begin ...\n");

    list_for_each(slider, list)

    {

        struct Node* n = list_entry(slider, struct Node, head);

        if( n->value == 3 )

        {

            list_del(slider);

            free(n);

            break;

        }

    }

    list_for_each(slider, list)

    {

        printf("%d\n", list_entry(slider, struct Node, head)->value);

    }

    printf("Delete end ...\n");

}

int main()

{

    list_demo_2();

    return 0;

}
运行结果为:
Insert begin ...

4

3

2

1

0

Insert end ...

Delete begin ...

4

2

1

0

Delete end ...
3.小结
- 编译器清楚的知道结构体成员变量的偏移位置
- ( { } ) 与逗号表达式类似,结果为最后一个语句的值
- typeof 只在编译期生效,用于得到变量的类型
- container_of 使用 ( { } ) 进行类型安全检查
- Linux内核链表移植时需要剔除依赖以及平台相关代码
- Linux内核链表是带头节点的双向循环链表
- 使用Linux内核链表时需要自定义链表结点
- 将 struct list_head 作为结构体的第一个成员或最后一个成员
- struct list_head 作为最后一个成员时,需要使用 list_entry 宏
- list_entry 的定义中使用了 container_of 宏
数据结构开发(10):Linux内核链表的更多相关文章
- Linux 内核链表实现和使用(一阴一阳,太极生两仪~)
0. 概述 学习使用一下 linux 内核链表,在实际开发中我们可以高效的使用该链表帮我们做点事, 链表是Linux 内核中常用的最普通的内建数据结构,链表是一种存放和操作可变数据元 素(常称为节点) ...
- Linux 内核链表的使用及深入分析【转】
转自:http://blog.csdn.net/BoArmy/article/details/8652776 1.内核链表和普通链表的区别 内核链表是一个双向链表,但是与普通的双向链表又有所区别.内核 ...
- Linux 内核链表 list.h 的使用
Linux 内核链表 list.h 的使用 C 语言本身并不自带集合(Collection)工具,当我们需要把结构体(struct)实例串联起来时,就需要在结构体内声明指向下一实例的指针,构成所谓的& ...
- Linux 内核链表使用举例
链表数据结构的定义非常简洁: struct list_head { struct list_head *next, *prev; }; list_head结构包括两个指向list_head结构的指针p ...
- Linux内核链表——看这一篇文章就够了
本文从最基本的内核链表出发,引出初始化INIT_LIST_HEAD函数,然后介绍list_add,通过改变链表位置的问题引出list_for_each函数,然后为了获取容器结构地址,引出offseto ...
- 深入分析 Linux 内核链表--转
引用地址:http://www.ibm.com/developerworks/cn/linux/kernel/l-chain/index.html 一. 链表数据结构简介 链表是一种常用的组织有序数据 ...
- linux内核链表分析
一.常用的链表和内核链表的区别 1.1 常规链表结构 通常链表数据结构至少应包含两个域:数据域和指针域,数据域用于存储数据,指针域用于建立与下一个节点的联系.按照指针域的组织以及各个节 ...
- 深入分析 Linux 内核链表
转载:http://www.ibm.com/developerworks/cn/linux/kernel/l-chain/ 一. 链表数据结构简介 链表是一种常用的组织有序数据的数据结构,它通过指 ...
- Linux 内核 链表 的简单模拟(1)
第零章:扯扯淡 出一个有意思的题目:用一个宏定义FIND求一个结构体struct里某个变量相对struc的编移量,如 struct student { int a; //FIND(struct stu ...
随机推荐
- [学习笔记]编译sensetime发表的Single View Stereo Matching(SVS)遇到的问题
最近在研究用深度学习预测图像深度信息的方法,一开始用的是2017年CVPR上Godard大神的monodepth,代码在这里.这篇文章介绍了利用双目的consistency训练网络以对单张图像进行深度 ...
- Unity扩展编辑器五
扩展系统自带组件Inspector 可以在系统摄像机组建上添加一个按钮,这样就可以单独处理逻辑了
- 使用CNN做数字识别和人脸识别
上次写的一层神经网络也都贴这里了. 我有点困,我先睡觉,完了我再修改 这个代码写法不太符合工业代码的规范,仅仅是用来学习的的.还望各位见谅 import sys,ossys.path.append(o ...
- 监控与管理-SpringBoot
在微服务架构中,我们将原本庞大的单体系统拆分成多个提供不同服务的应用. 虽然 各个应用的内部逻辑因分解而得以简化,但是由于部署应用的数量成倍增长,使得系统的 维护复杂度大大提升. 对于运维人员来说,随 ...
- 【Unity】 Cursor学习
CursorLockMode.None 光标行为未修改,第一人称视角下鼠标可以突破窗口. CursorLockMode.Locked 光标锁定到游戏窗口的中心,与全屏与否无关,同时隐藏光标(这一点在3 ...
- Java创建对象的动作分析
一.Java创建对象时将对象存放到内存的堆中. 创建对象时先执行类成员的初始化,然后才会调用构造函数初始化对象, package com.test.createsort; public class C ...
- ubuntu下Open vSwitch安装
ubuntu下Open vSwitch安装 有关Open vSwitch的安装,网上有各种的教程资料,但一些已经过时,按照网上的教程,花费了大量时间,都没能安装成功.于是,通过查阅官方安装教程以及综合 ...
- export命令详解
基础命令学习目录首页 export 的基本作用就是将父shell中的局部变量设置为环境变量,使得该变量可以在子shell中使用.下面设置两种情景对export进行原理解析. 情景 1. 有一个名为m ...
- 【数据预处理】TIMIT语料库WAV文件转换
1 问题描述 这两天复现代码.先构造数据集,纯净语音.不同噪声.不同SNR的混合语音.其中纯净语音由两部分组成,IEEE corpus和TIMIT. 一开始我用MATLAB中的audioread读取音 ...
- Codeforces Round #258 (Div. 2) 容斥+Lucas
题目链接: http://codeforces.com/problemset/problem/451/E E. Devu and Flowers time limit per test4 second ...
