SpringMVC的应用与工作流程解析
一:SpringMVC是什么
SpringMVC只是Spring的一个子框架,作用学过Struts2的应该很好理解,他们都是MVC的框架。学他就是用来代替Struts2的,那么为什么不用Struts2而选择SpringMVC呢!那就必须说说它相比与struts2的部分优点:
(2)整合:大部分企业都会使用Spring,而SpringMVC就是Spring的一个子框架,当然方便些。
(3)实现机制:Struts2是基于filter过滤器的,而SpringMVC是基于servlet,以前认为filter是servlet的一种特殊,但是servelet明显比filter快。而且struts2是多例的,而SpringMVC则是单利的
(4)参数封装上:
Struts基于属性进行封装。
Springmvc基于方法封装。颗粒更细
二:SpringMVC的执行流程
理论处理流程

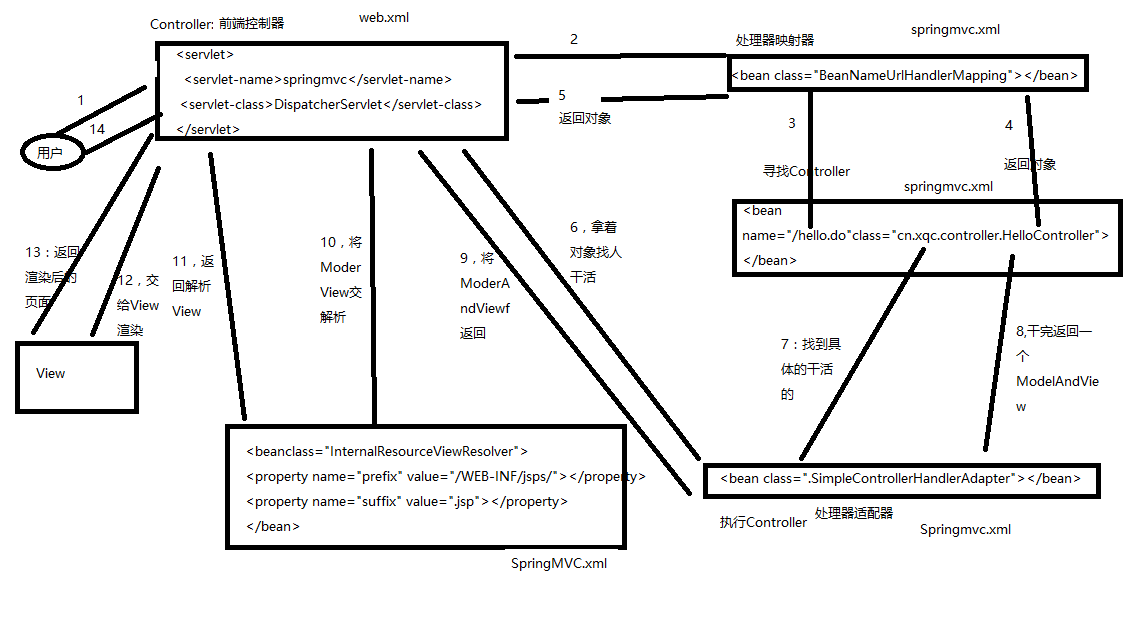
(1)用户发送请求至前端控制器DispatcherServlet;
(2) DispatcherServlet收到请求后,调用HandlerMapping处理器映射器,请求获取Handle;
(3)处理器映射器根据请求url找到具体的处理器,生成处理器对象及处理器拦截器(如果有则生成)一并返回给DispatcherServlet;
(4)DispatcherServlet 调用 HandlerAdapter处理器适配器;
(5)HandlerAdapter 经过适配调用 具体处理器(Handler,也叫后端控制器);
(6)Handler执行完成返回ModelAndView;
(7)HandlerAdapter将Handler执行结果ModelAndView返回给DispatcherServlet;
(8)DispatcherServlet将ModelAndView传给ViewResolver视图解析器进行解析;
(9)ViewResolver解析后返回具体View;
(10)DispatcherServlet对View进行渲染视图(即将模型数据填充至视图中)
(11)DispatcherServlet响应用户。
实现处理流程
1)在Web.xml中配置前端控制器
2)在SpringMVC的配置文件(springMVC.xml)中配置处理器映射器
3)在SpringMVC的配置文件(Springmvc.xml)中配置处理器适配器(处理器映射器有三种,无论采取哪种都可以)
4)创建自定义Controller
5)配置自定义Controller的bean在Springmvc中
6)配置视图解析器
三:注解开发
注解原理:
注解本质是一个继承了Annotation的特殊接口,其具体实现类是Java运行时生成的动态代理类。我们通过反射获取注解时,返回的是Java运行时生成的动态代理对象。通过代理对象调用自定义注解的方法,会最终调用AnnotationInvocationHandler的invoke方法。该方法会从memberValues这个Map中索引出对应的值。而memberValues的来源是Java常量池
1:Spring注解开发使用流程
在SpringMVC中进行配置,让其可以找到,当然我们也可以使用注解进行开发
添加扫描注解
<context:component-scan base-package="com.xqc"></context:component-scan>
配置注解的处理器映射器
1 <!-- 配置注解处理器映射器

2           功能:寻找执行类Controller

3  -->

4 <bean class="org.springframework.web.servlet.mvc.method.annotation.RequestMappingHandlerMapping">

5 </bean>
配置注解的处理器适配器
1 <!-- 配置注解处理器适配器

2     功能:调用controller方法,执行controller

3 -->

4 <bean class="org.springframework.web.servlet.mvc.method.annotation.RequestMappingHandlerAdapter">

5 </bean>
视图解析器
<!-- 配置sprigmvc视图解析器:解析逻辑试图

    后台返回逻辑试图:index

    视图解析器解析出真正物理视图:前缀+逻辑试图+后缀====/WEB-INF/jsps/index.jsp

-->

<bean class="org.springframework.web.servlet.view.InternalResourceViewResolver">

    <property name="prefix" value="/WEB-INF/jsps/"></property>

    <property name="suffix" value=".jsp"></property>

</bean>
4)自定义Controller类
@Controller 相当于在Springmvc.xml配置bean
@RequestMapping 参数封装
2:SpringMVC中常用的注解及其作用
@RequestMapping :请求和方法映射
@RequestBody : 接受客户端传入的JSON数据
@ResponseBody: 返回客户端JSON数据
@Controller : 标识控制层
@Service :标识业务层
@Repository : 标识数据层
@Component :把Bean添加到Spring容器中
@Autowired:按照类型自动注入
@Resource:自定义注入,可以根据类型注入,也可以根据名字注入
@PathVariable:RESTful风格时使用
@Param : 表单参数和方法形参不一样时使用
四:SpringMVC整合Spring ,Mybatis
1:创建工程
2:jar包准备,使用Maven则pom.xml准备
3:配置web.xml文件
3.1)加载SpringMVC配置文件
 1 <filter>

 2   <filter-name>characterEncoding</filter-name>

 3   <filter-class>org.springframework.web.filter.CharacterEncodingFilter</filter-class>

 4   <init-param>

 5     <param-name>encoding</param-name>

 6     <param-value>UTF-8</param-value>

 7   </init-param>

 8 </filter>

 9 <filter-mapping>

10   <filter-name>characterEncoding</filter-name>

11   <url-pattern>/*</url-pattern>

12 </filter-mapping>

13 <servlet>

14   <servlet-name>springmvc</servlet-name>

15   <servlet-class>org.springframework.web.servlet.DispatcherServlet</servlet-class>

16   <!-- 默认加载方式

17          默认加载必须规范:

18          * 文件命名:servlet-name-servlet.xml====springmvc-servlet.xml

19          * 路径规范:必须在WEB-INF目录下面

20    -->

21   <init-param>

22    <param-name>contextConfigLocation</param-name>

23    <param-value>classpath:springmvc.xml</param-value>

24   </init-param>

25  </servlet>

26 <servlet-mapping>

27   <servlet-name>springmvc</servlet-name>

28   <url-pattern>*.do</url-pattern>

29 </servlet-mapping>
3.2)加载spring配置文件
1 <!-- 加载spring配置文件 -->

2 <listener>

3   <listener-class>org.springframework.web.context.ContextLoaderListener</listener-class>

4 </listener>

5 <context-param>

6   <param-name>contextConfigLocation</param-name>

7   <param-value>classpath:beans.xml</param-value>

8 </context-param>
4:配置Springmvc.xml文件
<?xml version="1.0" encoding="UTF-8"?>

<beans xmlns="http://www.springframework.org/schema/beans"

    xmlns:xsi="http://www.w3.org/2001/XMLSchema-instance" xmlns:mvc="http://www.springframework.org/schema/mvc"

    xmlns:context="http://www.springframework.org/schema/context"

    xmlns:aop="http://www.springframework.org/schema/aop" xmlns:tx="http://www.springframework.org/schema/tx"

    xsi:schemaLocation="http://www.springframework.org/schema/beans

        http://www.springframework.org/schema/beans/spring-beans-3.2.xsd

        http://www.springframework.org/schema/mvc

        http://www.springframework.org/schema/mvc/spring-mvc-3.2.xsd

        http://www.springframework.org/schema/context

        http://www.springframework.org/schema/context/spring-context-3.2.xsd

        http://www.springframework.org/schema/aop

        http://www.springframework.org/schema/aop/spring-aop-3.2.xsd

        http://www.springframework.org/schema/tx

        http://www.springframework.org/schema/tx/spring-tx-3.2.xsd">

<!--注解开发,开启扫描-->

    <context:component-scan base-package="cn.itcast"></context:component-scan>

    <!-- annotation-driven:默认创建了多个对象:RequestMappingHandlerMapping,RequestMappingHandlerAdapter

        也就提供对json格式支持

     -->

    <mvc:annotation-driven/>

    <!-- 配置sprigmvc视图解析器:解析逻辑试图 后台返回逻辑试图:index 视图解析器解析出真正物理视图:前缀+逻辑试图+后缀====/WEB-INF/jsps/index.jsp -->

    <bean

        class="org.springframework.web.servlet.view.InternalResourceViewResolver">

        <property name="prefix" value="/WEB-INF/jsps/"></property>

        <property name="suffix" value=".jsp"></property>

    </bean>

</beans>
Springmvc.xml
5:配置beans.xml文件
<?xml version="1.0" encoding="UTF-8"?>

<beans xmlns="http://www.springframework.org/schema/beans"

    xmlns:xsi="http://www.w3.org/2001/XMLSchema-instance" xmlns:mvc="http://www.springframework.org/schema/mvc"

    xmlns:context="http://www.springframework.org/schema/context"

    xmlns:aop="http://www.springframework.org/schema/aop" xmlns:tx="http://www.springframework.org/schema/tx"

    xsi:schemaLocation="http://www.springframework.org/schema/beans

        http://www.springframework.org/schema/beans/spring-beans-3.2.xsd

        http://www.springframework.org/schema/mvc

        http://www.springframework.org/schema/mvc/spring-mvc-3.2.xsd

        http://www.springframework.org/schema/context

        http://www.springframework.org/schema/context/spring-context-3.2.xsd

        http://www.springframework.org/schema/aop

        http://www.springframework.org/schema/aop/spring-aop-3.2.xsd

        http://www.springframework.org/schema/tx

        http://www.springframework.org/schema/tx/spring-tx-3.2.xsd">

<!--Spring注解开发,开启扫描-->

        <context:component-scan base-package="com.xqc"></context:component-scan>

    <!-- 第一步:配置数据源 -->

    <context:property-placeholder location="classpath:jdbc.properties" />

    <bean id="dataSource" class="com.mchange.v2.c3p0.ComboPooledDataSource">

        <property name="jdbcUrl" value="${jdbc.url}"></property>

        <property name="driverClass" value="${jdbc.driver}"></property>

        <property name="user" value="${jdbc.username}"></property>

        <property name="password" value="${jdbc.password}"></property>

    </bean>

    <!-- 第二步:创建sqlSessionFactory。生产sqlSession -->

    <bean id="sqlSessionFactory" class="org.mybatis.spring.SqlSessionFactoryBean">

    <property name="dataSource" ref="dataSource"></property>

    <property name="configLocation" value="classpath:sqlMapConfig.xml"></property>

    </bean>

    <!-- 配置mybatis接口代理开发

        * 接口类名和映射文件必须同名

        * 接口类和映射文件必须在同一个目录下

        *  映射文件namespace名字必须是接口的全类路径名

        * 接口的方法名必须和映射Statement的id一致

     -->

     <bean class="org.mybatis.spring.mapper.MapperScannerConfigurer">

     <property name="basePackage" value="com.xqc.dao"></property>

     <property name="sqlSessionFactoryBeanName" value="sqlSessionFactory"></property>

     </bean>

    <!-- 第三步:事务 -->

    <bean id="transactionManager" class="org.springframework.jdbc.datasource.DataSourceTransactionManager">

    <property name="dataSource" ref="dataSource"></property>

    </bean>

    <!-- 配置通知 ,管理事务的策略-->

    <tx:advice id="txAdvice" transaction-manager="transactionManager">

    <tx:attributes>

    <tx:method name="save*" propagation="REQUIRED" />

    <tx:method name="update*" propagation="REQUIRED" />

    <tx:method name="delete*" propagation="REQUIRED" />

    <tx:method name="insert*" propagation="REQUIRED" />

    <tx:method name="*" propagation="REQUIRED" />

    </tx:attributes>

    </tx:advice>

    <!-- 配置拦截service ,切面-->

    <aop:config>

    <aop:advisor advice-ref="txAdvice" pointcut="execution(* com.xqc.service.*.*(..))"/>

    </aop:config>

</beans>
beans.xml
6:配置 jdbc.properties 文件
1 jdbc.url = jdbc\:mysql\:///mybatismoder

2 jdbc.driver = com.mysql.jdbc.Driver

3 jdbc.username= root

4 jdbc.password= 1234
7:配置Mybatis配置文件 sqlMapConfig.xml
<?xml version="1.0" encoding="UTF-8"?>

<!DOCTYPE configuration

PUBLIC "-//mybatis.org//DTD Config 3.0//EN"

"http://mybatis.org/dtd/mybatis-3-config.dtd">

<configuration>

</configuration>
sqlMapConfig.xml
8:创建包结构,编写代码即可。
四:SpringMVC常见问题
1:SpringMVC里的拦截器是怎么写的?
一种是实现HandlerInterceptor接口,
另外一种是继承适配器类,接着在接口方法当中,实现处理逻辑;
然后在SpringMvc的配置文件中配置拦截器即可:
4、如果想在拦截的方法里面得到从前台传入的参数,怎么得到?
答:直接在形参里面声明这个参数就可以,但必须名字和传过来的参数一样。
5、SpringMvc用什么对象从后台向前台传递数据的?
答:通过ModelMap对象,可以在这个对象里面调用put方法,把对象加到里面,前台就可以通过el表达式拿到。
SpringMVC的应用与工作流程解析的更多相关文章
- Java开发学习(二十三)----SpringMVC入门案例、工作流程解析及设置bean加载控制
一.SpringMVC概述 SpringMVC是隶属于Spring框架的一部分,主要是用来进行Web开发,是对Servlet进行了封装.SpringMVC是处于Web层的框架,所以其主要的作用就是用来 ...
- SpringMVC的简介和工作流程
一.简介 Spring MVC属于SpringFrameWork的后续产品,已经融合在Spring Web Flow里面.Spring 框架提供了构建 Web 应用程序的全功能 MVC 模块.Spri ...
- 了解SpringMVC框架及基本工作流程
传统原生的JSP+Servlet在开发上过程上虽然简单明了,JSP页面传递数据到Servlet,Servlet整理数据(逻辑开发)或者从数据库提取数据接着再转发到JSP页面上,但是其似乎只能止步于此, ...
- 服务容错保护断路器Hystrix之二:Hystrix工作流程解析
一.总运行流程 当你发出请求后,hystrix是这么运行的 红圈 :Hystrix 命令执行失败,执行回退逻辑.也就是大家经常在文章中看到的“服务降级”. 绿圈 :四种情况会触发失败回退逻辑( fal ...
- appium工作流程解析
为什么选择appium app自带测试框架,为什么要选择appium这个测试框架呢? Ios9.3以前使用的是UIAutomation,Ios9.3以后使用XCUITest.如果只使用Apple的 ...
- Hystrix工作流程解析
搭建Hystrix源码阅读环境 引入依赖 <dependency> <groupId>com.netflix.hystrix</groupId> <artif ...
- Java开发学习(十五)----AOP入门案例及其工作流程解析
一.AOP简介 1.1 什么是AOP AOP(Aspect Oriented Programming)面向切面编程,一种编程范式,指导开发者如何组织程序结构. OOP(Object Oriented ...
- SpringMVC学习手册(一)------工作原理解析
1.什么是MVC模式 图解: 2.SpringMVC原理图解: springMVC中的几个组件: 前端控制器(DispatcherServlet):接收请求,响应结果,相当于电脑的CP ...
- springMVC的拦截器工作流程
首先,springmvc的拦截器配置在这就不多说了.主要讲一下拦截器的三个方法的执行顺序. preHandle方法一定是最先执行的方法,如果它返回为false下面的方法均不执行. postHandle ...
随机推荐
- 移动端实现上拉加载更多(使用dropload.js vs js)
做下笔记,:移动端实现上拉加载更多,其实是数据的分段加载,在这里为了做测试我写了几个json文件作为分段数据: 方式一:使用dropload.js; 配置好相关参数及回调函数就可使用:代码如下 var ...
- 当碰到需要调试打包后的js
在react中经常开发碰到不能热更中进行调试的,如IE之类的 这个时候我们就需要打包才能运行看到效果, 但是往往每次打包都需要很长的时间: 这个时候我们就可以直接找到打包后的文件,直接在改文件中修改: ...
- C# 压缩图片到指定宽度,假如图片小于指定宽度 判断图片大小是否大于指定大小(KB) 如果大于则压缩图片质量 宽高不变
class Program { static void Main(string[] args) {//G:\zhyue\backup\projects\Test\ConsoleApplication1 ...
- RESULT_OK,RESULT_CANCELED,RESULT_FIRST_USER
RESULT_OK是执行结果,有RESULT_OK,RESULT_CANCELED,RESULT_FIRST_USER 在调用系统app时返回时RESULT_CANCELED如字面意思代表取消,RES ...
- linux 网络命令ping、关闭防火墙、ifconfig、ip addr、setup、nmtui、write、wall、mail
ping /bin/ping语法:ping [选项] IP地址 选项:-c 指定发送次数功能描述:测试网络连通性 ping -c 4 192.168.1.101 关闭防火墙systemctl stop ...
- The directory '/home/stone/.cache/pip/http' or its parent directory is not owned by the current user and the cache has been disabled. Please check the permissions and owner of that directory. If execu
使用sudo pip install ......的时候出现下面一段黄色的代码: The directory '/home/stone/.cache/pip/http' or its parent d ...
- LeetCode题解之Number of 1 Bits
1.题目描述 2.问题分析 使用C++ 标准库的 bitset 类,将整数转换为 二进制,然后将二进制表示转换为字符串,统计字符串中 1 的个数即可. 3.代码 int hammingWeight(u ...
- [SQLServer] 数据库SA用户被锁定或者忘记密码的恢复
一.以管理员权限运行命令提示符 CMD C:\>net stop mssqlserver您想继续此操作吗? (Y/N) [N]: y C:\>net start mssqlserver / ...
- Springboot 报application.properites文件找不到的解决方法
部署项目遇到了找不到application.properties的问题.网上搜了找不到答案,后面经过测试发现,问题在于clean了maven之后,target包还没删除,所以编译的时候才会出现 ...
- Take my breath away
Take my breath away 编辑 目录 1简介 2翻唱简介 3歌词 ▪ 英文歌词 ▪ 中英文歌词 1简介编辑 <Take My Breath Away>(中文译为<带走我 ...