JAVAEE——ssm综合练习:CRM系统(包含ssm整合)
1 CRM项目外观
1. 开发环境
IDE: Eclipse Mars2
Jdk: 1.7
数据库: MySQL
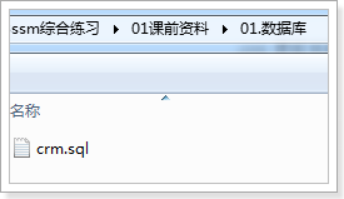
2. 创建数据库
数据库sql文件位置如下图:
创建crm数据库,执行sql
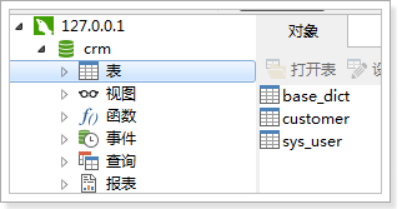
效果如下图:
3. 工程搭建
使用的Bootstrap前端框架,官方网站
http://www.bootcss.com/
工程使用Springmvc、spring、mybatis框架整合完成。
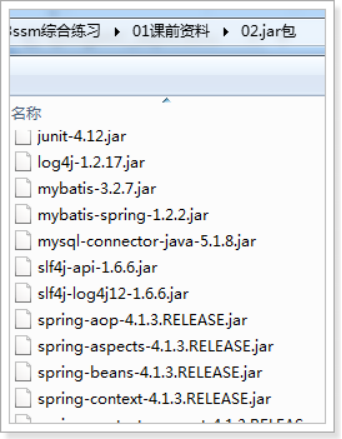
3.1. 需要的jar包
- spring(包括springmvc)
- mybatis
- mybatis-spring整合包
- 数据库驱动
- 第三方连接池。
- Json依赖包Jackson
jar包位置如下图:
3.2. 整合思路
Dao层:
1、SqlMapConfig.xml,空文件即可,但是需要文件头。
2、applicationContext-dao.xml
a) 数据库连接Druid
b) SqlSessionFactory对象,需要spring和mybatis整合包下的。
c) 配置mapper文件扫描器。Mapper动态代理开发 增强版
Service层:
1、applicationContext-service.xml包扫描器,扫描@service注解的类。
2、applicationContext-trans.xml配置事务。
Controller层:
1、Springmvc.xml
a) 包扫描器,扫描@Controller注解的类。
b) 配置注解驱动
c) 配置视图解析器
Web.xml文件:
1、配置spring监听器
2、配置前端控制器。
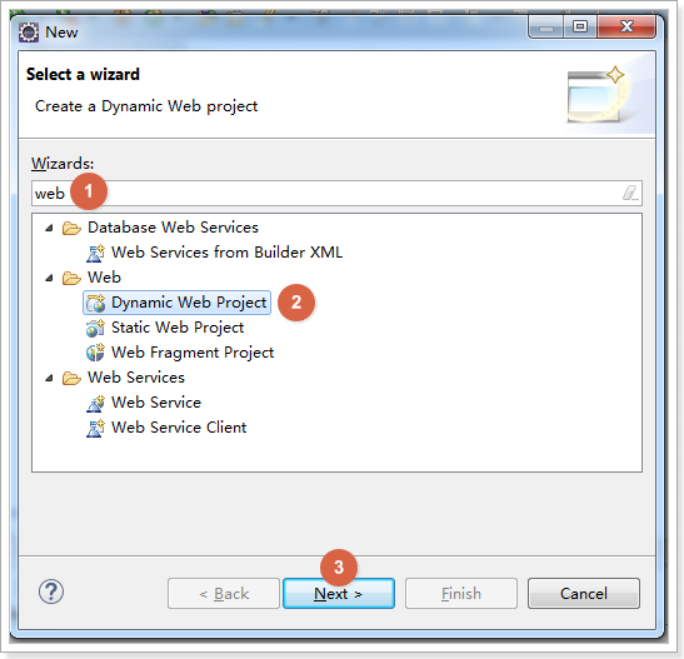
3.3. 创建工程
创建动态web工程,步骤如下图:
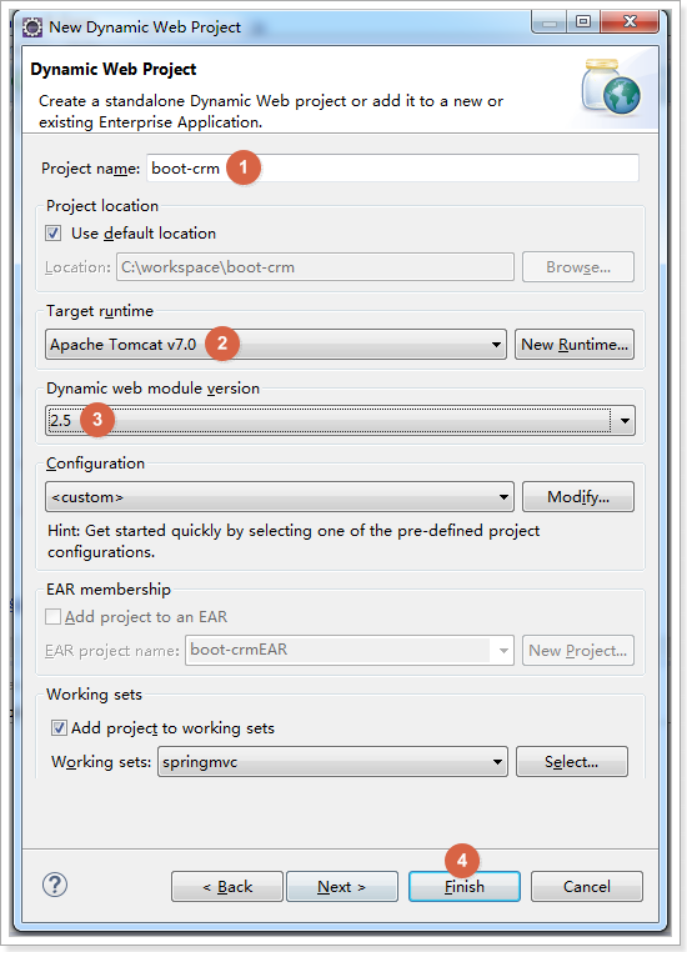
创建boot-crm,如下图
3.4. 加入jar包
加入课前资料中的jar包
3.5. 加入配置文件
创建config资源文件夹,在里面创建mybatis和spring文件夹
3.5.1. SqlMapConfig.xml
空文件即可
<?xml version="1.0" encoding="UTF-8" ?>

<!DOCTYPE configuration PUBLIC "-//mybatis.org//DTD Config 3.0//EN"

"http://mybatis.org/dtd/mybatis-3-config.dtd">

<configuration>

</configuration>
当然也可以加上包别名,在后面的Mapper xml文件中可以不用写全类名
<typeAliases>

<package name="com.xyp.crm.entity"/>

</typeAliases>
3.5.2. applicationContext-dao.xml
需要配置:
加载properties文件,数据源,SqlSessionFactory,Mapper扫描
<?xml version="1.0" encoding="UTF-8"?>

<beans xmlns="http://www.springframework.org/schema/beans"

    xmlns:context="http://www.springframework.org/schema/context" xmlns:p="http://www.springframework.org/schema/p"

    xmlns:aop="http://www.springframework.org/schema/aop" xmlns:tx="http://www.springframework.org/schema/tx"

    xmlns:xsi="http://www.w3.org/2001/XMLSchema-instance"

    xsi:schemaLocation="http://www.springframework.org/schema/beans http://www.springframework.org/schema/beans/spring-beans-4.0.xsd

    http://www.springframework.org/schema/context http://www.springframework.org/schema/context/spring-context-4.0.xsd

    http://www.springframework.org/schema/aop http://www.springframework.org/schema/aop/spring-aop-4.0.xsd http://www.springframework.org/schema/tx http://www.springframework.org/schema/tx/spring-tx-4.0.xsd

    http://www.springframework.org/schema/util http://www.springframework.org/schema/util/spring-util-4.0.xsd">

    <!-- 配置 读取properties文件 jdbc.properties -->

    <context:property-placeholder location="classpath:jdbc.properties" />

    <!-- 配置 数据源 -->

    <bean id="dataSource" class="com.alibaba.druid.pool.DruidDataSource">

        <property name="driverClassName" value="${jdbc.driver}" />

        <property name="url" value="${jdbc.url}" />

        <property name="username" value="${jdbc.username}" />

        <property name="password" value="${jdbc.password}" />

    </bean>

    <!-- 配置SqlSessionFactory -->

    <bean class="org.mybatis.spring.SqlSessionFactoryBean">

        <!-- 设置MyBatis核心配置文件 -->

        <property name="configLocation" value="classpath:mybatis/SqlMapConfig.xml" />

        <!-- 设置数据源 -->

        <property name="dataSource" ref="dataSource" />

    </bean>

    <!-- 配置Mapper扫描 -->

    <bean class="org.mybatis.spring.mapper.MapperScannerConfigurer">

        <!-- 设置Mapper扫描包 -->

        <property name="basePackage" value="cn.itcast.crm.mapper" />

    </bean>

</beans>
3.5.3. jdbc.properties
配置数据库信息
jdbc.driver=com.mysql.jdbc.Driver

jdbc.url=jdbc:mysql://localhost:3306/crm?characterEncoding=utf-8

jdbc.username=root

jdbc.password=root
3.5.4. log4j.properties
配置日志信息
# Global logging configuration

log4j.rootLogger=DEBUG, stdout

# Console output...

log4j.appender.stdout=org.apache.log4j.ConsoleAppender

log4j.appender.stdout.layout=org.apache.log4j.PatternLayout

log4j.appender.stdout.layout.ConversionPattern=%5p [%t] - %m%n
3.5.5. applicationContext-service.xml
配置service扫描
<?xml version="1.0" encoding="UTF-8"?>

<beans xmlns="http://www.springframework.org/schema/beans"

    xmlns:context="http://www.springframework.org/schema/context" xmlns:p="http://www.springframework.org/schema/p"

    xmlns:aop="http://www.springframework.org/schema/aop" xmlns:tx="http://www.springframework.org/schema/tx"

    xmlns:xsi="http://www.w3.org/2001/XMLSchema-instance"

    xsi:schemaLocation="http://www.springframework.org/schema/beans http://www.springframework.org/schema/beans/spring-beans-4.0.xsd

    http://www.springframework.org/schema/context http://www.springframework.org/schema/context/spring-context-4.0.xsd

    http://www.springframework.org/schema/aop http://www.springframework.org/schema/aop/spring-aop-4.0.xsd http://www.springframework.org/schema/tx http://www.springframework.org/schema/tx/spring-tx-4.0.xsd

    http://www.springframework.org/schema/util http://www.springframework.org/schema/util/spring-util-4.0.xsd">

    <!-- 配置Service扫描 -->

    <context:component-scan base-package="cn.itcast.crm.service" />

</beans>
3.5.6. applicationContext-trans.xml
配置事务管理:事务管理器、通知、切面
<?xml version="1.0" encoding="UTF-8"?>

<beans xmlns="http://www.springframework.org/schema/beans"

    xmlns:context="http://www.springframework.org/schema/context" xmlns:p="http://www.springframework.org/schema/p"

    xmlns:aop="http://www.springframework.org/schema/aop" xmlns:tx="http://www.springframework.org/schema/tx"

    xmlns:xsi="http://www.w3.org/2001/XMLSchema-instance"

    xsi:schemaLocation="http://www.springframework.org/schema/beans http://www.springframework.org/schema/beans/spring-beans-4.0.xsd

    http://www.springframework.org/schema/context http://www.springframework.org/schema/context/spring-context-4.0.xsd

    http://www.springframework.org/schema/aop http://www.springframework.org/schema/aop/spring-aop-4.0.xsd http://www.springframework.org/schema/tx http://www.springframework.org/schema/tx/spring-tx-4.0.xsd

    http://www.springframework.org/schema/util http://www.springframework.org/schema/util/spring-util-4.0.xsd">

    <!-- 事务管理器 -->

    <bean id="transactionManager"    class="org.springframework.jdbc.datasource.DataSourceTransactionManager">

        <!-- 数据源 -->

        <property name="dataSource" ref="dataSource" />

    </bean>

    <!-- 通知 -->

    <tx:advice id="txAdvice" transaction-manager="transactionManager">

        <tx:attributes>

            <!-- 传播行为 -->

            <tx:method name="save*" propagation="REQUIRED" />

            <tx:method name="insert*" propagation="REQUIRED" />

            <tx:method name="add*" propagation="REQUIRED" />

            <tx:method name="create*" propagation="REQUIRED" />

            <tx:method name="delete*" propagation="REQUIRED" />

            <tx:method name="update*" propagation="REQUIRED" />

            <tx:method name="find*" propagation="SUPPORTS" read-only="true" />

            <tx:method name="select*" propagation="SUPPORTS" read-only="true" />

            <tx:method name="get*" propagation="SUPPORTS" read-only="true" />

            <tx:method name="query*" propagation="SUPPORTS" read-only="true" />

        </tx:attributes>

    </tx:advice>

    <!-- 切面 -->

    <aop:config>

        <aop:advisor advice-ref="txAdvice"

            pointcut="execution(* cn.itcast.crm.service.*.*(..))" />

    </aop:config>

</beans>
3.5.7. Springmvc.xml
配置SpringMVC表现层:Controller扫描、注解驱动、视图解析器
<?xml version="1.0" encoding="UTF-8"?>

<beans xmlns="http://www.springframework.org/schema/beans"

    xmlns:xsi="http://www.w3.org/2001/XMLSchema-instance" xmlns:p="http://www.springframework.org/schema/p"

    xmlns:context="http://www.springframework.org/schema/context"

    xmlns:mvc="http://www.springframework.org/schema/mvc"

    xsi:schemaLocation="http://www.springframework.org/schema/beans http://www.springframework.org/schema/beans/spring-beans-4.0.xsd

        http://www.springframework.org/schema/mvc http://www.springframework.org/schema/mvc/spring-mvc-4.0.xsd

        http://www.springframework.org/schema/context http://www.springframework.org/schema/context/spring-context-4.0.xsd">

    <!-- 配置Controller扫描 -->

    <context:component-scan base-package="cn.itcast.crm.controller" />

    <!-- 配置注解驱动 -->

    <mvc:annotation-driven />

    <!-- 配置视图解析器 -->

    <bean    class="org.springframework.web.servlet.view.InternalResourceViewResolver">

        <!-- 前缀 -->

        <property name="prefix" value="/WEB-INF/jsp/" />

        <!-- 后缀 -->

        <property name="suffix" value=".jsp" />

    </bean>

</beans>
3.5.8. Web.xml
配置Spring、SpringMVC、解决post乱码问题
<?xml version="1.0" encoding="UTF-8"?>

<web-app xmlns:xsi="http://www.w3.org/2001/XMLSchema-instance"

    xmlns="http://java.sun.com/xml/ns/javaee"

    xsi:schemaLocation="http://java.sun.com/xml/ns/javaee http://java.sun.com/xml/ns/javaee/web-app_2_5.xsd"

    id="WebApp_ID" version="2.5">

    <display-name>boot-crm</display-name>

    <welcome-file-list>

        <welcome-file>index.jsp</welcome-file>

    </welcome-file-list>

    <!-- 配置spring -->

    <context-param>

        <param-name>contextConfigLocation</param-name>

        <param-value>classpath:spring/applicationContext-*.xml</param-value>

    </context-param>

    <!-- 配置监听器加载spring -->

    <listener>

        <listener-class>org.springframework.web.context.ContextLoaderListener</listener-class>

    </listener>

    <!-- 配置过滤器,解决post的乱码问题 -->

    <filter>

        <filter-name>encoding</filter-name>    <filter-class>org.springframework.web.filter.CharacterEncodingFilter</filter-class>

        <init-param>

            <param-name>Encoding</param-name>

            <param-value>utf-8</param-value>

        </init-param>

    </filter>

    <filter-mapping>

        <filter-name>encoding</filter-name>

        <url-pattern>/*</url-pattern>

    </filter-mapping>

    <!-- 配置SpringMVC -->

    <servlet>

        <servlet-name>boot-crm</servlet-name>

        <servlet-class>org.springframework.web.servlet.DispatcherServlet</servlet-class>

        <init-param>

            <param-name>contextConfigLocation</param-name>

            <param-value>classpath:spring/springmvc.xml</param-value>

        </init-param>

        <!-- 配置springmvc什么时候启动,参数必须为整数 -->

        <!-- 如果为0或者大于0,则springMVC随着容器启动而启动 -->

        <!-- 如果小于0,则在第一次请求进来的时候启动 -->

        <load-on-startup>1</load-on-startup>

    </servlet>

    <servlet-mapping>

        <servlet-name>boot-crm</servlet-name>

        <!-- 所有的请求都进入springMVC -->

        <url-pattern>/</url-pattern>

    </servlet-mapping>

</web-app>
3.6. 加入静态资源
最终效果如下图:

4. 实现页面展示
4.1. 代码实现
编写CustomerController 显示用户列表
@Controller

@RequestMapping("customer")

public class CustomerController {

    /**

     * 显示用户列表

     *

     * @return

     */

    @RequestMapping("list")

    public String queryCustomerList() {

        return "customer";

    }

}
4.2. 页面显示问题
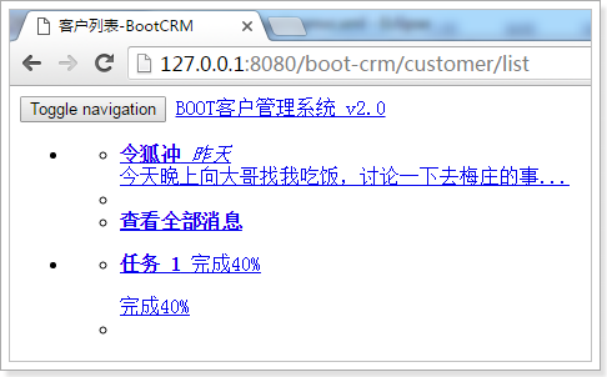
访问页面,发现不能正常显示
打开开发者工具,选择Network,
发现css、js等资源文件无法加载
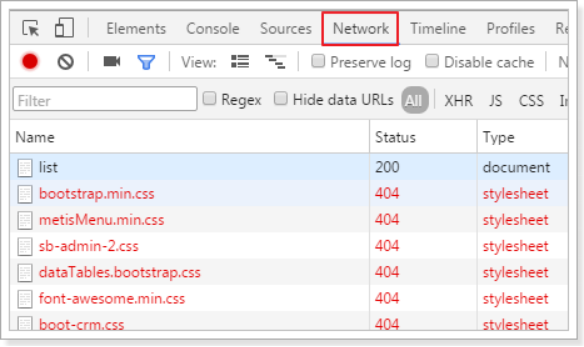
原因:web.xml配置时,是设置所有的请求都进入SpringMVC。但是SpringMVC 无法处理css、js等静态资源,所以无法正常显示
解决方案:
方法一:通过mvc:resources
    <!-- 对静态资源进行放行 -->

    <mvc:resources location="/css/" mapping="/css/**"/>

    <mvc:resources location="/fonts/" mapping="/fonts/**"/>

    <mvc:resources location="/js/" mapping="/js/**"/>
方法二:
在springmvc.xml中配置
    <!-- 解决静态资源无法被springMVC处理的问题 -->

    <mvc:default-servlet-handler />
方法三:
修改web.xml,让所有以action结尾的请求都进入SpringMVC
    <servlet-mapping>

        <servlet-name>boot-crm</servlet-name>

        <!-- 所有的请求都进入springMVC -->

        <url-pattern>*.action</url-pattern>

    </servlet-mapping>
解决后的效果如下图,可以正常显示页面样式:
我们使用第二种方式解决,因为此项目中的页面的请求都是以action结尾的,所以使用第二种方式,在web.xml里面进行相应的配置
    <servlet-mapping>

        <servlet-name>boot-crm</servlet-name>

        <!-- 所有以action结尾的请求都进入springMVC -->

        <url-pattern>*.action</url-pattern>

    </servlet-mapping>
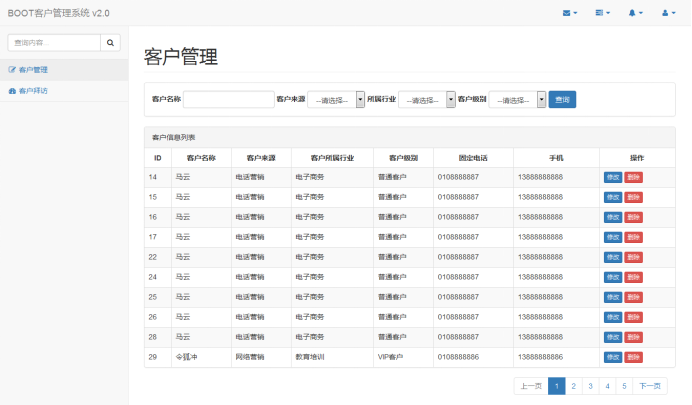
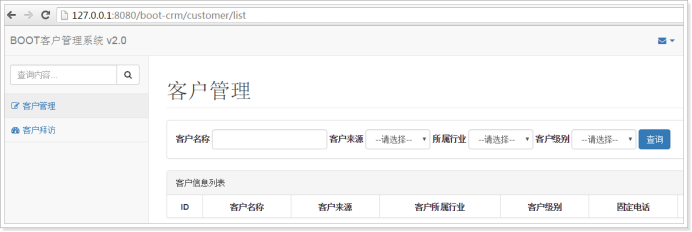
5. 实现查询条件初始化
5.1. 需求分析
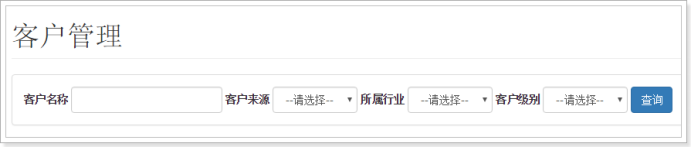
页面效果如上图,在查询客户的时候,可以选择客户来源,所属行业,客户级别信息,页面加载时需要初始化查询条件下拉列表。
前端jsp逻辑
<form class="form-inline" action="${pageContext.request.contextPath }/customer/list.action" method="get">

    <div class="form-group">

        <label for="customerName">客户名称</label>

        <input type="text" class="form-control" id="customerName" value="${custName }" name="custName">

    </div>

    <div class="form-group">

        <label for="customerFrom">客户来源</label>

        <select    class="form-control" id="customerFrom" placeholder="客户来源" name="custSource">

            <option value="">--请选择--</option>

            <c:forEach items="${fromType}" var="item">

                <option value="${item.dict_id}"<c:if test="${item.dict_id == custSource}"> selected</c:if>>${item.dict_item_name }</option>

            </c:forEach>

        </select>

    </div>

    <div class="form-group">

        <label for="custIndustry">所属行业</label>

        <select    class="form-control" id="custIndustry"  name="custIndustry">

            <option value="">--请选择--</option>

            <c:forEach items="${industryType}" var="item">

                <option value="${item.dict_id}"<c:if test="${item.dict_id == custIndustry}"> selected</c:if>>${item.dict_item_name }</option>

            </c:forEach>

        </select>

    </div>

    <div class="form-group">

        <label for="custLevel">客户级别</label>

        <select    class="form-control" id="custLevel" name="custLevel">

            <option value="">--请选择--</option>

            <c:forEach items="${levelType}" var="item">

                <option value="${item.dict_id}"<c:if test="${item.dict_id == custLevel}"> selected</c:if>>${item.dict_item_name }</option>

            </c:forEach>

        </select>

    </div>

    <button type="submit" class="btn btn-primary">查询</button>

</form>
按照jsp的要求,把对应的数据查询出来,放到模型中。
数据存放在base_dict表,可以使用dict_type_code类别代码进行查询
使用需要获取的数据如下图:

使用的sql:
SELECT * FROM base_dict WHERE dict_type_code = '001'
5.2. 实现DAO开发
5.2.1. pojo
因为页面显示的名字是下划线方式,和数据库表列名一样,根据页面的样式,编写pojo
public class BaseDict {

    private String dict_id;

    private String dict_type_code;

    private String dict_type_name;

    private String dict_item_name;

    private String dict_item_code;

    private Integer dict_sort;

    private String dict_enable;

    private String dict_memo;

get/set。。。。。。

}
5.2.2. Mapper
编写BaseDictMapper
public interface BaseDictMapper {

    /**

     * 根据类别代码查询数据

     *

     * @param dictTypeCode

     * @return

     */

    List<BaseDict> queryBaseDictByDictTypeCode(String dictTypeCode);

}
5.2.3. Mapper.xml
编写BaseDictMapper.xml
<?xml version="1.0" encoding="UTF-8" ?>

<!DOCTYPE mapper

PUBLIC "-//mybatis.org//DTD Mapper 3.0//EN"

"http://mybatis.org/dtd/mybatis-3-mapper.dtd">

<mapper namespace="cn.itcast.crm.mapper.BaseDictMapper">

    <!-- 根据类别代码查询数据 -->

    <select id="queryBaseDictByDictTypeCode" parameterType="String"

        resultType="cn.itcast.crm.pojo.BaseDict">

        SELECT * FROM base_dict WHERE dict_type_code =

        #{dict_type_code}

    </select>

</mapper>
5.3. 实现Service开发
5.3.1. BaseDictService 接口
public interface BaseDictService {

    /**

     * 根据类别代码查询

     *

     * @param dictTypeCode

     * @return

     */

    List<BaseDict> queryBaseDictByDictTypeCode(String dictTypeCode);

}
5.3.2. BaseDictServiceImpl 实现类
@Service

public class BaseDictServiceImpl implements BaseDictService {

    @Autowired

    private BaseDictMapper baseDictMapper;

    @Override

    public List<BaseDict> queryBaseDictByDictTypeCode(String dictTypeCode) {

        List<BaseDict> list = this.baseDictMapper.queryBaseDictByDictTypeCode(dictTypeCode);

        return list;

    }

}
5.4. 实现Controller开发
5.4.1. 修改之前编写的controller
@Controller

@RequestMapping("customer")

public class CustomerController {

    @Autowired

    private BaseDictService baseDictService;

    /**

     * 显示客户列表

     *

     * @return

     */

    @RequestMapping("list")

    public String queryCustomerList(Model model) {

        // 客户来源

        List<BaseDict> fromType = this.baseDictService.queryBaseDictByDictTypeCode("002");

        // 所属行业

        List<BaseDict> industryType = this.baseDictService.queryBaseDictByDictTypeCode("001");

        // 客户级别

        List<BaseDict> levelType = this.baseDictService.queryBaseDictByDictTypeCode("006");

        // 把前端页面需要显示的数据放到模型中

        model.addAttribute("fromType", fromType);

        model.addAttribute("industryType", industryType);

        model.addAttribute("levelType", levelType);

        return "customer";

    }

}
5.4.2. 效果
实现效果如下图:

5.4.3. 硬编码问题
这里是根据dict_type_code类别代码查询数据,这里的查询条件是写死的,有硬编码问题。可以把类别代码提取到配置文件中,再使用@value注解进行加载。
5.4.3.1. 添加env.properties
添加env.properties配置文件
#客户来源

CUSTOMER_FROM_TYPE=002

#客户行业

CUSTOMER_INDUSTRY_TYPE=001

#客户级别

CUSTOMER_LEVEL_TYPE=006
5.4.3.2. 修改springmvc.xml配置文件
在springmvc.xml中加载env.properties
    <!-- 加载controller需要的配置信息 -->

    <context:property-placeholder location="classpath:env.properties" />
注意:Controller需要的配置文件信息必须添加到springmvc的配置文件中
5.4.3.3. 修改Controller方法
@Controller

@RequestMapping("customer")

public class CustomerController {

    // 客户来源

    @Value("${CUSTOMER_FROM_TYPE}")

    private String CUSTOMER_FROM_TYPE;

    // 客户行业

    @Value("${CUSTOMER_INDUSTRY_TYPE}")

    private String CUSTOMER_INDUSTRY_TYPE;

    // 客户级别

    @Value("${CUSTOMER_LEVEL_TYPE}")

    private String CUSTOMER_LEVEL_TYPE;

    @Autowired

    private BaseDictService baseDictService;

    /**

     * 显示客户列表

     *

     * @return

     */

    @RequestMapping("list")

    public String queryCustomerList(Model model) {

        // 客户来源

        List<BaseDict> fromType = this.baseDictService.queryBaseDictByDictTypeCode(this.CUSTOMER_FROM_TYPE);

        // 所属行业

        List<BaseDict> industryType = this.baseDictService.queryBaseDictByDictTypeCode(this.CUSTOMER_INDUSTRY_TYPE);

        // 客户级别

        List<BaseDict> levelType = this.baseDictService.queryBaseDictByDictTypeCode(this.CUSTOMER_LEVEL_TYPE);

        // 把前端页面需要显示的数据放到模型中

        model.addAttribute("fromType", fromType);

        model.addAttribute("industryType", industryType);

        model.addAttribute("levelType", levelType);

        return "customer";

    }

}
6. 客户列表展示
6.1. 需求
展示客户列表,并且可以根据查询条件过滤查询结果,并且实现分页。
效果如下图:

页面代码:
<div class="panel-heading">客户信息列表</div>

<!-- /.panel-heading -->

<table class="table table-bordered table-striped">

    <thead>

        <tr>

            <th>ID</th>

            <th>客户名称</th>

            <th>客户来源</th>

            <th>客户所属行业</th>

            <th>客户级别</th>

            <th>固定电话</th>

            <th>手机</th>

            <th>操作</th>

        </tr>

    </thead>

    <tbody>

        <c:forEach items="${page.rows}" var="row">

            <tr>

                <td>${row.cust_id}</td>

                <td>${row.cust_name}</td>

                <td>${row.cust_source}</td>

                <td>${row.cust_industry}</td>

                <td>${row.cust_level}</td>

                <td>${row.cust_phone}</td>

                <td>${row.cust_mobile}</td>

                <td>

                    <a href="#" class="btn btn-primary btn-xs" data-toggle="modal" data-target="#customerEditDialog" onclick="editCustomer(${row.cust_id})">修改</a>

                    <a href="#" class="btn btn-danger btn-xs" onclick="deleteCustomer(${row.cust_id})">删除</a>

                </td>

            </tr>

        </c:forEach>

    </tbody>

</table>
分析我们需要根据四个条件进行查询,返回数据是分页对象Page
Sql语句:
SELECT

    a.cust_id,

    a.cust_name,

    a.cust_user_id,

    a.cust_create_id,

    b.dict_item_name cust_source,

    c.dict_item_name cust_industry,

    d.dict_item_name cust_level,

    a.cust_linkman,

    a.cust_phone,

    a.cust_mobile,

    a.cust_zipcode,

    a.cust_address,

    a.cust_createtime

FROM

    customer a

LEFT JOIN base_dict b ON a.cust_source = b.dict_id

LEFT JOIN base_dict c ON a.cust_industry = c.dict_id

LEFT JOIN base_dict d ON a.cust_level = d.dict_id

WHERE

    a.cust_name LIKE '%马%'

AND a.cust_source = ''

AND a.cust_industry = ''

AND a.cust_level = ''

LIMIT 0, 10
6.2. 创建pojo开发
public class Customer {

    private Long cust_id;

    private String cust_name;

    private Long cust_user_id;

    private Long cust_create_id;

    private String cust_source;

    private String cust_industry;

    private String cust_level;

    private String cust_linkman;

    private String cust_phone;

    private String cust_mobile;

    private String cust_zipcode;

    private String cust_address;

    private Date cust_createtime;

get/set。。。。。。

}
6.3. 实现DAO
分析:
- 前台发起请求,需要接收请求过来的查询条件数据,可以使用pojo接收数据。需要依此编写查询逻辑。
- 前台需要分页显示,根据准备好的分页实现,应该返回分页类Page,而创建Page分页类需要数据总条数,所以也需要查询数据总条数的逻辑。
根据分析,DAO需要编写两个方法:
- 需要根据条件分页查询客户信息
- 需要根据条件查询数据总条数
6.3.1. 创建QueryVo
需要编写QueryVo,里面包含查询条件属性和分页数据。
创建接受请求参数的QueryVo:
public class QueryVo {

    private String custName;

    private String custSource;

    private String custIndustry;

    private String custLevel;

    // 当前页码数

    private Integer page = 1;

    // 数据库从哪一条数据开始查

    private Integer start;

    // 每页显示数据条数

    private Integer rows = 10;

get/set。。。。。。

}
6.3.2. Mapper
创建CustomerMapper 接口
public interface CustomerMapper {

    /**

     * 根据queryVo分页查询数据

     *

     * @param queryVo

     * @return

     */

    List<Customer> queryCustomerByQueryVo(QueryVo queryVo);

    /**

     * 根据queryVo查询数据条数

     *

     * @param queryVo

     * @return

     */

    int queryCountByQueryVo(QueryVo queryVo);

}
6.3.3. Mapper.xml
创建CustomerMapper.xml
<?xml version="1.0" encoding="UTF-8" ?>

<!DOCTYPE mapper

PUBLIC "-//mybatis.org//DTD Mapper 3.0//EN"

"http://mybatis.org/dtd/mybatis-3-mapper.dtd">

<mapper namespace="cn.itcast.crm.mapper.CustomerMapper">

    <sql id="customerQueryVo">

        <where>

            <if test="custName != null and custName != ''">

                AND a.cust_name LIKE '%${custName}%'

            </if>

            <if test="custSource != null and custSource != ''">

                AND a.cust_source = #{custSource}

            </if>

            <if test="custIndustry != null and custIndustry != ''">

                AND a.cust_industry = #{custIndustry}

            </if>

            <if test="custLevel != null and custLevel != ''">

                AND a.cust_level = #{custLevel}

            </if>

        </where>

    </sql>

    <!-- 根据queryVo分页查询数据 -->

    <select id="queryCustomerByQueryVo" parameterType="cn.itcast.crm.pojo.QueryVo"

        resultType="cn.itcast.crm.pojo.Customer">

      SELECT

        a.cust_id,

        a.cust_name,

        a.cust_user_id,

        a.cust_create_id,

        b.dict_item_name cust_source,

        c.dict_item_name cust_industry,

        d.dict_item_name cust_level,

        a.cust_linkman,

        a.cust_phone,

        a.cust_mobile,

        a.cust_zipcode,

        a.cust_address,

        a.cust_createtime

      FROM

        customer a

        LEFT JOIN base_dict b ON a.cust_source = b.dict_id

        LEFT JOIN base_dict c ON a.cust_industry = c.dict_id

        LEFT JOIN base_dict d ON a.cust_level = d.dict_id

        <include refid="customerQueryVo" />

        <if test="start != null">

            LIMIT #{start}, #{rows}

        </if>

    </select>

    <!-- 根据queryVo查询数据条数 -->

    <select id="queryCountByQueryVo" parameterType="cn.itcast.crm.pojo.QueryVo"

        resultType="int">

        SELECT count(1) FROM customer a

        <include refid="customerQueryVo" />

    </select>

</mapper>
6.4. 实现service
6.4.1. 接口
编写接口CustomerService
public interface CustomerService {

    /**

     * 根据条件分页查询客户

     *

     * @param queryVo

     * @return

     */

    Page<Customer> queryCustomerByQueryVo(QueryVo queryVo);

}
6.4.2. 实现类
编写接口实现类CustomerServiceImpl
@Service

public class CustomerServiceImpl implements CustomerService {

    @Autowired

    private CustomerMapper customerMapper;

    @Override

    public Page<Customer> queryCustomerByQueryVo(QueryVo queryVo) {

        // 设置查询条件,从哪一条数据开始查

        queryVo.setStart((queryVo.getPage() - 1) * queryVo.getRows());

        // 查询数据结果集

        List<Customer> list = this.customerMapper.queryCustomerByQueryVo(queryVo);

        // 查询到的数据总条数

        int total = this.customerMapper.queryCountByQueryVo(queryVo);

        // 封装返回的page对象

        Page<Customer> page = new Page<>(total, queryVo.getPage(), queryVo.getRows(), list);

        return page;

    }

}
6.5. 实现Controller
改造Controller的方法
@RequestMapping("list")

public String queryCustomerList(QueryVo queryVo, Model model) {

    try {

        // 解决get请求乱码问题

        if (StringUtils.isNotBlank(queryVo.getCustName())) {

            queryVo.setCustName(new String(queryVo.getCustName().getBytes("ISO-8859-1"), "UTF-8"));

        }

    } catch (Exception e) {

        e.printStackTrace();

    }

    // 客户来源

    List<BaseDict> fromType = this.baseDictService.queryBaseDictByDictTypeCode(this.CUSTOMER_FROM_TYPE);

    // 所属行业

    List<BaseDict> industryType = this.baseDictService.queryBaseDictByDictTypeCode(this.CUSTOMER_INDUSTRY_TYPE);

    // 客户级别

    List<BaseDict> levelType = this.baseDictService.queryBaseDictByDictTypeCode(this.CUSTOMER_LEVEL_TYPE);

    // 把前端页面需要显示的数据放到模型中

    model.addAttribute("fromType", fromType);

    model.addAttribute("industryType", industryType);

    model.addAttribute("levelType", levelType);

    // 分页查询数据

    Page<Customer> page = this.customerService.queryCustomerByQueryVo(queryVo);

    // 把分页查询的结果放到模型中

    model.addAttribute("page", page);

    // 数据回显

    model.addAttribute("custName", queryVo.getCustName());

    model.addAttribute("custSource", queryVo.getCustSource());

    model.addAttribute("custIndustry", queryVo.getCustIndustry());

    model.addAttribute("custLevel", queryVo.getCustLevel());

    return "customer";

}
7. 修改客户信息
7.1. 需求
页面效果如下图:
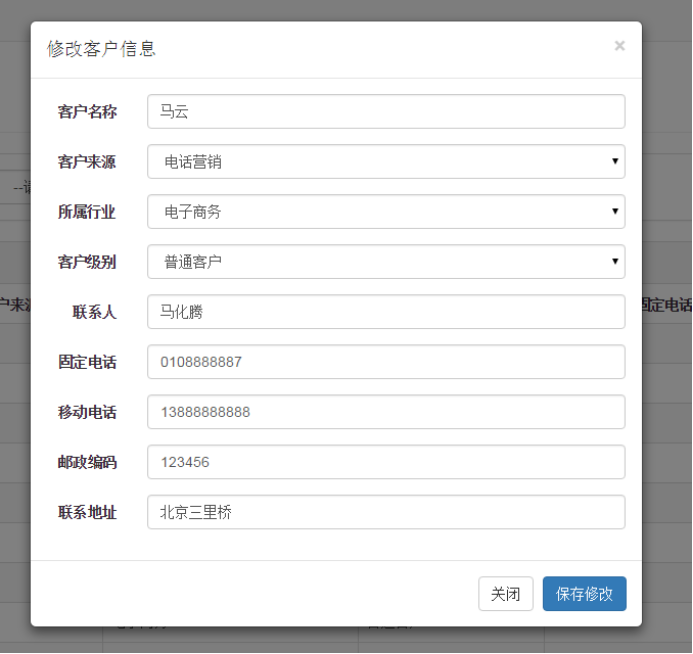
1、客户列表中点击“修改”按钮弹出客户信息修改窗,并初始化客户信息
2、点击“保存修改”按钮将修改后的结果保存到数据库中
7.2. 实现编辑数据回显
在客户列表显示中,可以点击修改按钮,弹出修改界面,打开浏览器的开发者工具,发现当点击修改按钮,会发起一个请求
如下图方式进行查看

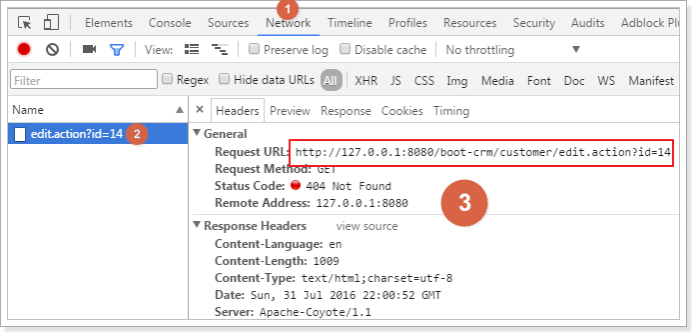
分析这里应该是发起请求到后台,获取该用户的详细信息,在页面上可以回显
复制请求路径中的edit.action,在customer.jsp页面中搜索,找到请求逻辑
找到的代码如下图:
发现这里是一个Ajax请求,根据这个请求我们可以开发后台逻辑,提供给前端页面进行调用
7.3. 回显功能实现
7.3.1. Mapper接口
在CustomerMapper添加方法
/**

 * 根据id查询客户

 *

 * @param id

 * @return

 */

Customer queryCustomerById(Long id);
7.3.2. Mapper.xml
在CustomerMapper.xml编写sql
<!-- 根据id查询用户 -->

<select id="queryCustomerById" resultType="cn.itcast.crm.pojo.Customer">

    SELECT * FROM customer WHERE cust_id = #{id}

</select>
7.3.3. Service接口
编写CustomerService.接口方法
/**

 * 根据id查询数据

 *

 * @param id

 * @return

 */

Customer queryCustomerById(Long id);
7.3.4. Service接口实现类
在CustomerServiceImpl实现接口方法
@Override

public Customer queryCustomerById(Long id) {

    Customer customer = this.customerMapper.queryCustomerById(id);

    return customer;

}
7.3.5. Controller
在CustomerController编写方法
/**

 * 根据id查询用户,返回json格式数据

 *

 * @param id

 * @return

 */

@RequestMapping("edit")

@ResponseBody

public Customer queryCustomerById(Long id) {

    Customer customer = this.customerService.queryCustomerById(id);

    return customer;

}
7.4. 实现编辑客户数据
在编辑框,点击保存修改按钮,应该进行数据保存,如下图所示:
发起请求如下图:

在页面找到的请求逻辑是:
function updateCustomer() {

    $.post("<%=basePath%>customer/update.action",$("#edit_customer_form").serialize(),function(data){

        alert("客户信息更新成功!");

        window.location.reload();

    });

}
7.5. 编辑功能实现
7.5.1. Mapper接口
在CustomerMapper添加方法
/**

 * 根据id编辑客户

 *

 * @param customer

 */

void updateCustomerById(Customer customer);
7.5.2. Mapper.xml
在CustomerMapper.xml编写sql
<select id="updateCustomerById" parameterType="cn.itcast.crm.pojo.Customer">

    UPDATE `customer`

    SET

    <if test="cust_name !=null and cust_name != ''">

        `cust_name` = #{cust_name},

    </if>

    <if test="cust_user_id !=null">

        `cust_user_id` = #{cust_user_id},

    </if>

    <if test="cust_create_id !=null">

        `cust_create_id` = #{cust_create_id},

    </if>

    <if test="cust_source !=null and cust_source != ''">

        `cust_source` = #{cust_source},

    </if>

    <if test="cust_industry !=null and cust_industry != ''">

        `cust_industry` = #{cust_industry},

    </if>

    <if test="cust_level !=null and cust_level != ''">

        `cust_level` = #{cust_level},

    </if>

    <if test="cust_linkman !=null and cust_linkman != ''">

        `cust_linkman` = #{cust_linkman},

    </if>

    <if test="cust_phone !=null and cust_phone != ''">

        `cust_phone` = #{cust_phone},

    </if>

    <if test="cust_mobile !=null and cust_mobile != ''">

        `cust_mobile` = #{cust_mobile},

    </if>

    <if test="cust_zipcode !=null and cust_zipcode != ''">

        `cust_zipcode` = #{cust_zipcode},

    </if>

    <if test="cust_address !=null and cust_address != ''">

        `cust_address` = #{cust_address},

    </if>

    `cust_createtime` = NOW()

    WHERE

    (`cust_id` = #{cust_id});

</select>
7.5.3. Service接口
编写CustomerService.接口方法
/**

 * 根据id编辑客户数据

 *

 * @param customer

 */

void updateCustomerById(Customer customer);
7.5.4. Service接口实现类
在CustomerServiceImpl实现接口方法
@Override

public void updateCustomerById(Customer customer) {

    this.customerMapper.updateCustomerById(customer);

}
7.5.5. Controller
在CustomerController编写方法
需要正确的响应,要告诉前端更新成功。返回值有没有都可以。
这里需要加@ResponseBody注解,使其不走视图解析器。
/**

 * 根据id查询用户,返回更新后客户的json格式数据

 *

 * @param id

 * @return

 */

@RequestMapping("update")

@ResponseBody

public String updateCustomerById(Customer customer) {

    Customer result = this.customerService.updateCustomerById(customer);

    return "OK";

}
8. 删除客户
8.1. 需求分析
点击客户列表中的删除按钮,提示“警告信息”,如下图

如下图,点击确定后删除用户信息,并刷新页面。

发起的请求如下图:

搜索前端jsp页面逻辑找到如下代码:
function deleteCustomer(id) {

    if(confirm('确实要删除该客户吗?')) {

        $.post("<%=basePath%>customer/delete.action",{"id":id},function(data){

            alert("客户删除更新成功!");

            window.location.reload();

        });

    }

}
8.2. 功能开发
8.2.1. Mapper接口
在CustomerMapper添加方法
/**

 * 根据id删除用户

 *

 * @param id

 */

void deleteCustomerById(Long id);
8.2.2. Mapper.xml
在CustomerMapper.xml编写sql
<!-- 根据id删除客户 -->

<delete id="deleteCustomerById" parameterType="long">

    DELETE FROM

    customer WHERE cust_id = #{id}

</delete>
8.2.3. Service接口
在CustomerService编写接口方法
/**

 * 根据id删除客户

 *

 * @param id

 */

void deleteCustomerById(Long id);
8.2.4. Service实现类
在CustomerServiceImpl实现接口方法
@Override

public void deleteCustomerById(Long id) {

    this.customerMapper.deleteCustomerById(id);

}
8.2.5. Controller
在CustomerController编写方法
/**

 * 删除用户

 *

 * @param id

 * @return

 */

@RequestMapping("delete")

@ResponseBody

public String deleteCustomerById(Long id) {

    this.customerService.deleteCustomerById(id);

    return "ok";

}
JAVAEE——ssm综合练习:CRM系统(包含ssm整合)的更多相关文章
- SSM综合练习
CRM系统 CRM项目外观 1. 开发环境 IDE: Eclipse Neon Release (4.6.0) Jdk: 1.8 数据库: MySQL 2. 创建数据库 创建crm数据库,这里使用的是 ...
- CRM系统新思维
客户关系管理系统(CRM系统)是管理公司当前以及未来潜在客户的系统,其主要目的是通过优化客户关系实现公司销售业绩的长期增长,它是企业信息系统的核心之一.目前,移动互联网.大数据以及人工智能技术发展日新 ...
- 简易的CRM系统案例之Struts2&Spring整合+Hibernate3+JSP+MySQL版本
主要对上一篇Struts2&Spring整合的改造 简易的CRM系统案例之Struts2+Hibernate3+JSP+MySQL版本 src/bean.xml <beans xmlns ...
- 零售CRM系统开发的核心功能
在零售行业中,客户关系管理系统是一个包含销售,市场营销和客户服务流程的中央枢纽.它为企业所有者提供了一种可以结合所有与销售有关的问题并管理销售流程的有效工具.零售CRM可以留住客户,提供个性化的一流客 ...
- 为什么企业需要CRM系统?CRM的作用及其重要性分析
客户管理系统(CRM)是企业核心应用软件之一,对于提高企业业绩起着至关重要的作用,现在很多企业都在客户发展方面投入大量的资金,以求获得更好的回报. 关于CRM CRM是一个客户数据中心,在CRM中,你 ...
- 企业选择CRM系统的要点
经过十数年的发展,CRM客户管理系统在企业当中开始家喻户晓,它的普及性也越来越高.管理者们也纷纷意识到CRM系统--这种企业管理工具带来的巨大好处.既然CRM给企业带来这么大的好处,那么企业该怎么选择 ...
- 通过CRM系统实现工作流程自动化
灵活运用CRM系统所拥有的自动化功能模块,是公司在快速发展和降低成本的关键保障.不管您的公司规模的大小,您企业的工作流程都必须遵照相同的流程反复操作.这种反复的工作是一个效率黑洞,长久以往会导致人力资 ...
- CRM系统用多种形式与客户无障碍沟通
当您与潜在客户.联系人交流,或者团队内部沟通时,是不是经常要在CRM系统和第三方应用之间来回切换,仅仅是为了打电话.开会等,简直不要太麻烦.而CRM客户管理系统与Zoho Meeting的集成,就能够 ...
- 如何在CRM系统中集成ActiveReports最终报表设计器
有时候,将ActiveReports设计器集成到业务系统中,为用户提供一些自定义的数据表,用户不需要了解如何底层的逻辑关系和后台代码,只需要选择几张关联的数据表,我们会根据用户的选择生成可供用户直接使 ...
- CRM系统简析
寄语: 简单阐述一下对CRM系统应用的理解,此内容参考网上资料所整理. CRM是Customer Relationship Management的缩写,简称客户关系管理. CRM系统可以从三个方面来分 ...
随机推荐
- Trying to get property of non-object
原文:http://www.jb51.net/article/29878.htm 总结:判断为空用 if(isset($v)){}代替if($v == null){}
- 产品排序 product
评测传送门 [问题描述] 你是一个公司的员工,你会按时间顺序受到一些产品的订单,你需要用一个栈来改变这些订单的顺序(每个产品都必须入栈和出栈一次). 按初始顺序,每次可以将一个产品入栈,或将栈顶产品弹 ...
- Python练习-迭代器-模拟cat|grep文件
代码如下: # 编辑者:闫龙 def grep(FindWhat): f=open("a.txt","r",encoding="utf8") ...
- 【译】第一篇 Integration Services:SSIS是什么
本篇文章是Integration Services系列的第一篇,详细内容请参考原文. Integration Services是一种在SQL Server中最受欢迎的子系统.允许你在各种数据源之间提取 ...
- ORB_SLAM2 源码阅读 ORB_SLAM2::Initializer::ComputeF21 (OpenCV 细节)
ORB_SLAM2 计算 F21 的代码是这样的. cv::Mat Initializer::ComputeF21(const vector<cv::Point2f> &vP1,c ...
- python学习笔记之split()方法与with
Python split()方法 以下内容摘自:http://www.runoob.com/python/att-string-split.html 描述 Python split()通过指定分隔符对 ...
- 搭建本地git服务器
最近因为项目需求,需要实现一个原型系统,加上后期项目需要多人协作,考虑采用了git做版本控制. 这里主要简要描述下git服务器和客户端的搭建和配置. 1.git服务器 (1)安装git sudo ap ...
- Python开发环境(3):使用Eclipse+PyDev插件创建Django项目
OS:Windows 10家庭中文版,Python:3.6,Eclipse:Oxygen.1a Release (4.7.1a), PyDev:6.3.2,Django:2.0.3 本文展示了怎么使用 ...
- 使用免安装压缩包安装MySQL
OS:Windows 10家庭中文版 MySQL:mysql-5.7.20-winx64.zip 作者:Ben.Z 参考链接: Installing MySQL on Microsoft Window ...
- linux java配置
1.java配置 配置环境变量在/etc/profile下增加# set Java environmentJAVA_HOME=/usr/share/jdk1.6.0_43PATH=$JAVA_HOME ...