项目管理实践【五】自动编译和发布网站【Using Visual Studio with Source Control System to build and publish website automatically】
在上一篇教程项目管理实践【三】每日构建【Daily Build Using CruiseControl.NET and MSBuild】 中,我们讲解了如何使用CCNET+MSBuild来自动编译项目,今天我们讲解一下怎么使用MSBuild+WebDeployment+Robocopy自动编译过和部署ASP.NET网站。
首先安装下面的三个软件:
1.MSBuild.Community.Tasks下载:
http://msbuildtasks.tigris.org/files/documents/3383/28296/MSBuild.Community.Tasks.msi
源代码:
http://msbuildtasks.tigris.org/files/documents/3383/36642/MSBuild.Community.Tasks.v1.2.0.306.zip
2.WebDeployment下载:
For VS2008 [RTW]
http://download.microsoft.com/download/9/4/9/9496adc4-574e-4043-bb70-bc841e27f13c/WebDeploymentSetup.msi
3.Utility Spotlight Robocopy GUI 下载:【下载后,解压后安装,Vista不用安装】
http://download.microsoft.com/download/f/d/0/fd05def7-68a1-4f71-8546-25c359cc0842/UtilitySpotlight2006_11.exe
安装完成后,就开始今天的教程了。
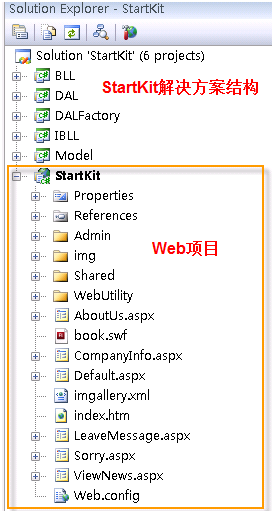
我们以前面教程中创建的StartKit解决方案为例子,结构如下:
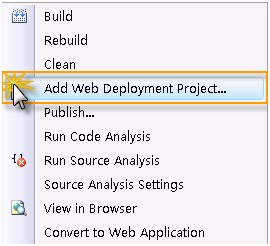
在上图所示的Web项目StartKit上右键点击,然后点击Add Web Deployment Project…,如下图:
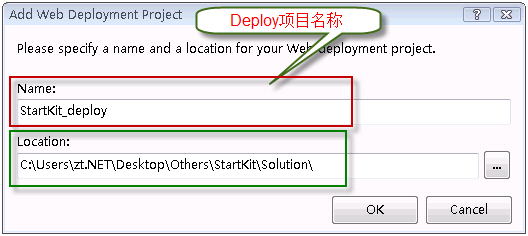
弹出下面的窗体,分别输入部署项目名称和项目要放置的位置,如下图:
点击OK按钮后,解决方案的结构如下图:

今天会讲到下面二个方法,上面的步骤一样,从这里开始,下面的步骤有区别。
方法一:使用WebDeployment创建虚拟目录
优点:使用简单
缺点:功能不够强大,只能部署到虚拟目录
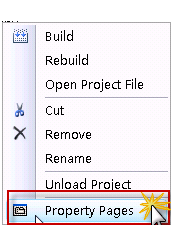
右键点击部署项目,点击菜单中的Property Pages,如下图:
在下面的窗体中,点击左侧的Complication,在右侧的Output Folder下的文本框中输入编译后网站文件的输出路径:
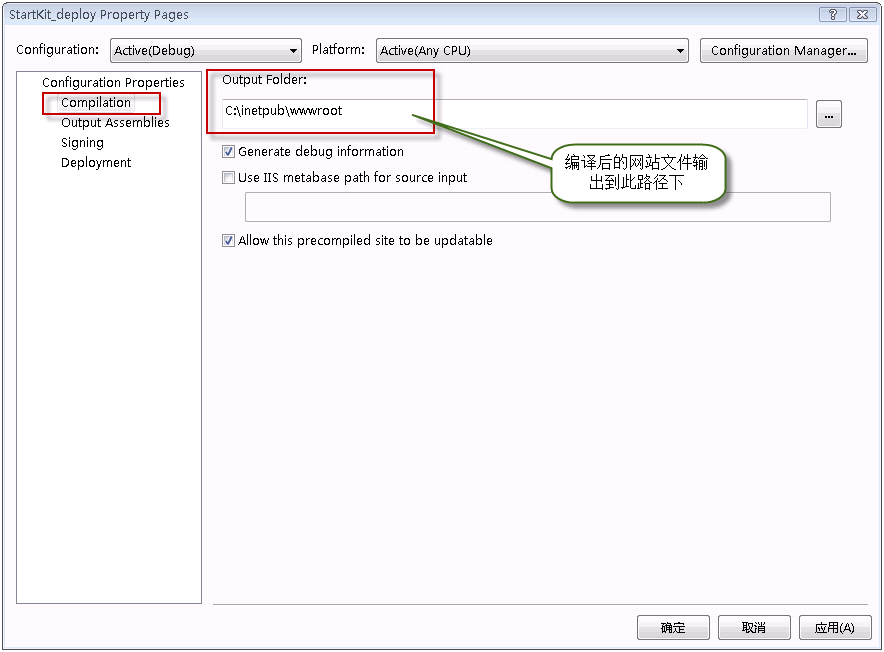
然后,点击左侧的Deploment,在右侧选中Create an IIS virtual directory for the output folder前面的CheckBox,在下面的Virtual directory name下的文本框中输入虚拟目录的名字,Replace the existing virtual directory前面的CheckBox根据实际情况确定是否选中,如下图:

点击确定按钮,编译部署项目StartKit.csproj_deploy,编译成功后,我们打开IIS,在默认网站下可以看到虚拟目录StartKit。OK,成功了!
方法二:使用WebDeployment+MSBuild+Robocopy
优点:功能强大
缺点:配置有点麻烦
这个方法不用配置Property Pages,直接右键点击StartKit.csproj_deploy项目文件,在菜单中点击Open Project File打开部署项目文件: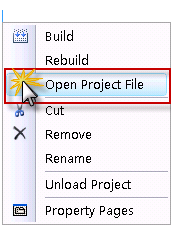
修改部署项目文件为下面的内容:
  1 <!--Microsoft Visual Studio 2008 Web Deployment Project http://go.microsoft.com/fwlink/?LinkID=104956-->

  2

  3 <Project ToolsVersion="3.5" DefaultTargets="Build" xmlns="http://schemas.microsoft.com/developer/msbuild/2003">

  4 <PropertyGroup>

  5 <Configuration Condition=" '$(Configuration)' == '' ">Debug</Configuration>

  6 <Platform Condition=" '$(Platform)' == '' ">AnyCPU</Platform>

  7 <ProductVersion>9.0.21022</ProductVersion>

  8 <SchemaVersion>2.0</SchemaVersion>

  9 <ProjectGuid>{00000000-0000-0000-0000-000000000000}</ProjectGuid>

 10 <SourceWebPhysicalPath>..\StartKit</SourceWebPhysicalPath>

 11 <SourceWebProject>{96E1A089-3FBB-4909-94F6-172665994449}|StartKit\StartKit.csproj</SourceWebProject>

 12 <SourceWebVirtualPath>/StartKit.csproj</SourceWebVirtualPath>

 13 <TargetFrameworkVersion>v3.5</TargetFrameworkVersion>

 14 <ProjectName>StartKit</ProjectName>

 15 <Major>1</Major>

 16 <Minor>0</Minor>

 17 <Revision>0</Revision>

 18 <VSSName>ttzhang</VSSName>

 19 <VSSPassword>123456</VSSPassword>

 20 <FtpName>anonymous</FtpName>

 21 <FtpPassword>anonymous</FtpPassword>

 22 <SmtpServerName>smtp.163.com</SmtpServerName>

 23 <FromAddress>ttzhang@163.com</FromAddress>

 24 <ToAddress>zttc@163.com</ToAddress>

 25 <MailPassword>testmail</MailPassword>

 26 </PropertyGroup>

 27 <PropertyGroup Condition=" '$(Configuration)|$(Platform)' == 'Debug|AnyCPU' ">

 28 <DebugSymbols>true</DebugSymbols>

 29 <OutputPath>.\Debug</OutputPath>

 30 <EnableUpdateable>true</EnableUpdateable>

 31 <UseMerge>true</UseMerge>

 32 <SingleAssemblyName>StartKit_deploy</SingleAssemblyName>

 33 </PropertyGroup>

 34 <PropertyGroup Condition=" '$(Configuration)|$(Platform)' == 'Release|AnyCPU' ">

 35 <DebugSymbols>false</DebugSymbols>

 36 <OutputPath>.\Release</OutputPath>

 37 <EnableUpdateable>true</EnableUpdateable>

 38 <UseMerge>true</UseMerge>

 39 <SingleAssemblyName>StartKit_deploy</SingleAssemblyName>

 40 </PropertyGroup>

 41 <ItemGroup>

 42 </ItemGroup>

 43 <!--下面的ItemGroup节点可选,这个和项目文件StartKit.csproj中的内容相同-->

 44 <ItemGroup>

 45 <ProjectReference Include="..\BLL\BLL.csproj">

 46 <Project>{73A293A1-CDCC-4919-9B05-BA2531ADDB56}</Project>

 47 <Name>BLL</Name>

 48 </ProjectReference>

 49 <ProjectReference Include="..\DAL\DAL.csproj">

 50 <Project>{AFF6077D-DD2D-48A0-BFAD-051BD67A6953}</Project>

 51 <Name>DAL</Name>

 52 </ProjectReference>

 53 <ProjectReference Include="..\IBLL\IBLL.csproj">

 54 <Project>{620770BB-7A27-4585-9B97-44EEE349121D}</Project>

 55 <Name>IBLL</Name>

 56 </ProjectReference>

 57 <ProjectReference Include="..\Model\Model.csproj">

 58 <Project>{EA43EC2E-5890-4431-BD3E-5F6C090DEA3A}</Project>

 59 <Name>Model</Name>

 60 </ProjectReference>

 61 </ItemGroup>

 62 <!--引入MSBuildCommunityTasks-->

 63 <Import Project="$(MSBuildExtensionsPath)\MSBuildCommunityTasks\MSBuild.Community.Tasks.Targets" />

 64 <!--邮件发送-->

 65 <!--<Target Name="EmailTest" >

 66 <Message Text = " Mail sending"></Message>

 67 <Mail SmtpServer="$(SmtpServerName)"

 68 Subject="Test"

 69 Password="$(MailPassword)"

 70 From ="$(FromAddress)"

 71 To ="$(ToAddress)"

 72 Body="This is a test of the mail task." />

 73 </Target>-->

 74 <!--备份文件到FTP-->

 75 <!--<Target Name="Backup" DependsOnTargets="Zip" >

 76 <FtpUpload UserName="$(FtpName)"

 77 Password="$(FtpPassword)"

 78 LocalFile="$(ZipFileName)"

 79 RemoteUri="ftp://192.168.1.2/SourceBackup/$(ZipFileName)" />

 80 <OnError ExecuteTargets="HandleErrorBackup" />

 81 </Target>-->

 82 <!--备份文件到FTP失败则发送邮件-->

 83 <!--<Target Name="HandleErrorBackup">

 84 <Message Text="Backup failed" />

 85 <Mail SmtpServer="$(SmtpServerName)"

 86 To="$(ToAddress)"

 87 From="$(FromAddress)"

 88 Subject="$(ProjectName) Build failed"

 89 Body="Backup Failure: Could not finish Backup ." />

 90 </Target>-->

 91 <!--编译项目-->

 92 <Target Name="BuildProjectReferences">

 93 <MSBuild Projects="@(ProjectReference)" Targets="Build" />

 94 </Target>

 95 <!--生成压缩文件-->

 96 <Target Name="Zip">

 97 <!--时间格式-->

 98 <Time Format="yyyyMMddHHmmss">

 99 <Output TaskParameter="FormattedTime" PropertyName="buildDate"/>

100 </Time>

101 <Zip Files="@(ZipFiles)" ZipFileName="StartKit V$(Major)-$(Minor)-$(Revision)-$(buildDate).zip"/>

102 </Target>

103 <!--复制文件-->

104 <Target Name="Copy">

105 <!--停止IIS服务-->

106 <ServiceController ServiceName="w3svc" Action="Stop" />

107 <!--使用Robocopy复制编译后的文件到指定位置 /XD是要忽略的文件夹,/XF要忽略的文件类型-->

108 <Exec Command="Robocopy Debug c:\inetpub\StartKit /MIR /XD Fckeditor attachments .svn obj doc Test /XF *.zip *.wdproj *.user *.cs *.csproj" IgnoreExitCode="true" />

109 <!--启动IIS服务-->

110 <ServiceController ServiceName="w3svc" Action="Start" />

111 </Target>

112 <!--引入WebDeployment-->

113 <Import Project="$(MSBuildExtensionsPath)\Microsoft\WebDeployment\v9.0\Microsoft.WebDeployment.targets" />

114 <!-- To modify your build process, add your task inside one of the targets below and uncomment it.

115 Other similar extension points exist, see Microsoft.WebDeployment.targets.-->

116 <Target Name="BeforeBuild"></Target>

117 <Target Name="BeforeMerge"></Target>

118 <Target Name="AfterMerge"></Target>

119 <Target Name="AfterBuild">

120 <!--编译成功后,执行下面的Targets-->

121 <!—不想生成ZIP文件,可以注释下面ZIP的target-->

122 <CallTarget Targets="Zip"/>

123 <CallTarget Targets="Copy" />

124 <!--<CallTarget Targets="EmailTest"/>

125 <CallTarget Targets="Backup" />-->

126 </Target>

127 </Project>
编译部署项目成功后,打开C:\inetpub\StartKit文件夹,看看是否成功复制过去了呢?好的,我去看看,哈哈,文件果然都在,OK,成功啦!
这时候,在IIS上创建一个虚拟目录或者网站,指向我们部署项目中指定的目录。上一篇我们已经将该项目添加到了CCNET中,所以以后我们每次提交代码后,MSBuild就会编译整个解决方案【当然也会编译部署项目】,如果编译成功,就会自动将最新的程序部署到我们网站上。这样就可以使网站和我们的开发实时保持同步,这只不是唯一的实现方法,其他还有很多可以实现这个功能的方法,大家可以在这里讨论和交流。
补充:
Microsoft Build Engine (MSBuild) 是 Microsoft 和 Visual Studio 的新的生成平台。MSBuild 在如何处理和生成软件方面是完全透明的,使开发人员能够在未安装 Visual Studio 的生成实验室环境中组织和生成产品。通过这几篇教程,我们可以看出,MSBuild的强大功能,如果希望理解更多关于MSBuild的信息,请查看这里http://msdn.microsoft.com/zh-cn/library/ms171451.aspx。
如果你对我讲解的这些内容不熟悉,建议你从头开始看这个系列的教程:项目管理实践系列教程。
转自:http://www.cnblogs.com/ttzhang/archive/2008/11/10/1330321.html
项目管理实践【五】自动编译和发布网站【Using Visual Studio with Source Control System to build and publish website automatically】的更多相关文章
- 项目管理实践【六】自动同步数据库【Using Visual Studio with Source Control System to synchronize database automatically】
在上一篇项目管理实践[五]自动编译和发布网站中,我们讲解了如何使用MSBuild+Robocopy+WebDeployment来自动编译和部署网站,今天,我们来看一下,如何使用MSBuild +SVN ...
- Ant自动编译打包&发布 android项目
Eclipse用起来虽然方便,但是编译打包android项目还是比较慢,尤其将应用打包发布到各个渠道时,用Eclipse手动打包各种渠道包就有点不切实际了,这时候我们用到Ant帮我们自动编译打包了. ...
- Andorid进阶7—— Ant自动编译打包&发布 android项目
http://www.cnblogs.com/tt_mc/p/3891546.html Eclipse用起来虽然方便,但是编译打包android项目还是比较慢,尤其将应用打包发布到各个渠道时,用Ecl ...
- 第五周课后作业——适用于人工智能的visual studio 的创新分析
个人觉得作业布置的(2)(3)(4)(5)的顺序并不合理,我将以(5)(2)(3)(4)的顺序开展我的分析. 创新的定义是做出一些改变或创造出新的东西,既是过程,也是结果.这是一个很泛的概念,所以去问 ...
- ASP.NET 打包发布中没有Visual Studio Installer
环境:win7 64位 : VisualStudio2015 问题描述 创建安装程序时,VisualStudio中没有打包安装程序的Visual Studio Installer功能 解决方法 下载V ...
- Visual Studio使用Web Deploy远程发布网站及其配置
https://blog.csdn.net/yzj_xiaoyue/article/details/60574378 废话不多说,直接进入正题(各个步骤请看图片的序号): IIS配置 1.打开服务器 ...
- Microsoft Azure Web Sites应用与实践【3】—— 通过Visual Studio Online在线编辑Microsoft Azure 网站
Microsoft Azure Web Sites应用与实践 系列: [1]—— 打造你的第一个Microsoft Azure Website [2]—— 通过本地IIS 远程管理Microsoft ...
- .NET 发布网站步骤
本文章分为三个部分: web网站发布.IIS6 安装方法.ASP.NET v4.0 安装方法 一.web网站发布 1.打开 Visual Studio 2013 编译环境 2.在其解决方案上右击弹出重 ...
- C#-VS发布网站-准备待发布网站-摘
通过使用“发布网站”工具部署网站项目 准备网站源文件 在vs生成发布文件 配置IIS .NET Framework 4 其他版本 Visual Studio 2008 Visual Studio ...
随机推荐
- 总结的OSM 地图相关的分析
How OSM works: Tile Format: png, z: levels [0- 18], x: Latitude [0- ], y: Longitude [0- ]; ...
- 设计模式-GoF23
书呢,是2012年双11买的. 没有面向对象程序经验的人,果然还是看不懂的.
- iOS Plugins
iOS Plugins This section provides details for how to implement native plugin code on the iOS platfor ...
- wall time
"showing elapsed time and wall clock time correspondingly." what's difference between elap ...
- UIBezierPath与CAShapeLayer结合画扇形
/*让半径等于期望半径的一半 lineWidth等于期望半径 就可以画圆*/ 可以看出layer的走势是从圆边的中间一半在圆外 一半在圆内 因此让半径等于期望半径的一半 lineWidth等于期望半径 ...
- c++ inline关键字的理解
1. inline是实现修饰符,而非声明修饰符,所以应该用于实现部分的修饰(你也可以放置inline在声明,但是没有必要) 2. 所有中类中定义的函数都默认声明为inline函数,所有我们不用显示地去 ...
- webpack+React.js
Webpack是目前基于React和Redux开发的应用的主要打包工具.我想使用Angular 2或其他框架开发的应用也有很多在使用Webpack. 当我第一次看到Webpack的配置文件时,它看起来 ...
- 用perl发送数据到钓鱼站
一个皮皮果的游戏很火 估计很多人想黑 偶然发现一个钓鱼站: http://ppgpergame.com/ 钓用户名与密码 抓包后发现数据会发送到: http://ppgpergame.com/db.a ...
- MongoDB高级查询用法大全
转载 http://blog.163.com/lgh_2002/blog/static/440175262012052116455/ 详见官方的手册: http://www.mongodb.org/d ...
- Xssf配合metaspolit使用
安装xssf download: svn export http://xssf.googlecode.com/svn/trunk /home/User/xssf install: svn expor ...