I2C的库函数应用示例
I2C Arduino 简单应用举例
例1 多机通信
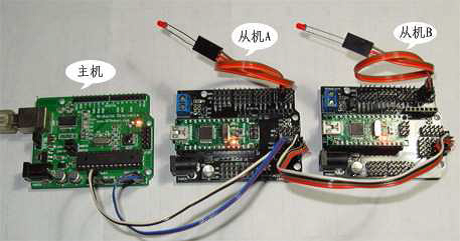
主机代码:(从编译器串口监视器发送数字1,2,3,4来控制从机的LED亮与灭)
 1 #include <Wire.h>

 2 void setup()

 3 {

 4     Wire.begin(); //启动I2C 总线,地址缺省表示为主机

 5     Serial.begin(9600); //启动串口,设置波特率为9600

 6     Serial.println("Ready"); //发送字符

 7 }

 8

 9 void loop()

10 {

11     int val;

12     if(Serial.available() > 0) //判断串口缓冲器是否有数据装入

13     {

14             val=Serial.read();  //读串口

15         if(val==49)   //1

16         {

17             Wire.beginTransmission(4);  // 与地址4 的从机连接通讯

18         Wire.write(1);  // 发送数字 1 开LED

19             Wire.endTransmission();  // 停止发送

20         Serial.println("49 OK");  // 串口上显示 49 OK 表示完成,49 表示为数字 1 的ASCII 码

21         delay(10);

22     }

23     else if(val==50)//2

24     {

25         Wire.beginTransmission(4); // 与地址4 的从机连接通讯

26       Wire. write (0); // 发送数字 0 关LED

27         Wire.endTransmission(); // 停止发送

28       Serial.println("50 OK"); // 串口上显示 50 OK 表示完成

29       delay(10);

30     }

31     else if(val==51)  //3

32     {

33         Wire.beginTransmission(5);  // 与地址5 的从机连接通讯

34         Wire. write (1);  // 发送数字 1 开LED

35         Wire.endTransmission();  // 停止发送

36        Serial.println("51 OK"); // 串口上显示 51 OK 表示完成

37         delay(10);

38     }

39     else if(val==52) //4

40     {

41         Wire.beginTransmission(5);  // 与地址5 的从机连接通讯

42         Wire.write (0);   // 发送数字 0 关LED

43         Wire.endTransmission();  // 停止发送

44         Serial.println("52 OK");  // 串口上显示 52 OK 表示完成

45         delay(10);

46     }

47     else

48     { Serial.println(val); }

49     }

50 }
从机A代码:(接收到主机发送的1点亮LED,接收到0关掉LED)
 1 #include <Wire.h>

 2 int LED = 2;

 3

 4 void setup()

 5 {

 6 Wire.begin(4);   // 设置从机地址为 4

 7 pinMode(LED,OUTPUT);   // 设置IO 口为输出模式

 8 Wire.onReceive(receiveEvent);   //从机接收主机发来的数据

 9 }

10

11 void loop()

12 { delay(100); }

13

14 void receiveEvent(int howMany)  // 接收从主机发过来的数据

15 {

16 int c = Wire.receive();  // 接收单个字节

17 if(c==1)

18 { digitalWrite(LED,HIGH); // 如果为 1 开LED }

19 else if(c==0)

20 { digitalWrite(LED,LOW); // 如果为 0 关LED }

21 }
从机B代码:(接收到主机发送的1点亮LED,接收到0关掉LED)
 1 #include <Wire.h>

 2 int LED = 2;

 3

 4 void setup()

 5 {

 6     Wire.begin(5);     // 设置从机地址为 5

 7     pinMode(LED,OUTPUT);

 8     Wire.onReceive(receiveEvent);

 9 }

10

11 void loop()

12 { delay(100);}

13

14 void receiveEvent(int howMany)

15 {

16     int c = Wire.receive();

17     if(c==1)

18     { digitalWrite(LED,HIGH); }

19     else if(c==0)

20     { digitalWrite(LED,LOW); }

21 }
例2 Master Reader/Slave Sender 从发主收信息共享
In some situations, it can be helpful to set up two (or more!) Arduino and Genuino boards to share information with each other(彼此共享信息). In this example, two boards are programmed to communicate with one another in a Master Reader/Slave Sender configuration(配置) via the I2C synchronous serial protocol(I2C同步串行协议).Several functions of Arduino's Wire Library are used to accomplish this. Arduino 1, the Master, is programmed to request, and then read, 6 bytes of data sent from the uniquely addressed Slave Arduino. Once that message is received, it can then be viewed in the Arduino Software (IDE) serial monitor window.
The I2C protocol involves using two lines to send and receive data: a serial clock pin (SCL) that the Arduino or Genuino Master board pulses at a regular interval, and a serial data pin (SDA) over which data is sent between the two devices. As the clock line changes from low to high (known as the rising edge of the clock pulse), a single bit of information - that will form in sequence the address of a specific device and a command or data - is transferred from the board to the I2Cdevice over the SDA line. When this information is sent - bit after bit -, the called upon device executes the request and transmits it's data back - if required - to the board over the same line using the clock signal still generated by the Master on SCL as timing.
Because the I2C protocol allows for each enabled device to have it's own unique address, and as both master and slave devices to take turns communicating over a single line, it is possible for your Arduino or Genuino board to communicate (in turn) with many devices, or other boards, while using just two pins of your microcontroller.
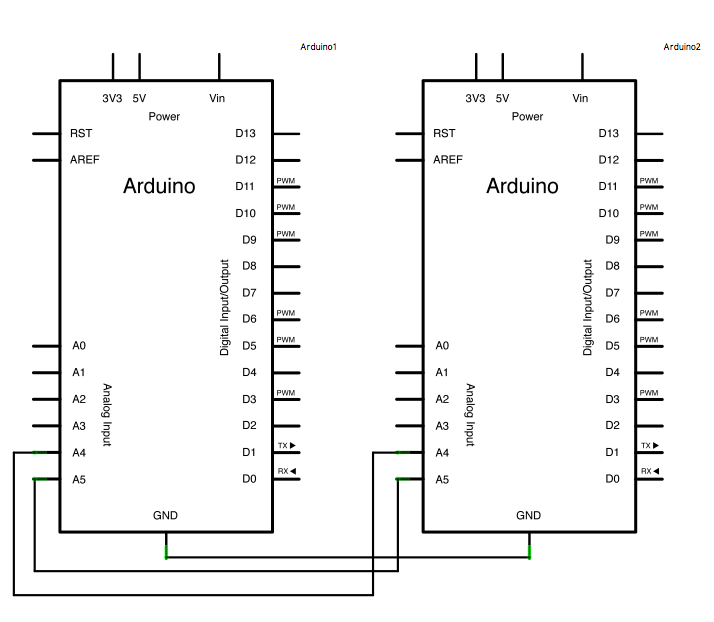
Hardware Required
- 2 Arduino or Genuino Boards
- hook-up wires
Circuit
Connect pin 4 (the data, or SDA, pin) and pin 5 (the clock, or SCL, pin) on the master board to their counterparts on the slave board. Make sure that both boards share a common ground. In order to enable serial communication, the master board must be connected to your computer via USB.
If powering the boards independently is an issue, connect the 5V output of the Master to the VIN pin on the slave.
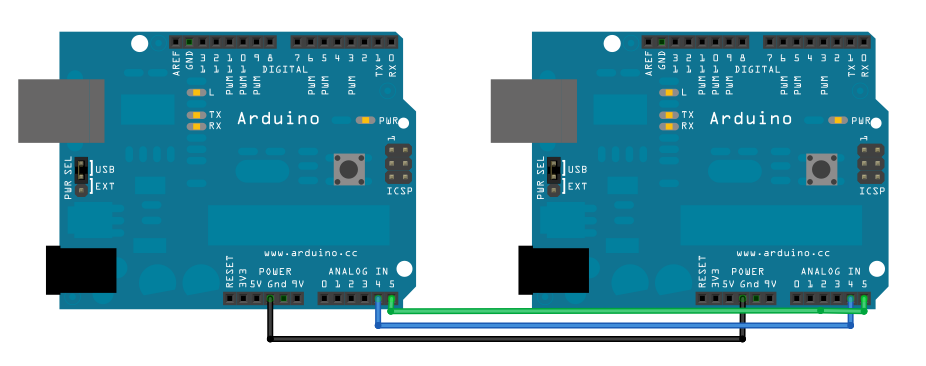
Schematic
Code for Master Reader - Program for Arduino 1
 1 #include <Wire.h>

 2

 3 void setup()

 4 {

 5   Wire.begin();        // join i2c bus (address optional for master)

 6   Serial.begin(9600);  // start serial for output

 7 }

 8

 9 void loop()

10 {

11   Wire.requestFrom(8, 6);    // request 6 bytes from slave device #8

12   while (Wire.available())

13   {

14     char c = Wire.read();   // receive a byte as character

15     Serial.print(c);         // print the character

16   }

17   delay(500);

18 }
Code for Slave Sender - Program for Arduino 2
 1 #include <Wire.h>

 2

 3 void setup()

 4 {

 5   Wire.begin(8);                  // join i2c bus with address #8

 6   Wire.onRequest(requestEvent);   // register event

 7 }

 8

 9 void loop()

10 { delay(100); }

11

12 void requestEvent()

13 {

14   Wire.write("hello ");  // respond with message of 6 bytes as expected by master

15 }
例3 Master Writer/Slave Receiver 主发从收信息共享
Hardware Required,Circuit,Schematic 同例2
Master Writer Code - Program for Arduino 1
 1 #include <Wire.h>

 2 byte x = 0;

 3

 4 void setup()

 5 {  Wire.begin(); // join i2c bus (address optional for master) }

 6

 7 void loop()

 8 {

 9   Wire.beginTransmission(8); // transmit to device #8

10   Wire.write("x is ");        // sends five bytes

11   Wire.write(x);              // sends one byte

12   Wire.endTransmission();    // stop transmitting

13   x++;

14   delay(500);

15 }
Slave Receiver Code - Program for Arduino 2
 1 #include <Wire.h>

 2

 3 void setup()

 4 {

 5   Wire.begin(8);                // join i2c bus with address #8

 6   Wire.onReceive(receiveEvent); // register event

 7   Serial.begin(9600);           // start serial for output

 8 }

 9

10 void loop()

11 { delay(100);}

12

13 void receiveEvent(int howMany)

14 {

15   while (1 < Wire.available())

16   {

17     char c = Wire.read();    // receive byte as a character

18     Serial.print(c);         // print the character

19   }

20   int x = Wire.read();     // receive byte as an integer

21   Serial.println(x);       // print the integer

22 }
I2C的库函数应用示例的更多相关文章
- linux下创建库函数
来源: 在Linux下如何使用自己的库函数-riverok-ChinaUnix博客 http://blog.chinaunix.net/uid-21393885-id-88128.html 构建Lin ...
- STM32模拟I2C
之前为了测试, 拿最小板做了一个I2C的主发跟主读, 一开始当然是尝试用硬件I2C, 结果弄了很久, 时间紧迫, 只好用了模拟, 结果发现, 哎, 真特么挺好用的, 现在1片儿顶过去5片儿. 硬件I2 ...
- NHibernate查询示例合集
基本查询 复杂查询示例 /// <summary> /// 获取自定义表单数据中属于部门的部分 /// </summary> /// <param name=&quo ...
- Python---socket库
为方便以后查询和学习,特从常用库函数和示例来总结socket库 1. 术语 family:AF_INET socktype:SOCK_STREAM或SOCK_DGRAM protocol:IPPROT ...
- 程序设计与算法(一)C语言程序设计CAP之字符串
C++中的字符串 字符串有三种形式 用双引号括起来的字符串常量,如果"CHINA"."C++ program" 存放于字符串数组中,以'\0'字符(ASCII吗 ...
- 剑指offer——把字符串转换成整数(c++)
题目描述请你写一个函数StrToInt,实现把字符串转换成整数这个功能.当然,不能使用atoi或者其他类似的库函数. 示例 1:输入: " -42"输出: -42解释: 第一个非空 ...
- Programiz 中文系列教程·翻译完成
原文:Programiz 协议:CC BY-NC-SA 4.0 欢迎任何人参与和完善:一个人可以走的很快,但是一群人却可以走的更远. 在线阅读 ApacheCN 学习资源 目录 Programiz C ...
- Programiz C 语言教程·翻译完成
原文:Programiz 协议:CC BY-NC-SA 4.0 欢迎任何人参与和完善:一个人可以走的很快,但是一群人却可以走的更远. 在线阅读 ApacheCN 学习资源 目录 C 简介 C 关键字和 ...
- GNU Readline库函数的应用示例
说明 GNU Readline是一个跨平台开源程序库,提供交互式的文本编辑功能.应用程序借助该库函数,允许用户编辑键入的命令行,并提供自动补全和命令历史等功能.Bash(Bourne Again Sh ...
随机推荐
- 【Android】Listview返回顶部,快速返回顶部的功能实现,详解代码。
作者:程序员小冰,GitHub主页:https://github.com/QQ986945193 新浪微博:http://weibo.com/mcxiaobing 首先给大家看一下我们今天这个最终实现 ...
- 深入了解Netty【七】Netty核心组件
1.Bootstrap与ServerBootstrap bootstrap用于引导Netty的启动,Bootstrap是客户端的引导类,ServerBootstrap是服务端引导类.类继承关系: 2. ...
- vue中实现后台管理路由标签页
<template> <section> <div class="navTabList el-tabs__nav-scroll" id="t ...
- php cookie及session
1.会话控制概括 1)http协议的缺陷 无状态,就是无记忆,不能让同一浏览器和服务器进行多次数据交换时,产生业务的连续性, 2)什么是会话控制 会话控制就是解决http无记忆缺陷的,能够==将数据持 ...
- 企业网站还是要考虑兼容至少IE10
中国国情,大部分企业还在使用win7,IE浏览器.为了兼容这些,还是少用比较VUE等一些高级的框架,改为使用jquery.用惯了VUE,jquey好多忘得差不多了,其中遇到的问题及解决方案 ajax, ...
- WinDbg排查CPU高的问题
一.概述 在Window服务器部署程序后,可能因为代码的不合理或者其他各种各样的问题,会导致CPU暴增,甚至达到100%等情况,严重危及到服务器的稳定以及系统稳定,但是一般来说对于已发布的程序,没法即 ...
- CSAPP =2= 信息的表示和处理
思维导图 预计阅读时间:30min 阅读书籍 <深入理解计算机系统 第五版> 参考视频 [精校中英字幕]2015 CMU 15-213 CSAPP 深入理解计算机系统 课程视频 参考文章 ...
- linux下限定连接ip和端口
1.限制端口 vim /etc/ssh/sshd_config 修改连接端口 修改之后重启sshd服务 service sshd restart 再次连接时就需要使用修改后的端口去连接了 备注:判断修 ...
- Fiddler的基本界面介绍
前言 fiddler的界面,主要是分以下6个模块. 一:主菜单栏: 可以参考:https://www.cnblogs.com/sjl179947253/p/7620524.html 二:工具栏: 1. ...
- JS将数字转换为中文
<!DOCTYPE html> <html> <head> <meta charset="UTF-8"> <title> ...