Learning Cocos2d-x for WP8(2)——深入刨析Hello World
原文:Learning Cocos2d-x for WP8(2)——深入刨析Hello World
cocos2d-x框架
在兄弟篇Learning Cocos2d-x for XNA(1)——小窥cocos2d-x框架中已有详细介绍cocos2d-x框架下的基本元素。可自行参考学习,概念的东西基本一样。
HelloWorld
HelloWorld程序虽然简单,但能测试程序是否能正确的运行,同时很能体现一个框架的整体结构。
cocos2d-x中HelloWorld显示主要通过AppDelegate和HelloWorldScene。
在显示HelloWorld程序时,得将图片资源放进Assets文件夹中

AppDelegate
C++程序中最主要的是头文件(.h)和源文件(.cpp)。
AppDelegate.h
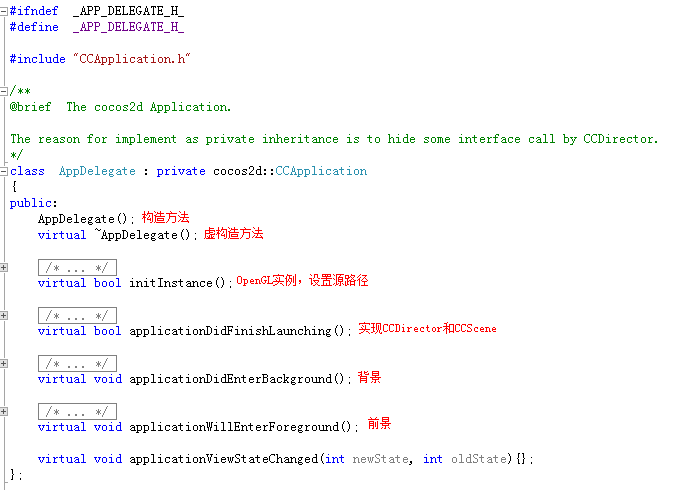
AppDelegate.h头文件中,定义类(Class)AppDelegate继承CCApplication。在AppDelegate中声明相关方法。

AppDelegate.cpp
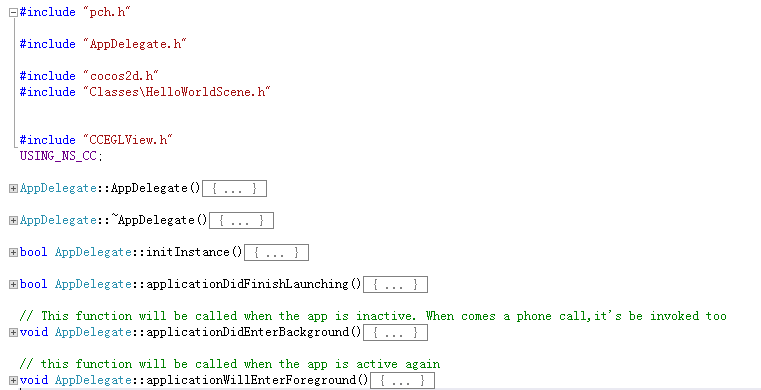
AppDelegate.cpp源文件中包含AppDelegate.h头文件,在其中实现头文件中声明的方法。

其中在方法applicationDidFinishLaunching中,我们找到了熟悉的CCDirector(导演),当中pScene为起始页面。很显然HelloWorld类,需要在AppDelegate.cpp中引用Classes文件夹中的HelloWorldScene.h头文件(fei话,呵呵)。

HelloWorldScene
scene()方法
主要负责将Layer层通过addChild到Scene层

init()方法
主要将Layer层以下层内容添加到Layer层。
- bool HelloWorld::init()
- {
- bool bRet = false;
- do
- {
- if ( !CCLayer::init() )
- {
- break;
- }
- this->setIsTouchEnabled(true);
- CCSize screenSize = CCDirector::sharedDirector()->getWinSize();
- // 1. Add a menu item with "X" image, which is clicked to quit the program.
- // Create a "close" menu item with close icon, it's an auto release object.
- CCMenuItemImage *pCloseItem = CCMenuItemImage::itemFromNormalImage(
- "CloseNormal.png",
- "CloseSelected.png",
- this,
- menu_selector(HelloWorld::menuCloseCallback));
- CC_BREAK_IF(! pCloseItem);
- // Place the menu item bottom-right conner.
- pCloseItem->setPosition(ccp(CCDirector::sharedDirector()->getWinSize().width - , ));
- // Create a menu with the "close" menu item, it's an auto release object.
- CCMenu* pMenu = CCMenu::menuWithItems(pCloseItem, NULL);
- pMenu->setPosition(CCPointZero);
- CC_BREAK_IF(! pMenu);
- // Add the menu to HelloWorld layer as a child layer.
- this->addChild(pMenu, );
- // 2. Add a label shows "Hello World".
- // Create a label and initialize with string "Hello World".
- CCLabelTTF* pLabel = CCLabelTTF::labelWithString("Hello World", "Arial", );
- CC_BREAK_IF(! pLabel);
- // Get window size and place the label upper.
- CCSize size = CCDirector::sharedDirector()->getWinSize();
- pLabel->setPosition(ccp(size.width / , size.height - ));
- // Add the label to HelloWorld layer as a child layer.
- this->addChild(pLabel, );
- // 3. Add add a splash screen, show the cocos2d splash image.
- CCSprite* pSprite = CCSprite::spriteWithFile("HelloWorld.png");
- CC_BREAK_IF(! pSprite);
- // Place the sprite on the center of the screen
- pSprite->setPosition(ccp(size.width/, size.height/));
- // Add the sprite to HelloWorld layer as a child layer.
- this->addChild(pSprite, );
- bRet = true;
- } while ();
- return bRet;
- }
HelloWorldScene.h完整代码
- #ifndef __HELLOWORLD_SCENE_H__
- #define __HELLOWORLD_SCENE_H__
- #include "cocos2d.h"
- #include "SimpleAudioEngine.h"
- class HelloWorld : public cocos2d::CCLayer
- {
- public:
- HelloWorld();
- ~HelloWorld();
- // Here's a difference. Method 'init' in cocos2d-x returns bool, instead of returning 'id' in cocos2d-iphone
- virtual bool init();
- // there's no 'id' in cpp, so we recommand to return the exactly class pointer
- static cocos2d::CCScene* scene();
- // a selector callback
- void menuCloseCallback(CCObject* pSender);
- // implement the "static node()" method manually
- LAYER_NODE_FUNC(HelloWorld);
- };
- #endif // __HELLOWORLD_SCENE_H__
HelloWorldScene.cpp完整代码
- #include "pch.h"
- #include "HelloWorldScene.h"
- using namespace cocos2d;
- HelloWorld::~HelloWorld()
- {
- // cpp don't need to call super dealloc
- // virtual destructor will do this
- }
- HelloWorld::HelloWorld()
- {
- }
- CCScene* HelloWorld::scene()
- {
- CCScene * scene = NULL;
- do
- {
- // 'scene' is an autorelease object
- scene = CCScene::node();
- CC_BREAK_IF(! scene);
- // 'layer' is an autorelease object
- HelloWorld *layer = HelloWorld::node();
- CC_BREAK_IF(! layer);
- // add layer as a child to scene
- scene->addChild(layer);
- } while ();
- // return the scene
- return scene;
- }
- // on "init" you need to initialize your instance
- bool HelloWorld::init()
- {
- bool bRet = false;
- do
- {
- if ( !CCLayer::init() )
- {
- break;
- }
- this->setIsTouchEnabled(true);
- CCSize screenSize = CCDirector::sharedDirector()->getWinSize();
- // 1. Add a menu item with "X" image, which is clicked to quit the program.
- // Create a "close" menu item with close icon, it's an auto release object.
- CCMenuItemImage *pCloseItem = CCMenuItemImage::itemFromNormalImage(
- "CloseNormal.png",
- "CloseSelected.png",
- this,
- menu_selector(HelloWorld::menuCloseCallback));
- CC_BREAK_IF(! pCloseItem);
- // Place the menu item bottom-right conner.
- pCloseItem->setPosition(ccp(CCDirector::sharedDirector()->getWinSize().width - , ));
- // Create a menu with the "close" menu item, it's an auto release object.
- CCMenu* pMenu = CCMenu::menuWithItems(pCloseItem, NULL);
- pMenu->setPosition(CCPointZero);
- CC_BREAK_IF(! pMenu);
- // Add the menu to HelloWorld layer as a child layer.
- this->addChild(pMenu, );
- // 2. Add a label shows "Hello World".
- // Create a label and initialize with string "Hello World".
- CCLabelTTF* pLabel = CCLabelTTF::labelWithString("Hello World", "Arial", );
- CC_BREAK_IF(! pLabel);
- // Get window size and place the label upper.
- CCSize size = CCDirector::sharedDirector()->getWinSize();
- pLabel->setPosition(ccp(size.width / , size.height - ));
- // Add the label to HelloWorld layer as a child layer.
- this->addChild(pLabel, );
- // 3. Add add a splash screen, show the cocos2d splash image.
- CCSprite* pSprite = CCSprite::spriteWithFile("HelloWorld.png");
- CC_BREAK_IF(! pSprite);
- // Place the sprite on the center of the screen
- pSprite->setPosition(ccp(size.width/, size.height/));
- // Add the sprite to HelloWorld layer as a child layer.
- this->addChild(pSprite, );
- bRet = true;
- } while ();
- return bRet;
- }
- void HelloWorld::menuCloseCallback(CCObject* pSender)
- {
- // "close" menu item clicked
- CCDirector::sharedDirector()->end();
- }

版本cocos2dx-0.13.0-wp8-0.8似乎不怎么给力,Lumia820真机上测试不通过,模拟器没任何问题。不过快有新版本出来了吧,现在凑合学习学习。
著作权声明:本文由http://www.cnblogs.com/suguoqiang 原创,欢迎转载分享。请尊重作者劳动,转载时保留该声明和作者博客链接,谢谢!
Learning Cocos2d-x for WP8(2)——深入刨析Hello World的更多相关文章
- Orchard 刨析:Logging
最近事情比较多,有预研的,有目前正在研发的,都是很需要时间的工作,所以导致这周只写了两篇Orchard系列的文章,这边不能保证后期会很频繁的更新该系列,但我会写完这整个系列,包括后面会把正在研发的东西 ...
- Orchard 刨析:Caching
关于Orchard中的Caching组件已经有一些文章做了介绍,为了系列的完整性会再次对Caching组件进行一次介绍. 缓存的使用 在Orchard看到如下一段代码: 可以看到使用缓存的方法Get而 ...
- Orchard 刨析:导航篇
之前承诺过针对Orchard Framework写一个系列.本应该在昨天写下这篇导航篇,不过昨天比较累偷懒的去玩了两盘单机游戏哈哈.下面进入正题. 写在前面 面向读者 之前和本文一再以Orchard ...
- MapReduce源码刨析
MapReduce编程刨析: Map map函数是对一些独立元素组成的概念列表(如单词计数中每行数据形成的列表)的每一个元素进行指定的操作(如把每行数据拆分成不同单词,并把每个单词计数为1),用户可以 ...
- Apollo 刨析:Localization
九月 30 2014 11:27 上午 admin 0 Comments 今天我们来看一看Apollo中的Localization Component. 本地化在Apollo中的使用 像这样的 ...
- 30s源码刨析系列之函数篇
前言 由浅入深.逐个击破 30SecondsOfCode 中函数系列所有源码片段,带你领略源码之美. 本系列是对名库 30SecondsOfCode 的深入刨析. 本篇是其中的函数篇,可以在极短的时间 ...
- Golang 性能测试 (3) 跟踪刨析 golang trace
简介 对于绝大部分服务,跟踪刨析是用不到的.但是如果遇到了下面问题,可以不妨一试: 怀疑哪个协程慢了 系统调用有问题 协程调度问题 (chan 交互.互斥锁.信号量等) 怀疑是 gc (Garbage ...
- 温故知新-多线程-深入刨析volatile关键词
文章目录 摘要 volatile的作用 volatile如何解决线程可见? CPU Cache CPU Cache & 主内存 缓存一致性协议 volatile如何解决指令重排序? volat ...
- 深入刨析tomcat 之---第8篇 how tomcat works 第11章 11.9应用程序,自定义Filter,及注册
writed by 张艳涛, 标签:全网独一份, 自定义一个Filter 起因:在学习深入刨析tomcat的学习中,第11章,说了调用过滤链的原理,但没有给出实例来,自己经过分析,给出来了一个Filt ...
随机推荐
- Swift - 发送消息(文本,图片,文件等)给微信好友或分享到朋友圈
通过调用微信提供的API接口,我们可以很方便的在应用中发送消息给微信好友,或者分享到朋友圈.在微信开发平台(https://open.weixin.qq.com)里,提供了详细的说明文档和样例.但由于 ...
- (Relax 数论1.6)POJ 1061 青蛙的约会(扩展的欧几里得公式)
/* * POJ_1061.cpp * * Created on: 2013年11月19日 * Author: Administrator */ #include <iostream> # ...
- 计算机内存碎片(中)——外部碎片化(内存 & 文件系统 & 数据库系统通杀)
本文原创为freas_1990,转载请标明出处:http://blog.csdn.net/freas_1990/article/details/17252221 外部碎片化 当计算机内存被划分成很细碎 ...
- Lucene.Net 2.3.1开发介绍 —— 三、索引(三)
原文:Lucene.Net 2.3.1开发介绍 -- 三.索引(三) 3.Field配置所产生的效果 索引数据,简单的代码,只要两个方法就搞定了,而在索引过程中用到的一些类里最简单,作用也不小的就是F ...
- c++ :: 域操作符
c++ :: 域操作符 作用域:变量在程序中的起作用范围简单分为:全局作用域,局部作用域,语句作用域作用域优先级:范围越小优先级越高作用域运算符:"::" 如果希望在局部变量的作用 ...
- IOS 后台执行 播放音乐
iOS 4開始引入的multitask.我们能够实现像ipod程序那样在后台播放音频了. 假设音频操作是用苹果官方的AVFoundation.framework实现.像用AvAudioPlayer.A ...
- Swift - 使用UIScrollView实现页面滚动切换
UIScrollView提供了以页面为单位滚动显示各个子页面内容的功能,每次手指滑动后会滚动一屏的内容. 要实现该功能,需要如下操作: 1,将UIScrollView的pagingEnabled属 ...
- js弹出对话框,遮罩效果,
刚刚来到实习单位,我跟着廖哥做项目.然后他分配给我一个小小的任务,实现起来总的效果如下: 然后,但我们单击显示数目这个链接的时候,就会弹出一个又遮罩效果的对话框,如下图: 当我们在对话框中再点击里面的 ...
- 如何利用Win32API取得另一支程式中的ListView內的所有值(RegisterHotKey,ReadProcessMemory,WindowFromPoint和VirtualAllocEx)
http://blog.csdn.net/shuaihj/article/details/6129506
- 利用PHP SOAP扩展实现简单Web Services
原文:利用PHP SOAP扩展实现简单Web Services WebServices能干什么? WebServices 可以将应用程序转换为网络应用程序. 通过使用 WebServices,您的应用 ...
