微服务SpringCloud之Spring Cloud Config配置中心服务化
在前面两篇Spring Cloud Config配置中心的博客中都是需要指定配置服务的地址url:spring.cloud.config.uri,客户端都是直接调用配置中心的server端来获取配置文件信息。如果server端要做集群,客户端只能通过原始的方式来路由,server端改变IP地址的时候,客户端也需要修改配置,不符合springcloud服务治理的理念。springcloud提供了这样的解决方案,我们只需要将server端当做一个服务注册到eureka中,client端去eureka中去获取配置中心server端的服务既可。
一、Server端改造
1.添加依赖
在SpringCloudConfigServer项目中,添加spring-cloud-starter-netflix-eureka-client引用。
<dependency>

    <groupId>org.springframework.cloud</groupId>

    <artifactId>spring-cloud-starter-netflix-eureka-client</artifactId>

</dependency>
<?xml version="1.0" encoding="UTF-8"?>

<project xmlns="http://maven.apache.org/POM/4.0.0" xmlns:xsi="http://www.w3.org/2001/XMLSchema-instance"

    xsi:schemaLocation="http://maven.apache.org/POM/4.0.0 http://maven.apache.org/xsd/maven-4.0.0.xsd">

    <modelVersion>4.0.0</modelVersion>

    <parent>

        <groupId>org.springframework.boot</groupId>

        <artifactId>spring-boot-starter-parent</artifactId>

        <version>2.1.6.RELEASE</version>

        <relativePath/> <!-- lookup parent from repository -->

    </parent>

    <groupId>com.example</groupId>

    <artifactId>SpringCloudConfigServer</artifactId>

    <version>0.0.1-SNAPSHOT</version>

    <packaging>war</packaging>

    <name>SpringCloudConfigServer</name>

    <description>Demo project for Spring Boot</description>

    <properties>

        <java.version>1.8</java.version>

        <spring-cloud.version>Greenwich.SR2</spring-cloud.version>

    </properties>

    <dependencies>

        <dependency>

            <groupId>org.springframework.boot</groupId>

            <artifactId>spring-boot-starter-web</artifactId>

        </dependency>

        <dependency>

            <groupId>org.springframework.cloud</groupId>

            <artifactId>spring-cloud-config-server</artifactId>

        </dependency>

<dependency>

    <groupId>org.springframework.cloud</groupId>

    <artifactId>spring-cloud-starter-netflix-eureka-client</artifactId>

</dependency>

        <dependency>

            <groupId>org.springframework.boot</groupId>

            <artifactId>spring-boot-starter-tomcat</artifactId>

            <scope>provided</scope>

        </dependency>

        <dependency>

            <groupId>org.springframework.boot</groupId>

            <artifactId>spring-boot-starter-test</artifactId>

            <scope>test</scope>

        </dependency>

    </dependencies>

    <dependencyManagement>

        <dependencies>

            <dependency>

                <groupId>org.springframework.cloud</groupId>

                <artifactId>spring-cloud-dependencies</artifactId>

                <version>${spring-cloud.version}</version>

                <type>pom</type>

                <scope>import</scope>

            </dependency>

        </dependencies>

    </dependencyManagement>

    <build>

        <plugins>

            <plugin>

                <groupId>org.springframework.boot</groupId>

                <artifactId>spring-boot-maven-plugin</artifactId>

            </plugin>

        </plugins>

    </build>

</project>
2.增加了eureka注册中心的配置
在application.properties中增加eureka注册中心的配置,http://localhost:8088是后面启动的eureka server的地址
eureka.client.serviceUrl.defaultZone=http://localhost:8088/eureka/
3.增加注解
在main方法中增加@EnableDiscoveryClient注解
二、客户端改造
1、添加依赖
也是引入spring-cloud-starter-netflix-eureka-client。
<dependency>

    <groupId>org.springframework.cloud</groupId>

    <artifactId>spring-cloud-starter-netflix-eureka-client</artifactId>

</dependency>
<?xml version="1.0" encoding="UTF-8"?>

<project xmlns="http://maven.apache.org/POM/4.0.0" xmlns:xsi="http://www.w3.org/2001/XMLSchema-instance"

    xsi:schemaLocation="http://maven.apache.org/POM/4.0.0 http://maven.apache.org/xsd/maven-4.0.0.xsd">

    <modelVersion>4.0.0</modelVersion>

    <parent>

        <groupId>org.springframework.boot</groupId>

        <artifactId>spring-boot-starter-parent</artifactId>

        <version>2.1.6.RELEASE</version>

        <relativePath/> <!-- lookup parent from repository -->

    </parent>

    <groupId>com.example</groupId>

    <artifactId>SpringCloudConfigClient</artifactId>

    <version>0.0.1-SNAPSHOT</version>

    <packaging>war</packaging>

    <name>SpringCloudConfigClient</name>

    <description>Demo project for Spring Boot</description>

    <properties>

        <java.version>1.8</java.version>

        <spring-cloud.version>Greenwich.SR2</spring-cloud.version>

    </properties>

    <dependencies>

        <dependency>

            <groupId>org.springframework.boot</groupId>

            <artifactId>spring-boot-starter-web</artifactId>

        </dependency>

        <dependency>

            <groupId>org.springframework.cloud</groupId>

            <artifactId>spring-cloud-starter-config</artifactId>

        </dependency>

<dependency>

  <groupId>org.springframework.boot</groupId>

  <artifactId>spring-boot-starter-actuator</artifactId>

</dependency>

<dependency>

    <groupId>org.springframework.cloud</groupId>

    <artifactId>spring-cloud-starter-netflix-eureka-client</artifactId>

</dependency>

        <dependency>

            <groupId>org.springframework.boot</groupId>

            <artifactId>spring-boot-starter-tomcat</artifactId>

            <scope>provided</scope>

        </dependency>

        <dependency>

            <groupId>org.springframework.boot</groupId>

            <artifactId>spring-boot-starter-test</artifactId>

            <scope>test</scope>

        </dependency>

    </dependencies>

    <dependencyManagement>

        <dependencies>

            <dependency>

                <groupId>org.springframework.cloud</groupId>

                <artifactId>spring-cloud-dependencies</artifactId>

                <version>${spring-cloud.version}</version>

                <type>pom</type>

                <scope>import</scope>

            </dependency>

        </dependencies>

    </dependencyManagement>

    <build>

        <plugins>

            <plugin>

                <groupId>org.springframework.boot</groupId>

                <artifactId>spring-boot-maven-plugin</artifactId>

            </plugin>

        </plugins>

    </build>

</project>
2.配置文件
在bootstrap.properties中去掉指定配置服务的地址url,增加了最后的三个配置:
spring.cloud.config.name=neo-config

spring.cloud.config.profile=dev

spring.cloud.config.label=

spring.cloud.config.discovery.enabled=true

spring.cloud.config.discovery.serviceId=spring-cloud-config-server

eureka.client.serviceUrl.defaultZone=http://localhost:8088/eureka/
spring.cloud.config.discovery.enabled :开启Config服务发现支持
spring.cloud.config.discovery.serviceId :指定server端的name,也就是server端spring.application.name的值
eureka.client.serviceUrl.defaultZone :指向注册中心的地址
3.启动类增加注解
在main方法中增加注解@EnableDiscoveryClient。
三、测试
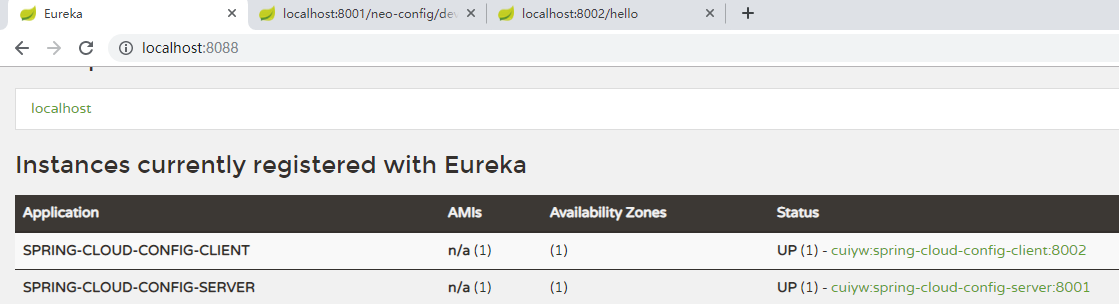
1.分别启动eureka server、SpringCloudConfigServer、SpringCloudConfigClient。
2.浏览器输入http://localhost:8088/,可以看到注入到eureka server中的服务。
3.输入http://localhost:8001/neo-config/dev,可以看到配置文件的配置信息。

4.输入http://localhost:8002/hello,可以读取到配置文件的属性信息

参考:http://www.ityouknow.com/springcloud/2017/05/25/springcloud-config-eureka.html
微服务SpringCloud之Spring Cloud Config配置中心服务化的更多相关文章
- 微服务SpringCloud之Spring Cloud Config配置中心Git
微服务以单个接口为颗粒度,一个接口可能就是一个项目,如果每个项目都包含一个配置文件,一个系统可能有几十或上百个小项目组成,那配置文件也会有好多,对后续修改维护也是比较麻烦,就和前面的服务注册一样,服务 ...
- 微服务SpringCloud之Spring Cloud Config配置中心SVN
在回来的路上看到一个个的都抱着花,吃了一路的狗粮,原本想着去旁边的工业园里跑跑步呢,想想还是算了,人家过七夕,俺们过巴西.上一博客学习了Spring Cloud Config使用git作为配置中心,本 ...
- 跟我学SpringCloud | 第七篇:Spring Cloud Config 配置中心高可用和refresh
SpringCloud系列教程 | 第七篇:Spring Cloud Config 配置中心高可用和refresh Springboot: 2.1.6.RELEASE SpringCloud: Gre ...
- spring cloud --- config 配置中心 [本地、git获取配置文件]
spring boot 1.5.9.RELEASE spring cloud Dalston.SR1 1.前言 spring cloud config 配置中心是什么? 为了统一管理配 ...
- SpringCloud学习笔记(7):使用Spring Cloud Config配置中心
简介 Spring Cloud Config为分布式系统中的外部化配置提供了服务器端和客户端支持,服务器端统一管理所有配置文件,客户端在启动时从服务端获取配置信息.服务器端有多种配置方式,如将配置文件 ...
- Spring Cloud Config 配置中心实践过程中,你需要了解这些细节!
本文导读: Spring Cloud Config 基本概念 Spring Cloud Config 客户端加载流程 Spring Cloud Config 基于消息总线配置 Spring Cloud ...
- Spring Cloud Config 配置中心高可用
详细参见 <Spring Cloud 与 Docker微服务架构实战> p163-9.10 Spring Cloud Config 与 Eureka 配合使用 p163-9.12 Conf ...
- Spring Cloud Config 配置中心 自动加解密功能 jasypt方式
使用此种方式会存在一种问题:如果我配置了自动配置刷新,则刷新过后,加密过后的密文无法被解密.具体原因分析,看 SpringCloud 详解配置刷新的原理 使用 jasypt-spring-boot- ...
- Spring Cloud Config 配置中心
请将远程配置文件的格式写对: 比如使用 *.yml 或者 *.properties yml: testconfig: testvalue properties: testconfig=testvalu ...
随机推荐
- list模板题
题面: 设计一个int类型的动态链表L,L中有一个代表当前位置的光标,支持下列操作: insert(x): 在光标前面插入元素x,插入后光标指向新插入的元素x move(d): 如果d为正数,则光标向 ...
- deque双端队列笔记
clear()clear()clear():清空队列 pushpushpush_back()back()back():从尾部插入一个元素. pushpushpush_front()front()fro ...
- 比赛:大奔的方案solution
分析: 此题是小奔的方案的改进.小奔的方案思路:倒推,每次都从小到大排序并且保证小号在前,然后使每一个人分到的金币都是上一次加一,直到金币分完或者自己可以存活(投票率大于等于所需概率),如果不行就-1 ...
- 一个测试文件与源文件位于不同模块时Jacoco覆盖率配置的例子
问题描述: 我们有个多模块项目,由于种种原因(更常见的可能是需要集成测试)测试文件和源文件不在一个模块,Jacoco的覆盖率无法正确显示,查询了一些资料,发现中文的例子比较少,就把我自己的Demo贴一 ...
- SQLyog12最新版破解
1.SQLyog-12.2.4-0.x64Trial.exe,直接去官网下载. 2.修改注册表项 开始-运行-regedit ,进入注册表 HKEY_CURRENT_USER\Software\ ...
- 数据库---T-SQL语句(一)
一.T-SQL语句 1.创建表:create table Name(Code varchar(50),) 主键:primary key 自增长:auto_increment 外键关系:referenc ...
- 动手造轮子:基于 Redis 实现 EventBus
动手造轮子:基于 Redis 实现 EventBus Intro 上次我们造了一个简单的基于内存的 EventBus,但是如果要跨系统的话就不合适了,所以有了这篇基于 Redis 的 EventBus ...
- python常用函数进阶(2)之map,filter,reduce,zip
Basic Python : Map, Filter, Reduce, Zip 1-Map() 1.1 Syntax # fun : a function applying to the iterab ...
- Shell基本语法---shell的变量以及常见符号
变量 1. 不同于其它语言需要先声明变量 2 .等号的两边不能有空格 3. 调用变量: $a 或者 ${a} a=; echo $a; echo ${a} 变量 变量意思 $? 判断上一条命令执行的 ...
- Django配置MySQL数据库
一.在settings.py中配置 DATABASES = { 'default': { 'ENGINE': 'django.db.backends.mysql', # 数据库引擎 'NAME': ' ...