【Android UI】自定义带按钮的标题栏
自定义标题栏在很多的android app中很常见,可以说是一种很有用的UI设计方法。自
己也本着学习的态度,经过一番各种坑,终于实现了,现总结如下:
一:大致流程
1. 对指定的android activity设置自定义主题风格,其中自定义主题风格是关键
在android 4.0以上版本中如果使用Theme.Holo或者Theme.Light等,程序会
一直报错误-you cannot combine custom title with other feature titles
2. 在对应的Activity中加入代码
- super.onCreate(savedInstanceState);
- requestWindowFeature(Window.FEATURE_CUSTOM_TITLE);
- setContentView(R.layout.main);
- getWindow().setFeatureInt(Window.FEATURE_CUSTOM_TITLE,R.layout.mycustomtitle);
3. 在styles.xml使用如下的自定义主题。
- <resources>
- <style name="WindowTitleBackground" >
- </style>
- <style name="MyTheme" parent="android:Theme">
- <item name="android:windowTitleSize">60dp</item>
- <item name="android:windowTitleBackgroundStyle">@style/WindowTitleBackground</item>
- </style>
- </resources>
二:测试MainActivity源代码
MainActivity.java
- package com.example.title_bar;
- import android.app.Activity;
- import android.content.Intent;
- import android.os.Bundle;
- import android.view.View;
- import android.view.View.OnClickListener;
- import android.view.Window;
- import android.widget.Button;
- public class MainActivity extends Activity {
- Button button;
- @Override
- protected void onCreate(Bundle savedInstanceState) {
- super.onCreate(savedInstanceState);
- requestWindowFeature(Window.FEATURE_CUSTOM_TITLE);
- setContentView(R.layout.activity_main);
- getWindow().setFeatureInt(Window.FEATURE_CUSTOM_TITLE,R.layout.titlebarstyle);
- button=(Button) findViewById(R.id.button1);
- button.setOnClickListener(new OnClickListener(){
- @Override
- public void onClick(View v) {
- // TODO Auto-generated method stub
- Intent intent=new Intent(MainActivity.this,test_title_bar.class);
- startActivity(intent);
- }
- });
- }
- }
test_title_bar.java
- package com.example.title_bar;
- import android.app.Activity;
- import android.os.Bundle;
- import android.view.Window;
- import android.widget.Button;
- import android.widget.TextView;
- public class test_title_bar extends Activity{
- @Override
- protected void onCreate(Bundle savedInstanceState) {
- super.onCreate(savedInstanceState);
- // 去标题
- //requestWindowFeature(Window.FEATURE_NO_TITLE);
- requestWindowFeature(Window.FEATURE_CUSTOM_TITLE);
- setContentView(R.layout.titlebartest);
- //设置标题为某个layout,标题样式
- getWindow().setFeatureInt(Window.FEATURE_CUSTOM_TITLE, R.layout.titlebarstyle);
- //设置标题栏的标题
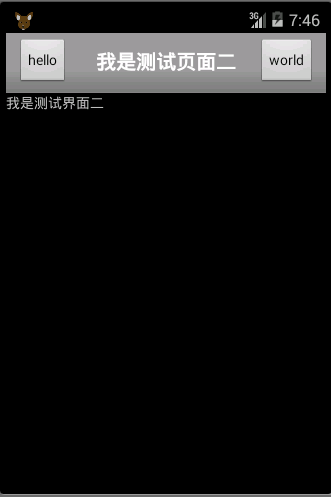
- settitle("hello","我是测试页面二","world");
- }
- private void settitle(String btn1str,String string,String btn2str) {
- // TODO Auto-generated method stub
- Button btnback=(Button) findViewById(R.id.back);
- Button btnnext=(Button) findViewById(R.id.next);
- TextView tvtitle=(TextView) findViewById(R.id.title);
- btnback.setText(btn1str);
- tvtitle.setText(string);
- btnnext.setText(btn2str);
- }
- }
三:XML资源文件
titlebarstyle.xml的内容
- <RelativeLayout xmlns:android="http://schemas.android.com/apk/res/android"
- android:layout_width="fill_parent"
- android:layout_gravity="fill_horizontal"
- android:orientation="horizontal"
- android:layout_height="fill_parent" >
- <Button android:id="@+id/header_left_btn"
- android:layout_width="wrap_content"
- android:layout_height="wrap_content"
- android:layout_alignParentLeft="true"
- android:layout_marginLeft="5dp"
- android:layout_centerVertical="true"
- android:text="back"
- android:textColor="#000000"/>
- <TextView android:id="@+id/header_text"
- android:layout_width="fill_parent"
- android:layout_height="fill_parent"
- android:layout_toRightOf="@+id/header_left_btn"
- android:layout_toLeftOf="@+id/header_right_btn"
- android:text="My Title Bar"
- android:textSize="20sp"
- android:textStyle="bold"
- android:textColor="#FFFFFF"
- android:gravity="center"
- android:layout_centerHorizontal="true"
- android:layout_centerVertical="true"
- android:singleLine="true" />
- <Button android:id="@+id/header_right_btn"
- android:layout_width="wrap_content"
- android:layout_height="wrap_content"
- android:layout_alignParentRight="true"
- android:layout_marginRight="5dp"
- android:layout_centerVertical="true"
- android:text="next"
- android:textColor="#000000"/>
- </RelativeLayout>
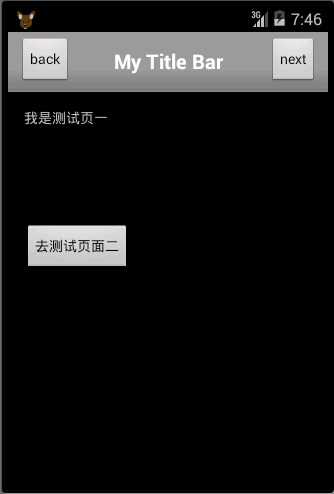
activity_main.xml
- <RelativeLayout xmlns:android="http://schemas.android.com/apk/res/android"
- xmlns:tools="http://schemas.android.com/tools"
- android:layout_width="match_parent"
- android:layout_height="match_parent"
- android:paddingBottom="@dimen/activity_vertical_margin"
- android:paddingLeft="@dimen/activity_horizontal_margin"
- android:paddingRight="@dimen/activity_horizontal_margin"
- android:paddingTop="@dimen/activity_vertical_margin"
- tools:context="com.example.title_bar.MainActivity" >
- <TextView
- android:id="@+id/textView1"
- android:layout_width="wrap_content"
- android:layout_height="wrap_content"
- android:text="我是测试页一" />
- <Button
- android:id="@+id/button1"
- android:layout_width="wrap_content"
- android:layout_height="wrap_content"
- android:layout_below="@+id/textView1"
- android:layout_marginTop="97dp"
- android:text="去测试页面二" />
- </RelativeLayout>
titlebartest.xml
- <?xml version="1.0" encoding="utf-8"?>
- <LinearLayout xmlns:android="http://schemas.android.com/apk/res/android"
- android:layout_width="match_parent"
- android:layout_height="match_parent"
- android:orientation="vertical" >
- <TextView
- android:id="@+id/textView1"
- android:layout_width="wrap_content"
- android:layout_height="wrap_content"
- android:text="我是测试界面二" />
- </LinearLayout>
最后别忘记在android的manifest配置文件中加上自定义的主题
- android:theme="@style/MyTheme"
界面一:
界面二:
【Android UI】自定义带按钮的标题栏的更多相关文章
- Android实现自定义带文字和图片的Button
Android实现自定义带文字和图片的Button 在Android开发中经常会需要用到带文字和图片的button,下面来讲解一下常用的实现办法. 一.用系统自带的Button实现 最简单的一种办法就 ...
- 【Android】Android实现自定义带文字和图片的Button
在Android开发中经常会需要用到带文字和图片的button,下面来讲解一下常用的实现办法. 一.用系统自带的Button实现 最简单的一种办法就是利用系统自带的Button来实现,这种方式代码量最 ...
- android 弹出带按钮的对话框
package com.example.helloworld; import android.os.Bundle;import android.app.Activity;import android. ...
- Android UI自定义Spinner下拉框(用popuwindow实现)-转
定义出第一个图片的布局和弹出框(一个listView)的布局,,这里就不在多说了~ListView需要自己定义一个MyspinnerAdapter~做好这些准备之后,就是弹出框的实现了~ prote ...
- [转]Android UI:看看Google官方自定义带旋转动画的ImageView-----RotateImageView怎么写(附 图片淡入淡出效果)
http://blog.csdn.net/yanzi1225627/article/details/22439119 众所周知,想要让ImageView旋转的话,可以用setRotation()让其围 ...
- Android UI:看看Google官方自定义带旋转动画的ImageView-----RotateImageView怎么写(附 图片淡入淡...)
众所周知,想要让ImageView旋转的话,可以用setRotation()让其围绕中心点旋转,但这个旋转是不带动画的,也就是旋转屏幕时图片噌的一下就转过去了,看不到旋转的过程,此UI体验不大好,为此 ...
- Android UI(五)云通讯录项目之联系人列表,带侧滑选择,带搜索框
作者:泥沙砖瓦浆木匠网站:http://blog.csdn.net/jeffli1993个人签名:打算起手不凡写出鸿篇巨作的人,往往坚持不了完成第一章节.交流QQ群:[编程之美 365234583]h ...
- Android UI 绘制过程浅析(五)自定义View
前言 这已经是Android UI 绘制过程浅析系列文章的第五篇了,不出意外的话也是最后一篇.再次声明一下,这一系列文章,是我在拜读了csdn大牛郭霖的博客文章<带你一步步深入了解View> ...
- Android 自定义Button按钮显示样式(正常、按下、获取焦点)
现在的用户对APP的外观看得很重要,如果APP内所有元件都用Android默认样式写,估计下面评论里就有一堆在骂UI丑的.今天学习自定义Button按钮样式.Button样式修改的是Button的背景 ...
随机推荐
- 为什么360、百度、腾讯出的Mac端云盘客户端都只有同步盘?(用户量小,同步盘开发成本低,Linux下都没有客户端)
如题,顾名思义,同步盘是用来同步的,不具备增量的功能,像这三家在Windows端出的客户端都是即有同步也有增量的. 陆续出来的,可能大家更多的是跟随策略,不得不提dropbox是这样的形式.mac电脑 ...
- Android零基础入门第75节:Activity状态和生命周期方法
前面两期我们学习了Activity的创建和注册.以及启动和关闭,也学会了重写onCraete方法,这些知识在实际开发中远远不够,还需要学习了解更多. 生命周期就是一个对象从创建到销毁的过程,每一个对象 ...
- SOA 相关开发调试软件
开发工具 IntelliJ IDEA:https://www.jetbrains.com/idea/ SOA调试 soapui:http://www.soapui.org/ wcfstorm:http ...
- Qt编程规范
一.概述 良好的编程规范可以大幅提高一个程序的可读性.可理解性和可维护性. 本规范参考Effective C++中文版.Google C++编码规范及Qt编码风格. 二.头文件 1) #de ...
- DI 容器实务建议
整理一些有关使用 DI 容器的一些建议事项,主要的参考数据源是 Jimmy Board 的文章:Container Usage Guidelines. 1.容器设定 避免对同一个组件(DLL)重复扫描 ...
- IT安全军火库-转
全球有260万信息安全专业人士,渗透测试工具是他们“安全军火库”中最常使用的装备,但直到最近,可用的渗透测试工具才丰富起来,但这也带来一个问题,挑选合适的渗透测试工具成了一件麻烦事,一个最简单的方法就 ...
- STL函数static void (* set_malloc_handler(void (*f)()))()与函数指针解析
在C++ STL的SGI实现版本中,一级空间配置器class __malloc_alloc_template中有一个静态函数的实现如下: static void (*set_malloc_handle ...
- 【原创】ABAP根据文件路径获取文件所在目录(续)
在上一篇文章<ABAP根据文件路径获取文件所在目录>中,我主要的思路是采用 “SPLIT dobj AT sep INTO TABLE result_tab” 句型将文件全路径按分隔符“\ ...
- c++ LeetCode (初级字符串篇) 九道算法例题代码详解(二)
原文作者:aircraft 原文链接:https://www.cnblogs.com/DOMLX/p/11089327.html 已经刷了很多篇leetcode题了,不过最近在找c++的实习工作(大佬 ...
- Python连载10-os包函数(续)
一.os包(接连载9) 1.函数:system() (1)用法:运行系统shell命令 (2)格式:os.system(系统命令) (3)返回值:打开一个shell或终端界面 (4)注意:一般是用su ...