abp(net core)+easyui+efcore实现仓储管理系统——使用 WEBAPI实现CURD (十四)
abp(net core)+easyui+efcore实现仓储管理系统目录
abp(net core)+easyui+efcore实现仓储管理系统——ABP总体介绍(一)
abp(net core)+easyui+efcore实现仓储管理系统——解决方案介绍(二)
abp(net core)+easyui+efcore实现仓储管理系统——领域层创建实体(三)
abp(net core)+easyui+efcore实现仓储管理系统——定义仓储并实现 (四)
abp(net core)+easyui+efcore实现仓储管理系统——创建应用服务(五)
abp(net core)+easyui+efcore实现仓储管理系统——展现层实现增删改查之控制器(六)
abp(net core)+easyui+efcore实现仓储管理系统——展现层实现增删改查之列表视图(七)
abp(net core)+easyui+efcore实现仓储管理系统——展现层实现增删改查之增删改视图(八)
abp(net core)+easyui+efcore实现仓储管理系统——展现层实现增删改查之菜单与测试(九)
abp(net core)+easyui+efcore实现仓储管理系统——多语言(十)
abp(net core)+easyui+efcore实现仓储管理系统——使用 WEBAPI实现CURD (十一)
abp(net core)+easyui+efcore实现仓储管理系统——使用 WEBAPI实现CURD (十二)
abp(net core)+easyui+efcore实现仓储管理系统——使用 WEBAPI实现CURD (十三)
上接(abp(net core)+easyui+efcore实现仓储管理系统——使用 WEBAPI实现CURD (十三)),在这一篇文章中我们实现新增供应商的相关功能。
九、新增供应商
(一) 创建js文件
我们先来看一下 “ABP.TPLMS.Web.Mvc”项目中的wwwroot目录下的view-resources\Users目录中的Index.js文件,然后参照此文件来写新增供应商的脚本文件。
1. 在Visual Studio 2017的“解决方案资源管理器”中,找到展现层“ABP.TPLMS.Web.Mvc”项目中的wwwroot目录下的view-resources目录。使用鼠标右键单击此目录,在弹出菜单中选择“添加” > “新建文件夹”。并重命名为“Supplier”。
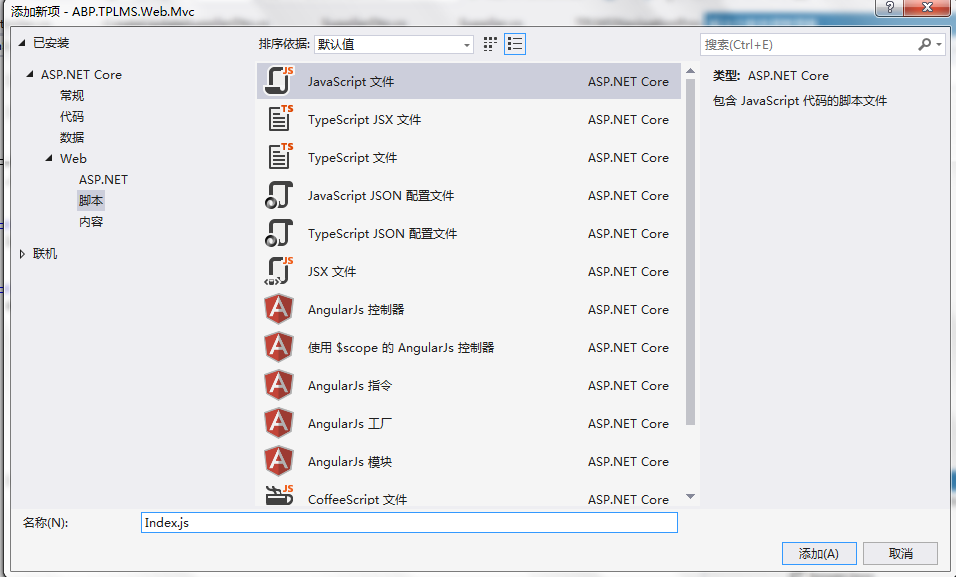
2. 在Visual Studio 2017的“解决方案资源管理器”中,鼠标右键单击“Supplier”文件夹,然后选择“添加” > “新建项…”。 在“添加新项-ABP.TPLMS.Web.Mvc”对话框中,选择“javascript文件”,并将名称命名为Index.js。如下图。
3. 在Index.js文件中,我们写入如下代码。
(function() {

    $(function() {

        var _supplierService = abp.services.app.supplier;

        var _$modal = $('#SupplierCreateModal');

        var _$form = _$modal.find('form');

        _$form.validate({

        });

        $('#RefreshButton').click(function () {

            refreshModuleList();

        });

        $('.delete-supplier').click(function () {

            var userId = $(this).attr("data-supplier-id");

            var userName = $(this).attr('data-supplier-name');

            deleteSupplier(userId, userName);

        });

        $('.edit-supplier').click(function (e) {

            var supplierId = $(this).attr("data-supplier-id");

            e.preventDefault();

            $.ajax({

                url: abp.appPath + 'Supplier/EditSupplierModal?supplierId=' + supplierId,

                type: 'POST',

                contentType: 'application/html',

                success: function (content) {

                    $('#SupplierEditModal div.modal-content').html(content);

                },

                error: function (e) { }

            });

        });

        _$form.find('button[type="submit"]').click(function (e) {

            e.preventDefault();

            if (!_$form.valid()) {

                return;

            }

            var supplier = _$form.serializeFormToObject(); //serializeFormToObject is defined in main.js

            abp.ui.setBusy(_$modal);

            _supplierService.create(supplier).done(function () {

                _$modal.modal('hide');

                location.reload(true); //reload page to see new user!

            }).always(function () {

                abp.ui.clearBusy(_$modal);

            });

        });

        _$modal.on('shown.bs.modal', function () {

            _$modal.find('input:not([type=hidden]):first').focus();

        });

        function refreshSupplierList() {

            location.reload(true); //reload page to see new user!

        }

        function deleteSupplier(supplierId, supplierName) {

            abp.message.confirm(

                abp.utils.formatString(abp.localization.localize('AreYouSureWantToDelete', 'TPLMS'), supplierName),

                function (isConfirmed) {

                    if (isConfirmed) {

                        _supplierService.delete({

                            id: supplierId

                        }).done(function () {

                            refreshSupplierList();

                        });

                    }

                }

            );

        }

    });

})();
4. 在Visual Studio 2017的“解决方案资源管理器”中,找到“ABP.TPLMS.Web.Mvc”项目中的Views目录下的Supplier目录中的Index.cshtml文件。双击打开此文件,并写入以下代码,引用脚本。
@section scripts    {

        <script src="~/view-resources/Views/Supplier/Index.js" asp-append-version="true"></script>   }
(二)创建新增供应商视图
1. 在Visual Studio 2017的“解决方案资源管理器”中,找到“ABP.TPLMS.Web.Mvc”项目中的Views目录下的Supplier目录中的Index.cshtml文件。双击打开此文件,并写入以下代码。
<div class="modal fade" id="SupplierCreateModal" tabindex="-1" role="dialog"
aria-labelledby="SupplierCreateModalLabel" data-backdrop="static">

    <div class="modal-dialog" role="document">

        <div class="modal-content">

            <div class="modal-header">

                <h4 class="modal-title">

                    <span>@L("CreateNewSupplier")</span>

                </h4>

            </div>

            <div class="modal-body">

                <form name="SupplierCreateForm" role="form"  class="form-validation">

                    <div>

                        <div class="row clearfix">

                            <div class="col-sm-6">

                                <div class="form-group form-float">

                                    <div class="form-line">

                                        <label asp-for="@Model.Supplier.Code" class="form-label"></label>

                                        <input type="text" name="Code" class="form-control" required maxlength="50" />

                                    </div>

                                </div>

                            </div>

                            <div class="col-sm-6">

                                <div class="form-group form-float">

                                    <div class="form-line">

                                        <label asp-for="@Model.Supplier.Name" class="form-label"></label>

                                        <input type="text" name="Name" class="form-control" required maxlength="50" />

                                    </div>

                                </div>

                            </div>

                        </div>

                        <div class="row clearfix">

                            <div class="col-sm-12">

                                <div class="form-group form-float">

                                    <div class="form-line">

                                        <label asp-for="@Model.Supplier.Address" class="form-label"></label>

                                        <input type="text" name="Address" class="form-control" required maxlength="255" />

                                    </div>

                                </div>

                            </div>

                        </div>

                        <div class="row clearfix">

                            <div class="col-sm-6">

                                <div class="form-group form-float">

                                    <div class="form-line">

                                        <label asp-for="@Model.Supplier.LinkName" class="form-label"></label>

                                        <input type="text" name="LinkName" class="form-control" />

                                    </div>

                                </div>

                            </div>

                            <div class="col-sm-6">

                                <div class="form-group form-float">

                                    <div class="form-line">

                                        <label asp-for="@Model.Supplier.Mobile" class="form-label"></label>

                                        <input type="text" name="Mobile" class="form-control" />

                                    </div>

                                </div>

                            </div>

                        </div>

                        <div class="row clearfix">

                            <div class="col-sm-6">

                                <div class="form-group form-float">

                                    <div class="form-line">

                                        <label asp-for="@Model.Supplier.Tel" class="form-label"></label>

                                        <input type="text" name="Tel" class="form-control" required maxlength="255" />

                                    </div>

                                </div>

                            </div>

                            <div class="col-sm-6">

                                <div class="form-group form-float">

                                    <div class="form-line">

                                         <label asp-for="@Model.Supplier.Status" class="form-label"></label>

                                        <input type="text" name="Status" class="form-control" />

                                    </div>

                                </div>

                            </div>

                        </div>

                        <div class="row clearfix">

                            <div class="col-sm-6">

                                <div class="form-line">

                                    <label asp-for="@Model.Supplier.Sex"></label>

                                    <input name="Sex" type="text" class="form-control" />

                                </div>

                            </div>

                            <div class="col-sm-6">

                                <div class="form-line">

                                    <label asp-for="@Model.Supplier.Email"></label>

                                    <input name="Email" type="text" class="form-control" />

                                </div>

                            </div>

                        </div>

                    </div>

                    <div class="modal-footer">

                        <button type="button" class="btn btn-default waves-effect" data-dismiss="modal">@L("Cancel")</button>

                        <button type="submit" class="btn btn-primary waves-effect">@L("Save")</button>

                    </div>

                </form>

            </div>

        </div>

    </div>

</div>
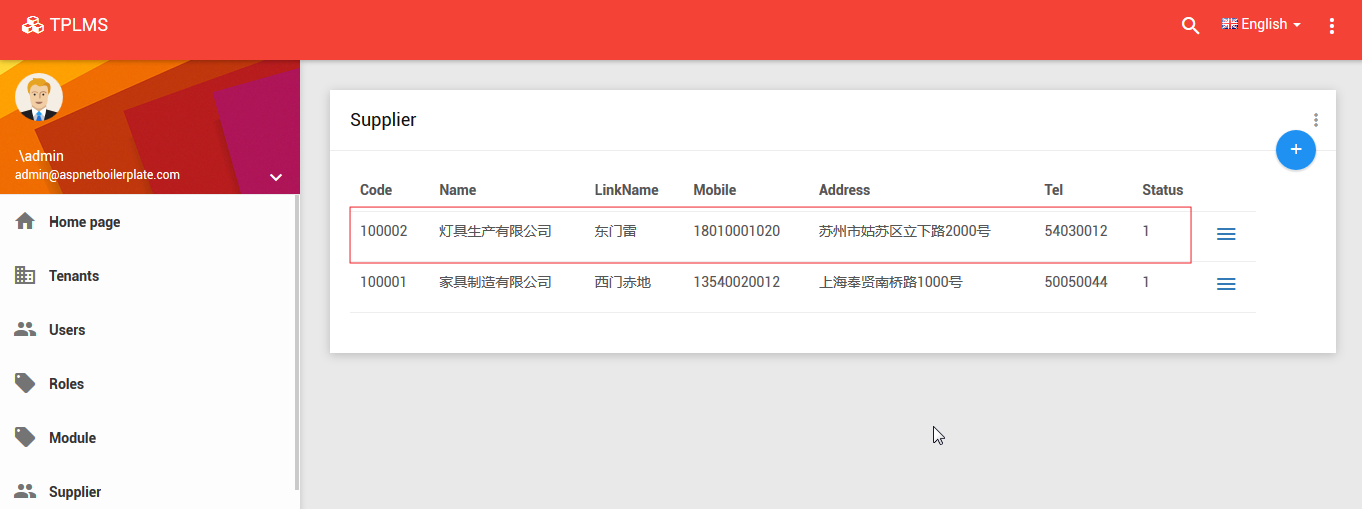
2. 在Visual Studio 2017中按F5运行应用程序。登录之后,点击“Supplier”目录,我们可以看到供应商列表页面。然后点击供应商列表页面中的新增按钮。如下图。
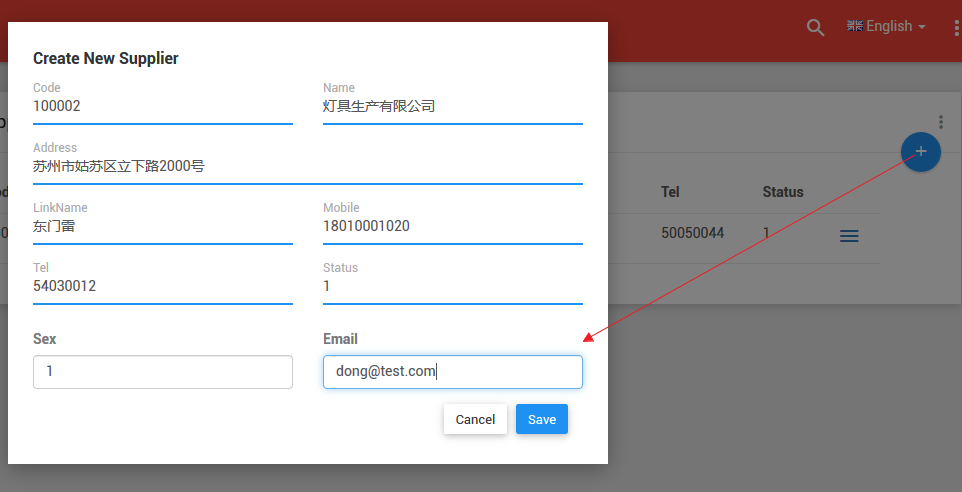
3. 在“Create New Supplier”页面中我们输入完信息之后,点击“Save”按钮。数据保存到数据库,应用会刷新供应商列表页面。如下图。
abp(net core)+easyui+efcore实现仓储管理系统——使用 WEBAPI实现CURD (十四)的更多相关文章
- abp(net core)+easyui+efcore实现仓储管理系统——使用 WEBAPI实现CURD (十五)
core)+easyui+efcore实现仓储管理系统目录 abp(net core)+easyui+efcore实现仓储管理系统——ABP总体介绍(一) abp(net core)+easyui+e ...
- abp(net core)+easyui+efcore实现仓储管理系统——使用 WEBAPI实现CURD (十二)
abp(net core)+easyui+efcore实现仓储管理系统目录 abp(net core)+easyui+efcore实现仓储管理系统——ABP总体介绍(一) abp(net core)+ ...
- abp(net core)+easyui+efcore实现仓储管理系统——使用 WEBAPI实现CURD (十三)
abp(net core)+easyui+efcore实现仓储管理系统目录 abp(net core)+easyui+efcore实现仓储管理系统——ABP总体介绍(一) abp(net core)+ ...
- abp(net core)+easyui+efcore实现仓储管理系统——出库管理之五(五十四)
abp(net core)+easyui+efcore实现仓储管理系统目录 abp(net core)+easyui+efcore实现仓储管理系统--ABP总体介绍(一) abp(net core)+ ...
- abp(net core)+easyui+efcore实现仓储管理系统——使用 WEBAPI实现CURD (十一)
abp(net core)+easyui+efcore实现仓储管理系统目录 abp(net core)+easyui+efcore实现仓储管理系统——ABP总体介绍(一) abp(net core)+ ...
- abp(net core)+easyui+efcore实现仓储管理系统——出库管理之三(五十二)
abp(net core)+easyui+efcore实现仓储管理系统目录 abp(net core)+easyui+efcore实现仓储管理系统--ABP总体介绍(一) abp(net core)+ ...
- abp(net core)+easyui+efcore实现仓储管理系统——出库管理之六(五十五)
abp(net core)+easyui+efcore实现仓储管理系统目录 abp(net core)+easyui+efcore实现仓储管理系统--ABP总体介绍(一) abp(net core)+ ...
- Abp(net core)+easyui+efcore实现仓储管理系统——出库管理之七(五十六)
abp(net core)+easyui+efcore实现仓储管理系统目录 abp(net core)+easyui+efcore实现仓储管理系统--ABP总体介绍(一) abp(net core)+ ...
- abp(net core)+easyui+efcore实现仓储管理系统——菜单 (十六)
系统目录 abp(net core)+easyui+efcore实现仓储管理系统——ABP总体介绍(一) abp(net core)+easyui+efcore实现仓储管理系统——解决方案介绍(二) ...
随机推荐
- Kubernetes1.15 部署 coredns
coredns.yaml文件如下所示 # __MACHINE_GENERATED_WARNING__ apiVersion: v1 kind: ServiceAccount metadata: nam ...
- SQL SERVER 活动监视-sys.dm_exec_requests
sys.dm_exec_requests (Transact-SQL)应用: 针对 SQL Server 内正在执行的每个请求返回一行.sys.dm_exec_connections.sys.dm_e ...
- Excel催化剂开源第5波-任务窗格在OFFICE2013中新建文档不能同步显示问题解决
在OFFICE2013及之后,使用了单文档界面技术,不同于以往版本可以共享任务空格.功能区.所以当开发任务窗格时,需要考虑到每一个工作薄都关联一个任务窗格. 背景介绍 单文档界面摘录官方定义如下:对 ...
- TCP端口复用引发的异常,用setsockopt来解决
TCP端口复用引发的异常,用setsockopt来解决 我们在并发连接一个服务端时候他会出现这种情况 OSError: [WinError 10048] 通常每个套接字地址(协议/网络地址/端口)只允 ...
- python常见模块-collections-time-datetime-random-os-sys-序列化反序列化模块(json-pickle)-subprocess-03
collections模块-数据类型扩展模块 ''' 在内置数据类型(dict.list.set.tuple)的基础上,collections模块还提供了几个额外的数据类型:Counter.deque ...
- Android系列教程之前言
内容转载自我自己的博客 目前安卓的主流开发语言是Java,在正式开始Android系列的教程之前,需要知道一些基本内容 Android介绍 Android['ændrɔid] 是一个基于Linux 内 ...
- mysql8.0的连接写法
由于mysql8.0的新特新,所以Driver要写成“com.mysql.cj.jdbc.Driver” url:"jdbc:mysql://host_address:3306/db_nam ...
- stack函数怎么用嘞?↓↓↓
c++ stl栈stack的头文件书写格式为: #include 实例化形式如下: stack StackName; 其中成员函数如下: 1.检验堆栈是否为空 empty() 堆栈为空则返回真 形式如 ...
- Swagger UI使用指南
1:认识Swagger Swagger 是一个规范和完整的框架,用于生成.描述.调用和可视化 RESTful 风格的 Web 服务.总体目标是使客户端和文件系统作为服务器以同样的速度来更新.文件的方法 ...
- http状态码 400-499
类比 服务器:便利店 客户端:客人 http报文:中文语言+钱 400-499 客户的错误 400 :服务器不理解客服端请求的意思是什么,如请求报文损坏 举例: 客户端:@#!3&* 服务器: ...