三天讲透SpringBoot-初识基础使用
这次我们来说一下我们的SpringBoot,现在SpringBoot已经成为趋势,在我这里我用三篇文章的形式来讲清楚我们的SpringBoot,大致分为,第一篇讲搭建,基本使用,第二篇三方集成,自动装配原理,第三篇,将main方法启动原理,总结史上最全的SpringBoot注解及其含义。后面有机会再细致的扒一下源码(书还没看完,怕误导大家)。
我们先来看我们的搭建,很简单,我们来一个最小最简洁的启动方式。
三种搭建(一):
准备工作,我们是在IntelliJ IDEA的工具上来讲解的,用Eclipse或者STS的都可以,大同小异,我们讲三种搭建方式,以后就别某度SpringBoot的搭建了。
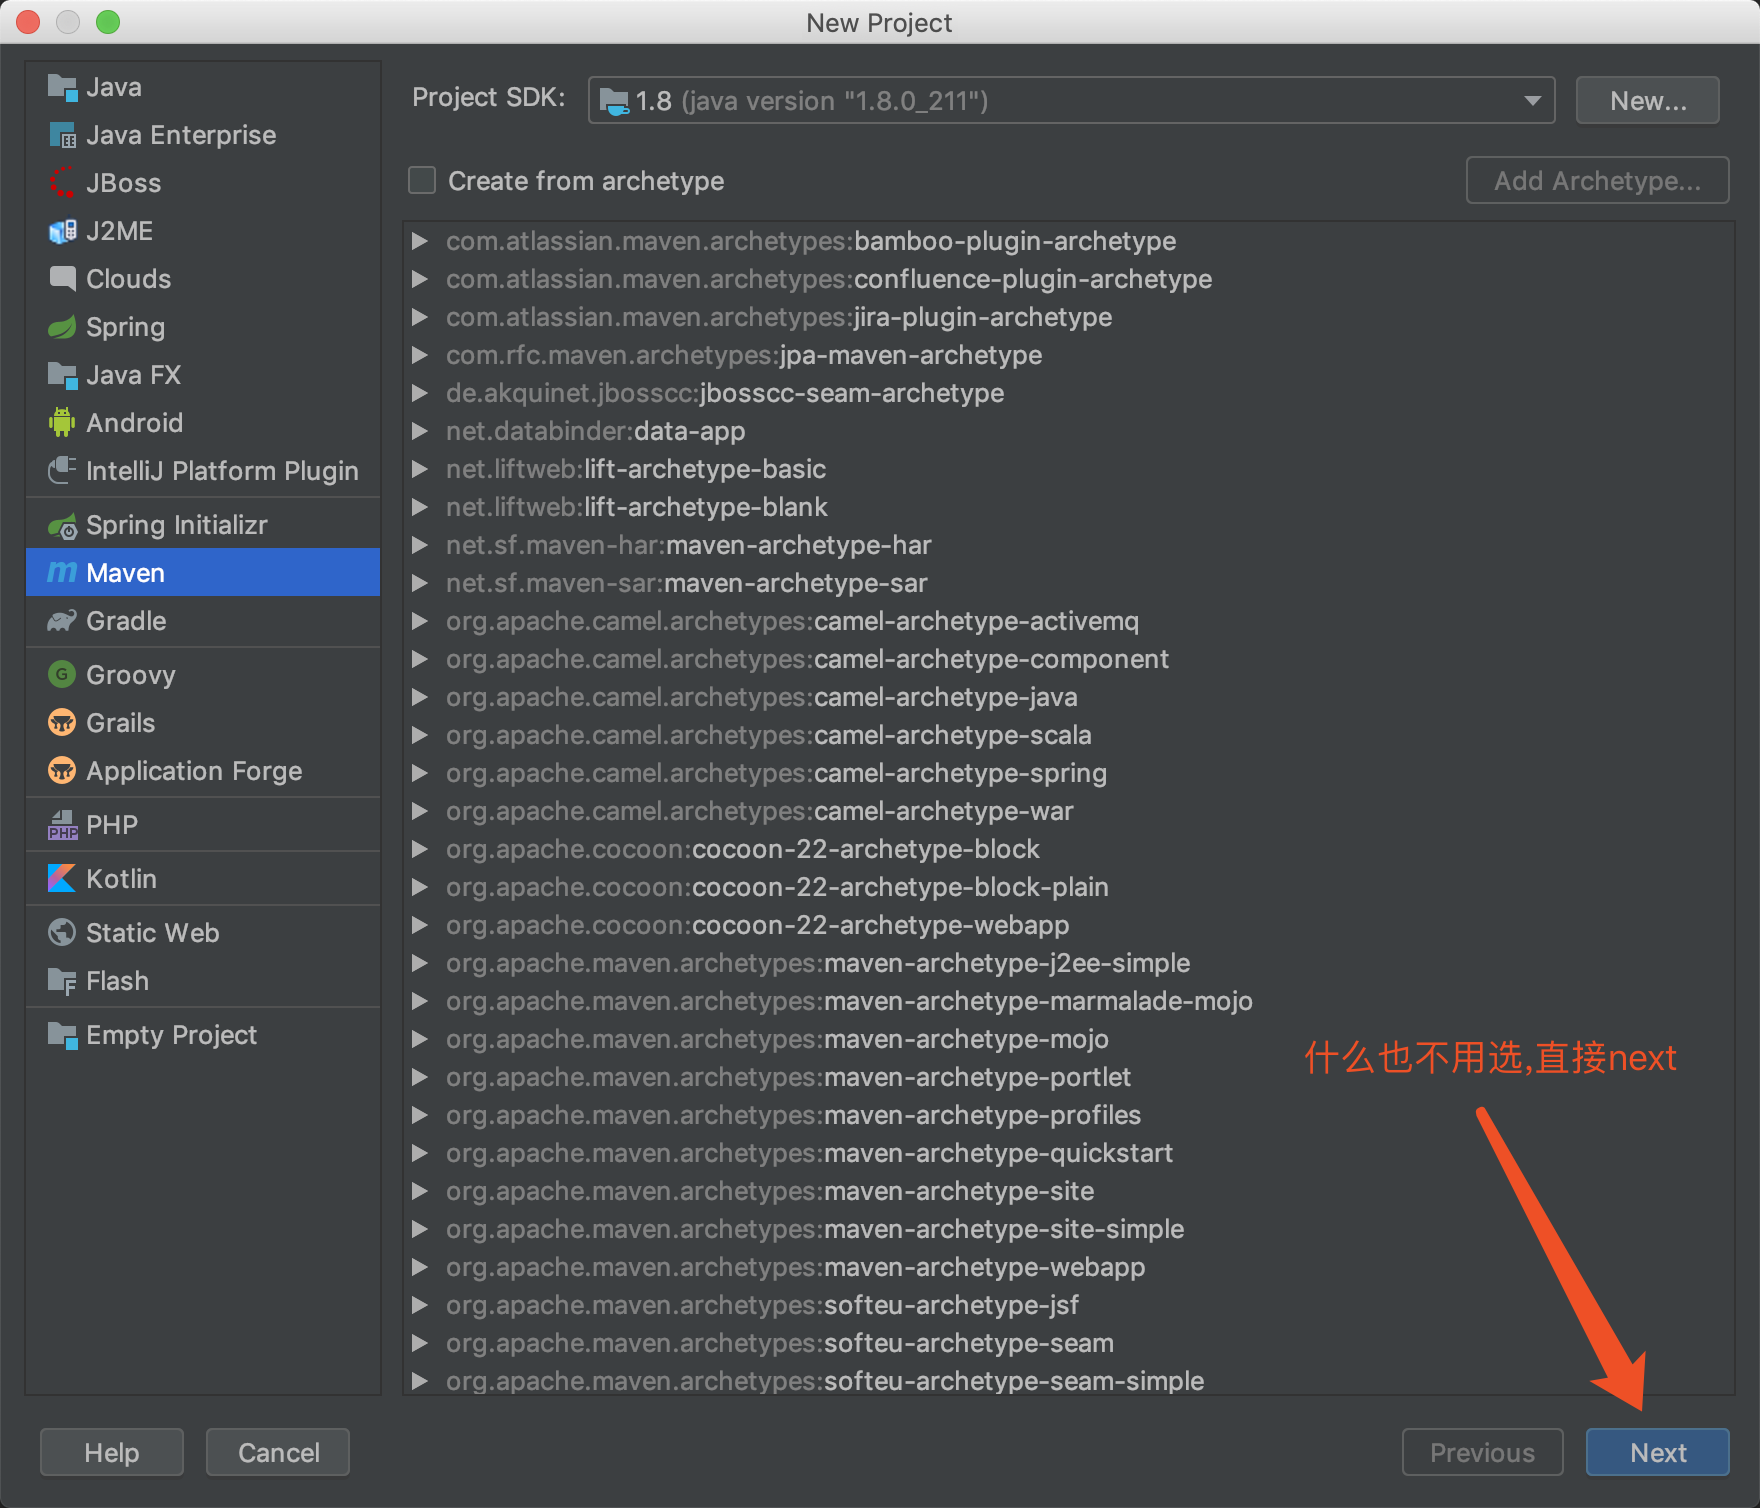
1.我们先来创建一个maven项目,最简单的方式创建即可

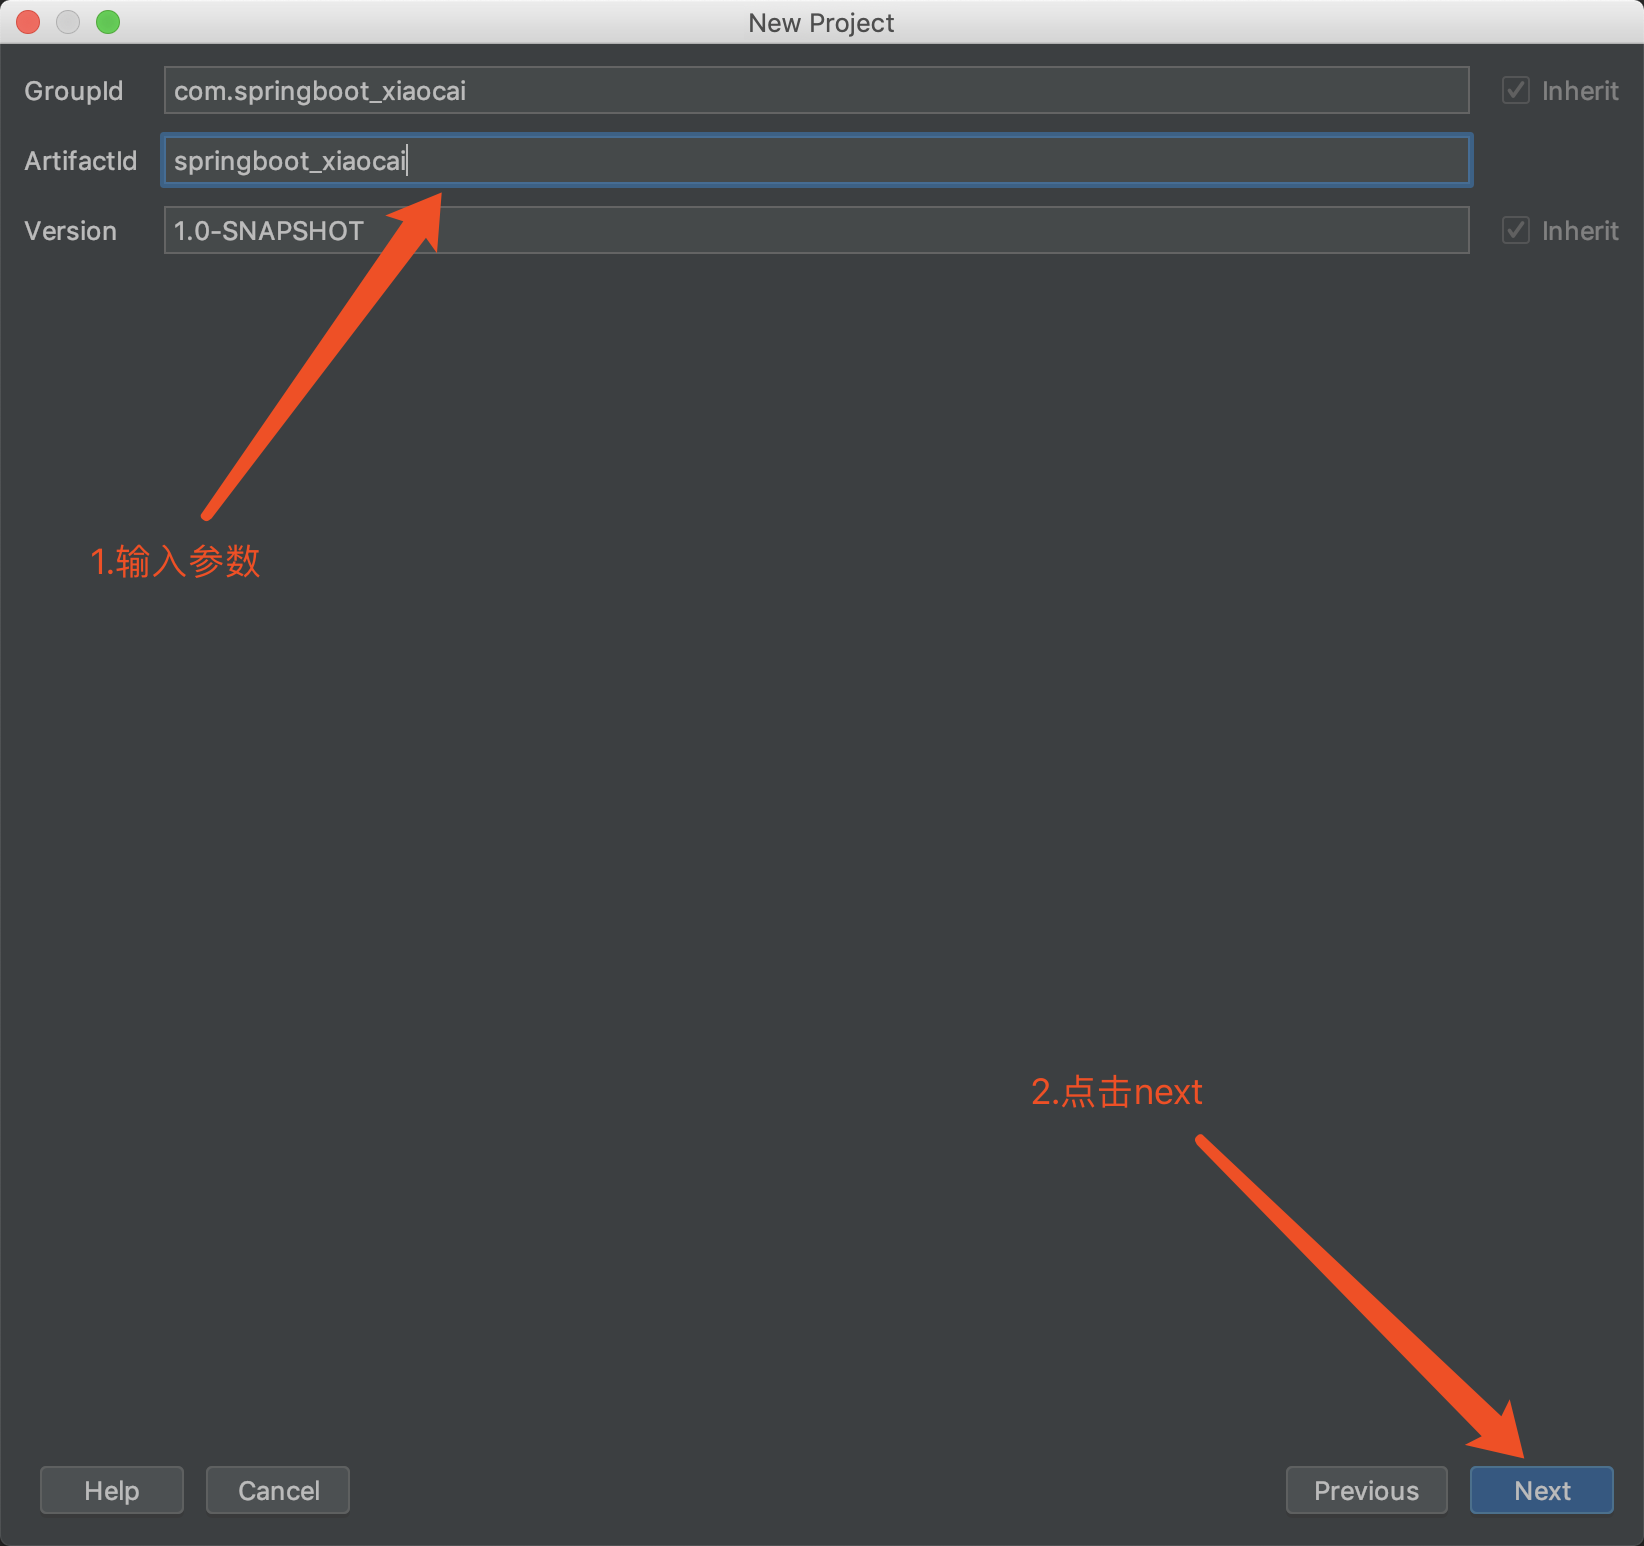
输入我们的GroupID和ArtifactID
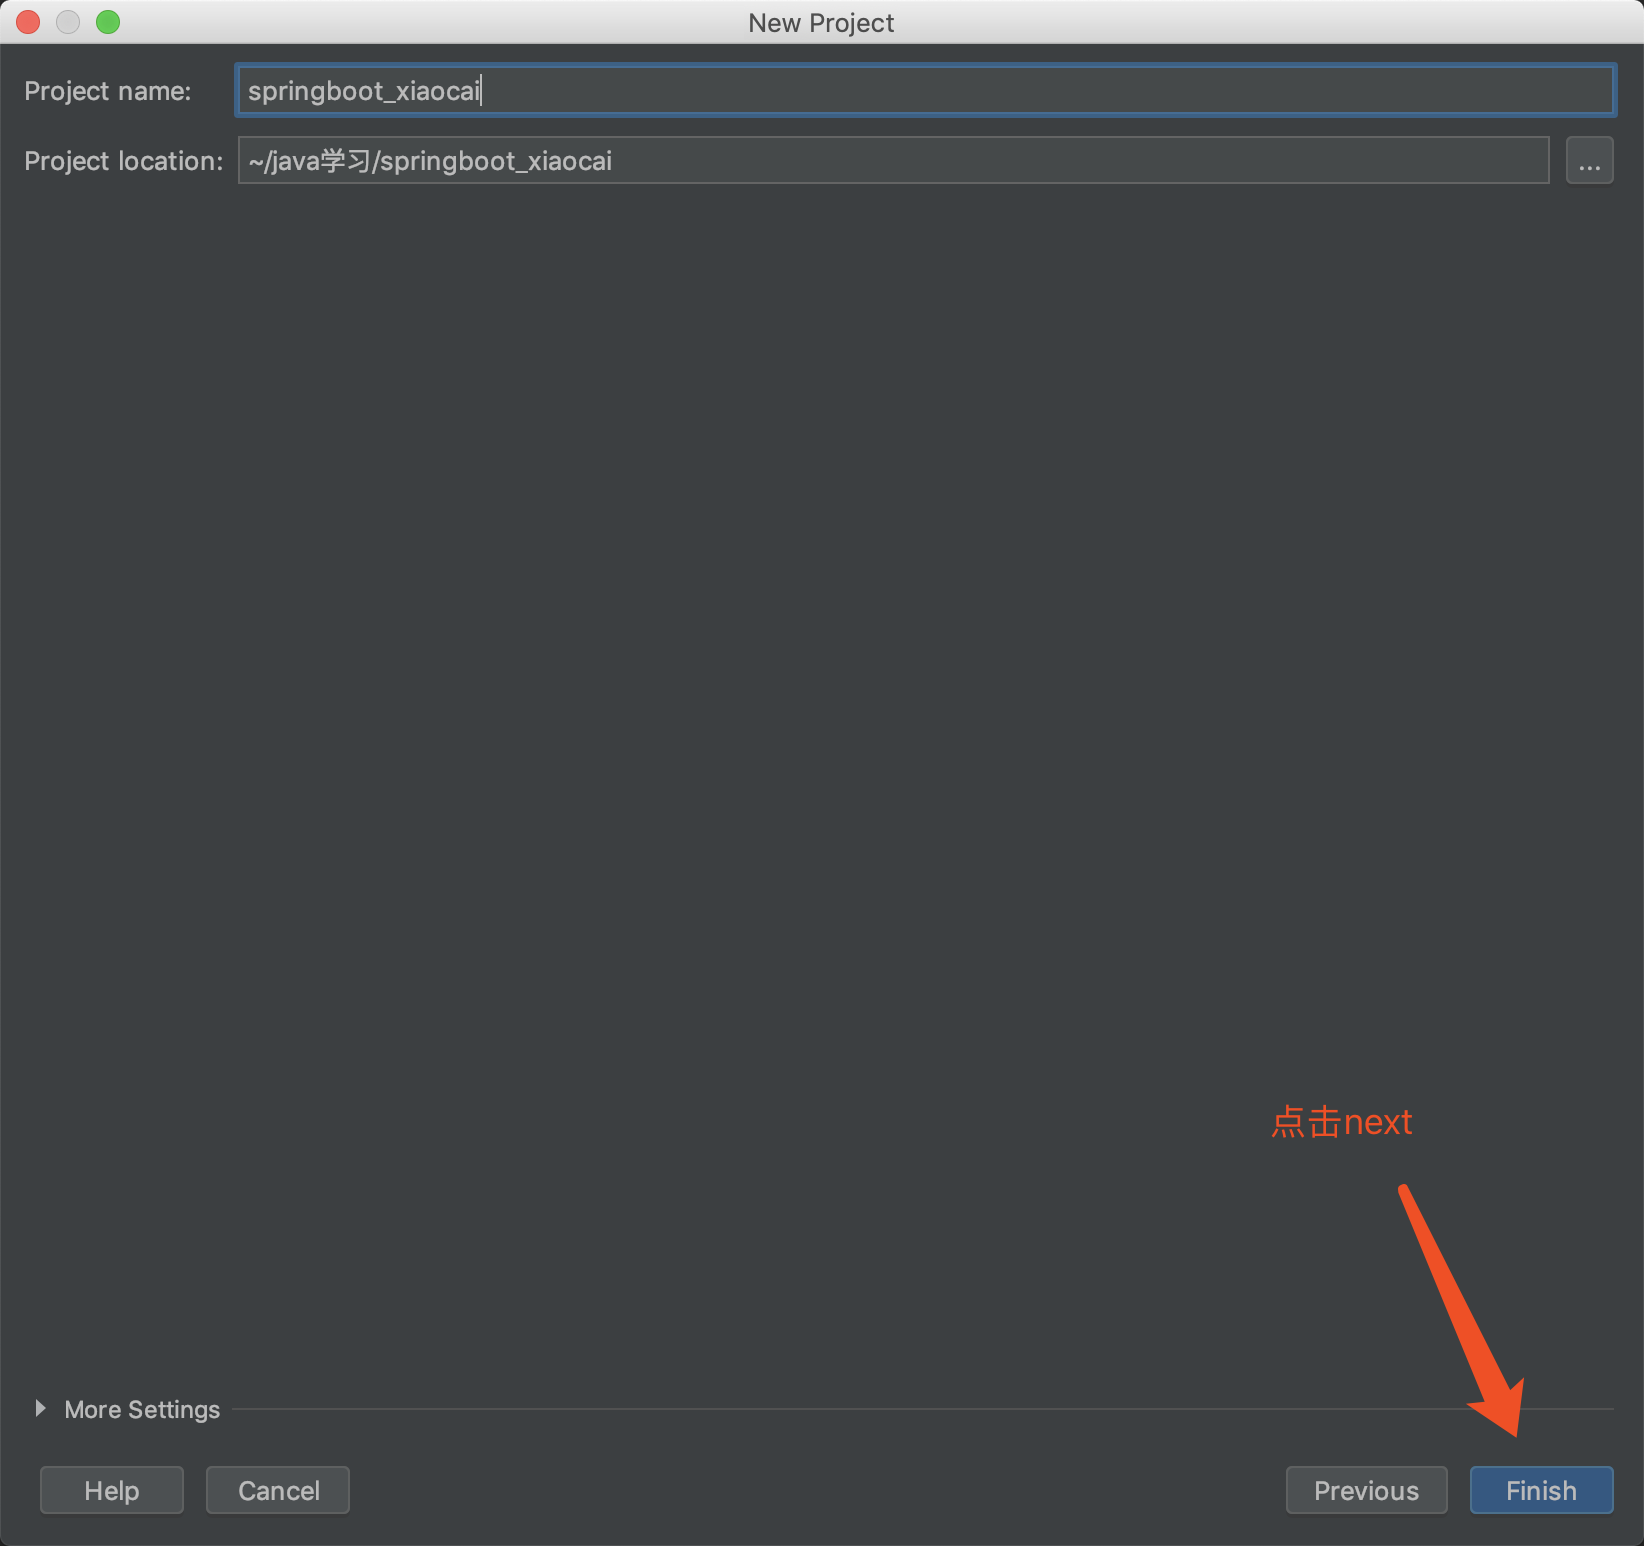
点击我们的Finish,我们的第一步就完成了。

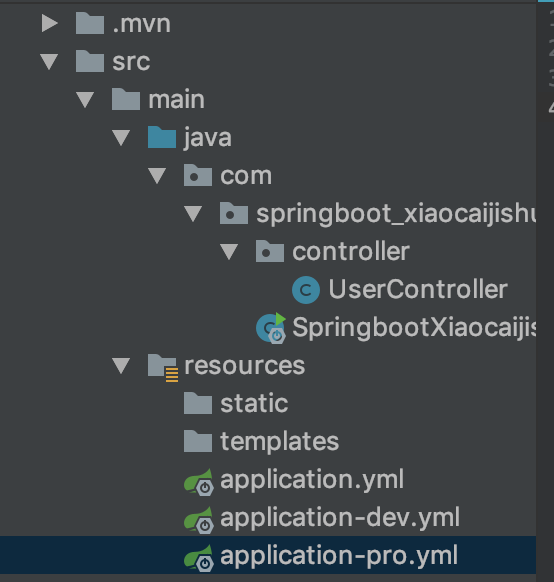
自己对比一下创建完成的目录结构是不是一致的。
2.接下来我们导入我们的jar依赖,修改我们的pom.xml
<?xml version="1.0" encoding="UTF-8"?>

<project xmlns="http://maven.apache.org/POM/4.0.0"

         xmlns:xsi="http://www.w3.org/2001/XMLSchema-instance"

         xsi:schemaLocation="http://maven.apache.org/POM/4.0.0 http://maven.apache.org/xsd/maven-4.0.0.xsd">

    <modelVersion>4.0.0</modelVersion>

    <groupId>com.springboot_xiaocai</groupId>

    <artifactId>springboot_xiaocai</artifactId>

    <version>1.0-SNAPSHOT</version>

    <dependencies>

        <!-- 加入springboot依赖-->

        <dependency>

            <groupId>org.springframework.boot</groupId>

            <artifactId>spring-boot-starter-parent</artifactId>

            <version>2.1.7.RELEASE</version>

        </dependency>

        <!-- 加入spring mvc-web依赖-->

        <dependency>

            <groupId>org.springframework.boot</groupId>

            <artifactId>spring-boot-starter-web</artifactId>

        </dependency>

    </dependencies>

    <build>

        <plugins>

            <!-- 引入一个springboot插件,可以支持我们将web应用打成jar包-->

            <plugin>

                <groupId>org.springframework.boot</groupId>

                <artifactId>spring-boot-maven-plugin</artifactId>

            </plugin>

        </plugins>

    </build>

</project>
所有加粗字体为我后来加的,你也可以全部复制到你的pom.xml文件下(注意项目名)。
3.加入我们的配置文件yml,在resources目录下创建application.yml,不创建也可以
application.yml
server:

  port: 8888
4.写入我们的启动类,MainStart.java
MainStart.java
package com.springboot_xiaocai.controller;

import org.springframework.boot.SpringApplication;

import org.springframework.boot.autoconfigure.SpringBootApplication;

@SpringBootApplication

public class MainStart {

    public static void main(String[] args) {

        SpringApplication.run(MainStart.class,args);

    }

}
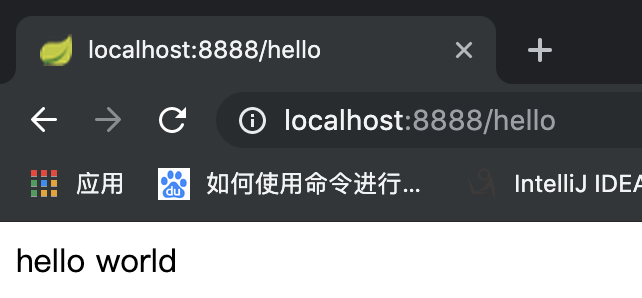
5.随便编写一个Controller测试类,运行main方法,走起。(贴图带目录结构,自己对比一下自己的对不对)
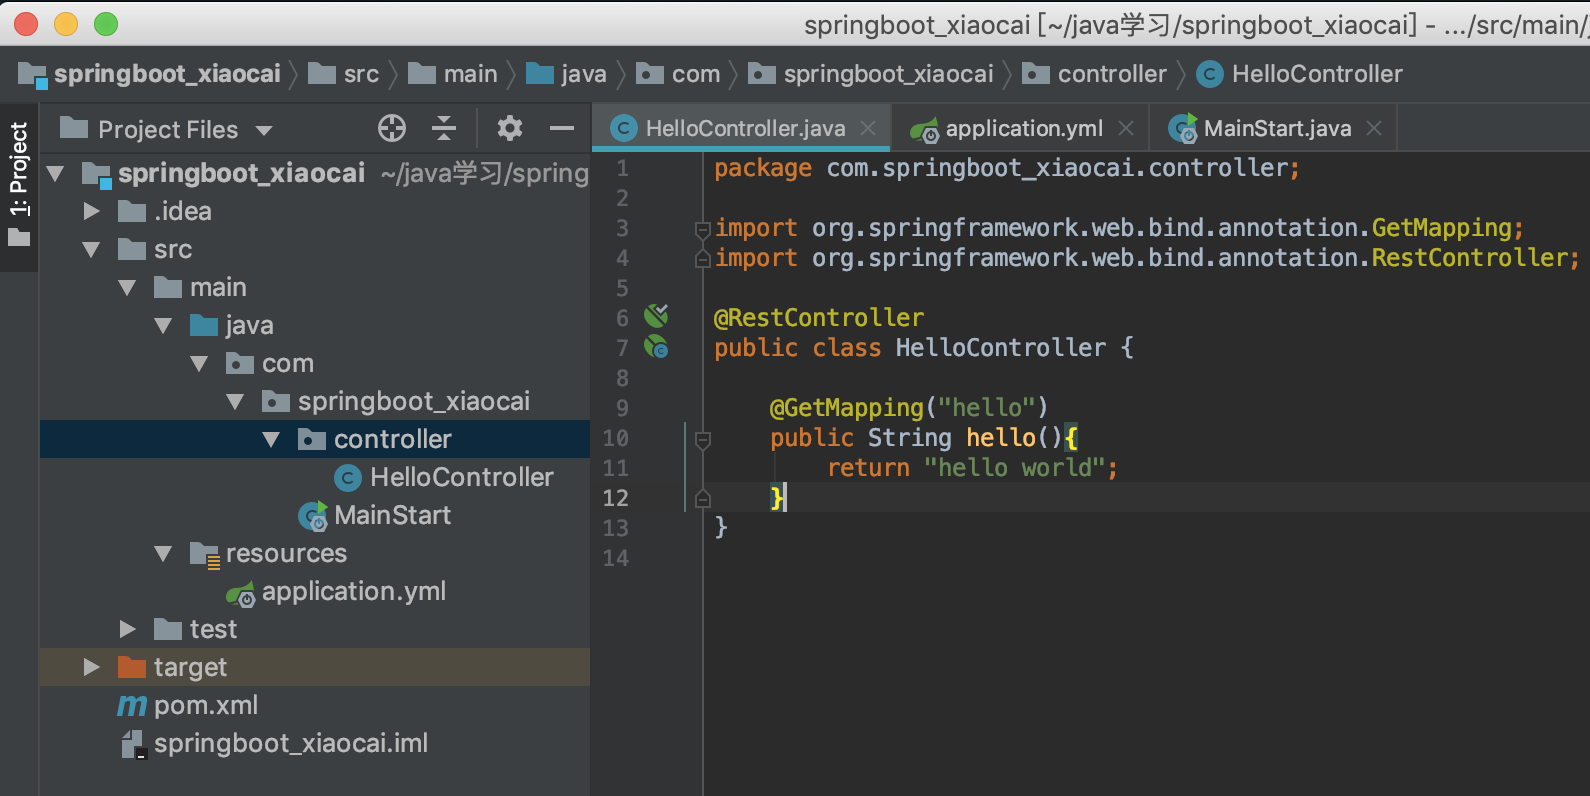
我们的第一种简单搭建就完成了。配置比较麻烦,不建议这样搭建,我们来看第二种搭建方式
三种搭建(二):
1.我们还是来构建一个项目,这里选择Spring Initializr

2.输入参数,点击next

3.选择Web,勾选Spring Web,点击next(有的版本可能没有Spring Web,那你就勾选Spring Web Starter),最上方可以设置spring boot的版本,我这里是2.1.9。

4.随便编写一个测试类,启动,看效果。

三种搭建(三):
第三种几乎没人用的,不是很方便,我只是带着说一下,直接登录https://start.spring.io/ 然后设置相关参数,点击Generate就会生成我们想要的SpringBoot项目了。
上述三种方式,第二种是最好用,也是最常用的,我们只需要记住第二种就可以了。
配置文件:
有的小伙伴看到我的前两种搭建方式配置文件并不一样,一种是application.yml,另外一种是application.properties,这两种配置文件都是可以的,官方推荐我们使用application.yml文件,我可以不接受他的意见,按照个人喜好来咯。
我们很多时候我们的生产环境和我们的开发环境的配置是完全不一致的,我们可以这样来设置
application.yml
spring:

  profiles:

    active: pro

---

spring:

  profiles: dev

server:

  port: 1111

---

spring:

  profiles: pro

server:

  port: 2222
意思就是我们激活pro的配置,下面用三个减号来设置多文档块。
貌似这样的设置还不是特别好,我们再来改一下。将application.yml复制多份,分别叫application-dev.yml和application-pro.yml
application-pro.yml
server:

  port: 2222
这样我们就更好的区分了,我们的配置环境,但貌似还不是很好的,我们的主配置是激活我们的pro配置,不能每次我们开发都设置激活我们的开发环境,然后部署的时候再改为激活生产环境吧。我们再来改一下。
我们保持application.yml配置不动,还是激活我们的Pro配置文件,我们来设置一下我们的启动参数
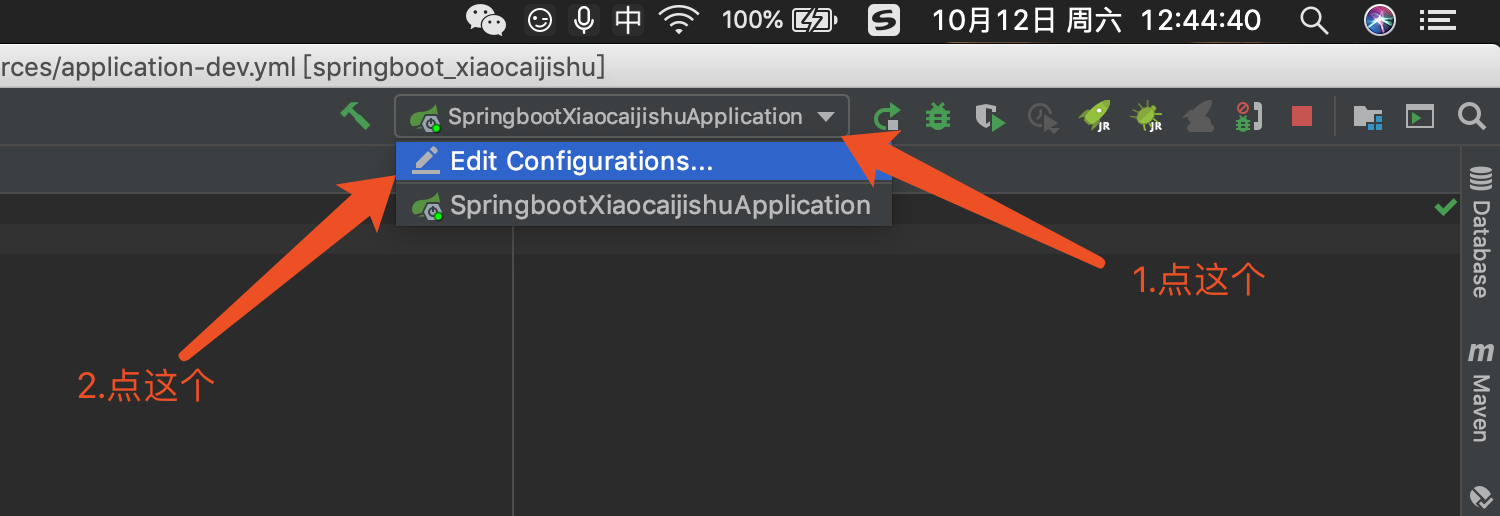
选择我们的主启动类,将我们的启动参数-Dspring.profiles.active=dev配置进去,如果要激活多个可以用|连接,例如-Dspring.profiles.active=dev|pro|st
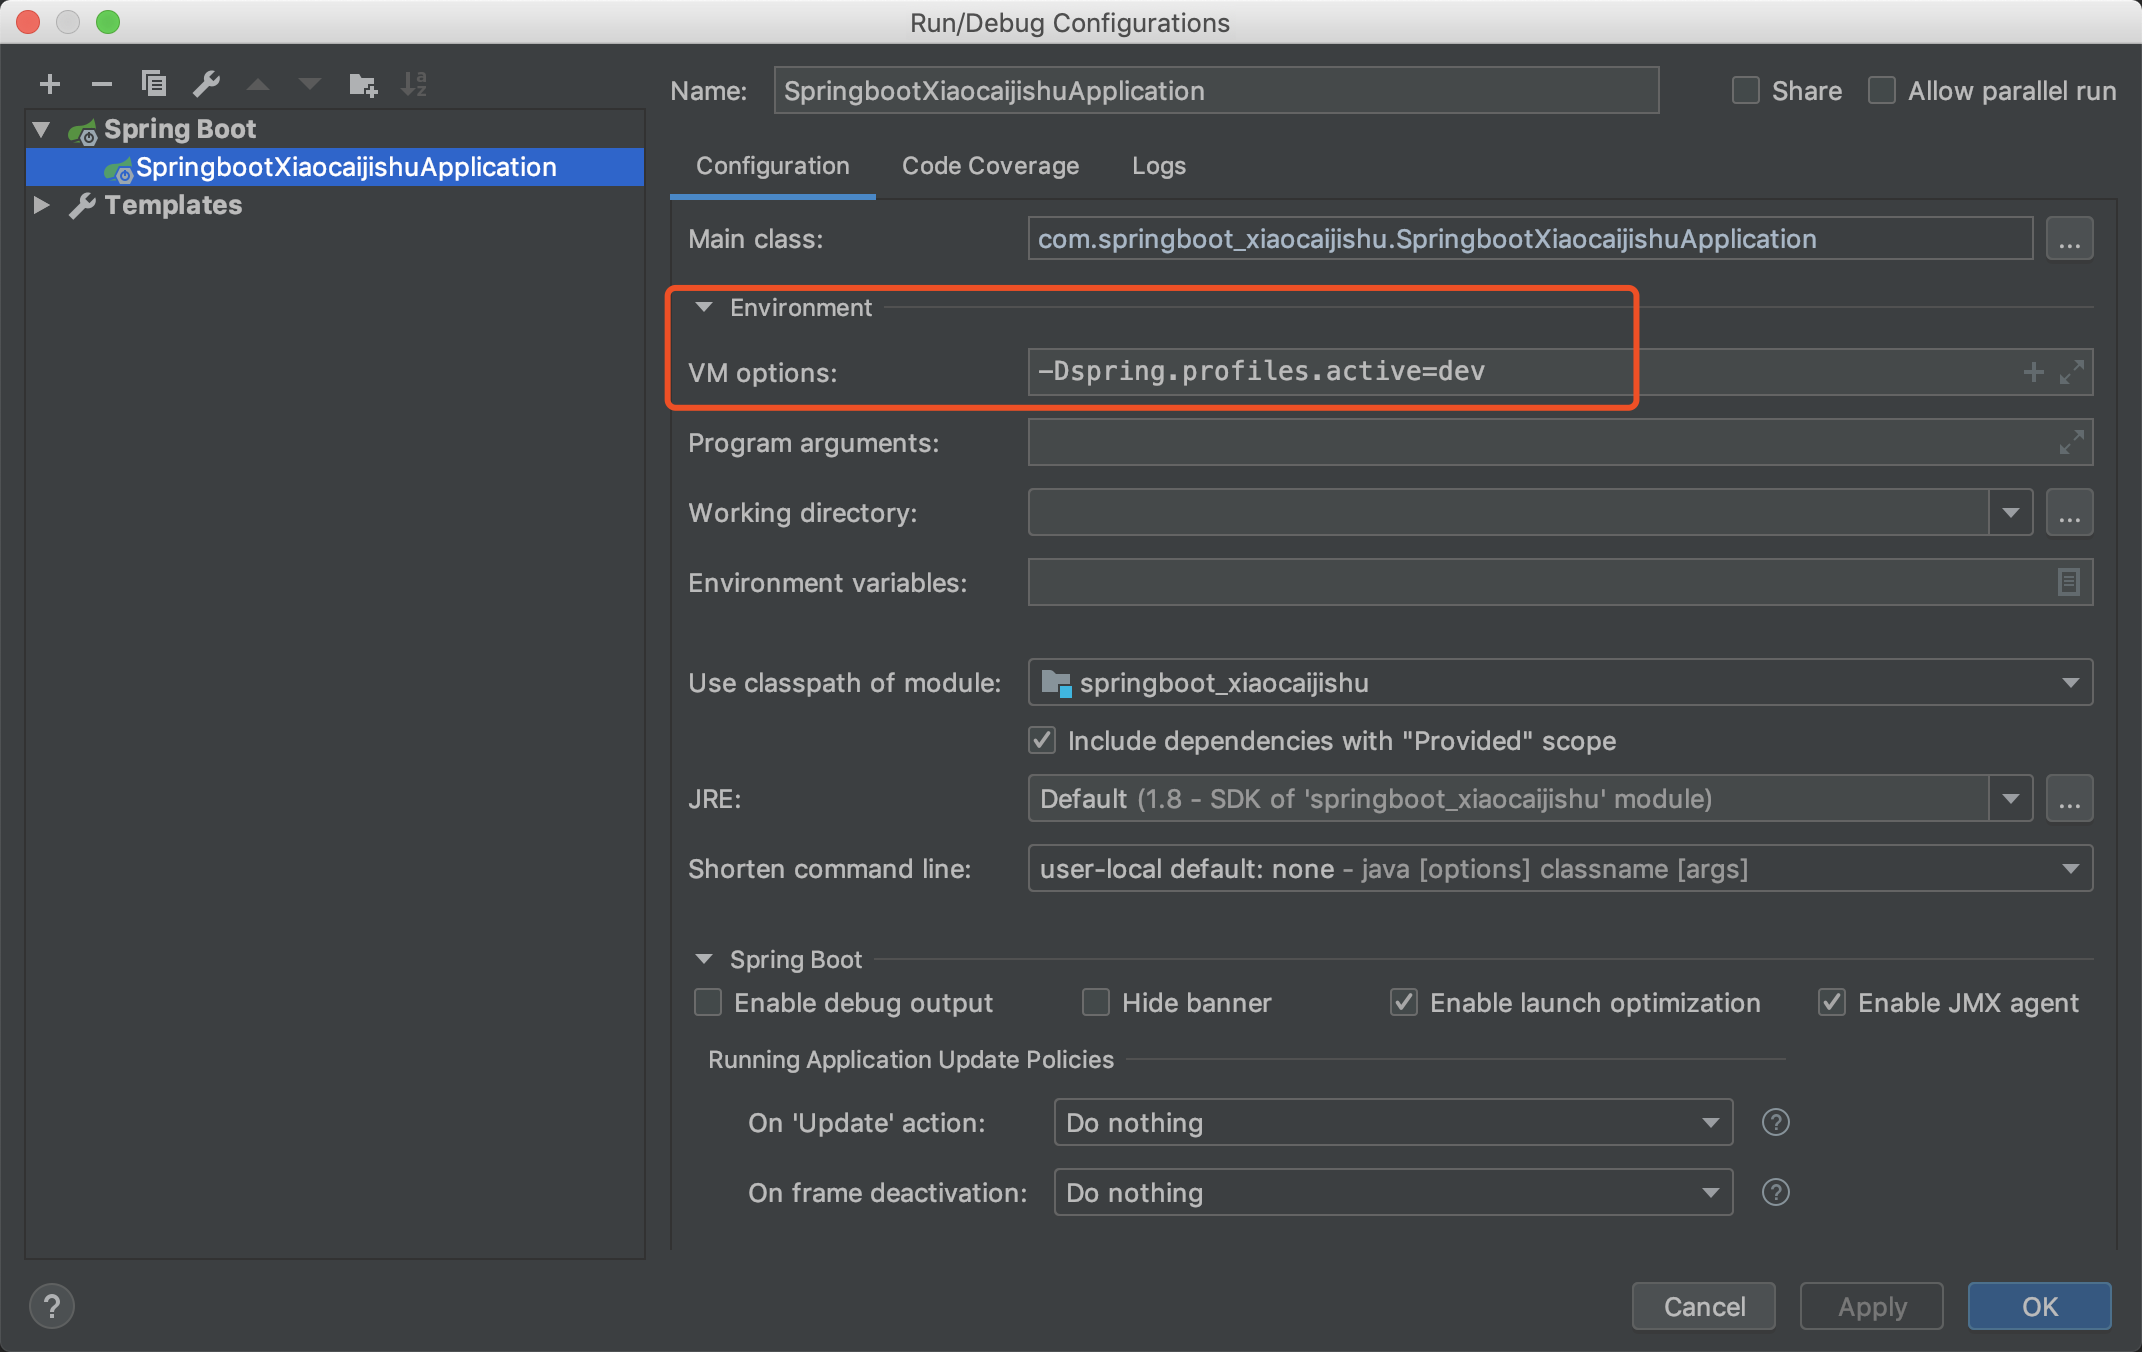
这样配置,我们再启动的时候就管你application.yml配置的激活什么配置,也是不起作用的,只有在我们的编辑器内部配置的参数才是生效的。
JAR与WAR
我们都知道SpringBoot打包出来的都是jar包,我们有时候不得不弄成war包的,比如遇到使用jsp的情况。
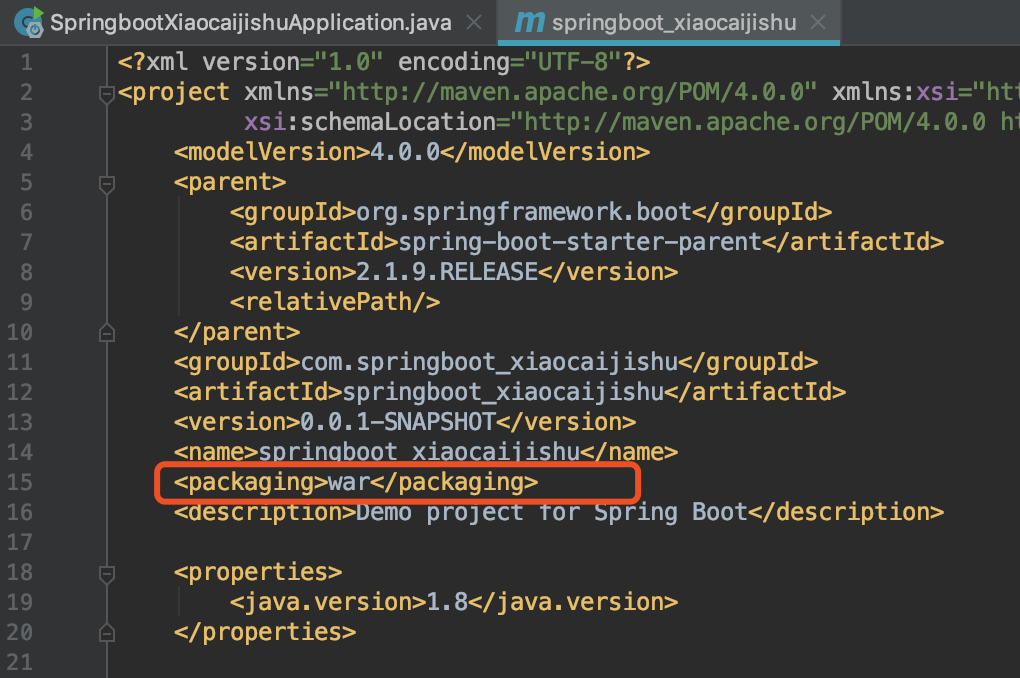
首先我们改一下我们的pom文件,设置成<packaging>war</packaging>
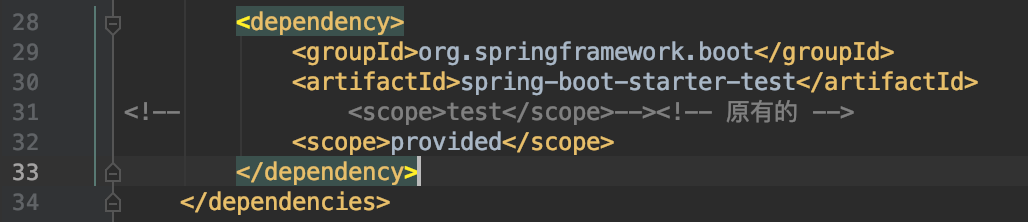
再来一下spring-boot-starter设置为provided
最后一步,改我们的启动类,继承SpringBootServletInitializer类,重写configure方法。
package com.springboot_xiaocaijishu;

import org.springframework.boot.SpringApplication;

import org.springframework.boot.autoconfigure.SpringBootApplication;

import org.springframework.boot.builder.SpringApplicationBuilder;

import org.springframework.boot.web.servlet.support.SpringBootServletInitializer;

@SpringBootApplication

public class SpringbootXiaocaijishuApplication extends SpringBootServletInitializer {

    public static void main(String[] args) {

        SpringApplication.run(SpringbootXiaocaijishuApplication.class, args);

    }

    @Override

    protected SpringApplicationBuilder configure(SpringApplicationBuilder builder) {

        return builder.sources(SpringbootXiaocaijishuApplication.class);

    }

}
打包,配置Tomcat,启动,进入测试类,走起。

这里带两个别的知识,不属于本节的SpringBoot的。

我们嫌弃包的名字太长,不方便,我们可以在<build>标签下设置<finalName>来指定我们的war包名。
<build>

    <plugins>

        <plugin>

            <groupId>org.springframework.boot</groupId>

            <artifactId>spring-boot-maven-plugin</artifactId>

        </plugin>

    </plugins>

    <finalName>xiaocaijishu</finalName>

</build>
读取配置文件:
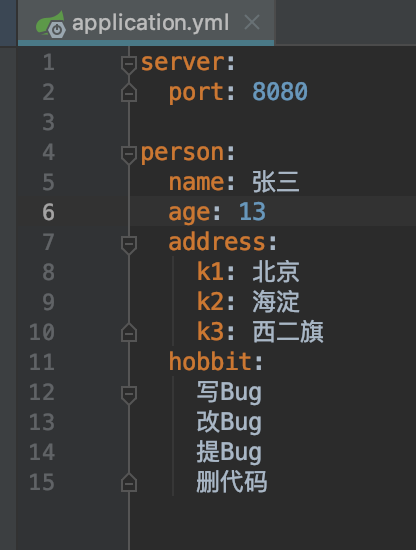
有时候我们需要读取配置文件的数据,比如自动任务开关,还有一些静态的参数配置,我们可以这样来写
假设我们要读取application.yml的person数据。
先来改我们的pom文件。添加依赖
<dependency>

    <groupId>org.springframework.boot</groupId>

    <artifactId>spring-boot-configuration-processor</artifactId>

    <optional>true</optional>

</dependency>
编写接收参数对象,在上面给予@ConfigurationProperties(prefix = "person")注解,prefix的值就是我们配置文件外层节点的值。
package com.springboot_xiaocaijishu.bean;

import org.springframework.boot.context.properties.ConfigurationProperties;

import java.util.List;

import java.util.Map;

@ConfigurationProperties(prefix = "person")

public class PersonBean {

    private String name;

    private int age;

    private Map<String, Object> address;

    private List<String> hobbit;

    public String getName() {

        return name;

    }

    public void setName(String name) {

        this.name = name;

    }

    public int getAge() {

        return age;

    }

    public void setAge(int age) {

        this.age = age;

    }

    public Map<String, Object> getAddress() {

        return address;

    }

    public void setAddress(Map<String, Object> address) {

        this.address = address;

    }

    public List<String> getHobbit() {

        return hobbit;

    }

    public void setHobbit(List<String> hobbit) {

        this.hobbit = hobbit;

    }

}
编写我们的测试类
package com.springboot_xiaocaijishu.controller;

import com.springboot_xiaocaijishu.bean.PersonBean;

import org.springframework.beans.factory.annotation.Autowired;

import org.springframework.boot.context.properties.EnableConfigurationProperties;

import org.springframework.web.bind.annotation.GetMapping;

import org.springframework.web.bind.annotation.RestController;

@RestController

@EnableConfigurationProperties(PersonBean.class)

public class UserController {

    @Autowired

    private PersonBean personBean;

    @GetMapping("getPerson")

    public PersonBean getPersonBean(){

        return personBean;

    }

}
测试走起,看结果。

SelectCompent:(Select过滤器)
以前我们的项目都有web.xml来配置我们的Servlet,现在没有了,我们来看一下配置,我们先创建一个ServletConifg类
ServletConifg类
package com.springboot_xiaocaijishu.servlet;

import com.springboot_xiaocaijishu.controller.ServletController;

import org.springframework.boot.web.servlet.ServletRegistrationBean;

import org.springframework.context.annotation.Bean;

import org.springframework.context.annotation.Configuration;

@Configuration

public class ServletConifg{

    @Bean

    public ServletRegistrationBean addServlet() {

        ServletRegistrationBean servletRegistrationBean = new ServletRegistrationBean(new ServletController(),"/hello_servlet");

        return servletRegistrationBean;

    }

}
编写一个ServletController类
package com.springboot_xiaocaijishu.controller;

import javax.servlet.ServletException;

import javax.servlet.http.HttpServlet;

import javax.servlet.http.HttpServletRequest;

import javax.servlet.http.HttpServletResponse;

import java.io.IOException;

public class ServletController extends HttpServlet {

    protected void doPost(HttpServletRequest req, HttpServletResponse resp) throws ServletException, IOException {

        resp.getWriter().write("hello Servlet");

    }

    protected void doGet(HttpServletRequest req, HttpServletResponse resp) throws ServletException, IOException {

        doPost(req, resp);

    }

}
这时我们启动项目,访问http://localhost:8080/hello_servlet就可以跳转到我们的Servlet下,有了Servlet,我们来添加过滤器吧。添加一个CustomFilter类。
CustomFilter类
package com.springboot_xiaocaijishu.CustomFilter;

import javax.servlet.*;

import java.io.IOException;

public class CustomFilter implements Filter {

    @Override

    public void init(FilterConfig filterConfig) throws ServletException {

        System.out.println("init");

    }

    @Override

    public void doFilter(ServletRequest servletRequest, ServletResponse servletResponse, FilterChain filterChain) throws IOException, ServletException {

        System.out.println("CustomFilter的doFilter方法");

        filterChain.doFilter(servletRequest, servletResponse);

    }

    @Override

    public void destroy() {

        System.out.println("destroy");

    }

}
将我们我Filter注册到Servlet中去,回到我们的ServletConifg类中,添加这样的代码。
/**

 * 注册一个filter

 * @return

 */

@Bean

public FilterRegistrationBean<CustomFilter> filterFilterRegistrationBean() {

    FilterRegistrationBean filterRegistrationBean = new FilterRegistrationBean();

    filterRegistrationBean.setFilter(new CustomFilter());

    filterRegistrationBean.addUrlPatterns("/*");

    return filterRegistrationBean;

}
拦截器:
定义一个CustomInterceptor类,实现HandlerInterceptor类。后期我会说下HandlerInterceptor类内部的源码。
package com.springboot_xiaocaijishu.CustomInterceptor;

import org.springframework.lang.Nullable;

import org.springframework.stereotype.Component;

import org.springframework.web.servlet.HandlerInterceptor;

import org.springframework.web.servlet.ModelAndView;

import javax.servlet.http.HttpServletRequest;

import javax.servlet.http.HttpServletResponse;

@Component

public class CustomInterceptor implements HandlerInterceptor {

    /**

     * 方法执行之前

     * @param request

     * @param response

     * @param handler

     * @return

     * @throws Exception

     */

    public boolean preHandle(HttpServletRequest request, HttpServletResponse response, Object handler)throws Exception {

        System.out.println("preHandle");

        return true;

    }

    /**

     * 调用目标方法之后,渲染视图之前

     * @param request

     * @param response

     * @param handler

     * @param modelAndView

     * @throws Exception

     */

    public void postHandle(HttpServletRequest request, HttpServletResponse response, Object handler, @Nullable ModelAndView modelAndView) throws Exception {

        System.out.println("postHandle");

    }

    /**

     * 渲染视图之后

     * @param request

     * @param response

     * @param handler

     * @param ex

     * @throws Exception

     */

    public void afterCompletion(HttpServletRequest request, HttpServletResponse response, Object handler, @Nullable Exception ex) throws Exception {

        System.out.println("afterCompletion");

    }

}
添加WebConifg类,注册我们的拦截器
package com.springboot_xiaocaijishu.servlet;

import com.springboot_xiaocaijishu.CustomInterceptor.CustomInterceptor;

import org.springframework.beans.factory.annotation.Autowired;

import org.springframework.context.annotation.Configuration;

import org.springframework.web.servlet.config.annotation.InterceptorRegistry;

import org.springframework.web.servlet.config.annotation.WebMvcConfigurer;

@Configuration

public class WebConifg implements WebMvcConfigurer {

    @Autowired

    private CustomInterceptor CustomInterceptor;

    /**

     * 注册拦截器

     * @param registry

     */

    public void addInterceptors(InterceptorRegistry registry) {

        registry.addInterceptor(CustomInterceptor).addPathPatterns("/**").excludePathPatterns("/login","/");

    }

}
东西实在太多了,有点弄不完了,代码还忘记保留了,下次我一起传代码吧,下次说一下我们继承那些三方插件吧~!


最进弄了一个公众号,小菜技术,欢迎大家的加入

三天讲透SpringBoot-初识基础使用的更多相关文章
- 从SpringBoot到SpringCloudAlibaba简明教程(一):初识SpringBoot及其基础项目构建
前言 Spring框架的大名想必大家早已如雷贯耳,我们来看一下springboot诞生的初衷,以及它在springframe的基础上解决了哪些痛点. 很久以前,J2EE还是java企业级应用的标准规范 ...
- 终于有人把O2O、C2C、B2B、B2C的区别讲透了!
终于有人把O2O.C2C.B2B.B2C的区别讲透了! 一.O2O.C2C.B2B.B2C的区别在哪里? O2O是online to offline分为四种运营模式: 1.online to offl ...
- 终于有人把Elasticsearch原理讲透了!
终于有人把Elasticsearch原理讲透了! http://developer.51cto.com/art/201904/594615.htm 小史是一个非科班的程序员,虽然学的是电子专业,但是通 ...
- (转)终于有人把Elasticsearch原理讲透了!
终于有人把Elasticsearch原理讲透了! 小史是一个非科班的程序员,虽然学的是电子专业,但是通过自己的努力成功通过了面试,现在要开始迎接新生活了. 来源:互联网侦察 | 2019-04-08 ...
- SpringBoot之基础入门-专题一
SpringBoot之基础入门-专题一 一.Spring介绍 1.1.SpringBoot简介 在初次学习Spring整合各个第三方框架构建项目的时候,往往会有一大堆的XML文件的配置,众多的dtd或 ...
- SpringBoot初识(一)
一.什么是SpringBoot 最近几年,微服务的概念越来越火.而相信大家在搜索微服务时,映入眼帘的首先就是SpringBoot以及SpringCloud.SpringCloud提供的一套完整的微服务 ...
- Oracle知识梳理(三)操作篇:SQL基础操作汇总
Oracle知识梳理(三)操作篇:SQL基础操作汇总 一.表操作 1.表的创建(CREATE TABLE): 基本语句格式: CREATE TABLE table_name ( col_ ...
- 面试准备——(三)Selenium(1)基础问题及自动化测试
转载:https://www.cnblogs.com/lesleysbw/p/6413880.html 面试准备——(三)Selenium(1)基础问题及自动化测试 滴滴面试: 1. 自己负责哪部 ...
- 【SpringBoot】SpringBoot的基础,全面理解bean的生命周期
前言 前段时间直接上手使用springboot开发了一个数据平台的后台部分,但是自身对于springboot的原理和过程还不是很清晰,所以反过来学习下springboot的基础. 大家都知道sprin ...
随机推荐
- 共价大爷游长沙 lct 维护子树信息
这个题目的关键就是判断 大爷所有可能会走的路 会不会经过询问的边. 某一条路径经过其中的一条边, 那么2个端点是在这条边的2测的. 现在我们要判断所有的路径是不是都经过 u -> v 我们以u为 ...
- HDU3652:B-number(数位DP)
Problem Description A wqb-number, or B-number for short, is a non-negative integer whose decimal for ...
- 基于LinkedhashMap实现的LRU算法
LRU全称是Least Recently Used,即最近最久未使用的意思.LRU算法的设计原则是:如果一个数据在最近一段时间没有被访问到,那么在将来它被访问的可能性也很小.也就是说,当限定的空间已存 ...
- webpack4.0 babel配置遇到的问题
babel配置 babel版本升级到8.x之后发现出现了很多问题.首先需要安装 "@babel/core": "^7.1.2", "@babel/pl ...
- spring接口文档注解:@ApiOperation(转)
spring接口文档注解:@ApiOperation @ApiOperation不是spring自带的注解是swagger里的 com.wordnik.swagger.annotations.ApiO ...
- SqlServer还原数据库时提示:异常终止,不能在此版本的SQL Server中启动,因为它包含分区函数
场景 在SqlServer Management中进行数据库还原时提示: 数据库不能在此版本的SQL Server中启动,因为它包含分区函数. 点击左下角的查看详细信息 实现 电脑上安装的是SQL S ...
- IDEA 配置Springboot项目热部署
实现的方式概述 注意以下的热部署方式在IDEA是默认没有打开自动编译的,手动编译需要快捷键(Ctrl+Shift+F9),自动编译的修改配置如下:(注意刷新不要太快,会有1-2秒延迟) File-Se ...
- 转换地图 (康托展开+预处理+BFS)
Problem Description 在小白成功的通过了第一轮面试后,他来到了第二轮面试.面试的题目有点难度了,为了考核你的思维能量,面试官给你一副(2x4)的初态地图,然后在给你一副(2x4)的终 ...
- Java第二次作业第二题
请编写图像界面程序,用户在第一文本行输入数字,有三个按钮,分别是计算2进制,8进制,16进制,点击其中一个按钮,第一个文本行中的数据转换为相应进制的数显示在第二个文本行中. package naizi ...
- Python3 爬虫之 Scrapy 核心功能实现(二)
博客地址:http://www.moonxy.com 基于 Python 3.6.2 的 Scrapy 爬虫框架使用,Scrapy 的搭建过程请参照本人的另一篇博客:Python3 爬虫之 Scrap ...