Android利用碎片fragment实现底部标题栏(Github模板开源)
在安卓开发当中,一个十分重要的布局则是底部标题栏了,拥有了底部标题栏,我们就拥有了整个软件UI开发的框架,一般而言,整个软件的布局首先就是从底部标题栏开始构建,然后再开始其他模块的编写,组成一个完善的软件,那么如何才能够编写一个底部标题栏呢,我这里使用了碎片来实现,当然是碎片的动态加载的方式,静态加载的话则不可以达到点击按钮切换碎片的功能。
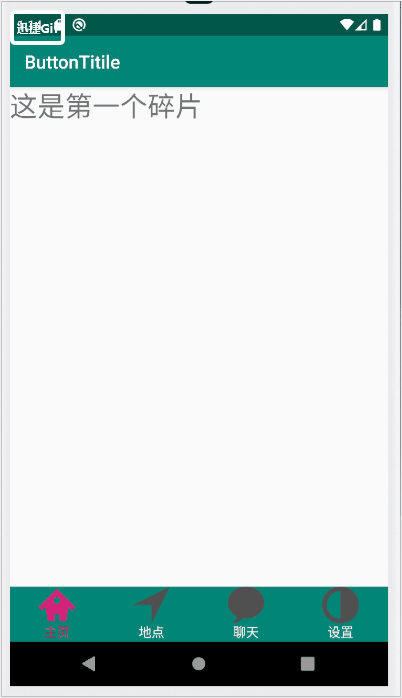
首先先上效果图:
github项目地址:https://github.com/Geeksongs/ButtonTitile
在每一个底部标题栏上一共有四个分类吗,分别是主页,地点,聊天和设置。每一个分类都对应着上方的一个fragment,因此我们需要创建四个fragment来对应下面的每一个分类,下面的底部导航栏不是由fragment来实现的,而是直接在主布局activity_main.xml当中使用imageview和textview组合而成。在activity_main.xml的上方是fragment,因此使用帧布局framelayout,下面是activity_main.xml的布局代码:
一.activity_main.xml
<?xml version="1.0" encoding="utf-8"?>

<RelativeLayout xmlns:android="http://schemas.android.com/apk/res/android"

    xmlns:app="http://schemas.android.com/apk/res-auto"

    xmlns:tools="http://schemas.android.com/tools"

    android:layout_width="match_parent"

    android:layout_height="match_parent"

    tools:context=".MainActivity">

    <LinearLayout

        android:id="@+id/tab_linear"

        android:layout_width="match_parent"

        android:layout_height="wrap_content"

        android:layout_alignParentBottom="true"

        android:orientation="horizontal"

        android:background="@color/colorPrimary">

        <LinearLayout

            android:id="@+id/home"

            android:orientation="vertical"

            android:layout_weight="1"

            android:layout_width="0dp"

            android:layout_height="60dp">

            <ImageView

                android:layout_gravity="center"

                android:layout_width="40dp"

                android:layout_height="40dp"

                android:src="@drawable/home"/>

            <TextView

                android:layout_width="wrap_content"

                android:layout_height="wrap_content"

                android:layout_gravity="center"

                android:text="主页"

                android:textColor="@drawable/text_color_back" />

        </LinearLayout>

        <LinearLayout

            android:id="@+id/location"

            android:orientation="vertical"

            android:layout_weight="1"

            android:layout_width="0dp"

            android:layout_height="60dp">

            <ImageView

                android:layout_gravity="center"

                android:layout_width="40dp"

                android:layout_height="40dp"

                android:src="@drawable/location_view"/>

            <TextView

                android:layout_width="wrap_content"

                android:layout_height="wrap_content"

                android:layout_gravity="center"

                android:text="地点"

                android:textColor="@drawable/text_color_back" />

        </LinearLayout>

        <LinearLayout

            android:id="@+id/linear_polymer"

            android:orientation="vertical"

            android:layout_weight="1"

            android:layout_width="0dp"

            android:layout_height="60dp">

            <ImageView

                android:layout_gravity="center"

                android:layout_width="40dp"

                android:layout_height="40dp"

                android:src="@drawable/comment"/>

            <TextView

                android:layout_width="wrap_content"

                android:layout_height="wrap_content"

                android:layout_gravity="center"

                android:text="聊天"

                android:textColor="@drawable/text_color_back" />

        </LinearLayout>

        <LinearLayout

            android:orientation="vertical"

            android:id="@+id/linear_user"

            android:layout_weight="1"

            android:layout_width="0dp"

            android:layout_height="60dp">

            <ImageView

                android:layout_gravity="center"

                android:layout_width="40dp"

                android:layout_height="40dp"

                android:src="@drawable/contrast_view" />

            <TextView

                android:layout_gravity="center"

                android:text="设置"

                android:textColor="@drawable/text_color_back"

                android:layout_width="wrap_content"

                android:layout_height="wrap_content"/>

        </LinearLayout>

    </LinearLayout>

    <FrameLayout

        android:id="@+id/fragment_frame"

        android:layout_width="match_parent"

        android:layout_height="match_parent"

        android:layout_above="@+id/tab_linear">

    </FrameLayout>

</RelativeLayout>
编写好的界面如下: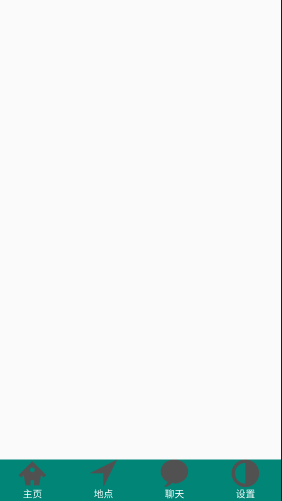
然后在我们最开始的演示视频当中大家也看到了我们每点击一次按钮,按钮的颜色就会发生变化,因此我们需要为每一个按钮编写选择器selector,这里就只展示第一个选择器"主页"的selector吧,还有三个按钮,咱们可以利用同样的方式建立selector,如果想要了解其他按钮的selector编写的话,请前往github:https://github.com/Geeksongs/ButtonTitile
二.home.xml
<?xml version="1.0" encoding="utf-8"?>

<selector xmlns:android="http://schemas.android.com/apk/res/android">

    <item android:state_selected="true" android:drawable="@drawable/home3"/>

    <item android:drawable="@drawable/home31"/>

</selector>
其中上面的图片我均放置在了drawble文件夹当中,这里强烈推荐阿里云矢量图标库,在这里可以找到你想要图标,网址如下:https://www.iconfont.cn/。然后找到你所需要的图标之后就可以进行下载啦!
三.fragment1.java
接下来是对碎片fragment1.java代码的编写,在这段代码的编写当中所需要注意的是我们将会返回整个fragment.xml的view布局,而不是直接返回一个textview或者imageview之类的控件,这样会让初学者感到十分困惑,为什么不返回整个fragment所对应的xml界面,代码如下:
import android.os.Bundle;

import androidx.annotation.Nullable;

import androidx.fragment.app.Fragment;

import android.view.LayoutInflater;

import android.view.View;

import android.view.ViewGroup;

import android.widget.TextView;

/**

 * A simple {@link Fragment} subclass.

 */

public class Fragment1 extends Fragment {

    private String fragmentText;

    private TextView fragmentTextView;

    @Nullable

    @Override

    public View onCreateView(LayoutInflater inflater, @Nullable ViewGroup container, @Nullable Bundle savedInstanceState) {

        View view=inflater.inflate(R.layout.fragment_fragment1,container,false);

        return view;//返回view布局

    }

    public Fragment1(String fragmentText) {

        this.fragmentText=fragmentText;

    }

}
其余几个fragment的代码也差不多,只是其构造方法的名称略有不同,所使用了fragment1(2/3/4),毕竟它们的类名不同嘛。编写了fragment的Java代码,是时候编写fragment的xml代码了,因为这样才可以将编写好的界面传递到主界面:activity_main.xml当中,代码如下:
四.fragment1.xml
<?xml version="1.0" encoding="utf-8"?>

<FrameLayout xmlns:android="http://schemas.android.com/apk/res/android"

    xmlns:tools="http://schemas.android.com/tools"

    android:layout_width="match_parent"

    android:layout_height="match_parent"

    tools:context=".Fragment1">

    <!-- TODO: Update blank fragment layout -->

    <TextView

        android:id="@+id/fragment1"

        android:layout_width="match_parent"

        android:layout_height="match_parent"

        android:textSize="30dp"

        android:text="这是第一个碎片" />

</FrameLayout>
由于安卓默认的字体比较小,我就略微修改了一下将字体的大小修改为了30dp,当然你也可以根据自己的需要进行改动,这个fragment文件我们一共需要建立4份,毕竟有四个底部标题栏的按钮。
五.MainActivity.java
下面是主活动的Java代码:
public class MainActivity extends AppCompatActivity implements View.OnClickListener{

    LinearLayout homeLinear;

    LinearLayout listLinear;

    LinearLayout polyLinear;

    LinearLayout userLinear;

    Fragment1 fragmentHome;

    Fragment2 fragmentList;

    Fragment3 fragmentPoly;

    Fragment4 fragmentUser;

    private FragmentManager mfragmentManger;

    @Override

    protected void onCreate(Bundle savedInstanceState) {

        super.onCreate(savedInstanceState);

        setContentView(R.layout.activity_main);

        homeLinear= (LinearLayout) findViewById(R.id.home);

        listLinear= (LinearLayout) findViewById(R.id.location);

        polyLinear= (LinearLayout) findViewById(R.id.linear_polymer);

        userLinear= (LinearLayout) findViewById(R.id.linear_user);

        homeLinear.setOnClickListener(this);

        listLinear.setOnClickListener(this);

        polyLinear.setOnClickListener(this);

        userLinear.setOnClickListener(this);

        mfragmentManger = getSupportFragmentManager();

        homeLinear.performClick();

    }

    @Override

    public void onClick(View view) {

        FragmentTransaction fragmentTransaction = mfragmentManger.beginTransaction();//只能是局部变量,不能为全局变量,否则不能重复commit

        //FragmentTransaction只能使用一次

        hideAllFragment(fragmentTransaction);

        switch (view.getId()){

            case R.id.home:

                setAllFalse();

                homeLinear.setSelected(true);

                if (fragmentHome==null){

                    fragmentHome=new Fragment1("Home");

                    fragmentTransaction.add(R.id.fragment_frame,fragmentHome);

                }else{

                    fragmentTransaction.show(fragmentHome);

                }

                break;

            case R.id.location:

                setAllFalse();

                listLinear.setSelected(true);

                if(fragmentList==null){

                    fragmentList=new Fragment2("List");

                    fragmentTransaction.add(R.id.fragment_frame,fragmentList);

                }else {

                    fragmentTransaction.show(fragmentList);

                }

                break;

            case R.id.linear_polymer:

                setAllFalse();

                polyLinear.setSelected(true);

                if(fragmentPoly==null){

                    fragmentPoly=new Fragment3("Polymer");

                    fragmentTransaction.add(R.id.fragment_frame,fragmentPoly);

                }else {

                    fragmentTransaction.show(fragmentPoly);

                }

                break;

            case R.id.linear_user:

                setAllFalse();

                userLinear.setSelected(true);

                if(fragmentUser==null){

                    fragmentUser=new Fragment4("User");

                    fragmentTransaction.add(R.id.fragment_frame,fragmentUser);

                }else {

                    fragmentTransaction.show(fragmentUser);

                }

                break;

        }

        fragmentTransaction.commit();//记得必须要commit,否则没有效果

}

    private void hideAllFragment(FragmentTransaction fragmentTransaction) {

        if(fragmentHome!=null){

            fragmentTransaction.hide(fragmentHome);

        }

        if(fragmentList!=null){

            fragmentTransaction.hide(fragmentList);

        }

        if(fragmentPoly!=null){

            fragmentTransaction.hide(fragmentPoly);

        }

        if(fragmentUser!=null){

            fragmentTransaction.hide(fragmentUser);

        }

    }

    private void setAllFalse() {

        homeLinear.setSelected(false);

        listLinear.setSelected(false);

        polyLinear.setSelected(false);

        userLinear.setSelected(false);

    }

}
咱们的底部标题栏就这样完美地实现啦,对于代码和整个工程布局还不太明白的地方可以参见github源码:https://github.com/Geeksongs/ButtonTitile,欢迎star呀!
Android利用碎片fragment实现底部标题栏(Github模板开源)的更多相关文章
- Android开发:碎片Fragment完全解析fragment_main.xml/activity_main.xml
Android开发:碎片Fragment完全解析 为了让界面可以在平板上更好地展示,Android在3.0版本引入了Fragment(碎片)功能,它非常类似于Activity,可以像 Activi ...
- Android学习——碎片Fragment的使用
一.碎片的简单用法(实现在一个活动中添加两个碎片,并让这两个碎片平分活动空间) 1.新建一个FragmentTest项目: 新建一个左侧碎片布局left_fragment.xml,代码如下:(只放置一 ...
- Android之碎片Fragment
Fragment是个特别的存在,有点像报纸上的专栏,看起来只占据页面的一小块,但是这一小块有自己的生命周期,可以自行其是,仿佛独立王国,并且这一小块的特性无论在哪个页面,给一个位置就行,添加以后不影响 ...
- Android开发:碎片Fragment完全解析fragment_main.xml/activity_main.xml(转)
注明:这个转的,见谅未能标明原始出处 我们都知道,Android上的界面展示都是通过Activity实现的,Activity实在是太常用了,我相信大家都已经非常熟悉了,这里就不再赘述. 但是Activ ...
- 【Android】碎片Fragment
1.碎片可以让界面在平板上更好地展示. 2.碎片是一种可以嵌入到活动中的UI片段,它能让程序更加合理和充分地利用一个大屏幕的空间.有自己的生命周期,能包含布局. 3.新建碎片类继承Fragment,可 ...
- Android学习笔记- Fragment实例 底部导航栏的实现
1.要实现的效果图以及工程目录结构: 先看看效果图吧: 接着看看我们的工程的目录结构: 2.实现流程: Step 1:写下底部选项的一些资源文件 我们从图上可以看到,我们底部的每一项点击的时候都有不同 ...
- Android交流会-碎片Fragment,闲聊单位与尺寸
女孩:又周末了哦~ 男孩:那么今日来开个交流会,我们也学一学人家高大尚的大会,自己开一个,广州站,Android开发攻城狮交流会~ 1.Fragment概要: Android从3.0开始引入了Frag ...
- android 开发 碎片Fragment布局例子(用按键切换碎片布局)
实现思路: 1.写一个父类布局,里面写一个按键和一个帧布局(用于给Fragment布局后续替代) 2.写3个子布局,并且在写3个class继承Fragment布局 3.在MainActivity的cl ...
- 安卓Android碎片fragment实现静态加载
静态加载好后的界面如下,两个碎片分别位于一个活动的左边和右边: 左边和右边分别为一个碎片,这两个碎片正好将一整个活动布满.一个活动当中可以拥有多个碎片,碎片的含义就是可以在同一个UI界面下,将这个界面 ...
随机推荐
- 2018-7-30 python基本数据类型
python基本数据类型 int 整数 str 字符串. 一般不存放大量的数据 bool 布尔值. 用来判断. True, False list 列表.用来存放大量数 ...
- Mongoose 基本用法
1. SchemaTypes数据类型 数据类型 描述 String 字符串 Number 数字 Date 日期 Boolean 布尔值 Mixed 混合 Objectid 对象ID Array 数组 ...
- MONGODB-LINUX 安装步骤
1.MongoDB 提供了 linux 各发行版本 64 位的安装包,你可以在官网下载安装包. 下载地址:https://www.mongodb.com/download-center#communi ...
- 聚类(一)——Kmeans
Clustering 聚类K-means 聚类是机器学习和数据挖掘领域的主要研究方向之一,它是一种无监督学习算法,小编研究生时期的主要研究方向是“数据流自适应聚类算法”,所以对聚类算法有比较深刻的理解 ...
- 【建站02】WordPress主题设置
大家好,我是帝哥.相信很多朋友看了我上一篇文章的介绍之后已经可以搭建自己的个人网站了,但是网站的功能和美观程度都还是有所欠缺的,现在呢,再给大家大概的介绍一些如何美化自己的网站,当然了,这个过程也是很 ...
- 创建 numpy.array
# 导包 import numpy as np numpy.array nparr = np.array([i for i in range(10)]) nparr # array([0, 1, 2, ...
- Python SQLAlchemy入门教程
本文将以Mysql举例,介绍sqlalchemy的基本用法.其中,Python版本为2.7,sqlalchemy版本为1.1.6. 一. 介绍 SQLAlchemy是Python中最有名的ORM工具. ...
- Tomcat性能调优实战
今日帮朋友做了tomcat性能调优的实际操作,心得记录一下. 服务器:Windows2017 配置:CPU 4 内存 8G Tomcat8.0+版本. 压力测试工具:apache-jmeter-4.0 ...
- Spring容器自动调用方法的两种方式
先看一个Spring中Bean的实例化过程: 1.配置文件中指定Bean的init-method参数 <bean class="com.jts.service.UserService& ...
- pip的简单用法
pip的用法: 其实跟linux的yum很像,它可以帮我们安装python所需要的环境包,并且可以包解决依赖关系 eg: 列出已安装的包 pip list 安装要安装的包 pip install xx ...