2、ansilbe常用模块详解及inventory介绍
Ansible
ansible格式:
ansible <host-pattern> [-f forks] [-m module_name] [-a args]
args: 用法
key=value 比如调用user模块时,name=dongshi或者state=present
# ansible all -m cron -a 'name="sync time from ntpserver" minute="*/10" job="/sbin/ntpdate -u pool.ntp.org &> /dev/null"'
# ansible all -m cron -a "name='sync time from ntpserver' minute='*/10' job='/sbin/ntpdate -u 133.100.11.8 &> /dev/null'"
# ansible all -a '/sbin/ntpdate -u pool.ntp.org'
# ansible all -m cron -a 'name="sync time from ntpserver" state=absent' //删除任务时只需指定任务的name,和跟state=absent
//注意上面两者的单双引号的引用,-a后面如果先用'',那么里面的name="sync time from ntpserver"就要用双引号,可互换,但不能混用。
//多个key=value之间要用空格隔开,state如果省略,就是默认的present,如果不指明user,默认就是管理员
# crontab -l 时间同步IP地址:https://www.cnblogs.com/xxlu/archive/2017/06/09/6965548.html
#Ansible: sync time from ntpserver
*/10 * * * * /sbin/ntpdate -u pool.ntp.org &> /dev/null
注意:command模块要执行命令无须为key=value格式,而是直接给出要执行的命令即可;
安装epel源
# yum install epel-release
# yum repolist
# ansible websrvs -a 'wget -O /tmp/ansible.rpm http://dl.fedoraproject.org/pub/epel/epel-release-latest-7.noarch.rpm'
//下载文件,首先必须指明下面文件保存的路径已经文件明:/tmp/ansible.rpm,另外就是被管控主机要安装了所调用的命令,这里142和143要安装wget命令。
//wegt可以使用静默模式
192.168.184.143 | FAILED | rc= >>     //143没有安装wget命令

[Errno ] No such file or directory

192.168.184.142 | SUCCESS | rc= >>    //142安装了wget命令

---- ::--  http://dl.fedoraproject.org/pub/epel/epel-release-latest-7.noarch.rpm

Resolving dl.fedoraproject.org (dl.fedoraproject.org)... 209.132.181.23, 209.132.181.24

Connecting to dl.fedoraproject.org (dl.fedoraproject.org)|209.132.181.23|:... connected.

HTTP request sent, awaiting response...  OK

Length:  (15K) [application/x-rpm]

Saving to: ‘/tmp/ansible.rpm’

     0K .......... ....                                       % .3K=.2s

-- :: (77.3 KB/s) - ‘/tmp/ansible.rpm’ saved [/]
# ansible websrvs -a 'yum install -y wget' //批量安装wegt
192.168.184.142 | SUCCESS | rc= >>       //之前被管控142主机已经安装了wget

Loaded plugins: fastestmirror

Loading mirror speeds from cached hostfile

 * base: mirrors.neusoft.edu.cn

 * extras: mirrors.tuna.tsinghua.edu.cn

 * updates: mirrors.neusoft.edu.cn

Package wget-1.14-.el7.x86_64 already installed and latest version

Nothing to do

192.168.184.143 | SUCCESS | rc= >>    //被管控主机143之前并没有安装,所以这里安装成功

Loaded plugins: fastestmirror

Determining fastest mirrors

 * base: mirrors.neusoft.edu.cn

 * epel: mirrors.tuna.tsinghua.edu.cn

 * extras: mirrors.tuna.tsinghua.edu.cn

 * updates: mirrors.tuna.tsinghua.edu.cn

Resolving Dependencies

--> Running transaction check

---> Package wget.x86_64 :1.14-.el7 will be installed

--> Finished Dependency Resolution

Dependencies Resolved

================================================================================

 Package         Arch              Version                Repository       Size

================================================================================

Installing:

 wget            x86_64            1.14-.el7            base             k

Transaction Summary

================================================================================

Install   Package

Total download size:  k

Installed size: 2.0 M

Downloading packages:

Running transaction check

Running transaction test

Transaction test succeeded

Running transaction

  Installing : wget-1.14-.el7.x86_64                                      /

  Verifying  : wget-1.14-.el7.x86_64                                      /

Installed:

  wget.x86_64 :1.14-.el7

Complete!
为websrvs组中的两台主机创建一个用户
# ansible-doc -s user //首先可以查看user的语法
- name: Manage user accounts

  user:

      append:                # If `yes', will only add groups, not set them to just the list in `groups'.

      comment:               # Optionally sets the description (aka `GECOS') of user account.

      createhome:            # Unless set to `no', a home directory will be made for the user when the account is created or if the

                               home directory does not exist.

      expires:               # An expiry time for the user in epoch, it will be ignored on platforms that do not support this.

                               Currently supported on Linux and FreeBSD.

      force:                 # When used with `state=absent', behavior is as with `userdel --force'.

      generate_ssh_key:      # Whether to generate a SSH key for the user in question. This will *not* overwrite an existing SSH key.

      group:                 # Optionally sets the user's primary group (takes a group name).

      groups:                # Puts the user in  list of groups. When set to the empty string ('groups='), the user is removed from

                               all groups except the primary group. Before version 2.3, the only input

                               format allowed was a 'comma separated string', now it should be able to

                               accept YAML lists also.

      home:                  # Optionally set the user's home directory.

      local:                 # Forces the use of "local" command alternatives on platforms that implement it. This is useful in

                               environments that use centralized authentification when you want to

                               manipulate the local users. I.E. it uses `luseradd` instead of

                               `useradd`. This requires that these commands exist on the targeted

                               host, otherwise it will be a fatal error.

      login_class:           # Optionally sets the user's login class for FreeBSD, OpenBSD and NetBSD systems.

      move_home:             # If set to `yes' when used with `home=', attempt to move the user's home directory to the specified

                               directory if it isn't there already.

      name:                  # (required) Name of the user to create, remove or modify.

      non_unique:            # Optionally when used with the -u option, this option allows to change the user ID to a non-unique

                               value.

      password:              # Optionally set the user's password to this crypted value.  See the user example in the github examples

                               directory for what this looks like in a playbook. See

                               http://docs.ansible.com/ansible/faq.html#how-do-i-generate-crypted-

                               passwords-for-the-user-module for details on various ways to generate

                               these password values. Note on Darwin system, this value has to be

                               cleartext. Beware of security issues.

      remove:                # When used with `state=absent', behavior is as with `userdel --remove'.

      seuser:                # Optionally sets the seuser type (user_u) on selinux enabled systems.

      shell:                 # Optionally set the user's shell.

      skeleton:              # Optionally set a home skeleton directory. Requires createhome option!

      ssh_key_bits:          # Optionally specify number of bits in SSH key to create.

      ssh_key_comment:       # Optionally define the comment for the SSH key.

      ssh_key_file:          # Optionally specify the SSH key filename. If this is a relative filename then it will be relative to

                               the user's home directory.

      ssh_key_passphrase:    # Set a passphrase for the SSH key.  If no passphrase is provided, the SSH key will default to having no

                               passphrase.

      ssh_key_type:          # Optionally specify the type of SSH key to generate. Available SSH key types will depend on

                               implementation present on target host.

      state:                 # Whether the account should exist or not, taking action if the state is different from what is stated.

      system:                # When creating an account, setting this to `yes' makes the user a system account.  This setting cannot

                               be changed on existing users.

      uid:                   # Optionally sets the `UID' of the user.

      update_password:       # `always' will update passwords if they differ.  `on_create' will only set the password for newly

                               created users.

(END)
# ansible websrvs -m user -a "name=dongshi state=present" //最关键的一项就是名称,state表示状态,-m user表示调用user模块
192.168.184.142 | SUCCESS => {

    "changed": true,

    "comment": "",

    "createhome": true,

    "group": ,

    "home": "/home/dongshi",

    "name": "dongshi",

    "shell": "/bin/bash",

    "state": "present",

    "system": false,    //不是系统用户

    "uid":

}

192.168.184.143 | SUCCESS => {

    "changed": true,

    "comment": "",

    "createhome": true,

    "group": ,

    "home": "/home/dongshi",

    "name": "dongshi",

    "shell": "/bin/bash",

    "state": "present",

    "system": false,

    "uid":

}
# ansible websrvs -m user -a "name=dongshi state=absent remove=yes" //删除用户,同时删除家目录
192.168.184.143 | SUCCESS => {

    "changed": true,

    "force": false,

    "name": "dongshi",

    "remove": false,

    "state": "absent"

}

192.168.184.142 | SUCCESS => {

    "changed": true,

    "force": false,

    "name": "dongshi",

    "remove": false,

    "state": "absent"

}
常用模块
command
-a 'COMMAND' //-a可以省略
user
-a 'name= state={present|absent} system= uid='
group
-a 'name= gid= state= system='
cron
-a 'name= minute= hour= day= month= weekday= job= user= state='
copy
-a 'dest= src= mode= owner= group='
# ansible websrvs -m copy -a 'src=/etc/fstab dest=/tmp/fstab.tmp mode=600'
file
-a 'path= mode= owner= group= state={directory|link|present|absent} src='
# ansible websrvs -m file -a 'path=/tmp/dir state=directory'
# ansible websrvs -m file -a 'path=/tmp/fstab.symlink state=link src=/tmp/fstab.tmp'
//创建一个连接文件/tmp/fstab.symlink,连接目标指向src,如果其中一台被管控主机没有连接目标的文件即fstab.tmp,那么就会报错,也可以使用force=yes强制
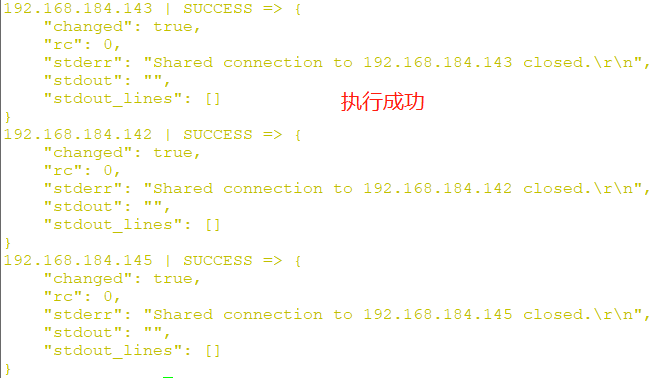
# ansible all -m file -a 'path=fstab.sym state=link src=/tmp/fstab.tmp force=yes' //在没有连接目标文件的情况下强制创建
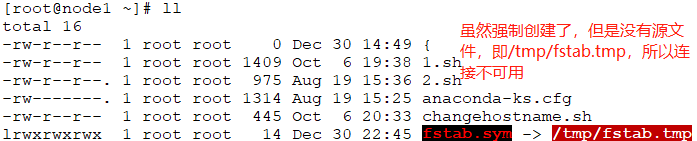
# ansible all -m file -a 'path=fstab.sym state=absent force=yes' //强制删除链接
ping
没有参数
# ansible all -m ping
yum
-a 'name= state={present|latest|absent}'
# ansible websrvs -m yum -a 'name=nginx state=latest' //安装nginx,但是必须要有epel源,这里同时安装了centos7和centos6都没有问题
//如果没有epel源,可参考https://www.jianshu.com/p/fd9bc81e94ed
# ansible websrvs -m yum -a 'name=nginx state=absent' //卸载nginx
service //管理每一个被管控主机上的服务的
-a 'name= state={started|stopped|restarted} enabled='
# ansible websrvs -m service -a 'name=nginx state=started enabled=yes' //同时启动centos6和centos7主机上的nginx服务
# ansible websrvs -m service -a 'name=nginx state=stopped' //关闭服务
shell //指明一个shell程序运行后面给出的命令,而不是直接在当前命令中运行
-a 'COMMAND' //无需指明key=value
假如在每一个主机上创建一个centos用户,并添加密码为centos
# ansible websrvs -m user -a 'name=ceontos state=absent' //此时centos用户创建成功,但忘了加密码,用command模块加密码
# ansible websrvs -m command -a 'echo centos | passwd --stdin centos' //在管控主机上为centos用户加密码
192.168.184.143 | SUCCESS | rc=0 >>
centos | passwd --stdin centos //注意,这里只是把centos | passwd --stdin centos当作字符串echo出来了而已,并没有把"|"理解为管道去执行
192.168.184.142 | SUCCESS | rc=0 >>
centos | passwd --stdin centos
192.168.184.145 | SUCCESS | rc=0 >>
centos | passwd --stdin centos
# tail -2 /etc/shadow
centos:!!:17896:0:99999:7:::
dongshi:$6$8/UL2igK$fEp5oQTQG4pVkHBuuIkykj5dimzVJBDptOx7kzIXflyXGdUm.sAAZHmZXKbS9UYskiEMNW.Jq7QcL15viv1cQ0:17896:0:99999:7:::
//查看任何一个被管控主机时,centos用户是没有密码的,因为在使用ansible在管控主机上为被管控主机上的用户添加密码时,使用echo命令加管道"|",这时echo命令就在当前主机(管控主机)上执行此命令了,而不是把echo命令送到目标主机上后再执行echo命令的。所以要利用管道做一些复杂命令时,就比如上一个例子,那么command命令是无法实现的,如果想把这些命令(即'echo centos | passwd --stdin centos')放在一起执行,那么需要把这些命令放在shell子进程中实现,这就是shell模块的意义。
# ansible websrvs -m shell -a 'echo centos | passwd --stdin centos' //调用shell模块
192.168.184.142 | SUCCESS | rc=0 >>
Changing password for user centos.
passwd: all authentication tokens updated successfully. //这里才把"|"理解为管道
192.168.184.143 | SUCCESS | rc=0 >>
Changing password for user centos.
passwd: all authentication tokens updated successfully.
192.168.184.145 | SUCCESS | rc=0 >>
Changing password for user centos.
passwd: all authentication tokens updated successfully.
# tail -2 /etc/shadow //此时centos用户的密码才算添加成功
centos:$6$A2c63GoQ$RTqD0MCCIrvioLQDNs5xc2FQLVdCGuA31H4uu5zTDKWE.lhThdQ43THOhLP3GXrcJmqisUj9WP/ChZ8cTicFn.:17896:0:99999:7:::
dongshi:$6$8/UL2igK$fEp5oQTQG4pVkHBuuIkykj5dimzVJBDptOx7kzIXflyXGdUm.sAAZHmZXKbS9UYskiEMNW.Jq7QcL15viv1cQ0:17896:0:99999:7:::
script //如果本地主机有一个脚本,但这个脚本不想在本地运行,而是在每一个远程主机上运行,就调用script模块。
//它会先把脚本传送到目标主机,然后把脚本运行一遍,运行完后再把脚本删除掉。
# ansible-doc -s script //查看模块script的详细信息
-a '/path/to/script' //指明路径就可以了,-a可以省略
实例:在管控主机上创建一个脚本
# vim /tmp/test.sh //注意这里并没有为test.sh添加执行权限
#!/bin/bash
#
echo "$(hostname) ansible test." > /tmp/ansible.txt
# ansible websrvs -m script -a '/tmp/test.sh' //自动把脚本复制到远程主机,调用bash shell去执行这个脚本,执行完成后,再把脚本删除
# cat /tmp/ansible.txt //在远程主机上查看创建结果
node2 ansible test.
setup - name: Gathers facts about remote hosts 从远程主机收集facts,包括主机名、IP地址、操作系统版本号、多少颗CPU等物理平台的相关信息。
在指挥每一个被管控主机运行ansible程序时或在ansible的指挥下被管控主机完成某些任务时,每一个被管控主机会首先向ansible报告其主机相关信息,或者使用setup去收集,要求被管控主机所有的可收集信息都报告给管控主机,收集来的每一个元素和元素的值,每一个元素的元素名都可以直接当作变量使用。这些变量通常称为facts
# ansible websrvs -m setup | less //由于信息太多,所以后面加了一个less

比如ansible_architecture是facts的名称,而x86_64是facts的值,facts的名称会在被管控主机在被指挥的后,运行的时候都报告给管控主机的,因此可以在配置文件中直接调用这些变量名来作为判断标准。
Playbooks 可以把要实现的多种任务编排在一个文件中,这个文件就叫playbooks
playbooks的核心元素:
tasks: 任务 playbooks中最核心的元素
variables:变量,有很多种
templates:模板,可以根据模板创建配置文件的一种方式,比如copy模块,但copy文件只能原封不动的把文件传输到指定主机,如果想根据目标主机当前的实际状态配置 某些参数的值,就需要借助于templates机制,通过文件提供的模板来实现
handlers:处理器,主要作用:比如配置文件修改了,那么就要重启服务。一旦出现异常状况,如何处理就要通过handlers进行指定
roles:角色
playbooks是如何定义的呢?它依赖于YAML
- name:deploy web server //-:引导一个列表,name、user、sudo和hosts属于同一个列表中四个key value键值对,遵循特定格式
user:foouser
sudo:true
hosts:all
tasks:
name:install apache
apt:pkg=apache2-mpm-prefork state=latest
1、YAML介绍
YAML是一个可读性高的用来表达资料序列的格式。YAML参考了其他多种语言,包括:XML、C语言、Python、Perl以及电子邮件格式RFC2822等。
Clark Evans在2001年在首次发表了这种语言,另外Ingy döt Net与Oren Ben-Kiki也是这语言的共同设计者。
YAML Ain't Markup Language,即YAML不是XML。不过,在开发的这种语言时,YAML的意思其实是:"Yet Another Markup Language"(仍是一种标记语言)。
2、YAML的特性:
YAML的可读性好
YAML和脚本语言的交互性好
YAML使用实现语言的数据类型
YAML有一个一致的信息模型
YAML易于实现
YAML可以基于流来处理
YAML表达能力强,扩展性好
更多的内容及规范参见http://www.yaml.org。
3、YAML语法
YAML的语法和其他高阶语言类似,并且可以简单表达清单、散列表(键值)、标量等数据结构。其结构(Structure)通过空格来展示,序列(Sequence)里的项用"-"来代表,Map里的键值对用":"分隔。
下面是一个示例:
name: John Smith //这是一个键值对,即map
age: 41 //这也是一个键值对
gender: Male
spouse: //键值数据结构是可以嵌套的,比如spouse是键,里面嵌套的都是值
name: Jane Smith //这是一对键值对
age: 37
gender: Female //红色部分三个都是键spouse的值,都叫做映射
children: //children是一个键,它的值由一个列表组成,这个列表有两个元素。如果同一类元素出现2个以上时,使用"-"来引导,这种就叫做列表
- name: Jimmy Smith
age: 17
gender: Male
- name: Jenny Smith
age 13
gender: Female
YAML文件扩展名通常为.yaml,如example.yaml。
3.1 list
列表的所有元素均使用"-"打头,列表内部的元素可以是字符串(- Apple),可以是键值对(- name: Jimmy Smith),也可以是N个键值对组合起来的,是一种扩展或嵌套
例如:
# A list of tasty fruits
- Apple
- Orange
- Strawberry
- Mango
3.2 dictionary 字典,由多个键值对共同组成的集合
字典通过key与value进行标识,
例如:
---
# An employee record
name: Example Developer
job: Developer
skill: Elite
也可以将key:value放置于{}中进行表示,用","进行分割。
例如:
---
# An employee record
{name: Example Developer, job: Developer, skill: Elite}
YAML文件格式介绍
# vim test.yml
tasks: //tasks是键,下面三个任务是值。它的值是一个列表,每一个列表又是一个字典(这里的字段有两个键值组成)
- name: install a pkg //第一个任务
yum: name=nginx state=latest
- name: copy conf file //第二个任务
copy: src= dest= state=
- name: start nginx service //第三个任务
service: name= state=
Ansible基础元素
1、变量
1.1.1 变量命名
变量名仅能由字母、数字和下划线组成,且只能以字母开头。
1.1.2 facts
facts是由正在通信的远程目标主机发回的信息,这些信息被保存在ansible变量中。要获取指定的远程主机所支持的所有facts,可使用如下命令进行:
# ansible hostname -m setup
1.1.3 register
把任务的输出定义为变量,然后用于其他任务,示例如下:
tasks:
- shell: /usr/bin/foo //把/usr/bin/foo运行的结果保存在register中,然后调用这个register
register: foo_result
ignore_errors: True
1.1.4 通过命令行传递变量
在运行playbook的时候也可以传递一些变量供playbook使用,示例如下:
ansible-playbook test.yml --extra-vars "hosts=www user=mageedu"
1.1.5 通过roles传递变量
当给一个主机应用角色的时候可以传递变量,然后在角色内使用这些变量,示例如下:
- hosts: webservers
roles:
- commom
- { role: foo_app_instance, dir: '/web/htdocs/a.com', port: 8080 }
1.2 Inventory
ansible的主要功用在于批量主机操作,为了便捷地使用其中的部分主机,可以在inventory file中将其分组命名。默认的inventory file为/etc/ansible/hosts。
inventory file可以有多个,且也可以通过Dynamic Inventory来动态生成。
1.2.1 inventory文件格式
inventory文件遵循INI文件风格,中括号中的字符为组名。可以将同一个主机同时归并到多个不同的组中;此外,当如若目标主机使用了非默认的SSH端口,还可以在主机名称之后使用冒号加端口号来标明。
ntp.magedu.com
[webservers] //组名
www1.magedu.com:2222
www2.magedu.com
[dbservers]
db1.magedu.com
db2.magedu.com
db3.magedu.com
如果主机名称遵循相似的命名模式,还可以使用列表的方式标识各主机,例如:
[webservers] //使用通配符
www[01:50].example.com
[databases] //使用列表
db-[a:f].example.com
1.2.2 主机变量,在inventory中也可以使用变量
可以在inventory中定义主机时为其添加主机变量以便于在playbook中使用。例如:
hostname name=value name=value
[webservers]
www1.magedu.com http_port=80 maxRequestsPerChild=808 //http_port是变量名,80就是值
www2.magedu.com http_port=8080 maxRequestsPerChild=909 //主机变量的好处是即使变量名一样,但每一个主机都可以有与其他主机不一样的取值
上述是给每个主机定义变量,即在www1.magedu.com主机上执行时,调用某个模板直接可以调用http_port变量替换成80即变量值。除此之外还可以在主机后面定义主机参数,主机参数不是为了在模板中调用变量的目的,而是链接主机时它的ssh参数。可以在管控主机和非管控主机之间不做认证,而是在本地文件中指明absible_ssh_host,详情见1.2.5。
1.2.3 组变量
组变量是指赋予给指定组内所有主机上的在playbooks中可用的变量。例如:
[groupname:vars]
name=value
name=value
[webservers]
www1.magedu.com
www2.magedu.com
[webservers:vars] //这里的webservers就是上面定义的[webservers]组 ,webservers是组名,可变。:vars是固定格式不能改变,
ntp_server=ntp.magedu.com
nfs_server=nfs.magedu.com
1.2.4 组嵌套
inventory中,组还可以包含其它的组,并且也可以向组中的主机指定变量。不过,这些变量只能在ansible-playbook中使用,而ansible不支持。例如:
[apache]
httpd1.magedu.com
httpd2.magedu.com
[nginx]
ngx1.magedu.com
ngx2.magedu.com
[webservers:children] //webservers表示组名,children表示要调用apache和nginx两个组,这是固定格式:children是不能变的,webservers即组名可变
apache
nginx
[webservers:vars]
ntp_server=ntp.magedu.com
1.2.5 inventory参数
ansible基于ssh连接inventory中指定的远程主机时,还可以通过参数指定其交互方式;这些参数如下所示:
ansible_ssh_host //链接的IP
The name of the host to connect to, if different from the alias you wish to give to it.
ansible_ssh_port //链接的端口
The ssh port number, if not 22
ansible_ssh_user //链接的用户
The default ssh user name to use.
ansible_ssh_pass //链接的密码
The ssh password to use (this is insecure, we strongly recommend using --ask-pass or SSH keys)
ansible_sudo_pass
The sudo password to use (this is insecure, we strongly recommend using --ask-sudo-pass)
ansible_connection
Connection type of the host. Candidates are local, ssh or paramiko. The default is paramiko before Ansible 1.2, and 'smart' afterwards which detects whether usage of 'ssh' would be feasible based on whether ControlPersist is supported.
ansible_ssh_private_key_file
Private key file used by ssh. Useful if using multiple keys and you don't want to use SSH agent.
ansible_shell_type
The shell type of the target system. By default commands are formatted using 'sh'-style syntax by default. Setting this to 'csh' or 'fish' will cause commands executed on target systems to follow those shell's syntax instead.
ansible_python_interpreter
The target host python path. This is useful for systems with more
than one Python or not located at "/usr/bin/python" such as \*BSD, or where /usr/bin/python
is not a 2.X series Python. We do not use the "/usr/bin/env" mechanism as that requires the remote user's
path to be set right and also assumes the "python" executable is named python, where the executable might
be named something like "python26".
ansible\_\*\_interpreter
Works for anything such as ruby or perl and works just like ansible_python_interpreter.
This replaces shebang of modules which will run on that host.
2、ansilbe常用模块详解及inventory介绍的更多相关文章
- Ansible安装部署及常用模块详解
Ansible命令使用 Ansible语法使用ansible <pattern_goes_here> -m <module_name> -a <arguments> ...
- ansible中常用模块详解
ansible中常用的模块详解: file模块 ansible内置的可以查看模块用法的命令如下: [root@docker5 ~]# ansible-doc -s file - name: Sets ...
- python常用模块详解
python常用模块详解 什么是模块? 常见的场景:一个模块就是一个包含了python定义和声明的文件,文件名就是模块名字加上.py的后缀. 但其实import加载的模块分为四个通用类别: 1 使用p ...
- Ansible安装部署以及常用模块详解
一. Ansible 介绍Ansible是一个配置管理系统configuration management system, python 语言是运维人员必须会的语言, ansible 是一个基于py ...
- python中常用模块详解二
log模块的讲解 Python 使用logging模块记录日志涉及四个主要类,使用官方文档中的概括最为合适: logger提供了应用程序可以直接使用的接口API: handler将(logger创建的 ...
- python3 常用模块详解
这里是python3的一些常用模块的用法详解,大家可以在这里找到它们. Python3 循环语句 python中模块sys与os的一些常用方法 Python3字符串 详解 Python3之时间模块详述 ...
- Ansible 常用模块详解
经过前面的介绍,我们已经熟悉了 Ansible 的一些常识性的东西和如何编译安装Ansible,从本章开始我们将全面介绍 Ansible 的各种生产常用模块,这些也是我们使用 Ansible 的过程中 ...
- ansible常用模块详解(三)
1.模块介绍 明确一点:模块的执行就类似是linux命令的一条命令,就单单的是为了执行一条语句,不是批量的操作,批量操作需要用到playbook内类似shell编写脚本进行批量. 1.1 模块的使用方 ...
- python常用模块详解(一)
一.简介 模块是一个保存了Python代码的文件.模块能定义函数,类和变量.模块里也能包含可执行的代码 模块分为三种: 自定义模块 内置标准模块 开源模块(第三方) 自定义模块: 模块导入 impor ...
随机推荐
- 20165305 苏振龙《Java程序设计》第七周学习总结
第十一章 JDBC技术在数据库开发中占有很重要的地位,JDBC操作不同的数据库仅仅是连接方式上的差异而已,使用JDBC的应用程序一旦和数据库建立连接,就可以使用JDBC提供的API操作数据库. 当查询 ...
- python 在列表,元组,字典变量前加*号
废话不说,直接上代码(可能很多人以前不知道有这种方法): a=[1,2,3]b=(1,2,3)c={1:"a",2:"b",3:"c"}pr ...
- interface接口——公共规范标准
黑马课程学习记录: 个人理解也可以看成一个类:源代码还是.java,编译后的字节文件还是.class 抽象类中可以含有普通成员方法,但是有抽象方法的必须是抽象类或者接口, 接口中只能含有抽象方法: 创 ...
- Music life
some songs: you are you are <<你眼中的世界> Trouble I'm In > 1:40 secs 忧桑钢琴曲 < 豆花之歌 The Tru ...
- [转载]C#中使用正则表达式验证电话号码、手机号、身份证号、数字和邮编
原文出处:https://www.cnblogs.com/wuhuisheng/archive/2011/03/23/1992652.html 验证电话号码的主要代码如下: public bool I ...
- ubuntu_virtualenv
sudo pip install virtualenv 1.安装virtualenv(需要先安装pip): $ [sudo] pip install virtualenv 2.创建虚拟环境: $ vi ...
- Errors occurred during the build. Errors running builder 'Validation' on pro
选择项目-->右键-->Properties-->Builders 右面有四个选项,把Validation前面勾去掉
- nginx 启动 + uwsgi + django
https://www.cnblogs.com/chenice/p/6921727.html https://blog.csdn.net/Aaroun/article/details/78218131
- mysql INSERT ... ON DUPLICATE KEY UPDATE语句
网上关于INSERT ... ON DUPLICATE KEY UPDATE大多数文章都是同一篇文章转来转去,首先这个语法的目的是为了解决重复性,当数据库中存在某个记录时,执行这条语句会更新它,而不存 ...
- python的类和实例化对象
一切皆对象,类也是对象,类来自于元类type,如果一个类没有声明自己的元类,默认它就是元类. 即类是元类的实例,通过type(类)会显示type,而实例来自于类. 类有两个属性,数据属性和函数属性,下 ...