【深度学习】BP反向传播算法Python简单实现
转载:火烫火烫的
个人觉得BP反向传播是深度学习的一个基础,所以很有必要把反向传播算法好好学一下
得益于一步一步弄懂反向传播的例子这篇文章,给出一个例子来说明反向传播
不过是英文的,如果你感觉不好阅读的话,优秀的国人已经把它翻译出来了。
一步一步弄懂反向传播的例子(中文翻译)
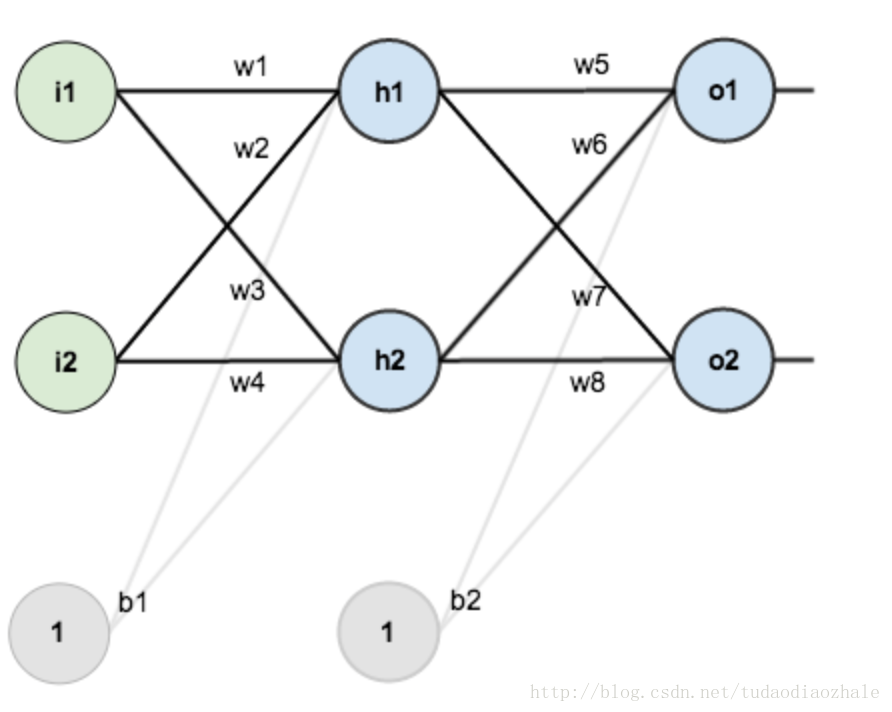
然后我使用了那个博客的图片。这次的目的主要是对那个博客的一个补充。但是首先我觉得先用面向过程的思想来实现一遍感觉会好一点。
随便把文中省略的公式给大家给写出来。大家可以先看那篇博文
import numpy as np # "pd" 偏导
def sigmoid(x):
return 1 / (1 + np.exp(-x)) def sigmoidDerivationx(y):
return y * (1 - y) if __name__ == "__main__":
#初始化
bias = [0.35, 0.60]
weight = [0.15, 0.2, 0.25, 0.3, 0.4, 0.45, 0.5, 0.55]
output_layer_weights = [0.4, 0.45, 0.5, 0.55]
i1 = 0.05
i2 = 0.10
target1 = 0.01
target2 = 0.99
alpha = 0.5 #学习速率
numIter = 10000 #迭代次数
for i in range(numIter):
#正向传播
neth1 = i1*weight[1-1] + i2*weight[2-1] + bias[0]
neth2 = i1*weight[3-1] + i2*weight[4-1] + bias[0]
outh1 = sigmoid(neth1)
outh2 = sigmoid(neth2)
neto1 = outh1*weight[5-1] + outh2*weight[6-1] + bias[1]
neto2 = outh2*weight[7-1] + outh2*weight[8-1] + bias[1]
outo1 = sigmoid(neto1)
outo2 = sigmoid(neto2)
print(str(i) + ", target1 : " + str(target1-outo1) + ", target2 : " + str(target2-outo2))
if i == numIter-1:
print("lastst result : " + str(outo1) + " " + str(outo2))
#反向传播
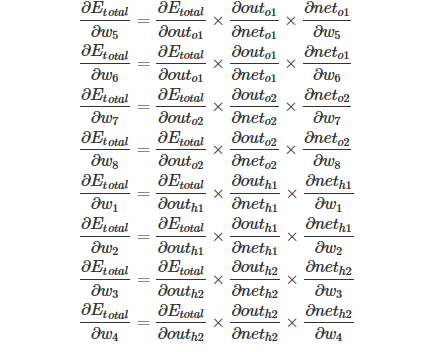
#计算w5-w8(输出层权重)的误差
pdEOuto1 = - (target1 - outo1)
pdOuto1Neto1 = sigmoidDerivationx(outo1)
pdNeto1W5 = outh1
pdEW5 = pdEOuto1 * pdOuto1Neto1 * pdNeto1W5
pdNeto1W6 = outh2
pdEW6 = pdEOuto1 * pdOuto1Neto1 * pdNeto1W6
pdEOuto2 = - (target2 - outo2)
pdOuto2Neto2 = sigmoidDerivationx(outo2)
pdNeto1W7 = outh1
pdEW7 = pdEOuto2 * pdOuto2Neto2 * pdNeto1W7
pdNeto1W8 = outh2
pdEW8 = pdEOuto2 * pdOuto2Neto2 * pdNeto1W8 # 计算w1-w4(输出层权重)的误差
pdEOuto1 = - (target1 - outo1) #之前算过
pdEOuto2 = - (target2 - outo2) #之前算过
pdOuto1Neto1 = sigmoidDerivationx(outo1) #之前算过
pdOuto2Neto2 = sigmoidDerivationx(outo2) #之前算过
pdNeto1Outh1 = weight[5-1]
pdNeto2Outh2 = weight[7-1] pdEOuth1 = pdEOuto1 * pdOuto1Neto1 * pdNeto1Outh1 + pdEOuto2 * pdOuto2Neto2 * pdNeto1Outh1
pdOuth1Neth1 = sigmoidDerivationx(outh1)
pdNeth1W1 = i1
pdNeth1W2 = i2
pdEW1 = pdEOuth1 * pdOuth1Neth1 * pdNeth1W1
pdEW2 = pdEOuth1 * pdOuth1Neth1 * pdNeth1W2
pdNeto1Outh2 = weight[6-1]
pdNeto2Outh2 = weight[8-1]
pdOuth2Neth2 = sigmoidDerivationx(outh2)
pdNeth2W3 = i1
pdNeth2W4 = i2
pdEOuth2 = pdEOuto1 * pdOuto1Neto1 * pdNeto1Outh2 + pdEOuto2 * pdOuto2Neto2 * pdNeto2Outh2
pdEW3 = pdEOuth2 * pdOuth2Neth2 * pdNeth2W3
pdEW4 = pdEOuth2 * pdOuth2Neth2 * pdNeth2W4
#权重更新
weight[1-1] = weight[1-1] - alpha * pdEW1
weight[2-1] = weight[2-1] - alpha * pdEW2
weight[3-1] = weight[3-1] - alpha * pdEW3
weight[4-1] = weight[4-1] - alpha * pdEW4
weight[5-1] = weight[5-1] - alpha * pdEW5
weight[6-1] = weight[6-1] - alpha * pdEW6
weight[7-1] = weight[7-1] - alpha * pdEW7
weight[8-1] = weight[8-1] - alpha * pdEW8
# print(weight[1-1])
# print(weight[2-1])
# print(weight[3-1])
# print(weight[4-1])
# print(weight[5-1])
# print(weight[6-1])
# print(weight[7-1])
# print(weight[8-1])
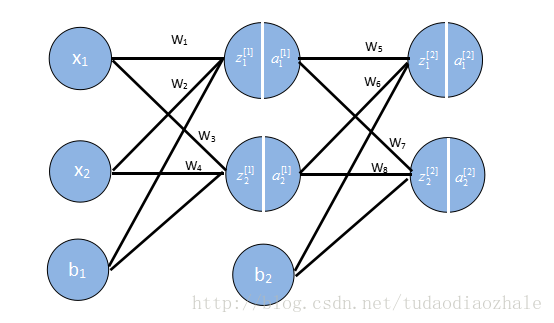
不知道你是否对此感到熟悉一点了呢?反正我按照公式实现一遍之后深有体会,然后用向量的又写了一次代码。
接下来我们要用向量来存储这些权重,输出结果等,因为如果我们不这样做,你看上面的例子就知道我们需要写很多w1,w2等,这要是参数一多就很可怕。
这些格式我是参考吴恩达的格式,相关课程资料->吴恩达深度学习视频。
 import numpy as np

 def sigmoid(x):

     return 1 / (1 + np.exp(-x))

 def sigmoidDerivationx(y):

     return y * (1 - y)

 if __name__ == '__main__':

     # 初始化一些参数

     alpha = 0.5

     numIter = 1000000 #迭代次数

     w1 = [[0.15, 0.20], [0.25, 0.30]]  # Weight of input layer

     w2 = [[0.40, 0.45], [0.50, 0.55]]

     # print(np.array(w2).T)

     b1 = 0.35

     b2 = 0.60

     x = [0.05, 0.10]

     y = [0.01, 0.99]

     # 前向传播

     z1 = np.dot(w1, x) + b1     # dot函数是常规的矩阵相乘

     a1 = sigmoid(z1)

     z2 = np.dot(w2, a1) + b2

     a2 = sigmoid(z2)

     for n in range(numIter):

         # 反向传播 使用代价函数为C=1 / (2n) * sum[(y-a2)^2]

         # 分为两次

         # 一次是最后一层对前面一层的错误

         delta2 = np.multiply(-(y-a2), np.multiply(a2, 1-a2))

         # for i in range(len(w2)):

         #     print(w2[i] - alpha * delta2[i] * a1)

         #计算非最后一层的错误

         # print(delta2)

         delta1 = np.multiply(np.dot(np.array(w2).T, delta2), np.multiply(a1, 1-a1))

         # print(delta1)

         # for i in range(len(w1)):

             # print(w1[i] - alpha * delta1[i] * np.array(x))

         #更新权重

         for i in range(len(w2)):

             w2[i] = w2[i] - alpha * delta2[i] * a1

         for i in range(len(w1)):

             w1[i] = w1[i] - alpha * delta1[i] * np.array(x)

         #继续前向传播,算出误差值

         z1 = np.dot(w1, x) + b1

         a1 = sigmoid(z1)

         z2 = np.dot(w2, a1) + b2

         a2 = sigmoid(z2)

         print(str(n) + " result:" + str(a2[0]) + ", result:" +str(a2[1]))

         # print(str(n) + "  error1:" + str(y[0] - a2[0]) + ", error2:" +str(y[1] - a2[1]))
可以看到,用向量来表示的话代码就简短了非常多。但是用了向量化等的方法,如果不太熟,去看吴恩达深度学习的第一部分,再返过来看就能懂了。
【深度学习】BP反向传播算法Python简单实现的更多相关文章
- 深度学习之反向传播算法(BP)代码实现
反向传播算法实战 本文仅仅是反向传播算法的实现,不涉及公式推导,如果对反向传播算法公式推导不熟悉,强烈建议查看另一篇文章神经网络之反向传播算法(BP)公式推导(超详细) 我们将实现一个 4 层的全连接 ...
- 机器学习 —— 基础整理(七)前馈神经网络的BP反向传播算法步骤整理
这里把按 [1] 推导的BP算法(Backpropagation)步骤整理一下.突然想整理这个的原因是知乎上看到了一个帅呆了的求矩阵微分的方法(也就是 [2]),不得不感叹作者的功力.[1] 中直接使 ...
- 深度学习——前向传播算法和反向传播算法(BP算法)及其推导
1 BP算法的推导 图1 一个简单的三层神经网络 图1所示是一个简单的三层(两个隐藏层,一个输出层)神经网络结构,假设我们使用这个神经网络来解决二分类问题,我们给这个网络一个输入样本,通过前向运算得到 ...
- PyTorch深度学习实践——反向传播
反向传播 课程来源:PyTorch深度学习实践--河北工业大学 <PyTorch深度学习实践>完结合集_哔哩哔哩_bilibili 目录 反向传播 笔记 作业 笔记 在之前课程中介绍的线性 ...
- 深度学习梯度反向传播出现Nan值的原因归类
症状:前向计算一切正常.梯度反向传播的时候就出现异常,梯度从某一层开始出现Nan值(Nan: Not a number缩写,在numpy中,np.nan != np.nan,是唯一个不等于自身的数). ...
- 手推机器学习公式(一) —— BP 反向传播算法
方便起见,本文仅以三层的神经网络举例. f(⋅):表示激励函数 xi:表示输入层: yj:表示中间的隐层: yj=f(netj) netj=∑i=0nvijxi ok:表示输出层,dk 则表示期望输出 ...
- BP反向传播算法的工作原理How the backpropagation algorithm works
In the last chapter we saw how neural networks can learn their weights and biases using the gradient ...
- 100天搞定机器学习|day37 无公式理解反向传播算法之精髓
100天搞定机器学习(Day1-34) 100天搞定机器学习|Day35 深度学习之神经网络的结构 100天搞定机器学习|Day36 深度学习之梯度下降算法 本篇为100天搞定机器学习之第37天,亦 ...
- 100天搞定机器学习|day38 反向传播算法推导
往期回顾 100天搞定机器学习|(Day1-36) 100天搞定机器学习|Day37无公式理解反向传播算法之精髓 上集我们学习了反向传播算法的原理,今天我们深入讲解其中的微积分理论,展示在机器学习中, ...
随机推荐
- Django中的session于cookie的用法
1.cookies 1.django 中使用 cookies 1.设置cookies的值(将数据保存到客户端) 语法: 响应对象.set_cookie(key,value,expires) key:c ...
- VS 提升代码辨识度 (工欲善其事必先利其器)新手开发必备!
VS简化编译.提高生产 本文提供全流程,中文翻译. Chinar 坚持将简单的生活方式,带给世人!(拥有更好的阅读体验 -- 高分辨率用户请根据需求调整网页缩放比例) Chinar -- 心分享.心创 ...
- ORB(oriented FAST and rotated BRIEF)特征提取与检测
ORB采取FAST算法检测特征点,采取BRIEF算法计算特征点描述子. 1.检测特征点 检测候选特征点周围一圈的像素值,若有足够多的像素值与候选特征点的差异都较大,则认为该候选特征点是特征点. 对于上 ...
- ZOJ5833 Tournament(递归打表)
题目链接:传送门 假思路: 根据题意要求,只能按字典序最小的方法安排比赛. 所以第一场必定是1和2比,3和4比.... 选手:1 2 对手:2 1 根据要求如果1与2比过赛了,1再与其它的人(不妨设为 ...
- Android系统备忘1
Android的4种模式 模式 功能 ADB调试system 正常使用 开发者模式开启usb调试recovery 备份,恢复模式 卡刷模式 twrp下开启ADB Sideloadfastboot 线刷 ...
- 【HDOJ1043】【康拓展开+BFS】
http://acm.hdu.edu.cn/showproblem.php?pid=1043 Eight Time Limit: 10000/5000 MS (Java/Others) Memo ...
- 【BZOJ3244】【UOJ#122】【NOI2013]树的计数
NOI都是酱的题怎么玩啊,哇.jpg 原题: 我们知道一棵有根树可以进行深度优先遍历(DFS)以及广度优先遍历(BFS)来生成这棵树的DFS序以及BFS序.两棵不同的树的DFS序有可能相同,并且它们的 ...
- nginx安装最简单教程
[root@bogon ~]# wget -c http://nginx.org/download/nginx-1.7.9.tar.gz #下载安装包 [root@bogon ~]# ls anaco ...
- 做 Excel 的 XML schema.xsd
做 Excel 的 XML schema.xsd 因为需要将 BOM Cost 归档并使用 Git 管理,原来 XLSX 是二进制的,使用 Git 管理并不方便. 于是有了想用 XML 来管理想法,在 ...
- jQuery的ready()事件与js中的onload事件的区别
出处:http://blog.csdn.net/yuanmei1986/article/details/50781453