Spark 核心篇-SparkContext
本章内容:
1、功能描述
本篇文章就要根据源码分析SparkContext所做的一些事情,用过Spark的开发者都知道SparkContext是编写Spark程序用到的第一个类,足以说明SparkContext的重要性;这里先摘抄SparkContext源码注释来简单介绍介绍SparkContext,注释的第一句话就是说SparkContext为Spark的主要入口点,简明扼要,如把Spark集群当作服务端那Spark Driver就是客户端,SparkContext则是客户端的核心;如注释所说 SparkContext用于连接Spark集群、创建RDD、累加器(accumlator)、广播变量(broadcast variables),所以说SparkContext为Spark程序的根本都不为过。
SparkContext 是 Spark 中元老级的 API,从0.x.x 版本就已经存在。有过 Spark 使用经验会感觉 SparkContext 已经太老了,然后 SparkContext 始终跟随着 Spark 的迭代不断向前。SparkContext 内部虽然已经发生了很大的变化,有些内部组件已经废弃,有些组件已经优化,还有一些新的组件不断加入,不断焕发的强大的魅力,是 Spark 的灵魂。

/**

 * Main entry point for Spark functionality. A SparkContext represents the connection to a Spark

 * cluster, and can be used to create RDDs, accumulators and broadcast variables on that cluster.

 *

 * Only one SparkContext may be active per JVM.  You must `stop()` the active SparkContext before

 * creating a new one.  This limitation may eventually be removed; see SPARK-2243 for more details.

 *

 * @param config a Spark Config object describing the application configuration. Any settings in

 *   this config overrides the default configs as well as system properties.

 */

class SparkContext(config: SparkConf) extends Logging
也就是说SparkContext是Spark的入口,相当于应用程序的main函数。目前在一个JVM进程中可以创建多个SparkContext,但是只能有一个active级别的。如果你需要创建一个新的SparkContext实例,必须先调用stop方法停掉当前active级别的SparkContext实例。

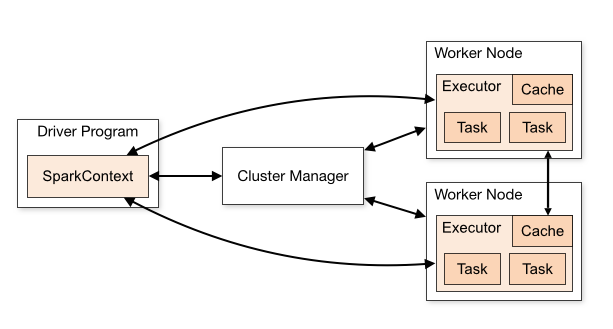
图1 Spark 架构图
图片来自Spark官网,可以看到SparkContext处于DriverProgram核心位置,所有与Cluster、Worker Node交互的操作都需要SparkContext来完成。

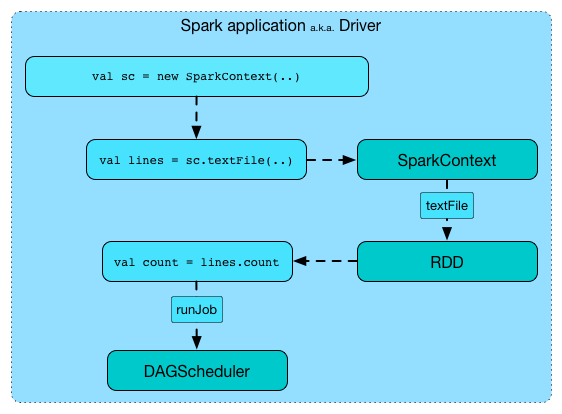
图2 SparkContext 在 Spark 应用程序中的扮演的主要角色

图3 Driver 上运行的服务组件
2、相关组件
|
名称
|
说明
|
|---|---|
|
SparkConf |
Spark配置类,配置已键值对形式存储,封装了一个ConcurrentHashMap类实例settings用于存储Spark的配置信息。 |
| SparkEnv | SparkContext中非常重要的类,它维护着Spark的执行环境,所有的线程都可以通过SparkContext访问到同一个SparkEnv对象。 |
| LiveListenerBus | SparkContext 中的事件总线,可以接收各种使用方的事件,并且异步传递Spark事件监听与SparkListeners监听器的注册。 |
| SparkUI | 为Spark监控Web平台提供了Spark环境、任务的整个生命周期的监控。 |
| TaskScheduler | 为Spark的任务调度器,Spark通过他提交任务并且请求集群调度任务。因其调度的 Task 由 DAGScheduler 创建,所以 DAGScheduler 是 TaskScheduler 的前置调度。 |
| DAGScheduler | 为高级的、基于Stage的调度器, 负责创建 Job,将 DAG 中的 RDD 划分到不同的 Stage,并将Stage作为Tasksets提交给底层调度器TaskScheduler执行。 |
| HeartbeatReceiver | 心跳接收器,所有 Executor 都会向HeartbeatReceiver 发送心跳,当其接收到 Executor 的心跳信息后,首先更新 Executor 的最后可见时间,然后将此信息交给 TaskScheduler 进一步处理。 |
|
ExecutorAllocationManager |
Executor 动态分配管理器,根据负载动态的分配与删除Executor,可通过其设置动态分配最小Executor、最大Executor、初始Executor数量等配置。 |
| ContextClearner | 上下文清理器,为RDD、shuffle、broadcast状态的异步清理器,清理超出应用范围的RDD、ShuffleDependency、Broadcast对象。 |
| SparkStatusTracker | 低级别的状态报告API,只能提供非常脆弱的一致性机制,对Job(作业)、Stage(阶段)的状态进行监控。 |
| HadoopConfiguration | Spark默认使用HDFS来作为分布式文件系统,用于获取Hadoop配置信息。 |
以上的对象为SparkContext使用到的主要对象,可以看到SparkContext包含了Spark程序用到的几乎所有核心对象可见SparkContext的重要性;创建SparkContext时会添加一个钩子到ShutdownHookManager中用于在Spark程序关闭时对上述对象进行清理,在创建RDD等操作也会判断SparkContext是否已stop;通常情况下一个Driver只会有一个SparkContext实例,但可通过spark.driver.allowMultipleContexts配置来允许driver中存在多个SparkContext实例。
3、代码分析
|
代码
|
说明
|
|---|---|
SparkContext.markPartiallyConstructed(this, allowMultipleContexts) |
用来确保实例的唯一性 |
try {
|
|
SparkContext.setActiveContext(this, allowMultipleContexts) |
将SparkContext标记为激活 |
3.1 初始设置
首先保存了当前的CallSite信息,并且判断是否允许创建多个SparkContext实例,使用的是spark.driver.allowMultipleContexts属性,默认为false。
// 包名:org.apache.spark

// 类名:SparkContext

class SparkContext(config: SparkConf) extends Logging {

  // The call site where this SparkContext was constructed.

  // 获取当前SparkContext的当前调用栈。包含了最靠近栈顶的用户类及最靠近栈底的Scala或者Spark核心类信息

  private val creationSite: CallSite = Utils.getCallSite()

  // If true, log warnings instead of throwing exceptions when multiple SparkContexts are active

  // SparkContext默认只有一个实例。如果在config(SparkConf)中设置了allowMultipleContexts为true,

  // 当存在多个active级别的SparkContext实例时Spark会发生警告,而不是抛出异常,要特别注意。

  // 如果没有配置,则默认为false

  private val allowMultipleContexts: Boolean =

    config.getBoolean("spark.driver.allowMultipleContexts", false)

  // In order to prevent multiple SparkContexts from being active at the same time, mark this

  // context as having started construction.

  // NOTE: this must be placed at the beginning of the SparkContext constructor.

  // 用来确保SparkContext实例的唯一性,并将当前的SparkContext标记为正在构建中,以防止多个SparkContext实例同时成为active级别的。

  SparkContext.markPartiallyConstructed(this, allowMultipleContexts)

  ......

}
接下来是对SparkConf进行复制,然后对各种配置信息进行校验,其中最主要的就是SparkConf必须指定 spark.master(用于设置部署模式)和 spark.app.name(应用程序名称)属性,否则会抛出异常。
// 变量声明

// 包名:org.apache.spark

// 类名:SparkContext

private var _conf: SparkConf = _

// 变量处理

// 包名:org.apache.spark

// 类名:SparkContext

_conf = config.clone()

_conf.validateSettings()

if (!_conf.contains("spark.master")) {

  throw new SparkException("A master URL must be set in your configuration")

}

if (!_conf.contains("spark.app.name")) {

  throw new SparkException("An application name must be set in your configuration")

}
3.2 创建执行环境 SparkEnv
SparkEnv是Spark的执行环境对象,其中包括与众多Executor指向相关的对象。在local模式下Driver会创建Executor,local-cluster部署模式或者Standalone部署模式下Worker另起的CoarseGrainedExecutorBackend进程中也会创建Executor,所以SparkEnv存在于Driver或者CoarseGrainedExecutorBackend进程中。
创建SparkEnv主要使用SparkEnv的createDriverEnv方法,有四个参数:conf、isLocal、listenerBus 以及在本地模式下driver运行executor需要的numberCores。
// 变量声明

// 包名:org.apache.spark

// 类名:SparkContext

private var _env: SparkEnv = _

// 变量处理

// 包名:org.apache.spark

// 类名:SparkContext

def isLocal: Boolean = Utils.isLocalMaster(_conf)

private[spark] def listenerBus: LiveListenerBus = _listenerBus

// Create the Spark execution environment (cache, map output tracker, etc)

_env = createSparkEnv(_conf, isLocal, listenerBus)

SparkEnv.set(_env)

private[spark] def createSparkEnv(

    conf: SparkConf,

    isLocal: Boolean,

    listenerBus: LiveListenerBus): SparkEnv = {

  SparkEnv.createDriverEnv(conf, isLocal, listenerBus, SparkContext.numDriverCores(master))

}

/**

 * 获取在本地模式下执行程序需要的cores个数,否则不需要,为0

 * The number of driver cores to use for execution in local mode, 0 otherwise.

 */

private[spark] def numDriverCores(master: String): Int = {

  def convertToInt(threads: String): Int = {

    if (threads == "*") Runtime.getRuntime.availableProcessors() else threads.toInt

  }

  master match {

    case "local" => 1

    case SparkMasterRegex.LOCAL_N_REGEX(threads) => convertToInt(threads)

    case SparkMasterRegex.LOCAL_N_FAILURES_REGEX(threads, _) => convertToInt(threads)

    case _ => 0 // driver is not used for execution

  }

}
3.3 创建 SparkUI
SparkUI 提供了用浏览器访问具有样式及布局并且提供丰富监控数据的页面。其采用的是时间监听机制。发送的事件会存入缓存,由定时调度器取出后分配给监听此事件的监听器对监控数据进行更新。如果不需要SparkUI,则可以将spark.ui.enabled置为false。
// 变量声明

// 包名:org.apache.spark

// 类名:SparkContext

private var _ui: Option[SparkUI] = None

// 变量处理

// 包名:org.apache.spark

// 类名:SparkContext

_ui =

  if (conf.getBoolean("spark.ui.enabled", true)) {

    Some(SparkUI.create(Some(this), _statusStore, _conf, _env.securityManager, appName, "",

      startTime))

  } else {

    // For tests, do not enable the UI

    None

  }

// Bind the UI before starting the task scheduler to communicate

// the bound port to the cluster manager properly

_ui.foreach(_.bind())
3.4 Hadoop 相关配置
默认情况下,Spark使用HDFS作为分布式文件系统,所以需要获取Hadoop相关的配置信息:
// 变量声明

// 包名:org.apache.spark

// 类名:SparkContext

private var _hadoopConfiguration: Configuration = _

// 变量处理

// 包名:org.apache.spark

// 类名:SparkContext

_hadoopConfiguration = SparkHadoopUtil.get.newConfiguration(_conf)
获取的配置信息包括:
- 将Amazon S3文件系统的AWS_ACCESS_KEY_ID和 AWS_SECRET_ACCESS_KEY加载到Hadoop的Configuration;
- 将SparkConf中所有的以spark.hadoop.开头的属性都赋值到Hadoop的Configuration;
- 将SparkConf的属性spark.buffer.size复制到Hadoop的Configuration的配置io.file.buffer.size。
// 第一步

// 包名:org.apache.spark

// 类名:SparkContext

def get: SparkHadoopUtil = instance

// 第二步

// 包名:org.apache.spark

// 类名:SparkContext

/**

 * Return an appropriate (subclass) of Configuration. Creating config can initializes some Hadoop

 * subsystems.

 */

def newConfiguration(conf: SparkConf): Configuration = {

  val hadoopConf = SparkHadoopUtil.newConfiguration(conf)

  hadoopConf.addResource(SparkHadoopUtil.SPARK_HADOOP_CONF_FILE)

  hadoopConf

}

// 第三步

// 包名:org.apache.spark.deploy

// 类名:SparkHadoopUtil

/**

 * Returns a Configuration object with Spark configuration applied on top. Unlike

 * the instance method, this will always return a Configuration instance, and not a

 * cluster manager-specific type.

 */

private[spark] def newConfiguration(conf: SparkConf): Configuration = {

  val hadoopConf = new Configuration()

  appendS3AndSparkHadoopConfigurations(conf, hadoopConf)

  hadoopConf

}

// 第四步

// 包名:org.apache.spark.deploy

// 类名:SparkHadoopUtil

private def appendS3AndSparkHadoopConfigurations(

    conf: SparkConf,

    hadoopConf: Configuration): Unit = {

  // Note: this null check is around more than just access to the "conf" object to maintain

  // the behavior of the old implementation of this code, for backwards compatibility.

  if (conf != null) {

    // Explicitly check for S3 environment variables

    val keyId = System.getenv("AWS_ACCESS_KEY_ID")

    val accessKey = System.getenv("AWS_SECRET_ACCESS_KEY")

    if (keyId != null && accessKey != null) {

      hadoopConf.set("fs.s3.awsAccessKeyId", keyId)

      hadoopConf.set("fs.s3n.awsAccessKeyId", keyId)

      hadoopConf.set("fs.s3a.access.key", keyId)

      hadoopConf.set("fs.s3.awsSecretAccessKey", accessKey)

      hadoopConf.set("fs.s3n.awsSecretAccessKey", accessKey)

      hadoopConf.set("fs.s3a.secret.key", accessKey)

      val sessionToken = System.getenv("AWS_SESSION_TOKEN")

      if (sessionToken != null) {

        hadoopConf.set("fs.s3a.session.token", sessionToken)

      }

    }

    appendSparkHadoopConfigs(conf, hadoopConf)

    val bufferSize = conf.get("spark.buffer.size", "65536")

    hadoopConf.set("io.file.buffer.size", bufferSize)

  }

}

// 第五步

// 包名:org.apache.spark.deploy

// 类名:SparkHadoopUtil

private def appendSparkHadoopConfigs(conf: SparkConf, hadoopConf: Configuration): Unit = {

  // Copy any "spark.hadoop.foo=bar" spark properties into conf as "foo=bar"

  for ((key, value) <- conf.getAll if key.startsWith("spark.hadoop.")) {

    hadoopConf.set(key.substring("spark.hadoop.".length), value)

  }

}
3.5 Executor 环境变量
executorEnvs包含的环境变量将会注册应用程序的过程中发送给Master,Master给Worker发送调度后,Worker最终使用executorEnvs提供的信息启动Executor。
通过配置spark.executor.memory指定Executor占用的内存的大小,也可以配置系统变量SPARK_EXECUTOR_MEMORY或者SPARK_MEM设置其大小。
// 变量声明

// 包名:org.apache.spark

// 类名:SparkContext

private var _executorMemory: Int = _

// 变量处理

// 包名:org.apache.spark

// 类名:SparkContext

_executorMemory = _conf.getOption("spark.executor.memory")

  .orElse(Option(System.getenv("SPARK_EXECUTOR_MEMORY")))

  .orElse(Option(System.getenv("SPARK_MEM"))

  .map(warnSparkMem))

  .map(Utils.memoryStringToMb)

  .getOrElse(1024)
executorEnvs是由一个HashMap存储:
// 变量声明

// 包名:org.apache.spark

// 类名:SparkContext

// Environment variables to pass to our executors.

private[spark] val executorEnvs = HashMap[String, String]()

// 变量处理

// 包名:org.apache.spark

// 类名:SparkContext

// Convert java options to env vars as a work around

// since we can't set env vars directly in sbt.

for { (envKey, propKey) <- Seq(("SPARK_TESTING", "spark.testing"))

  value <- Option(System.getenv(envKey)).orElse(Option(System.getProperty(propKey)))} {

  executorEnvs(envKey) = value

}

Option(System.getenv("SPARK_PREPEND_CLASSES")).foreach { v =>

  executorEnvs("SPARK_PREPEND_CLASSES") = v

}

// The Mesos scheduler backend relies on this environment variable to set executor memory.

// TODO: Set this only in the Mesos scheduler.

executorEnvs("SPARK_EXECUTOR_MEMORY") = executorMemory + "m"

executorEnvs ++= _conf.getExecutorEnv

executorEnvs("SPARK_USER") = sparkUser
3.6 注册 HeartbeatReceiver 心跳接收器
在 Spark 的实际生产环境中,Executor 是运行在不同的节点上的。在 local 模式下的 Driver 与 Executor 属于同一个进程,所以 Dirver 与 Executor 可以直接使用本地调用交互,当 Executor 运行出现问题时,Driver 可以很方便地知道,例如,通过捕获异常。但是在生产环境下,Driver 与 Executor 很可能不在同一个进程内,他们也许运行在不同的机器上,甚至在不同的机房里,因此 Driver 对 Executor 失去掌握。为了能够掌控 Executor,在 Driver 中创建了这个心跳接收器。
创建 HeartbearReceiver 的代码:
// 变量声明

// 包名:org.apache.spark

// 类名:SparkContext

// HeartbeatReceiver.ENDPOINT_NAME val ENDPOINT_NAME = "HeartbeatReceiver"

// We need to register "HeartbeatReceiver" before "createTaskScheduler" because Executor will

// retrieve "HeartbeatReceiver" in the constructor. (SPARK-6640)

_heartbeatReceiver = env.rpcEnv.setupEndpoint(

  HeartbeatReceiver.ENDPOINT_NAME, new HeartbeatReceiver(this))

// 变量处理

// 包名:org.apache.spark.rpc.netty

// 类名:NettyRpcEnv

override def setupEndpoint(name: String, endpoint: RpcEndpoint): RpcEndpointRef = {

  dispatcher.registerRpcEndpoint(name, endpoint)

}
上面的代码中使用了 SparkEnv 的子组件 NettyRpcEnv 的 setupEndpoint 方法,此方法的作用是想 RpcEnv 的 Dispatcher 注册 HeartbeatReceiver,并返回 HeartbeatReceiver 的 NettyRpcEndpointRef 引用。
3.7 创建任务调度器 TaskScheduler
TaskScheduler也是SparkContext的重要组成部分,负责任务的提交,请求集群管理器对任务调度,并且负责发送的任务到集群,运行它们,任务失败的重试,以及慢任务的在其他节点上重试。 其中给应用程序分配并运行 Executor为一级调度,而给任务分配 Executor 并运行任务则为二级调度。另外 TaskScheduler 也可以看做任务调度的客户端。
- 为 TaskSet创建和维护一个TaskSetManager并追踪任务的本地性以及错误信息;
- 遇到Straggle 任务会方到其他的节点进行重试;
- 向DAGScheduler汇报执行情况, 包括在Shuffle输出lost的时候报告fetch failed 错误等信息;
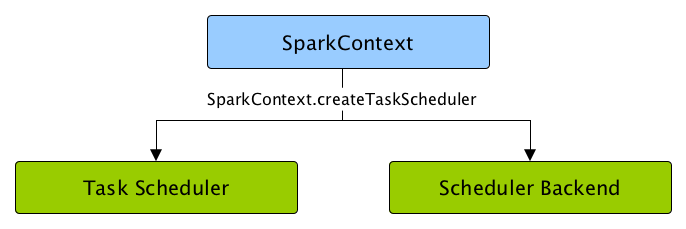
TaskScheduler负责任务调度资源分配,SchedulerBackend负责与Master、Worker通信收集Worker上分配给该应用使用的资源情况。

图4 SparkContext 创建 Task Scheduler 和 Scheduler Backend
创建 TaskScheduler 的代码:
// 变量声明

// 包名:org.apache.spark

// 类名:SparkContext

private var _schedulerBackend: SchedulerBackend = _

private var _taskScheduler: TaskScheduler = _

// 变量处理

// 包名:org.apache.spark

// 类名:SparkContext

// Create and start the scheduler

val (sched, ts) = SparkContext.createTaskScheduler(this, master, deployMode)

_schedulerBackend = sched

_taskScheduler = ts
createTaskScheduler方法根据master的配置匹配部署模式,创建TaskSchedulerImpl,并生成不同的SchedulerBackend。
// 包名:org.apache.spark

// 类名:SparkContext

/**

 * Create a task scheduler based on a given master URL.

 * Return a 2-tuple of the scheduler backend and the task scheduler.

 */

private def createTaskScheduler(

    sc: SparkContext,

    master: String,

    deployMode: String): (SchedulerBackend, TaskScheduler) = {

  import SparkMasterRegex._

  // When running locally, don't try to re-execute tasks on failure.

  val MAX_LOCAL_TASK_FAILURES = 1

  master match {

    case "local" =>

      val scheduler = new TaskSchedulerImpl(sc, MAX_LOCAL_TASK_FAILURES, isLocal = true)

      val backend = new LocalSchedulerBackend(sc.getConf, scheduler, 1)

      scheduler.initialize(backend)

      (backend, scheduler)

    case LOCAL_N_REGEX(threads) =>

      def localCpuCount: Int = Runtime.getRuntime.availableProcessors()

      // local[*] estimates the number of cores on the machine; local[N] uses exactly N threads.

      val threadCount = if (threads == "*") localCpuCount else threads.toInt

      if (threadCount <= 0) {

        throw new SparkException(s"Asked to run locally with $threadCount threads")

      }

      val scheduler = new TaskSchedulerImpl(sc, MAX_LOCAL_TASK_FAILURES, isLocal = true)

      val backend = new LocalSchedulerBackend(sc.getConf, scheduler, threadCount)

      scheduler.initialize(backend)

      (backend, scheduler)

    case LOCAL_N_FAILURES_REGEX(threads, maxFailures) =>

      def localCpuCount: Int = Runtime.getRuntime.availableProcessors()

      // local[*, M] means the number of cores on the computer with M failures

      // local[N, M] means exactly N threads with M failures

      val threadCount = if (threads == "*") localCpuCount else threads.toInt

      val scheduler = new TaskSchedulerImpl(sc, maxFailures.toInt, isLocal = true)

      val backend = new LocalSchedulerBackend(sc.getConf, scheduler, threadCount)

      scheduler.initialize(backend)

      (backend, scheduler)

    case SPARK_REGEX(sparkUrl) =>

      val scheduler = new TaskSchedulerImpl(sc)

      val masterUrls = sparkUrl.split(",").map("spark://" + _)

      val backend = new StandaloneSchedulerBackend(scheduler, sc, masterUrls)

      scheduler.initialize(backend)

      (backend, scheduler)

    case LOCAL_CLUSTER_REGEX(numSlaves, coresPerSlave, memoryPerSlave) =>

      // Check to make sure memory requested <= memoryPerSlave. Otherwise Spark will just hang.

      val memoryPerSlaveInt = memoryPerSlave.toInt

      if (sc.executorMemory > memoryPerSlaveInt) {

        throw new SparkException(

          "Asked to launch cluster with %d MB RAM / worker but requested %d MB/worker".format(

            memoryPerSlaveInt, sc.executorMemory))

      }

      val scheduler = new TaskSchedulerImpl(sc)

      val localCluster = new LocalSparkCluster(

        numSlaves.toInt, coresPerSlave.toInt, memoryPerSlaveInt, sc.conf)

      val masterUrls = localCluster.start()

      val backend = new StandaloneSchedulerBackend(scheduler, sc, masterUrls)

      scheduler.initialize(backend)

      backend.shutdownCallback = (backend: StandaloneSchedulerBackend) => {

        localCluster.stop()

      }

      (backend, scheduler)

    case masterUrl =>

      val cm = getClusterManager(masterUrl) match {

        case Some(clusterMgr) => clusterMgr

        case None => throw new SparkException("Could not parse Master URL: '" + master + "'")

      }

      try {

        val scheduler = cm.createTaskScheduler(sc, masterUrl)

        val backend = cm.createSchedulerBackend(sc, masterUrl, scheduler)

        cm.initialize(scheduler, backend)

        (backend, scheduler)

      } catch {

        case se: SparkException => throw se

        case NonFatal(e) =>

          throw new SparkException("External scheduler cannot be instantiated", e)

      }

  }

}
3.8 创建和启动 DAGScheduler
DAGScheduler主要用于在任务正式交给TaskScheduler提交之前做一些准备工作,包括:创建Job,将DAG中的RDD划分到不同的Stage,提交Stage等等。

图5 任务执行流程
创建 DAGScheduler 的代码:
// 变量声明

// 包名:org.apache.spark

// 类名:SparkContext

@volatile private var _dagScheduler: DAGScheduler = _

// 变量处理

// 包名:org.apache.spark

// 类名:SparkContext

_dagScheduler = new DAGScheduler(this)
DAGScheduler的数据结构主要维护jobId和stageId的关系、Stage、ActiveJob,以及缓存的RDD的Partition的位置信息。
3.9 TaskScheduler 的启动
TaskScheduler在启动的时候实际是调用了backend的start方法:
// 包名:org.apache.spark

// 类名:SparkContext

// start TaskScheduler after taskScheduler sets DAGScheduler reference in DAGScheduler's

// constructor

_taskScheduler.start()

// TaskSchedulerImpl.scala

override def start() {

  backend.start()

  if (!isLocal && conf.getBoolean("spark.speculation", false)) {

    logInfo("Starting speculative execution thread")

    speculationScheduler.scheduleWithFixedDelay(new Runnable {

      override def run(): Unit = Utils.tryOrStopSparkContext(sc) {

        checkSpeculatableTasks()

      }

    }, SPECULATION_INTERVAL_MS, SPECULATION_INTERVAL_MS, TimeUnit.MILLISECONDS)

  }

}
3.10 启动测量系统 MetricsSystem
MetricsSystem中三个概念:
- Instance: 指定了谁在使用测量系统;
Spark按照Instance的不同,区分为Master、Worker、Application、Driver和Executor;- Source: 指定了从哪里收集测量数据;
Source的有两种来源:Spark internal source: MasterSource/WorkerSource等; Common source: JvmSource- Sink:指定了往哪里输出测量数据;
Spark目前提供的Sink有ConsoleSink、CsvSink、JmxSink、MetricsServlet、GraphiteSink等;Spark使用MetricsServlet作为默认的Sink。
MetricsSystem的启动过程包括:
- 注册Sources;
- 注册Sinks;
- 将Sinks增加Jetty的ServletContextHandler;
MetricsSystem启动完毕后,会遍历与Sinks有关的ServletContextHandler,并调用attachHandler将它们绑定到Spark UI上。
// 包名:org.apache.spark

// 类名:SparkContext

// The metrics system for Driver need to be set spark.app.id to app ID.

// So it should start after we get app ID from the task scheduler and set spark.app.id.

_env.metricsSystem.start()

// Attach the driver metrics servlet handler to the web ui after the metrics system is started.

_env.metricsSystem.getServletHandlers.foreach(handler => ui.foreach(_.attachHandler(handler)))
3.11 创建事件日志监听器
EventLoggingListener 是将事件持久化到存储的监听器,是 SparkContext 中可选组件。当spark.eventLog.enabled属性为 true 时启动,默认为 false。
创建 EventLoggingListener 的代码:
// 变量声明

// 包名:org.apache.spark

// 类名:SparkContext

private var _eventLogDir: Option[URI] = None

private var _eventLogCodec: Option[String] = None

private var _eventLogger: Option[EventLoggingListener] = None

private[spark] def isEventLogEnabled: Boolean = _conf.getBoolean("spark.eventLog.enabled", false)

private[spark] def eventLogDir: Option[URI] = _eventLogDir

private[spark] def eventLogCodec: Option[String] = _eventLogCodec

// 变量处理

// 包名:org.apache.spark

// 类名:SparkContext

_eventLogDir =

  if (isEventLogEnabled) {

    val unresolvedDir = conf.get("spark.eventLog.dir", EventLoggingListener.DEFAULT_LOG_DIR)

      .stripSuffix("/")

    Some(Utils.resolveURI(unresolvedDir))

  } else {

    None

  }

_eventLogCodec = {

  val compress = _conf.getBoolean("spark.eventLog.compress", false)

  if (compress && isEventLogEnabled) {

    Some(CompressionCodec.getCodecName(_conf)).map(CompressionCodec.getShortName)

  } else {

    None

  }

}

_eventLogger =

  if (isEventLogEnabled) {

    val logger =

      new EventLoggingListener(_applicationId, _applicationAttemptId, _eventLogDir.get,

        _conf, _hadoopConfiguration)

    logger.start()

    listenerBus.addToEventLogQueue(logger)

    Some(logger)

  } else {

    None

  }
EventLoggingListenser 也将参与到事件总线中事件的监听中,并把感兴趣的事件记录到日志中。
EventLoggingListenser 最为核心的方法是 logEvent,其代码如下:
// 包名:org.apache.spark.scheduler

// 类名:EventLoggingListener

/** Log the event as JSON. */

private def logEvent(event: SparkListenerEvent, flushLogger: Boolean = false) {

  val eventJson = JsonProtocol.sparkEventToJson(event)

  // scalastyle:off println

  writer.foreach(_.println(compact(render(eventJson))))

  // scalastyle:on println

  if (flushLogger) {

    writer.foreach(_.flush())

    hadoopDataStream.foreach(ds => ds.getWrappedStream match {

      case wrapped: DFSOutputStream => wrapped.hsync(EnumSet.of(SyncFlag.UPDATE_LENGTH))

      case _ => ds.hflush()

    })

  }

  if (testing) {

    loggedEvents += eventJson

  }

}
logEvent用于将事件转换为 Json 字符串后写入日志文件。
3.12 创建和启动 ExecutorAllocationManager
ExecutorAllocationManager用于对以分配的Executor进行管理。
创建和启动ExecutorAllocationManager代码:
// 包名:org.apache.spark

// 类名:SparkContext

// Optionally scale number of executors dynamically based on workload. Exposed for testing.

val dynamicAllocationEnabled = Utils.isDynamicAllocationEnabled(_conf)

_executorAllocationManager =

  if (dynamicAllocationEnabled) {

    schedulerBackend match {

      case b: ExecutorAllocationClient =>

        Some(new ExecutorAllocationManager(

          schedulerBackend.asInstanceOf[ExecutorAllocationClient], listenerBus, _conf,

          _env.blockManager.master))

      case _ =>

        None

    }

  } else {

    None

  }

_executorAllocationManager.foreach(_.start())
默认情况下不会创建ExecutorAllocationManager,可以修改属性spark.dynamicAllocation.enabled为true来创建。ExecutorAllocationManager可以动态的分配最小Executor的数量、动态分配最大Executor的数量、每个Executor可以运行的Task数量等配置信息,并对配置信息进行校验。start方法将ExecutorAllocationListener加入listenerBus中,ExecutorAllocationListener通过监听listenerBus里的事件,动态的添加、删除Executor。并且通过不断添加Executor,遍历Executor,将超时的Executor杀死并移除。
3.13 ContextCleaner 的创建与启动
ContextCleaner用于清理超出应用范围的RDD、ShuffleDependency和Broadcast对象。
// 包名:org.apache.spark

// 类名:SparkContext

_cleaner =

  if (_conf.getBoolean("spark.cleaner.referenceTracking", true)) {

    Some(new ContextCleaner(this))

  } else {

    None

  }

_cleaner.foreach(_.start())
ContextCleaner的组成:
- referenceQueue: 缓存顶级的AnyRef引用;
- referenceBuff:缓存AnyRef的虚引用;
- listeners:缓存清理工作的监听器数组;
- cleaningThread:用于具体清理工作的线程。
3.14 额外的 SparkListener 与启动事件
SparkContext 中提供了添加用于自定义 SparkListener 的地方,代码如下:
// 第一步

// 包名:org.apache.spark

// 类名:SparkContext

// 注册config的spark.extraListeners属性中指定的监听器,并启动监听器总线

setupAndStartListenerBus()

// 第二步

// 包名:org.apache.spark

// 类名:SparkContext

/**

 * Registers listeners specified in spark.extraListeners, then starts the listener bus.

 * This should be called after all internal listeners have been registered with the listener bus

 * (e.g. after the web UI and event logging listeners have been registered).

 */

private def setupAndStartListenerBus(): Unit = {

  try {

    // 获取用户自定义的 SparkListenser 的类名

    conf.get(EXTRA_LISTENERS).foreach { classNames =>

      // 通过发射生成每一个自定义 SparkListenser 的实例,并添加到事件总线的监听列表中

      val listeners = Utils.loadExtensions(classOf[SparkListenerInterface], classNames, conf)

      listeners.foreach { listener =>

        listenerBus.addToSharedQueue(listener)

        logInfo(s"Registered listener ${listener.getClass().getName()}")

      }

    }

  } catch {

    case e: Exception =>

      try {

        stop()

      } finally {

        throw new SparkException(s"Exception when registering SparkListener", e)

      }

  }

  // 启动事件总线,并将_listenerBusStarted设置为 true

  listenerBus.start(this, _env.metricsSystem)

  _listenerBusStarted = true

}

// 包名:org.apache.spark.internal

// 类名:package object config

private[spark] val EXTRA_LISTENERS = ConfigBuilder("spark.extraListeners")

  .doc("Class names of listeners to add to SparkContext during initialization.")

  .stringConf

  .toSequence

  .createOptional
根据代码描述,setupAndStartListenerBus 的执行步骤如下:
- 从 spark.extraListeners 属性中获取用户自定义的 SparkListener的类名。用户可以通过逗号分割多个自定义 SparkListener。
- 通过发射生成每一个自定义 SparkListener 的实例,并添加到事件总线的监听器列表中。
- 启动事件总线,并将_listenerBusStarted设置为 true。
3.15 Spark 环境更新
在SparkContext的初始化过程中,可能对其环境造成影响,所以需要更新环境:
// 包名:org.apache.spark

// 类名:SparkContext

postEnvironmentUpdate()
SparkContext初始化过程中,如果设置了spark.jars属性,spark.jars指定的jar包将由addJar方法加入httpFileServer的jarDir变量指定的路径下。每加入一个jar都会调用postEnvironmentUpdate方法更新环境。增加文件与增加jar相同,也会调用postEnvironmentUpdate方法。
// 变量声明

// 包名:org.apache.spark

// 类名:SparkContext

private var _jars: Seq[String] = _

private var _files: Seq[String] = _

// 变量处理

// 第一步

// 包名:org.apache.spark

// 类名:SparkContext

_jars = Utils.getUserJars(_conf)

_files = _conf.getOption("spark.files").map(_.split(",")).map(_.filter(_.nonEmpty))

  .toSeq.flatten

/**

 * Return the jar files pointed by the "spark.jars" property. Spark internally will distribute

 * these jars through file server. In the YARN mode, it will return an empty list, since YARN

 * has its own mechanism to distribute jars.

 */

def getUserJars(conf: SparkConf): Seq[String] = {

  val sparkJars = conf.getOption("spark.jars")

  sparkJars.map(_.split(",")).map(_.filter(_.nonEmpty)).toSeq.flatten

}

// 第二步

// 包名:org.apache.spark

// 类名:SparkContext

// Add each JAR given through the constructor

if (jars != null) {

  jars.foreach(addJar)

}

if (files != null) {

  files.foreach(addFile)

}

// 第三步

// 包名:org.apache.spark

// 类名:SparkContext

/**

 * Adds a JAR dependency for all tasks to be executed on this `SparkContext` in the future.

 *

 * If a jar is added during execution, it will not be available until the next TaskSet starts.

 *

 * @param path can be either a local file, a file in HDFS (or other Hadoop-supported filesystems),

 * an HTTP, HTTPS or FTP URI, or local:/path for a file on every worker node.

 */

def addJar(path: String) {

  def addJarFile(file: File): String = {

    try {

      if (!file.exists()) {

        throw new FileNotFoundException(s"Jar ${file.getAbsolutePath} not found")

      }

      if (file.isDirectory) {

        throw new IllegalArgumentException(

          s"Directory ${file.getAbsoluteFile} is not allowed for addJar")

      }

      env.rpcEnv.fileServer.addJar(file)

    } catch {

      case NonFatal(e) =>

        logError(s"Failed to add $path to Spark environment", e)

        null

    }

  }

  if (path == null) {

    logWarning("null specified as parameter to addJar")

  } else {

    val key = if (path.contains("\\")) {

      // For local paths with backslashes on Windows, URI throws an exception

      addJarFile(new File(path))

    } else {

      val uri = new URI(path)

      // SPARK-17650: Make sure this is a valid URL before adding it to the list of dependencies

      Utils.validateURL(uri)

      uri.getScheme match {

        // A JAR file which exists only on the driver node

        case null =>

          // SPARK-22585 path without schema is not url encoded

          addJarFile(new File(uri.getRawPath))

        // A JAR file which exists only on the driver node

        case "file" => addJarFile(new File(uri.getPath))

        // A JAR file which exists locally on every worker node

        case "local" => "file:" + uri.getPath

        case _ => path

      }

    }

    if (key != null) {

      val timestamp = System.currentTimeMillis

      if (addedJars.putIfAbsent(key, timestamp).isEmpty) {

        logInfo(s"Added JAR $path at $key with timestamp $timestamp")

        postEnvironmentUpdate()

      }

    }

  }

}

/**

 * Add a file to be downloaded with this Spark job on every node.

 *

 * If a file is added during execution, it will not be available until the next TaskSet starts.

 *

 * @param path can be either a local file, a file in HDFS (or other Hadoop-supported

 * filesystems), or an HTTP, HTTPS or FTP URI. To access the file in Spark jobs,

 * use `SparkFiles.get(fileName)` to find its download location.

 */

def addFile(path: String): Unit = {

  addFile(path, false)

}

/**

 * Add a file to be downloaded with this Spark job on every node.

 *

 * If a file is added during execution, it will not be available until the next TaskSet starts.

 *

 * @param path can be either a local file, a file in HDFS (or other Hadoop-supported

 * filesystems), or an HTTP, HTTPS or FTP URI. To access the file in Spark jobs,

 * use `SparkFiles.get(fileName)` to find its download location.

 * @param recursive if true, a directory can be given in `path`. Currently directories are

 * only supported for Hadoop-supported filesystems.

 */

def addFile(path: String, recursive: Boolean): Unit = {

  val uri = new Path(path).toUri

  val schemeCorrectedPath = uri.getScheme match {

    case null | "local" => new File(path).getCanonicalFile.toURI.toString

    case _ => path

  }

  val hadoopPath = new Path(schemeCorrectedPath)

  val scheme = new URI(schemeCorrectedPath).getScheme

  if (!Array("http", "https", "ftp").contains(scheme)) {

    val fs = hadoopPath.getFileSystem(hadoopConfiguration)

    val isDir = fs.getFileStatus(hadoopPath).isDirectory

    if (!isLocal && scheme == "file" && isDir) {

      throw new SparkException(s"addFile does not support local directories when not running " +

        "local mode.")

    }

    if (!recursive && isDir) {

      throw new SparkException(s"Added file $hadoopPath is a directory and recursive is not " +

        "turned on.")

    }

  } else {

    // SPARK-17650: Make sure this is a valid URL before adding it to the list of dependencies

    Utils.validateURL(uri)

  }

  val key = if (!isLocal && scheme == "file") {

    env.rpcEnv.fileServer.addFile(new File(uri.getPath))

  } else {

    schemeCorrectedPath

  }

  val timestamp = System.currentTimeMillis

  if (addedFiles.putIfAbsent(key, timestamp).isEmpty) {

    logInfo(s"Added file $path at $key with timestamp $timestamp")

    // Fetch the file locally so that closures which are run on the driver can still use the

    // SparkFiles API to access files.

    Utils.fetchFile(uri.toString, new File(SparkFiles.getRootDirectory()), conf,

      env.securityManager, hadoopConfiguration, timestamp, useCache = false)

    postEnvironmentUpdate()

  }

}
根据代码描述,postEnvironmentUpdate方法处理步骤:
- 通过调用 SparkEnv 的方法 environmentDetails,将环境的 JVM 参数、Spark 属性、系统属性、classPath 等信息设置为环境明细信息。
- 生成事件 SparkListenerEnvironmentUpdate(此事件携带环境明细信息),并投递到事件总线 listenerBus,此事件最终被 EnvironmentListener 监听,并影响 EnvironmentPage 页面中的输出内容。
// 第一步

// 包名:org.apache.spark

// 类名:SparkContext

/** Post the environment update event once the task scheduler is ready */

private def postEnvironmentUpdate() {

  if (taskScheduler != null) {

    val schedulingMode = getSchedulingMode.toString

    val addedJarPaths = addedJars.keys.toSeq

    val addedFilePaths = addedFiles.keys.toSeq

    val environmentDetails = SparkEnv.environmentDetails(conf, schedulingMode, addedJarPaths,

      addedFilePaths)

    val environmentUpdate = SparkListenerEnvironmentUpdate(environmentDetails)

    listenerBus.post(environmentUpdate)

  }

}

// 第二步

// 包名:org.apache.spark

// 类名:SparkEnv

/**

 * Return a map representation of jvm information, Spark properties, system properties, and

 * class paths. Map keys define the category, and map values represent the corresponding

 * attributes as a sequence of KV pairs. This is used mainly for SparkListenerEnvironmentUpdate.

 */

private[spark]

def environmentDetails(

    conf: SparkConf,

    schedulingMode: String,

    addedJars: Seq[String],

    addedFiles: Seq[String]): Map[String, Seq[(String, String)]] = {

  import Properties._

  val jvmInformation = Seq(

    ("Java Version", s"$javaVersion ($javaVendor)"),

    ("Java Home", javaHome),

    ("Scala Version", versionString)

  ).sorted

  // Spark properties

  // This includes the scheduling mode whether or not it is configured (used by SparkUI)

  val schedulerMode =

    if (!conf.contains("spark.scheduler.mode")) {

      Seq(("spark.scheduler.mode", schedulingMode))

    } else {

      Seq.empty[(String, String)]

    }

  val sparkProperties = (conf.getAll ++ schedulerMode).sorted

  // System properties that are not java classpaths

  val systemProperties = Utils.getSystemProperties.toSeq

  val otherProperties = systemProperties.filter { case (k, _) =>

    k != "java.class.path" && !k.startsWith("spark.")

  }.sorted

  // Class paths including all added jars and files

  val classPathEntries = javaClassPath

    .split(File.pathSeparator)

    .filterNot(_.isEmpty)

    .map((_, "System Classpath"))

  val addedJarsAndFiles = (addedJars ++ addedFiles).map((_, "Added By User"))

  val classPaths = (addedJarsAndFiles ++ classPathEntries).sorted

  Map[String, Seq[(String, String)]](

    "JVM Information" -> jvmInformation,

    "Spark Properties" -> sparkProperties,

    "System Properties" -> otherProperties,

    "Classpath Entries" -> classPaths)

}
3.16 投递应用程序启动事件
postApplicationStart方法只是向listenerBus发送了SparkListenerApplicationStart事件:
// 第一步

// 包名:org.apache.spark

// 类名:SparkContext

postApplicationStart()

// 第二步

// 包名:org.apache.spark

// 类名:SparkContext

/** Post the application start event */

private def postApplicationStart() {

  // Note: this code assumes that the task scheduler has been initialized and has contacted

  // the cluster manager to get an application ID (in case the cluster manager provides one).

  listenerBus.post(SparkListenerApplicationStart(appName, Some(applicationId),

    startTime, sparkUser, applicationAttemptId, schedulerBackend.getDriverLogUrls))

}
3.17 创建 DAGSchedulerSource、BlockManagerSource和 ExecutorAllocationManagerSource
首先要调用taskScheduler的postStartHook方法,其目的是为了等待backend就绪。
// 包名:org.apache.spark

// 类名:SparkContext

// Post init

_taskScheduler.postStartHook()

_env.metricsSystem.registerSource(_dagScheduler.metricsSource)

_env.metricsSystem.registerSource(new BlockManagerSource(_env.blockManager))

_executorAllocationManager.foreach { e =>

  _env.metricsSystem.registerSource(e.executorAllocationManagerSource)

}
3.18 将 SparkContext 标记为激活
SparkContext初始化的最后将当前SparkContext的状态从contextBeingConstructed(正在构建中)改为activeContext(已激活):
// 包名:org.apache.spark

// 类名:SparkContext

// In order to prevent multiple SparkContexts from being active at the same time, mark this

// context as having finished construction.

// NOTE: this must be placed at the end of the SparkContext constructor.

SparkContext.setActiveContext(this, allowMultipleContexts)
至此,SparkContext的construction构造完成。由于涉及的内容比较多,需要单独对每个模块进行学习,后面会把学习的链接补充上。
参考文献:
- Spark源码分析之SparkContext概述
- SparkContext主要组成部分
- 深入理解 Spark - 核心思想与源码分析 @耿嘉安
- Spark 内核设计的艺术 - 架构设计与实现 @耿嘉安
- Spark 大数据处理 - 技术、应用与性能优化 @高彦杰
- 图解 Spark 核心技术与案例实战 @郭景瞻
- Spark 技术内幕 - 深入解析 Spark 内核、架构设计与实现原理 @张安站
- SparkContext — Entry Point to Spark Core
Spark 核心篇-SparkContext的更多相关文章
- Spark 核心篇-SparkEnv
本章内容: 1.功能概述 SparkEnv是Spark的执行环境对象,其中包括与众多Executor执行相关的对象.Spark 对任务的计算都依托于 Executor 的能力,所有的 Executor ...
- spark[源码]-sparkContext详解[一]
spark简述 sparkContext在Spark应用程序的执行过程中起着主导作用,它负责与程序和spark集群进行交互,包括申请集群资源.创建RDD.accumulators及广播变量等.spar ...
- spark核心原理
spark运行结构图如下: spark基本概念 应用程序(application):用户编写的spark应用程序,包含驱动程序(Driver)和分布在集群中多个节点上运行的Executor代码,在执行 ...
- 科普Spark,Spark核心是什么,如何使用Spark(1)
科普Spark,Spark是什么,如何使用Spark(1)转自:http://www.aboutyun.com/thread-6849-1-1.html 阅读本文章可以带着下面问题:1.Spark基于 ...
- spark[源码]-sparkContext概述
SparkContext概述 sparkContext是所有的spark应用程序的发动机引擎,就是说你想要运行spark程序就必须创建一个,不然就没的玩了.sparkContext负责初始化很多东西, ...
- spark浅谈(2):SPARK核心编程
一.SPARK-CORE 1.spark核心模块是整个项目的基础.提供了分布式的任务分发,调度以及基本的IO功能,Spark使用基础的数据结构,叫做RDD(弹性分布式数据集),是一个逻辑的数据分区的集 ...
- Spark核心—RDD初探
本文目的 最近在使用Spark进行数据清理的相关工作,初次使用Spark时,遇到了一些挑(da)战(ken).感觉需要记录点什么,才对得起自己.下面的内容主要是关于Spark核心-RDD的相关 ...
- Spark 核心概念 RDD 详解
RDD全称叫做弹性分布式数据集(Resilient Distributed Datasets),它是一种分布式的内存抽象,表示一个只读的记录分区的集合,它只能通过其他RDD转换而创建,为此,RDD支持 ...
- 从壹开始微服务 [ DDD ] 之十二 ║ 核心篇【下】:事件驱动EDA 详解
缘起 哈喽大家好,又是周二了,时间很快,我的第二个系列DDD领域驱动设计讲解已经接近尾声了,除了今天的时间驱动EDA(也有可能是两篇),然后就是下一篇的事件回溯,就剩下最后的权限验证了,然后就完结了, ...
随机推荐
- Linux !的使用
转自:https://www.linuxidc.com/Linux/2015-05/117774.htm 一.history 78 cd /mnt/ 79 ls 80 cd / 81 history ...
- 097实战 关于ETL的几种运行方式
一:代码部分 1.新建maven项目 2.添加需要的java代码 3.书写mapper类 4.书写runner类 二:运行方式 1.本地运行 2.集群运行 3.本地提交集群运行 三:本地运行方式 1. ...
- ubuntu16.04下vim的安装与配置
一.安装vim 使用命令 $ sudo apt-get install vim 来安装vim,安装后的vim需要进行一些配置,不然使用起来会有些不方便,比如不会自动缩进. 二.配置vim 使用命令 ...
- 使用SQL语句从数据库一个表中随机获取数据
-- 随机获取 10 条数据 SQL Server:SELECT TOP 10 * FROM T_USER ORDER BY NEWID() ORACLE:SELECT * FROM (SELECT ...
- RabbitMQ消息可靠性分析和应用
RabbitMQ流程简介(带Exchange) RabbitMQ使用一些机制来保证可靠性,如持久化.消费确认及发布确认等. 先看以下这个图: P为生产者,X为中转站(Exchange),红色部分为消息 ...
- lintcode 最大子数组III
题目描述 给定一个整数数组和一个整数 k,找出 k 个不重叠子数组使得它们的和最大.每个子数组的数字在数组中的位置应该是连续的. 返回最大的和. 注意事项 子数组最少包含一个数 样例 给出数组 [-1 ...
- 【RAY TRACING THE REST OF YOUR LIFE 超详解】 光线追踪 3-1 蒙特卡罗 (一)
今天起,我们就开始学习第三本书了 这本书主要讲的是蒙特卡罗渲染,以及相关的数学.术语概念等 这本书相较于前面两本有着什么不同,承担着什么样的任务,尚涉书未深,姑妄言之: 第一本书,带领我们初探光线追踪 ...
- 用redis来实现Session保存的一个简单Demo
现在很多项目都用Redis(RedisSessionStateProvider)来保存Session数据,但是最近遇到一个比较典型的情况,需要把用户数据全部load到redis里面,在加上RedisS ...
- 数据恢复工具PhotoRec
数据恢复工具PhotoRec PhotoRec是一款文件恢复工具.它可以从硬盘.光驱.记忆卡中恢复视频.文档.压缩包等文件.该工具绕开文件系统,采用文件特征码机制,直接进行底层数据扫描,尝试恢复文件. ...
- adb monkey测试 命令
adb shell monkey -p cn.com.linktrust.als.ipad 3500 LOWED_PACKAGE [-p ALLOWED_PACKAGE] ...] [-c MAIN_ ...
