python之RabbitMQ队列
一.介绍
RabbitMQ是一个在AMQP基础上完整的,可复用的企业消息系统。他遵循Mozilla Public License开源协议。
MQ全称为Message Queue, 消息队列(MQ)是一种应用程序对应用程序的通信方法。应用程序通过读写出入队列的消息(针对应用程序的数据)来通信,而无需专用连接来链接它们。消 息传递指的是程序之间通过在消息中发送数据进行通信,而不是通过直接调用彼此来通信,直接调用通常是用于诸如远程过程调用的技术。排队指的是应用程序通过 队列来通信。队列的使用除去了接收和发送应用程序同时执行的要求。
二.引入
基于Queue实现生产者消费者模型
#!/usr/bin/env python

# -*- coding:utf-8 -*-

import Queue

import threading

message = Queue.Queue(10)

def producer(i):

    while True:

        message.put(i)

def consumer(i):

    while True:

        msg = message.get()

for i in range(12):

    t = threading.Thread(target=producer, args=(i,))

    t.start()

for i in range(10):

    t = threading.Thread(target=consumer, args=(i,))

    t.start()
对于RabbitMQ来说,生产和消费不再针对内存里的一个Queue对象,而是在某台服务器上的RabbitMQ Server实现消息队列
实现最简单的队列通信:
#!/usr/bin/env python

import pika

# ######################### 生产者 #########################

connection = pika.BlockingConnection(pika.ConnectionParameters(

        host='localhost'))

channel = connection.channel()


#声明query

channel.queue_declare(queue='hello')

channel.basic_publish(exchange='',

                      routing_key='hello',

                      body='Hello World!')

print(" [x] Sent 'Hello World!'")

connection.close()


#!/usr/bin/env python

import pika

# ########################## 消费者 ##########################

connection = pika.BlockingConnection(pika.ConnectionParameters(

        host='localhost'))

channel = connection.channel()

#接收端也需要声明query,如果不声明就必须要先运行发送端,参照之前的socket通信

channel.queue_declare(queue='hello')

def callback(ch, method, properties, body):

    print(" [x] Received %r" % body)

channel.basic_consume(callback,

                      queue='hello',

                      no_ack=True)

print(' [*] Waiting for messages. To exit press CTRL+C')

channel.start_consuming()
三.几种模式
#四种交换器

fanout: 所有bind到此exchange的queue都可以接收消息

direct: 通过routingKey和exchange决定的那个唯一的queue可以接收消息

topic:所有符合routingKey(此时可以是一个表达式)的routingKey所bind的queue可以接收消息

    表达式符号说明:#代表一个或多个字符,*代表任何字符

      例:#.a会匹配a.a,aa.a,aaa.a等

          *.a会匹配a.a,b.a,c.a等

     注:使用RoutingKey为#,Exchange Type为topic的时候相当于使用fanout

headers: 通过headers 来决定把消息发给哪些queue
1.work模式
在这种模式下,RabbitMQ会默认把p发的消息依次分发给各个消费者(c),跟负载均衡差不多

import pika

import time

connection = pika.BlockingConnection(pika.ConnectionParameters(

    'localhost'))

channel = connection.channel()

# 声明queue

channel.queue_declare(queue='task_queue')

# n RabbitMQ a message can never be sent directly to the queue, it always needs to go through an exchange.

import sys

message = ' '.join(sys.argv[1:]) or "Hello World! %s" % time.time()

channel.basic_publish(exchange='',

                      routing_key='task_queue',

                      body=message,

                      properties=pika.BasicProperties(

                          delivery_mode=2,  # make message persistent

                      )

                      )

print(" [x] Sent %r" % message)

connection.close()
消息发送端
#_*_coding:utf-8_*_

import pika, time

connection = pika.BlockingConnection(pika.ConnectionParameters(

    'localhost'))

channel = connection.channel()

def callback(ch, method, properties, body):

    print(" [x] Received %r" % body)

    time.sleep(20)

    print(" [x] Done")

    print("method.delivery_tag",method.delivery_tag)

    ch.basic_ack(delivery_tag=method.delivery_tag)

channel.basic_consume(callback,

                      queue='task_queue',

                      no_ack=True

                      )

print(' [*] Waiting for messages. To exit press CTRL+C')

channel.start_consuming()
消息接受端
启动一个发送端,启动三个接收端,通过生产者多发送几条消息,你会发现,这几条消息会被依次分配到各个消费者身上。
注意:
1)消息不丢失
设置消息应答模式no-ack = False,如果有一个消费者挂掉了,那么我们应该将分发给它的任务交付给另一个消费者去处理。
如果no-ack = True,那么如果杀死正在执行任务的消费者,会丢失正在处理的消息,也会丢失已经分发给这个消费者但尚未处理的消息。
#接受端

channel.basic_consume(callback,

                      queue='hello',

                      no_ack=True

                      )

#实际上按照上面的参数顺序会报错,需要这么写

channel.basic_consume('hello',callback,False)
我们已经了解了如何确保即使消费者死亡,任务也不会丢失。但是如果RabbitMQ服务器停止,我们的任务仍将失去!
当RabbitMQ退出或者崩溃,将会丢失队列和消息。除非你不要队列和消息。
所以两件事儿必须保证消息不被丢失:我们必须把“队列”和“消息”设为持久化。
2)接受端和发送端都需要设置durable=true ,其实保证的是队列的持久化
channel.queue_declare(queue='hello', durable=True)
3)要实现消息持久化还需要设置发送端delivery_mode = 2
channel.basic_publish(exchange='',

                      routing_key="task_queue",

                      body=message,

                      properties=pika.BasicProperties(

                         delivery_mode = 2, # make message persistent

                      ))
如果Rabbit只管按顺序把消息发到各个消费者身上,不考虑消费者负载的话,很可能出现,一个机器配置不高的消费者那里堆积了很多消息处理不完,同时配置高的消费者却一直很轻松。为解决此问题,可以在各个消费者端,配置perfetch=1,意思就是告诉RabbitMQ在我这个消费者当前消息还没处理完的时候就不要再给我发新消息了。

channel.basic_qos(prefetch_count=1)
带消息持久化+公平分发的完整代码
发送端
import pika

import sys

connection = pika.BlockingConnection(pika.ConnectionParameters(host='127.0.0.1'))

channel = connection.channel()

channel.queue_declare(queue='task_queue',durable=True)

message = 'Hello World!'

channel.basic_publish(exchange='',routing_key='task_queue',

                      body=message,

                      properties=pika.BasicProperties(delivery_mode=2,))

print('[x] sent %r' %message)

connection.close()
接收端
import pika

import time

connection = pika.BlockingConnection(pika.ConnectionParameters(

    host='127.0.0.1'))

channel = connection.channel()

channel.queue_declare(queue='task_queue', durable=True)

print(' [*] Waiting for messages. To exit press CTRL+C')

def callback(ch, method, properties, body):

    print(" [x] Received %r" % body)

    time.sleep(body.count(b'.'))

    print(" [x] Done")

    ch.basic_ack(delivery_tag=method.delivery_tag)

channel.basic_qos(prefetch_count=1)

channel.basic_consume('task_queue',callback,False)

channel.start_consuming()
2.发布/订阅模式
之前的例子基本都是1对1的消息发送和接收,即消息只能发送到指定的queue里,但有些时候你想让你的消息被所有的Queue收到,类似广播的效果,这时候就要用到exchange了,
Exchange在定义的时候是有类型的,以决定到底是哪些Queue符合条件,可以接收消息。

发送方:
import pika

import sys

connection = pika.BlockingConnection(pika.ConnectionParameters(

        host='localhost'))

channel = connection.channel()

channel.exchange_declare(exchange='logs',

                         exchange_type='fanout')

message = ' '.join(sys.argv[1:]) or "info: Hello World!"

channel.basic_publish(exchange='logs',

                      routing_key='',

                      body=message)

print(" [x] Sent %r" % message)

connection.close()
接收方
import pika

connection = pika.BlockingConnection(pika.ConnectionParameters(

        host='localhost'))

channel = connection.channel()

channel.exchange_declare(exchange='logs',

                         exchange_type='fanout')

result = channel.queue_declare(exclusive=True) #不指定queue名字,rabbit会随机分配一个名字,exclusive=True会在使用此queue的消费者断开后,自动将queue删除

queue_name = result.method.queue

channel.queue_bind(exchange='logs',

                   queue=queue_name)

print(' [*] Waiting for logs. To exit press CTRL+C')

def callback(ch, method, properties, body):

    print(" [x] %r" % body)

channel.basic_consume(queue_name,callback,True)

channel.start_consuming()
应用场景
比如一个商城系统需要在管理员上传商品新的图片时,前台系统必须更新图片,日志系统必须记录相应的日志,那么就可以将两个队列绑定到图片上传交换器上,一个用于前台系统更新图片,另一个用于日志系统记录日志。
3.路由模式
RabbitMQ还支持根据关键字发送,即:队列绑定关键字,发送者将数据根据关键字发送到消息exchange,exchange根据 关键字 判定应该将数据发送至指定队列。例如:我们只想把error级别的日志写到磁盘文件中,而其它级别的日志消息则过滤掉。
在这里我们将要使用direct类型的exchange。Direct类型exchange的路由算法是很简单的:要想一个消息能到达这个队列,需要binding key和routing key正好能匹配得上。

发送端
import pika

import sys

connection = pika.BlockingConnection(pika.ConnectionParameters(

    host='localhost'))

channel = connection.channel()

channel.exchange_declare(exchange='direct_logs',

                         exchange_type='direct')

severity = sys.argv[1] if len(sys.argv) > 1 else 'info'

message = ' '.join(sys.argv[2:]) or 'Hello World!'

channel.basic_publish(exchange='direct_logs',

                      routing_key=severity,

                      body=message)

print(" [x] Sent %r:%r" % (severity, message))

connection.close()
接受端:
import pika

import sys

connection = pika.BlockingConnection(pika.ConnectionParameters(

    host='localhost'))

channel = connection.channel()

channel.exchange_declare(exchange='direct_logs',

                         exchange_type='direct')

result = channel.queue_declare('anne')

queue_name = result.method.queue

severities = sys.argv[1:]

if not severities:

    sys.stderr.write("Usage: %s [info] [warning] [error]\n" % sys.argv[0])

    sys.exit(1)

for severity in severities:

    channel.queue_bind(exchange='direct_logs',

                       queue=queue_name,

                       routing_key=severity)

print(' [*] Waiting for logs. To exit press CTRL+C')
应用场景
利用消费者能够有选择性的接收消息的特性,比如我们商城系统的后台管理系统对于商品进行修改、删除、新增操作都需要更新前台系统的界面展示,而查询操作确不需要,那么这两个队列分开接收消息就比较好。
4.主题模式
上面的路由模式是根据路由key进行完整的匹配(完全相等才发送消息),这里的通配符模式通俗的来讲就是模糊匹配。
在topic类型下,可以让队列绑定几个模糊的关键字,之后发送者将数据发送到exchange,exchange将传入”路由值“和 ”关键字“进行匹配,匹配成功,则将数据发送到指定队列。
- # 表示可以匹配 0 个 或 多个 单词
- * 表示只能匹配 一个 单词

在这个例子中,我们将会发送一些描述动物的消息。Routing key的第一个单词是描述速度的,第二个单词是描述颜色的,第三个是描述物种的:“<speed>.<colour>.<species>”。

这里我们创建三个Binding:Binding key为”.orange.”的Q1,和binding key为”..rabbit”和”lazy.#”的Q2。

这些binding可以总结为:

Q1对所有橘色的(orange)的动物感兴趣;

Q2希望能拿到所有兔子的(rabbit)信息,还有比较懒惰的(lazy.#)动物信息。

一条以” quick.orange.rabbit”为routing key的消息将会推送到Q1和Q2两个queue上,routing key为“lazy.orange.elephant”的消息同样会被推送到Q1和Q2上。但如果routing key为”quick.orange.fox”的话,消息只会被推送到Q1上;routing key为”lazy.brown.fox”的消息会被推送到Q2上,routing key为"lazy.pink.rabbit”的消息也会被推送到Q2上,但同一条消息只会被推送到Q2上一次。

如果在发送消息时所指定的exchange和routing key在消费者端没有对应的exchange和binding key与之绑定的话,那么这条消息将会被丢弃掉。例如:"orange"和"quick.orange.male.rabbit"。但是routing为”lazy.orange.male.rabbit”的消息,将会被推到Q2上。
例子
发送方
#!/usr/bin/env python

import pika

import sys

connection = pika.BlockingConnection(pika.ConnectionParameters(

        host='localhost'))

channel = connection.channel()

channel.exchange_declare(exchange='topic_logs',

                        exchange_type='topic')

routing_key = sys.argv[1] if len(sys.argv) > 1 else 'anonymous.info'

message = ' '.join(sys.argv[2:]) or 'Hello World!'

channel.basic_publish(exchange='topic_logs',

                      routing_key=routing_key,

                      body=message)

print(" [x] Sent %r:%r" % (routing_key, message))

connection.close()
接收方
#!/usr/bin/env python

import pika

import sys

connection = pika.BlockingConnection(pika.ConnectionParameters(

        host='localhost'))

channel = connection.channel()

channel.exchange_declare(exchange='topic_logs',

                         exchange_type='topic')

result = channel.queue_declare(exclusive=True)

queue_name = result.method.queue

binding_keys = sys.argv[1:]

if not binding_keys:

    sys.stderr.write("Usage: %s [binding_key]...\n" % sys.argv[0])

    sys.exit(1)

for binding_key in binding_keys:

    channel.queue_bind(exchange='topic_logs',

                       queue=queue_name,

                       routing_key=binding_key)

print(' [*] Waiting for logs. To exit press CTRL+C')

def callback(ch, method, properties, body):

    print(" [x] %r:%r" % (method.routing_key, body))

channel.basic_consume(queue_name,

                      callback,

                      True)

channel.start_consuming()
总结:
关于 RabbitMQ 的五种队列,其实实际使用最多的是最后一种主题模式,通过模糊匹配,使得操作更加自如。那么我们总结一下有交换器参与的队列(最后三种队列)工作方式如下
生产者:
1.链接Rabbit MQ--->2.获取信道--->3.声明交换器--->4.创建消息--->5.发布消息--->6.关闭信道--->7.关闭链接
消费者:
1.链接Rabbit MQ--->2.获取信道--->3.声明交换器--->4.声明队列--->5.把队列和交换器绑定-->6.消费消息--->7.关闭信道--->8.关闭链接
四.远程调用(RPC)
前面介绍的都是一个发送方,一个接收方,如果我们发送方发送了之后想从接收方获取结果呢?
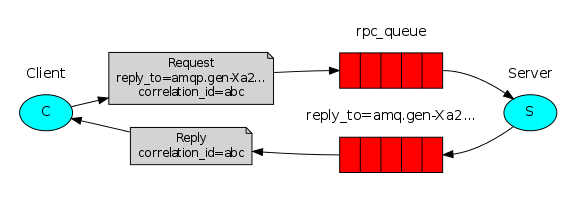
首先,发送方发送请求时,声明结果返回的队列(即结果返回时到哪个队列取结果),并在发送消息时将需要返回结果的队列以及生成的corr_id一并发送,
接收方收到请求后,将结果发送到指定的队列,并附带上corr_id。
最后原先的发送方再到指定的队列取结果。
实现一个远程调用斐波那契数列
RPC server
import pika

import time

connection = pika.BlockingConnection(pika.ConnectionParameters(

    host='localhost'))

channel = connection.channel()

channel.queue_declare(queue='rpc_queue')  #绑定取消息的队列

def fib(n):

    if n == 0:

        return 0

    elif n == 1:

        return 1

    else:

        return fib(n - 1) + fib(n - 2)

#处理请求的方法

def on_request(ch, method, props, body):

    n = int(body)  #消息主题为str格式需要转成int

    print(" [.] fib(%s)" % n)

    response = fib(n)  #调用fib(),生成返回结果

    ch.basic_publish(exchange='',

                     routing_key=props.reply_to,#返回指定队列

                     properties=pika.BasicProperties(correlation_id=

                        props.correlation_id),#将请求附带的correlation_id返回

                     body=str(response)) #将结果转成str返回

    ch.basic_ack(delivery_tag=method.delivery_tag)

channel.basic_qos(prefetch_count=1)

channel.basic_consume('rpc_queue',on_request)  #从rpc_queue取消息,并调用on_request方法处理

print(" [x] Awaiting RPC requests")

channel.start_consuming()
RPC client
import pika

import uuid

class FibonacciRpcClient(object):

    def __init__(self):

        self.connection = pika.BlockingConnection(pika.ConnectionParameters(

            host='localhost'))

        self.channel = self.connection.channel()

        result = self.channel.queue_declare('anne')  #绑定返回队列,随机生成

        self.callback_queue = result.method.queue

        self.channel.basic_consume(self.callback_queue,self.on_response,True,

                                   ) #从绑定的返回队列取结果

    def on_response(self, ch, method, props, body):

        if self.corr_id == props.correlation_id:  #检测是否与发送的corr_id一致

            self.response = body  #取出返回结果传给response

    def call(self, n):

        self.response = None

        self.corr_id = str(uuid.uuid4())    #生成唯一的corr_id

        self.channel.basic_publish(exchange='',

                                   routing_key='rpc_queue',  #发送的队列

                                   properties=pika.BasicProperties(

                                       reply_to=self.callback_queue,  #返回的队列

                                       correlation_id=self.corr_id, #发送corr_id

                                   ),

                                   body=str(n))#消息主体

        while self.response is None:

            self.connection.process_data_events()

        return int(self.response)

fibonacci_rpc = FibonacciRpcClient()

print(" [x] Requesting fib(30)")

response = fibonacci_rpc.call(30)  #调用Call()方法

print(" [.] Got %r" % response)  #打印返回结果
python之RabbitMQ队列的更多相关文章
- Python自动化 【第十一篇】:Python进阶-RabbitMQ队列/Memcached/Redis
本节内容: RabbitMQ队列 Memcached Redis 1. RabbitMQ 安装 http://www.rabbitmq.com/install-standalone-mac.htm ...
- 【python】-- RabbitMQ 队列消息持久化、消息公平分发
RabbitMQ 队列消息持久化 假如消息队列test里面还有消息等待消费者(consumers)去接收,但是这个时候服务器端宕机了,这个时候消息是否还在? 1.队列消息非持久化 服务端(produc ...
- Python开发【十一章】:RabbitMQ队列
RabbitMQ队列 rabbitMQ是消息队列:想想之前的我们学过队列queue:threading queue(线程queue,多个线程之间进行数据交互).进程queue(父进程与子进程进行交互或 ...
- python RabbitMQ队列/redis
RabbitMQ队列 rabbitMQ是消息队列:想想之前的我们学过队列queue:threading queue(线程queue,多个线程之间进行数据交互).进程queue(父进程与子进程进行交互或 ...
- Day10 - Python协程、异步IO、redis缓存、rabbitMQ队列
Python之路,Day9 - 异步IO\数据库\队列\缓存 本节内容 Gevent协程 Select\Poll\Epoll异步IO与事件驱动 Python连接Mysql数据库操作 RabbitM ...
- python RabbitMQ队列使用(入门篇)
---恢复内容开始--- python RabbitMQ队列使用 关于python的queue介绍 关于python的队列,内置的有两种,一种是线程queue,另一种是进程queue,但是这两种que ...
- python RabbitMQ队列使用
python RabbitMQ队列使用 关于python的queue介绍 关于python的队列,内置的有两种,一种是线程queue,另一种是进程queue,但是这两种queue都是只能在同一个进程下 ...
- Python之协程、异步IO、redis缓存、rabbitMQ队列
本节内容 Gevent协程 Select\Poll\Epoll异步IO与事件驱动 Python连接Mysql数据库操作 RabbitMQ队列 Redis\Memcached缓存 Paramiko SS ...
- openresty 学习笔记番外篇:python访问RabbitMQ消息队列
openresty 学习笔记番外篇:python访问RabbitMQ消息队列 python使用pika扩展库操作RabbitMQ的流程梳理. 客户端连接到消息队列服务器,打开一个channel. 客户 ...
随机推荐
- FOI冬令营 Day1
目录 T1.全连(fc) 传送门 Code T2.原样输出(copy) 传送门 Code T3.不同的缩写(diff) 传送门 Code 打算把省冬的题目放上来,主要是防止自己偷懒不订正 T1. ...
- 解决vim升级后导致的高亮行行好有下划线问题,
在自己的guodersert.vim中添加下面一行即可 hi CursorLineNr term=bold cterm=NONE ctermfg=darkgreen gui=bold guifg=Ye ...
- [信息收集]Nmap命令详解
0x00[介绍] Nmap,也就是Network Mapper,中文为"网络映射器". Nmap是一款开源的网络探测和安全审核的工具,它的设计目标是快速地扫描大型网络. 它是网络管 ...
- SpringCloud介绍及入门一
springcloud是什么 基于spring boot实现的服务治理工具包,管理和协微服务 把别人的东西拿来组合在一起,形成各种组件 微服务协调者[service registtry注册中心 Eur ...
- 常见的可以写入VIM配置文件中的设置参数
常见的可以写入.vimrc文件中的设置参数 设置参数 含义 :set nu :set nonu 设置与取消行号 :syn on :syn off 是否依据语法显示相关的颜色帮助,在VIM修改相关的配置 ...
- LeetCode 222. 完全二叉树的节点个数(Count Complete Tree Nodes)
题目描述 给出一个完全二叉树,求出该树的节点个数. 说明: 完全二叉树的定义如下:在完全二叉树中,除了最底层节点可能没填满外,其余每层节点数都达到最大值,并且最下面一层的节点都集中在该层最左边的若干位 ...
- [Java]两个将秒数转化为日时分秒形式的函数
比如900秒要反应一下,说15分就直观了.下面两个函数性能差不多,大家任意取用. 代码: import java.util.concurrent.TimeUnit; public class Test ...
- linux内核中IS_ALIGNED是如何定义的?
1. 定义如下: (include/linux/kernel.h) #define IS_ALIGNED(x, a) (((x) & ((typeof(x))(a ...
- 单硬盘根分区扩容(非LVM)
单用户模式(内核参数末尾加single)救援模式(用光盘启动,选第三个,rescue installed system) 救援模式有什么作用: 1可以更改root密码:2恢复硬盘.文件系统操作:3系统 ...
- angular 中的dom操作(原生JS)
<h2>这是一个home组件--DOM操作演示</h2> <div id="box"> this is box </div> < ...