Express4.x之中间件与路由详解及源码分析
- Application.use()
- Application.router()
- express核心源码模拟
一、express.use()
1.1app.use([path,] callback [, callback ...])
通过语法结构可以看到Application.use()参数分别有以下几种情形:
app.use(function(){...}); //给全局添加一个中间件

app.use(path,function(){...}); //给指定路由path添加一个中间件

app.use(function(){...}, function(){...}, ...); //给全局添加n个中间件

app.use(path,function(){...},function(){...}, ...); //给指定路由path添加n个中间件
关于path最简单也是最常用的就是字符串类型(例:‘/abcd’);除了字符串Express还提供了模板和正则格式(例:'/abc?d', '/ab+cd', '/ab\*cd', '/a(bc)?d', '/\/abc|\/xyz/');除了单个的字符串和模板还可以将多个path作为一个数组的元素,然后将这个数组作为use的path,这样就可以同时给多个路由添加中间件,详细内容可以参考官方文档:https://www.expressjs.com.cn/4x/api.html#path-examples。
关于callbakc多个或单个中间件程序这已经再语法结构中直观的体现出来了,这里重点来看看回调函数的参数:
app.use(function(req,res,next){...}); //必须提供的参数

app.use(function(err,req,res,next){...}); //错误中间件需要在最前面添加一个错误参数
关于中间件的简单应用:
let express = require('./express');

let app = express();

app.use('/',function(req,res,next){

    console.log("我是一个全局中间件");

    next(); //每个中间件的最末尾必须调用next

});

app.use('/',function(err,req,res,next){

    console.log("我是一个全局错误中间,当发生错误是调用")

    console.error(err.stack);

    res.status(500).send('服务出错误了!');

    //由于这个错误处理直接响应了客户端,可以不再调用next,当然后面还需要处理一些业务的话也是可以调用next的

});
1.2简单的模拟Express源码实现Appliction.use()以及各个请求方法的响应注册方法(这里个源码模拟路由概念还比较模糊,所以使用请求方法的响应注册API,而没有使用路由描述):


 //文件结构

 express

     index.js

 //源码模拟实现

 let http = require("http");

 let url = require('url');

 function createApplication(){

     //app是一个监听函数

     let app = (req,res) =>{

         //取出每一个层

         //1.获取请求的方法

         let m = req.method.toLowerCase();

         let {pathname} = url.parse(req.url,true);

         //通过next方法进行迭代

         let index = 0;

         function next(err){

             //如果routes迭代完成还没有找到,说明路径不存在

             if(index === app.routes.length) return res.end(`Cannot ${m} ${pathname}`);

             let {method, path, handler} = app.routes[index++];//每次调用next就应该取下一个layer

             if(err){

                 if(handler.length === 4){

                     handler(err,req,res,next);

                 }else{

                     next(err);

                 }

             }else{

                 if(method === 'middle'){ //处理中间件

                     if(path === '/' || path === pathname || pathname.startsWith(path+'/')){

                         handler(req,res,next);

                     }else{

                         next();//如果这个中间件没有匹配到,继续通过next迭代路由容器routes

                     }

                 }else{ //处理路由

                     if( (method === m || method ==='all') && (path === pathname || path === '*')){ //匹配请求方法和请求路径(接口)

                         handler(req,res);//匹配成功后执行的Callback

                     }else{

                         next();

                     }

                 }

             }

         }

         next();

     }

     app.routes = [];//路由容器

     app.use = function(path,handler){

         if(typeof handler !== 'function'){

             handler = path;

             path = '/';

         }

         let layer = {

             method:'middle', //method是middle就表示它是一个中间件

             path,

             handler

         }

         app.routes.push(layer);

     }

     app.all = function(path,handler){

         let layer = {

             method:'all',

             path,

             handler

         }

         app.routes.push(layer);

     }

     console.log(http.METHODS);

     http.METHODS.forEach(method =>{

         method = method.toLocaleLowerCase();

         app[method] = function (path,handler){//批量生成各个请求方法的路由注册方法

             let layer = {

                 method,

                 path,

                 handler

             }

             app.routes.push(layer);

         }

     });

     //內置中间件,给req扩展path、qury属性

     app.use(function(req,res,next){

         let {pathname,query} = url.parse(req.url,true);

         let hostname = req.headers['host'].split(':')[0];

         req.path = pathname;

         req.query = query;

         req.hostname = hostname;

         next();

     });

     //通过app.listen调用http.createServer()挂在app(),启动express服务

     app.listen = function(){

         let server = http.createServer(app);

         server.listen(...arguments);

     }

     return app;

 }

 module.exports = createApplication;
测试模拟实现的Express:
 let express = require('./express');

 let app = express();

 app.use('/',function(req,res,next){

     console.log("我是一个全局中间件");

     next();

 });

 app.use('/user',function(req,res,next){

     console.log("我是user接口的中间件");

     next();

 });

 app.get('/name',function(req,res){

     console.log(req.path,req.query,req.hostname);

     res.end('zfpx');

 });

 app.post('/name',function(req,res){

     res.end('post name');

 });

 app.all("*",function(req,res){

     res.end('all');

 });

 app.use(function(err,req,res,next){

     console.log(err);

     next();

 });

 app.listen(12306);
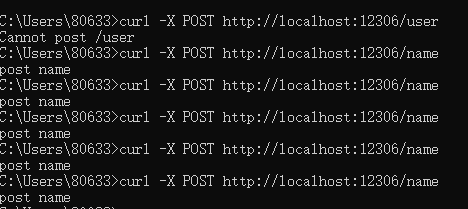
在windows系统下测试请求:
关于源码的构建详细内容可以参考这个视频教程:app.use()模拟构建视频教程,前面就已经说明过这个模式实现仅仅是从表面的业务逻辑,虽然有一点底层的雏形,但与源码还是相差甚远,这一部分也仅仅只是想帮助理解Express采用最简单的方式表现出来。
1.3如果你看过上面的源码或自己也实现过,就会发现Express关于中间件的添加方式除了app.use()还有app.all()及app.METHOD()。在模拟源码中我并未就use和all的差异做处理,都是采用了请求路径绝对等于path,这种方式是all的特性,use的path实际表示为请求路径的开头:
app.use(path,callback):path表示请求路径的开头部分。
app.all(path,callback):paht表示完全等于请求路径。
app.METHOD(path,callback):并不是真的有METHOD这个方法,而是指HTTP请求方法,实际上表示的是app.get()、app.post()、app.put()等方法,而有时候我们会将这些方法说成用来注册路由,这是因为路由注册的确使用这些方法,但同时这些方法也是可以用作中间的添加,这在前一篇博客中的功能解析中就有说明(Express4.x之API:express),详细见过后面的路由解析就会更加明了。
二、express.router()
2.1在实例化一个Application时会实例化一个express.router()实例并被添加到app._router属性上,实际上这个app使用的use、all、METHOD时都是在底层调用了该Router实例上对应的方法,比如看下面这些示例:
 let express = require("express");

 let app = express();

 app._router.use(function(req,res,next){

     console.log("--app.router--");

     next();

 });

 app._router.post("/csJSON",function(req,res,next){

     res.writeHead(200);

     res.write(JSON.stringify(req.body));

     res.end();

 });

 app.listen(12306);
上面示例中的app._router.use、app._router.post分别同等与app.use、app.post,这里到这里也就说明了上一篇博客中的路由与Application的关系Express4.x之API:express。
2.2Express中的Router除了为Express.Application提供路由功能以外,Express也将它作为一个独立的路由工具分离了出来,也就是说Router自身可以独立作为一个应用,如果我们在实际应用中有相关业务有类似Express.Application的路由需求,可以直接实例化一个Router使用,应用的方式如下:
let express = require('/express');

let router = express.Router();

//这部分可以详细参考官方文档有详细的介绍
2.3由于这篇博客主要是分析Express的中间件及路由的底层逻辑,所以就不在这里详细介绍某个模块的应用,如果有时间我再写一篇关于Router模块的应用,这里我直接上一份模拟Express路由的代码以供参考:
文件结构:
express //根路径

    index.js //express主入口文件

    application.js //express应用构造模块

    router //路由路径

        index.js //路由主入口文件

        layer.js //构造层的模块

        route.js //子路由模块
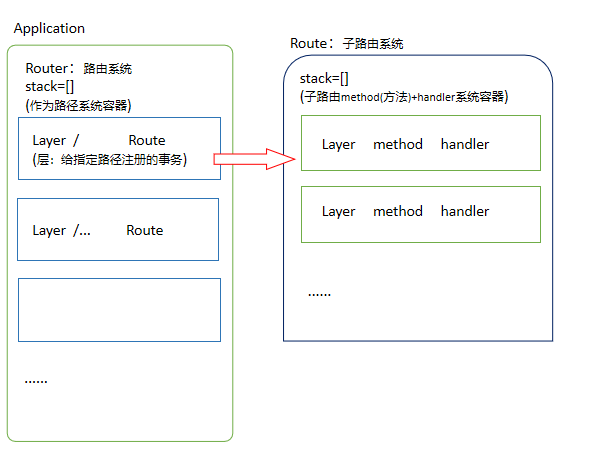
Express路由系统的逻辑结构图:
模拟代码(express核心源码模拟):
 //express主入口文件

 let Application = require('./application.js');

 function createApplication(){

     return new Application();

 }

 module.exports = createApplication;
index.js //express主入口文件
 //用来创建应用app

 let http = require('http');

 let url = require('url');

 //导入路由系统模块

 let Router = require('./router');

 const methods = http.METHODS;

 //Application ---- express的应用系统

 function Application(){

     //创建一个內置的路由系统

     this._router = new Router();

 }

 //app.get ---- 实现路由注册业务

 // Application.prototype.get = function(path,...handlers){

 //     this._router.get(path,'use',handlers);

 // }

 methods.forEach(method => {

     method = method.toLocaleLowerCase();

     Application.prototype[method] = function(path,...handlers){

         this._router[method](path,handlers);

     }

 });

 //app.use ---- 实现中间件注册业务

 //这里模拟处理三种参数模式:

 // -- 1个回调函数:callback

 // -- 多个回调函数:[callback,] callback [,callback...]

 // -- 指定路由的中间件:[path,] callback [,callback...]

 // -- 注意源码中可以处理这三种参数形式还可以处理上面数据的数组形式,以及其他Application(直接将其他app上的中间件添加到当前应用上)

 Application.prototype.use = function(fn){

     let path = '/';

     let fns = [];

     let arg = [].slice.call(arguments);

     if(typeof fn !== 'function' && arg.length >= 2){

         if(typeof arg[0] !== 'string'){

             fns = arg;

         }else{

             path = arg[0];

             fns = arg.slice(1);

         }

     }else{

         fns = arg;

     }

     this._router.use(path,'use',fns);

 }

 Application.prototype.all = function(fn){

     let path = '/';

     let fns = [];

     let arg = [].slice.call(arguments);

     if(typeof fn !== 'function' && arg.length >= 2){

         if(typeof arg[0] !== 'string'){

             fns = arg;

         }else{

             path = arg[0];

             fns = arg.slice(1);

         }

       }else{

         fns = arg;

     }

     this._router.use(path,'all',fns);

 }

 //将http的listen方法封装到Application的原型上

 Application.prototype.listen = function(){

     let server = http.createServer((req,res)=>{

         //done 用于当路由无任何可匹配项时调用的处理函数

         function done(){

             res.end(`Cannot ${req.url} ${req.method}`);

         }

         this._router.handle(req,res,done); //调用路由系统的handle方法处理请求

     });

     server.listen(...arguments);

 };

 module.exports = Application;
application.js //express应用构造模块
 //express路由系统

 const Layer = require('./layer.js');

 const Route = require('./route.js');

 const http = require('http');

 const methods = http.METHODS;

 const url = require('url');

 //路由对象构造函数

 function Router(){

     this.stack = [];

 }

 //router.route ---- 用于创建子路由对象route与主路由上层(layer)的关系

 //并将主路由上的层缓存到路由对象的stack容器中,该层建立路径与子路由处理请求的关系

 Router.prototype.route = function(path){

     let route = new Route();

     let layer = new Layer(path,route.dispatch.bind(route));

     this.stack.push(layer);

     return route;

 }

 //router.get ---- 实现路由注册

 //实际上这个方法调用router.route方法分别创建一个主路由系统层、一个子路由系统,并建立两者之间的关系,详细见Router.prototype.route

 //然后获取子路由系统对象,并将回调函数和请求方法注册在这个子路由系统上

 // Router.prototype.get = function(path,handlers){

 //     let route = this.route(path);

 //     route.get(handlers);

 // }

 methods.forEach(method =>{

     method = method.toLocaleLowerCase();

     //注意下面这个方法会出现内存泄漏问题,有待改进

     Router.prototype[method] = function(path, handlers){

         let route = this.route(path);

         route[method](handlers);

     }

 });

 //router.use ---- 实现中间件注册(按照路由开头的路径匹配,即相对路由匹配)

 Router.prototype.use = function(path,routerType,fns){

     let router = this;

     fns.forEach(function(fn){

         let layer = new Layer(path,fn);

         layer.middle = true; //标记这个层为相对路由中间件

         layer.routerType = routerType;

         router.stack.push(layer);

     });

 }

 //调用路由处理请求

 Router.prototype.handle = function(req,res,out){

     let {pathname} = url.parse(req.url);

     let index = 0;

     let next = () => {

         if(index >= this.stack.length) return out();

         let layer = this.stack[index++];

         if(layer.middle && (layer.path === '/' || pathname === layer.path || pathname.startsWith(layer.path + '/'))){

             //处理中间件

             if(layer.routerType === 'use'){

                 layer.handle_request(req,res,next);

             }else if(layer.routerType === 'all' && layer.path === pathname){

                 layer.handle_request(req,res,next);

             }else{

                 next();

             }

         }else if(layer.match(pathname)){

             //处理响应--更准确的说是处理具体请求方法上的中间件或响应

             layer.handle_request(req,res,next);

         }else{

             next();

         }

     }

     next();

 }

 module.exports = Router;
index.js //路由主入口文件
 //Layer的构造函数

 function Layer(path,handler){

     this.path = path; //当前层的路径

     this.handler = handler;  //当前层的回调函数

 }

 //判断请求方法与当前层的方法是否一致

 Layer.prototype.match = function(pathname){

     return this.path === pathname;

 }

 //调用当前层的回调函数handler

 Layer.prototype.handle_request = function(req,res,next){

     this.handler(req,res,next);

 }

 module.exports = Layer;
layer.js //构造层的模块
 //Layer的构造函数

 function Layer(path,handler){

     this.path = path; //当前层的路径

     this.handler = handler;  //当前层的回调函数

 }

 //判断请求方法与当前层的方法是否一致

 Layer.prototype.match = function(pathname){

     return this.path === pathname;

 }

 //调用当前层的回调函数handler

 Layer.prototype.handle_request = function(req,res,next){

     this.handler(req,res,next);

 }

 module.exports = Layer;
route.js //子路由模块
测试代码:
 let express = require('./express');

 let app = express();

 app.use('/name',function(req,res,next){

     console.log('use1');

     next();

 });

 app.use(function(req,res,next){

     console.log('use2-1');

     next();

 },function(req,res,next){

     console.log('use2-2');

     next();

 });

 app.all('/name',function(req,res,next){

     console.log('all-1');

     next();

 });

 app.all('/name/app',function(req,res,next){

     console.log('all-2');

     next();

 });

 app.get('/name/app',function(req,res){

     res.end(req.url);

 });

 // console.log(app._router.stack);

 app.listen(12306);
测试结果:


Express4.x之中间件与路由详解及源码分析的更多相关文章
- Android应用AsyncTask处理机制详解及源码分析
1 背景 Android异步处理机制一直都是Android的一个核心,也是应用工程师面试的一个知识点.前面我们分析了Handler异步机制原理(不了解的可以阅读我的<Android异步消息处理机 ...
- Java SPI机制实战详解及源码分析
背景介绍 提起SPI机制,可能很多人不太熟悉,它是由JDK直接提供的,全称为:Service Provider Interface.而在平时的使用过程中也很少遇到,但如果你阅读一些框架的源码时,会发现 ...
- Spring Boot启动命令参数详解及源码分析
使用过Spring Boot,我们都知道通过java -jar可以快速启动Spring Boot项目.同时,也可以通过在执行jar -jar时传递参数来进行配置.本文带大家系统的了解一下Spring ...
- 【转载】Android应用AsyncTask处理机制详解及源码分析
[工匠若水 http://blog.csdn.net/yanbober 转载烦请注明出处,尊重分享成果] 1 背景 Android异步处理机制一直都是Android的一个核心,也是应用工程师面试的一个 ...
- 线程池底层原理详解与源码分析(补充部分---ScheduledThreadPoolExecutor类分析)
[1]前言 本篇幅是对 线程池底层原理详解与源码分析 的补充,默认你已经看完了上一篇对ThreadPoolExecutor类有了足够的了解. [2]ScheduledThreadPoolExecut ...
- SpringMVC异常处理机制详解[附带源码分析]
目录 前言 重要接口和类介绍 HandlerExceptionResolver接口 AbstractHandlerExceptionResolver抽象类 AbstractHandlerMethodE ...
- Hadoop RCFile存储格式详解(源码分析、代码示例)
RCFile RCFile全称Record Columnar File,列式记录文件,是一种类似于SequenceFile的键值对(Key/Value Pairs)数据文件. 关键词:Reco ...
- ArrayList用法详解与源码分析
说明 此文章分两部分,1.ArrayList用法.2.源码分析.先用法后分析是为了以后忘了查阅起来方便-- ArrayList 基本用法 1.创建ArrayList对象 //创建默认容量的数组列表(默 ...
- [转]SpringMVC拦截器详解[附带源码分析]
目录 前言 重要接口及类介绍 源码分析 拦截器的配置 编写自定义的拦截器 总结 前言 SpringMVC是目前主流的Web MVC框架之一. 如果有同学对它不熟悉,那么请参考它的入门blog:ht ...
随机推荐
- 王艳 201771010127《面向对象程序设计(Java)》第四周学习总结
第一部分:理论知识. 第四章:对象与类 4.1:类与对象的概念. 类:是构造对象的模板或蓝图.由类构造对象的过程称为创建类的实例. 对象:想要使用oop,一定要清楚对象的三个特性: 1)对象的行为:对 ...
- Hibernate实现limit查询报错 :unexpected token: limit near line 1, column 33 [from pojo.Product p order by id limit ?,? ]
原因: hibernate无法识别limit, hql语句更不能这样写String hql="from Product p order by id limit ?,? "; 解决 ...
- MySQL事务锁等待超时 Lock wait timeout exceeded; try restarting transaction
工作中处理定时任务分发消息时出现的问题,在查找并解决问题的时候,将相关的问题博客收集整理,在此记录下,以便之后再遇到相同的问题,方便查阅. 问题场景 问题出现的场景: 在消息队列处理消息时,同一事务内 ...
- Spring Boot 开发集成 WebSocket,实现私有即时通信系统
1/ 概述 利用Spring Boot作为基础框架,Spring Security作为安全框架,WebSocket作为通信框架,实现点对点聊天和群聊天. 2/ 所需依赖 Spring Boot 版本 ...
- 杂谈WebApiClient的性能优化
前言 WebApiClient的netcoreapp版本的开发已接近尾声,最后的进攻方向是性能的压榨,我把我所做性能优化的过程介绍给大家,大家可以依葫芦画瓢,应用到自己的实际项目中,提高程序的性能. ...
- 又抓了一个导致频繁GC的鬼--数组动态扩容
概述 本周有个同事过来咨询一个比较诡异的gc问题,大概现象是,系统一直在做cms gc,但是老生代一直不降下去,但是执行一次jmap -histo:live之后,也就是主动触发一次full gc之后, ...
- [自动化-脚本]001.自动领淘金币:Anyweb模拟操作
通过模拟手工操作的方法领取淘金币.该方法万能且通用,有能力的还可以自行修改脚本. 工具 软件下载 anywebscript.com 方法/步骤 1.安装软件如图所示 2.设置脚本: (1)进入网站:[ ...
- [工具-003]如何从ipa中提取info.plist并提取相应信息
最近公司的产品要进行一次批量的升级,产品中的一些配置存放在info.plist,为了保证产品的信息无误,我们必须要对产品的发布信息进行验证.例如:广告ID,umeng,talkingdata等等.那么 ...
- 50个SQL语句(MySQL版) 问题二
--------------------------表结构-------------------------- student(StuId,StuName,StuAge,StuSex) 学生表 tea ...
- 一篇文章看清楚 Linux 的职业发展方向
手机.汽车.甚至宇宙飞船,在今天的科技世界中,你几乎到处都能看到 Linux 的身影.前两天 SpaceX 成功将宇航员送入太空的猎鹰9号火箭与龙飞船用的也是 Linux的操作系统.身处与 Linux ...