JavaScript实现单向链表结构
一.什么是链表结构?
1.1.简介
链表和数组一样, 可以用于存储一系列的元素, 但是链表和数组的实现机制完全不同,链表中的元素在内存不是连续的空间,链表的每个元素由一个存储元素本身(数据)的节点和一个指向下一个元素的引用(指针或者链接)组成。
通俗来说链表类似于火车: 有一个火车头, 火车头会连接一个节点, 节点上有乘客(数据), 并且这个节点会(通过指针)连接下一个节点, 以此类推...
链表的火车结构:

给火车加上数据结构后的结构:
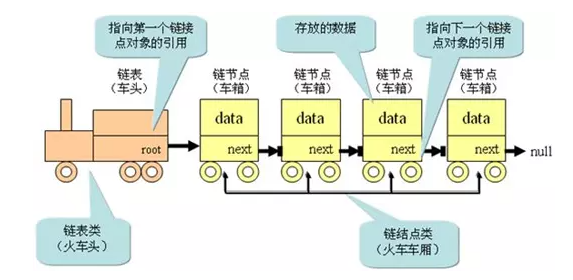
链表的数据结构:

1.2.链表和数组的对比
数组存在的缺点:
- 数组的创建需要申请一段连续并且大小固定的内存空间,当数组不能满足容量的需求是,需要扩容(申请一个更大的数组,将原数组复制过去,反复创建数组会降低性能)
- 在数组开头或者中间位置插入数据的成本很高,需要进行大量元素的位移
链表的优点: - 链表中的元素在内存中不必是连续的空间,所有可以充分利用计算机的内存,实现灵活的内存动态管理
- 链表不不必在创建时确定大小,并且大小可以无限的延伸下去
- 链表在插入和删除数据时,因为不需要进行大量的位移,相对数据效率高很多
链表的缺点: - 因为其指针访问机制,当需要访问任何一个位置元素都需要从头开始访问,当链表数据量过大时性能低
- 无法像数组那样通过下标直接访问元素,访问机制都是从头开始查找
1.3.链表常见操作
- append(element):向列表尾部添加一个新的项
- insert(position, element):向列表的特定位置插入一个新的项。
- remove(element):从列表中移除一项。
- indexOf(element):返回元素在列表中的索引。如果列表中没有该元素则返回-1。
- removeAt(position):从列表的特定位置移除一项。
- isEmpty():如果链表中不包含任何元素,返回true,如果链表长度大于0则返回false。
- size():返回链表包含的元素个数。与数组的length属性类似。
- toString():由于列表项使用了Node类,就需要重写继承自JavaScript对象默认的toString方法,让其只输出元素的值。
二.封装单向链表类
2.1.创建单向链表类
// 封装单向链表类function LinkedList() {// 内部的类:节点类function Node(data) {this.data = datathis.next = null // 指向下一节点的引用默认为null}// 属性this.head = null // 链表头部this.length = 0 // 记录链表的长度}
2.2.append(element)
代码实现
// 1.append 追加方法LinkedList.prototype.append = function (data) {// 1.创建新的节点var newNode = new Node(data)// 2.判断是否添加的是第一个节点if (this.length === 0) {// 2.1是第一个节点this.head = newNode} else {// 2.2不是第一个节点// 找到最后一个节点// 判断current是否为空,为空即为链表最后一个节点,停止循环var current = this.head // 此时this.head指向最后一个节点while (current.next) {current = current.next}// 让最后节点的next指向新添加的节点current.next = newNode}// 3.length+1this.length += 1}
过程讲解
情况1:当添加的节点是第一个节点,直接在head后插入

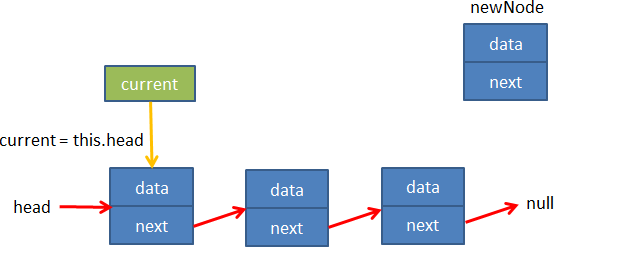
情况2:当链表中已经有节点了,需要向最后的next中添加节点
添加一个变量current让其指向head,循环判断其next属性是否为空?
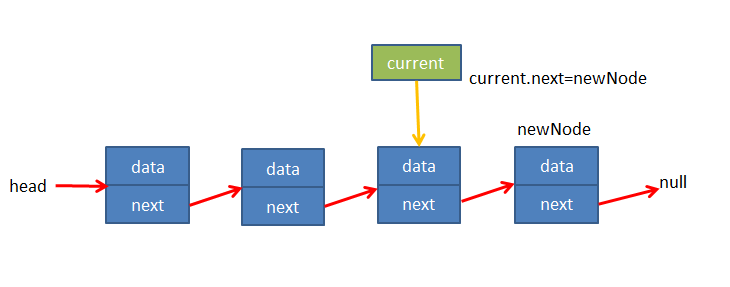
当current.next为空时current就是最后一个节点,此时让current.next指向添加的节点
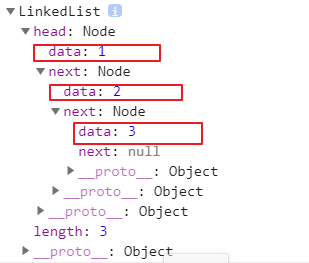
代码测试
var list = new LinkedList()list.append(1)list.append(2)list.append(3)console.log(list)
2.3.toString()
代码实现
// 2.toStringLinkedList.prototype.toString = function () {// 1.定义变量var current = this.headvar listString = ''// 2.循环获取一个个的节点while (current) {listString += current.data + ' 'current = current.next}return listString}
代码测试
var list = new LinkedList()list.append(1)list.append(2)list.append(3)console.log(list.toString())

2.4.insert(positon,element)
代码实现
// 3.insert 插入 参数:传入位置和数据LinkedList.prototype.insert = function (position, data) {// 1.对 position 进行越界判断 不能为负数且不能超过链表长度if (position < 0 || position > this.length) return fasle// 2.根据data创建newNodevar newNode = new Node(data)// 3.判断插入的位置是否是第一个if (position === 0) {newNode.next = this.head // 先让newNode指向原第一个this.head = newNode // 再让this.head指向插入的} else {var index = 0var current = this.headvar previous = null// 当index小于position就一直往后找while (index++ < position) {previous = currentcurrent = current.next}newNode.next = currentprevious.next = newNode}// 4.链表长度增加1this.length += 1return true}
过程解释
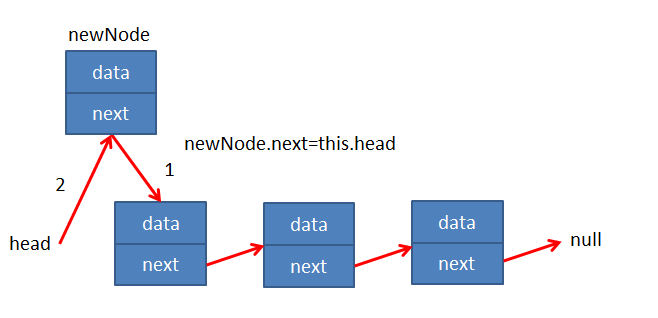
情况1:position=0
- 这个时候表示新添加的节点是头,需要将原来的头节点,作为新节点的next
- 另外这个时候的head应该指向新节点
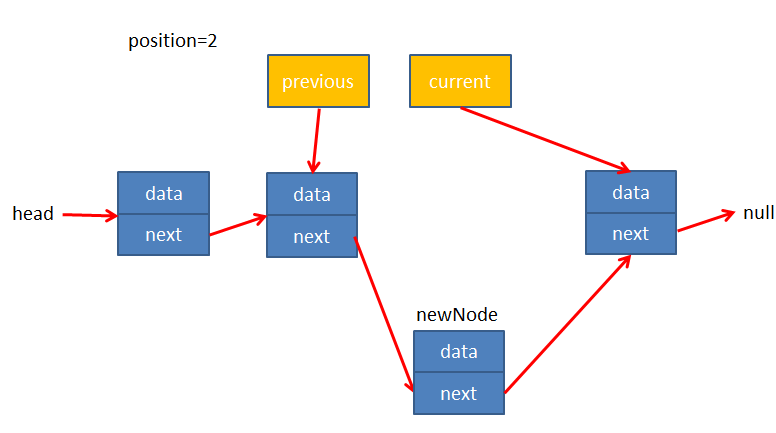
情况2:positon>0
我们需要定义两个变量previous和current分别指向需要插入位置的前一个节点和后一个节点
代码测试
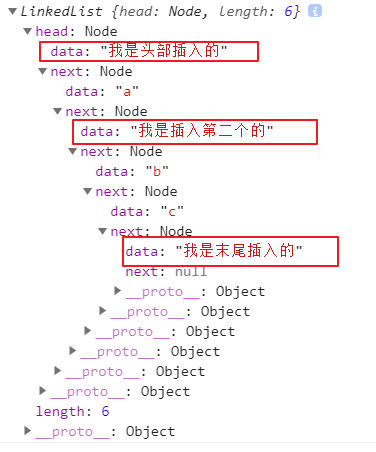
var list = new LinkedList()list.append('a')list.append('b')list.append('c')list.insert(0, '我是头部插入的')list.insert(2, '我是插入第二个的')list.insert(5, '我是末尾插入的')
2.5.get(positon)
代码实现
// 4.get() 获取对应位置的元素LinkedList.prototype.get = function (position) {// 1.越界判断if (position < 0 || position >= this.length) return null// 2.获取对应的数据var current = this.headvar index = 0while (index++ < position) {current = current.next}return current.data}
过程解释
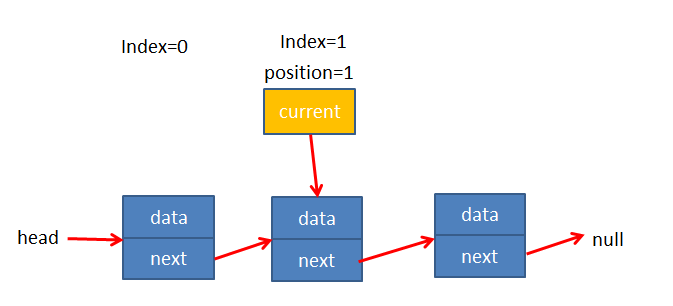
通过变量current指向当前数据,index保存索引,再循环判断index是否等于输入的位置
代码测试
var list = new LinkedList()list.append('a')list.append('b')list.append('c')console.log(list.get(1)) // b
2.6.indexOf(data)
代码实现
// 5.indexOf(element)返回元素在列表的索引,如果没有则返回-1LinkedList.prototype.indexOf = function (data) {// 1.定义变量var current = this.headvar index = 0// 2.开始查找while (current) {if (current.data === data) {return index}current = current.nextindex += 1}// 3.没有找到return -1}
过程解释
通过变量current指向当前数据,index保存索引,再循环判断current.data是否和输入的数据相等即可
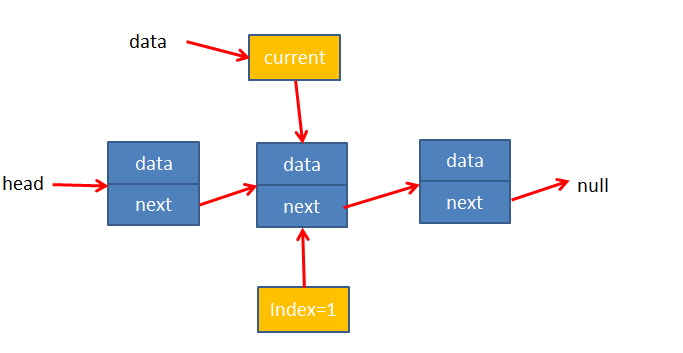
**代码测试**// 测试代码var list = new LinkedList()list.append('a')list.append('b')list.append('c')console.log(list.indexOf('b')) // 1
2.7.opdate(position,element)
代码实现
LinkedList.prototype.update = function (position, newData) {// 1.越界判断if (position < 0 || position >= this.length) return null// 2.查找正确的节点var current = this.headvar index = 0while (index++ < position) {current = current.next}// 3.将positon位置的node的data修改为新newDatecurrent.data = newDatareturn true}
代码测试
var list = new LinkedList()list.append('a')list.append('b')list.append('c')console.log(list.update(0, '修改的数据a'))console.log(list.update(1, '修改的数据b'))console.log(list.update(2, '修改的数据c'))console.log(list)
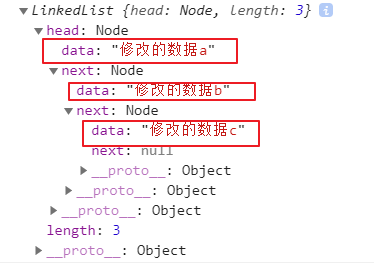
2.8.removeAt(position)
代码实现
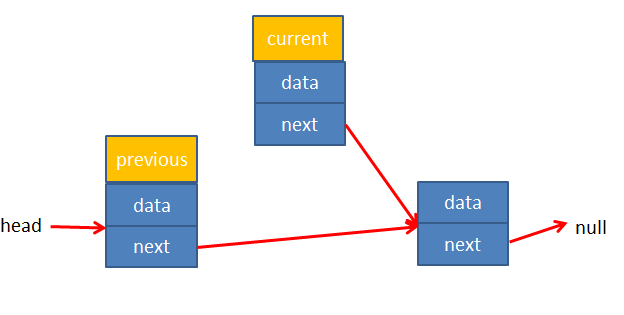
LinkedList.prototype.removeAt = function (position) {// 1.越界判断if (position < 0 || position >= this.length) return nullvar current = this.head// 2.判断删除的是否是第一个节点if (position === 0) {this.head = this.head.next} else {var index = 0var previous = this.headwhile (index++ < position) {previous = currentcurrent = current.next}// 让前一个节点的next指向current的nextprevious.next = current.next}// 3.长度减小 -1this.length -= 1return current.data}}
过程解释
情况1:position=0
- 只需要修改 this.head 的指向即可
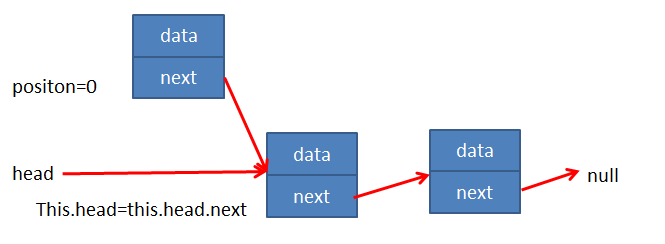
情况2:positon>0 - 这时候就需要通过变量previous和current分别指向删除元素的前一个数和需要删除的元素,再修改previous的next指向
代码测试
var list = new LinkedList()list.append('a')list.append('b')list.append('c')console.log(list.removeAt('1'))console.log(list)
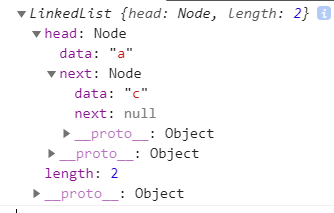
2.9.remove(element)
代码实现
LinkedList.prototype.remove = function (data) {// 1.获取data在链表中的位置var position = this.indexOf(data)// 2.根据位置信息删除节点return this.removeAt(position)}
代码测试
var list = new LinkedList()list.append('a')list.append('b')list.append('c')console.log(list.remove('a'))console.log(list)
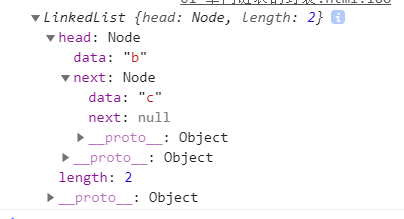
2.10.其他方法
代码实现
// 10.isEmpty()LinkedList.prototype.isEmpty = function () {return this.length}// 11.size()LinkedList.prototype.size = function () {return this.length}
代码测试
var list = new LinkedList()list.append('a')list.append('b')list.append('c')console.log(list.isEmpty()) // 3console.log(list.size()) // 3
2.11.完整代码
// 封装单向链表类function LinkedList() {// 内部的类:节点类function Node(data) {this.data = datathis.next = null // 指向下一节点的引用默认为null}// 属性this.head = null // 链表头部this.length = 0 // 记录链表的长度// 方法// 1.append 追加方法LinkedList.prototype.append = function (data) {// 1.创建新的节点var newNode = new Node(data)// 2.判断是否添加的是第一个节点if (this.length === 0) {// 2.1是第一个节点this.head = newNode} else {// 2.2不是第一个节点// 找到最后一个节点// 判断current是否为空,为空即为链表最后一个节点,停止循环var current = this.head // 此时this.head指向最后一个节点while (current.next) {current = current.next}// 让最后节点的next指向新添加的节点current.next = newNode}// 3.链表长度增加1this.length += 1}// 2.toStringLinkedList.prototype.toString = function () {// 1.定义变量var current = this.headvar listString = ''// 2.循环获取一个个的节点while (current) {listString += current.data + ' 'current = current.next}return listString}// 3.insert(position,data) 插入 参数:传入位置和数据LinkedList.prototype.insert = function (position, data) {// 1.对 position 进行越界判断 不能为负数且不能超过链表长度if (position < 0 || position > this.length) return fasle// 2.根据data创建newNodevar newNode = new Node(data)// 3.判断插入的位置是否是第一个if (position === 0) {newNode.next = this.head // 先让newNode指向原第一个this.head = newNode // 再让this.head指向插入的} else {var index = 0var current = this.headvar previous = null// 当index小于position就一直往后找while (index++ < position) {previous = currentcurrent = current.next}newNode.next = currentprevious.next = newNode}// 4.链表长度增加1this.length += 1return true}// 4.get(position) 获取对应位置的元素LinkedList.prototype.get = function (position) {// 1.越界判断if (position < 0 || position >= this.length) return null// 2.获取对应的数据var current = this.headvar index = 0while (index++ < position) {current = current.next}return current.data}// 5.indexOf(element)返回元素在列表的索引,如果没有则返回-1LinkedList.prototype.indexOf = function (data) {// 1.定义变量var current = this.headvar index = 0// 2.开始查找while (current) {if (current.data === data) {return index}current = current.nextindex += 1}// 3.没有找到return -1}// 6.update(positon,element)LinkedList.prototype.update = function (position, newData) {// 1.越界判断if (position < 0 || position >= this.length) return null// 2.查找正确的节点var current = this.headvar index = 0while (index++ < position) {current = current.next}// 3.将positon位置的node的data修改为新newDatecurrent.data = newDatareturn true}// 7.removeAt(positon)LinkedList.prototype.removeAt = function (position) {// 1.越界判断if (position < 0 || position >= this.length) return nullvar current = this.head// 2.判断删除的是否是第一个节点if (position === 0) {this.head = this.head.next} else {var index = 0var previous = this.headwhile (index++ < position) {previous = currentcurrent = current.next}// 让前一个节点的next指向current的nextprevious.next = current.next}// 3.长度减小 -1this.length -= 1return current.data}// 9.remove(element)LinkedList.prototype.remove = function (data) {// 1.获取data在链表中的位置var position = this.indexOf(data)// 2.根据位置信息删除节点return this.removeAt(position)}// 10.isEmpty()LinkedList.prototype.isEmpty = function () {return this.length}// 11.size()LinkedList.prototype.size = function () {return this.length}}
JavaScript实现单向链表结构的更多相关文章
- JavaScript实现单向链表
JavaScript 本身提供了十分好用的数据类型,以满足大家的日常使用.单靠 Array 和 Object 也的确足够应付日常的绝大部分需求,这也导致了很多前端er对数据结构这一块不是十分的了解. ...
- javascript中的链表结构—双向链表
1.概念 上一个文章里我们已经了解到链表结构,链表的特点是长度不固定,不用担心插入新元素的时候新增位置的问题.插入一个元素的时候,只要找到插入点就可以了,不需要整体移动整个结构. 这里我们了解一下双向 ...
- [置顶] ※数据结构※→☆线性表结构(list)☆============单向链表结构(list single)(二)
单向链表(单链表)是链表的一种,其特点是链表的链接方向是单向的,对链表的访问要通过顺序读取从头部开始:链表是使用指针进行构造的列表:又称为结点列表,因为链表是由一个个结点组装起来的:其中每个结点都有指 ...
- javascript中的链表结构—从链表中删除元素
1.概念 上一个博文我们讲到链表,其中有一个方法remove()是暂时注释的,这个方法有点复杂,需要添加一个Previous()方法找到要删除的元素的前一个节点,这一个博文我们来分析一下这个remov ...
- javascript中的链表结构
1.定义 很多编程语言中数组的长度是固定的,就是定义数组的时候需要定义数组的长度,所以当数组已经被数据填满的时候,需要再加入新的元素就很困难.只能说在部分变成语言中会有这种情况,在javascript ...
- 使用JavaScript实现单向链表
一.实现功能 1.链表元素头部插入 this.unShift = function(data) {} 2.链表元素尾部插入 this.append= function(data) {} //返回boo ...
- 《Java数据结构》链表结构(单向链表,双向链表)
单向链表(单链表)是链表的一种,其特点是链表的链接方向是单向的,对链表的访问要通过顺序读取从头部开始:链表是使用指针进行构造的列表:又称为结点列表,因为链表是由一个个结点组装起来的:其中每个结点都有指 ...
- (原创)用Java实现链表结构对象:单向无环链表
转载请注明本文出处:http://www.cnblogs.com/Starshot/p/6918569.html 链表的结构是由一个一个节点组成的,所谓链,就是每个节点的头尾连在一起.而单向链表就是: ...
- C++异常机制的实现方式和开销分析 (大图,编译器会为每个函数增加EHDL结构,组成一个单向链表,非常著名的“内存访问违例”出错对话框就是该机制的一种体现)
白杨 http://baiy.cn 在我几年前开始写<C++编码规范与指导>一文时,就已经规划着要加入这样一篇讨论 C++ 异常机制的文章了.没想到时隔几年以后才有机会把这个尾巴补完 :- ...
随机推荐
- 手把手教你用Rancher创建产品质量数据库设置
目标:在本文中,我们将介绍如何运行一个分布式产品质量数据库设置,它由Rancher进行管理,并且保证持久性.为了部署有状态的分布式Cassandra数据库,我们将使用Stateful Sets (有状 ...
- Vue项目中jQuery的引入
1.安装jQuery依赖 npm install jquery --save-dev 2.在webpack.base.conf.js头部加入如下代码 var webpack = require(&qu ...
- 理解卷积神经网络中的channel
在一般的深度学习框架的 conv2d 中,如 tensorflow.mxnet,channel 都是必填的一个参数 在 tensorflow 中,对于输入样本中 channels 的含义,一般是RGB ...
- java :技巧
如何查看安装的jdk的路径? 答: 1.情况一:已安装,且环境已配置好 在window环境下,我们先执行java -version 指令查看是否已经配置过java了,如果查到java版本则证明已经安装 ...
- jmeter正则表达式提取多个数据/一组数据时,应该怎么做——debug sampler的使用
背景:今天有个接口需要借助前面接口产生的一组ids数据,来作为入参使用,但是之前都是提取单个接口,所以到底怎么提取接口,遇到了很大的问题,按照多方查取资料都没有成功,最终在一个不相关帖子的最后一句话被 ...
- PHP命令执行学习总结
前言 最近学习了PHP命令执行,内容比较多,把自己学到的总结下来,加深理解,水平有限,欢迎大佬斧正. 什么是PHP命令注入攻击? Command Injection,即命令注入攻击,是指由于Web应用 ...
- 软件工程复习 WHUT
软件过程模型: 瀑布模型:界限分明的独立阶段,计划驱动的软件过程.规范软件开发活动 (例如:可分为分析.开发.维护三个阶段) 也称生命周期模型.线性模型,采用结构化分析.设计.编程技术 不足的地方:知 ...
- 使用EF Code First生成模型,如何让时间字段由数据库自动生成
场景:保存记录时需要时间字段,该时间如果由前台通过DateTime.Now产生,存在风险,比如修改客户端的系统时间,就会伪造该记录的生成时间.因此,需要在保存记录时,由后台自动赋予具体的时间. 实现方 ...
- 【Hadoop离线基础总结】Hive级联求和
Hive级联求和 建表 CREATE TABLE t_salary_detail( username string, month string, salary INT ) ROW format del ...
- ADC电路持续更新
http://www.mcuol.com/tech/109/30923.htm
