Elasticsearch和Head插件安装(转)
环境:
CentOS7 Elasticsearch-6.3.2 JDK8
准备:
JDK8 下载地址:http://www.oracle.com/technetwork/java/javase/downloads/jdk8-downloads-2133151.html
Elasticsearch-6.3.2下载地址: https://www.elastic.co/downloads/elasticsearch
安装:
jdk安装
<1>删除open jdk,没有的话则不需要
rpm -qa|grep java

rpm -e nodeps <name>
<2>解压jdk包
mkdir /usr/jdk

tar -xvf jdk-8u112-linux-x64.tar.gz /usr/jdk
32的JDK需要安装 glibc.i686
yum install glibc.i686
<3>配置环境变量
vim /etc/profile
保存退出,使更改配置生效
source /etc/profile
<4>查看jdk安装是否成功
java-version
如下图则OK

Elasticsearch安装
<1>解压elasticsearch安装包 (安装在 /opt/elasticsearch/elasticsearch-6.3.2/)
unzip elasticsearch-6.3.2.zip
<2>创建elasticsearch用户,root用户启动elasticsearch会失败
groupadd elsearch

useradd elsearch -g elsearch

chown -R elsearch:elsearch /opt/elasticsearch/elasticsearch-6.3.2/
<3>创建elasticsearch数据文件和日志文件
mkdir /data

chown -R elsearch:elsearch /data/

su  elsearch

mkdir -p es/data

mkdir -p es/logs
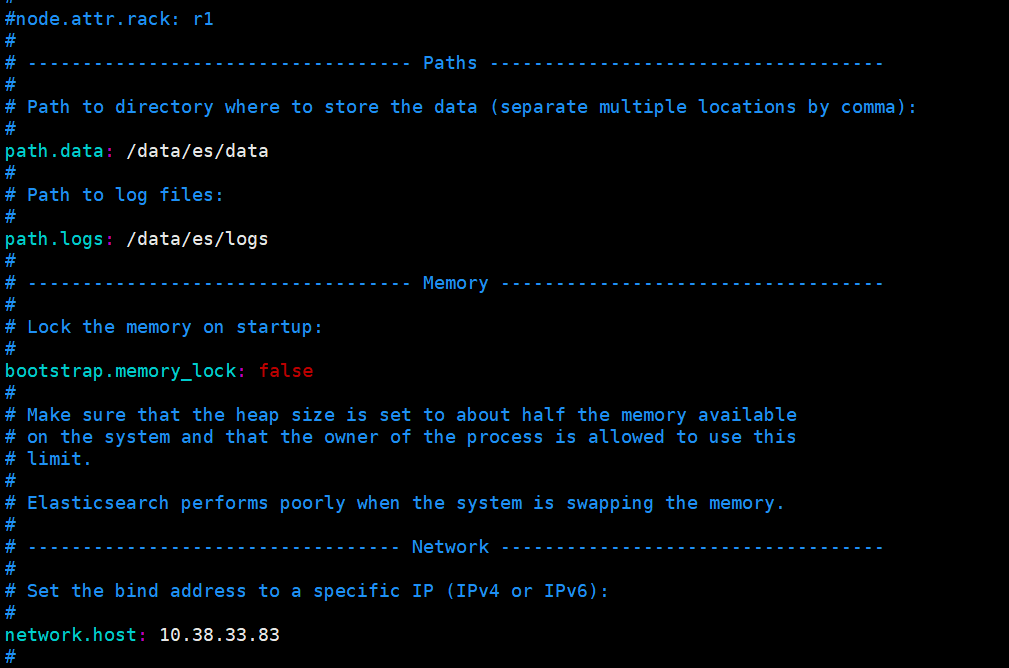
<4>修改配置文件elasticsearch.yml

<5>启动并查看,需要使用非root用户启动
[elsearch@imok bin]$ ./elasticsearch -d
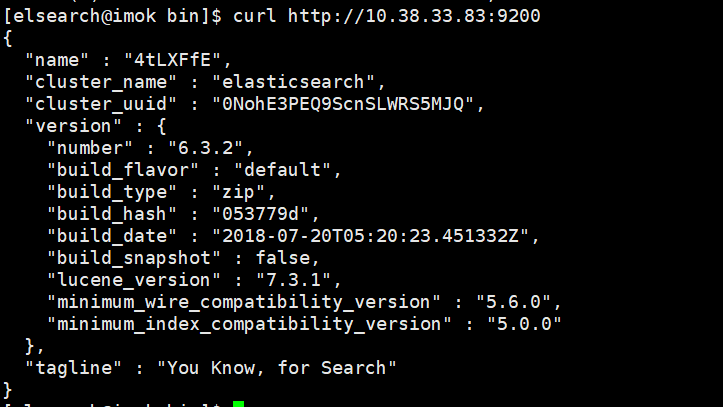
查看是否启动成功: curl http://自己配置的IP地址:9200/
如下图表示安装OK

安装Head插件
由于head插件本质上还是一个nodejs的工程,因此需要安装node,使用npm来安装依赖的包。
<1>安装Node.js
下载解压
wget https://nodejs.org/dist/v6.10.2/node-v6.10.2-linux-x64.tar.xz
xz –d node-v6.10.2-linux-x64.tar.xz

tar xvf node-v6.10.2-linux-x64.tar

mv node-v6.10.2-linux-x64 /usr/local/node
配置并生效
vim /etc/profile

export NODE_HOME=/usr/local/node

export PATH=$PATH:$NODE_HOME/bin

source /etc/profile
查看版本验证
[elsearch@imok bin]$ node -v

v6.10.2

[elsearch@imok bin]$ npm -v

3.10.
<2>下载head插件
如果未安装git ,则先安装git工具
yum install –y git

git clone https://github.com/mobz/elasticsearch-head.git
<3>安装grunt
cd elasticsearch-head

npm install -g grunt --registry=https://registry.npm.taobao.org
<4>安装插件
npm install
在elasticsearch-head目录下node_modules/grunt下如果没有grunt二进制程序,需要执行:
npm install grunt --save
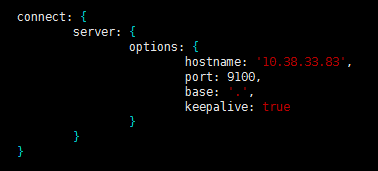
<5>修改配置 elasticsearch-head下Gruntfile.js文件
修改connect配置节点

修改 _site/app.js 修改http://localhost:9200字段到本机ES端口与IP

<6>修改 elasticsearch配置文件
修改elasticsearch.yml文件加入以下内容:
# 是否支持跨域

http.cors.enabled: true

# *表示支持所有域名

http.cors.allow-origin: "*"

<7>启动head插件服务(后台运行)
/elasticsearch-head/node_modules/grunt/bin/grunt server &

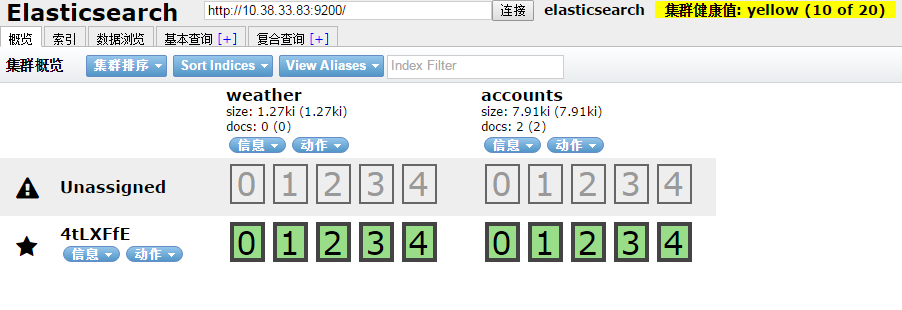
<8>查看
如下图说明安装OK

安装中文分词器
中文分词器的版本和elasticsearch的版本要一致。随笔中安装的是6.3.2版本
$ ./bin/elasticsearch-plugin install https://github.com/medcl/elasticsearch-analysis-ik/releases/download/v6.3.2/elasticsearch-analysis-ik-6.3.2.zip
安装OK后重启elasticsearch服务
安装过程遇到的问题:
[1]: max file descriptors [4096] for elasticsearch process is too low, increase to at least [65536]
解决:vim /etc/security/limits.conf ,在文件末尾添加以下参数 (* 要带上)
* soft nofile 65536

* hard nofile 131072

* soft nproc 2048

* hard nproc
ulimit -n查看进程数
[2]: max virtual memory areas vm.max_map_count [65530] is too low, increase to at least [262144]
解决:修改 /etc/sysclt.conf配置
vi /etc/sysctl.conf
添加一下配置参数
vm.max_map_count=
执行命令
sysctl -p
重启elasticsearch服务即可。
参考:
https://www.cnblogs.com/hunttown/p/6723286.html
https://www.cnblogs.com/lizichao1991/p/7809156.html
Elasticsearch和Head插件安装(转)的更多相关文章
- ElasticSearch 2 (6) - 插件安装Head、Kopf与Bigdesk
ElasticSearch 2 (6) - 插件安装Head.Kopf与Bigdesk 摘要 安装Elasticsearch插件Head.Kopf与Bigdesk 版本 elasticsearch版本 ...
- ElasticSearch之常用插件安装命令
#head监控安装,推荐 bin/plugin -install mobz/elasticsearch-head #bigdesk集群状态,推荐 bin/plugin -install lukas-v ...
- 分布式搜索引擎ElasticSearch+Kibana (Marvel插件安装详解)
在安装插件的过程中,尤其是安装Marvel插件遇到了很多问题,要下载license.Marvel-agent,又要下载安装Kibana 版本需求 Java 7 or later Elasticsear ...
- 【ElasticSearch】 elasticsearch-head插件安装
本章介绍elasticsearch-head插件安装,elasticsearch安装参考:[ElasticSearch] 安装 elasticsearch-head安装和学习可参照官方文档: http ...
- elasticsearch及head插件安装与配置
1. 环境软件版本说明 系统:ubuntu14.04.1 JDK:1.8 elasticsearch:5.5.2 node:9.11.1 elasticsearch:5.X 2. 环境软件下载说明 1 ...
- Elasticsearch之sense插件安装之后的浏览详解
前提博客是 Elasticsearch之sense插件的安装(图文详解) 立马,可以看到 http://192.168.80.145:5601/app/sense 以后更新
- Elasticsearch学习1--head插件安装
1.简要介绍 elasticsearch-head是一个elasticsearch的集群管理工具,它是完全由html5编写的独立网页程序. 2.最近尝试学习elasticsearch,查了一些资料,但 ...
- Elasticsearch之head插件安装之后的浏览详解
前提, Elasticsearch之插件介绍及安装 https://i.cnblogs.com/posts?categoryid=950999&page=2 (强烈建议,从头开始看) 比如, ...
- Elasticsearch之kopf插件安装之后的浏览详解
前提, Elasticsearch之插件介绍及安装 https://i.cnblogs.com/posts?categoryid=950999&page=2 (强烈建议,从头开始看) 比如, ...
- Elasticsearch和Head插件安装
环境: CentOS7 Elasticsearch-6.3.2 JDK8 准备: JDK8 下载地址:http://www.oracle.com/technetwork/java/javase/do ...
随机推荐
- 关于winsxs目录的处理
参考文档: 1.http://www.360doc.com/content/14/0415/12/7873863_369147503.shtml 2.http://www.360doc.com/con ...
- ajax使用案例
1.初步了解 这里可以修改网络快和慢.限网,流量式的,做模拟的. network->all代表加载的所有事件 后面的那个显示有/,这个是首路由.后面有很多svg和js等文件 想要这个服务器的地址 ...
- PHP openssl DES加解密
不说废话上代码 加密 $str_padded = 'android'; //要加密的字符串 $iv = "12345678"; 偏移值 cbc必填 "\x01\x02\x ...
- 51nod 2387 戴德兰
牛牛非常喜欢赶deadline.输入n, c, d一共有n个任务,第i个任务需要a[i]分钟完成 特别的,在最后d分钟,牛牛的效率会变成双倍(耗时变为一半) 可能出现一个任务前半部分不在最后d分钟,后 ...
- jdk1.8换成11,启动项目报错java.net.MalformedURLException: unknown protocol: jrt
jdk11 Information:Internal caches are corrupted or have outdated format, forcing project rebuild: Mo ...
- 序列:SEQUENCE
一.序列介绍 Oracle的序列是一种数据库对象,主要作用是用来产生唯一值.序列被创建以后可以通过数据字典找到序列对象,因此序列可以被多个对象共享. 二.创建序列 序列使用CREATE SEQUENC ...
- Java入门程序HelloWord
Java程序开发三步骤:编写,编译,运行 编译器(编译):javac.exe 解释器(运行):java.exe 编译:把我们能看得懂的java代码(xxx.java)翻译成jvm可以运行的java字节 ...
- log4j+junit+maven
本文在开发第一个maven示例的基础上进行扩展. 日志级别测试 在src\main\resources文件夹下新建log4j.properties log4j.rootLogger = warn,st ...
- [React] Write a Custom React Effect Hook
Similar to writing a custom State Hook, we’ll write our own Effect Hook called useStarWarsQuote, whi ...
- RabbitMQ交换机、RabbitMQ整合springCloud
目标 1.交换机 2.RabbitMQ整合springCloud 交换机 蓝色区域===生产者 红色区域===Server:又称Broker,接受客户端的连接,实现AMQP实体服务 绿色区域===消费 ...
