nginx+uwsgi+django开发环境搭建
Nginx+uWSGI+Djangoi开发环境搭建
Django简介,环境搭建
uWSGI简介,安装与配置
Nginx安装与配置
Nginx+uWSGI+Django原理解析
1、django简介,环境搭建
django简介
Django 是用Python开发的一个免费开源的Web框架,可以用于快速搭建高性能,优雅的网站!
Django 中提供了开发网站经常用到的模块,常见的代码都为你写好了,通过减少重复的代码,Django 使你能够专注于 web 应用上有 趣的关键性的东西。
Django的理念是DRY(Don't Repeat Yourself)来鼓励快速开发!
学Django需要什么基础
1. Django是 python 语言写的一个Web框架包,所以你得知道一些 Python 基础知识。
2. 其次你最好有一些做网站的经验,懂一些网页 HTML, CSS, JavaScript 的知识。
没有经验也没有关系,慢慢来就好了,你一定可以学会,Django 很简单!
django环境搭建
虚拟软件:Oracle VM VirtualBox
虚拟机系统:centos 6.4
Python版本:2.7.13
Django版本:1.11.16
本地宿主机是win10,以上是我的环境配置,现在开始搭建Django环境。
安装Django
pip install Django==1.11.16
检查Django 是否安装完成
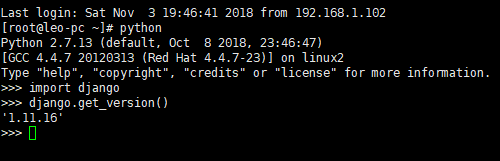
如果运行后看到版本号,就证明安装成功了。YEAH
2、uwsgi简介,安装与配置
uwsgi简介
uWSGI是一个Web服务器,它实现了WSGI协议、uwsgi、http等协议。Nginx中HttpUwsgiModule的作用是与uWSGI服务器进行交换。
要注意 WSGI / uwsgi / uWSGI 这三个概念的区分。
- WSGI是一种Web服务器网关接口。它是一个Web服务器(如nginx,uWSGI等服务器)与web应用(如用Flask框架写的程序)通信的一种规范。
- uwsgi是一种线路协议而不是通信协议,在此常用于在uWSGI服务器与其他网络服务器的数据通信。
- 而uWSGI是实现了uwsgi和WSGI两种协议的Web服务器。
- uwsgi协议是一个uWSGI服务器自有的协议,它用于定义传输信息的类型(type of information),每一个uwsgi packet前4byte为传输信息类型描述,它与WSGI相比是两样东西。
uwsgi安装
1)uwsgi原理
2)uwsgi安装与调试
pip install uwsgi
安全uwsgi前,确保已安装 yum -y install libxml2 python-devel gcc gcc-c++等插件
检查uwsgi是否安装成功
创建一个python文件 test.py
def application(env, start_response):

    start_response('200 OK',[('Content-Type','text/html')])

    return ['Hello World']
启动uwsgi,命令uwsgi --http :8000 --wsgi-file test.py
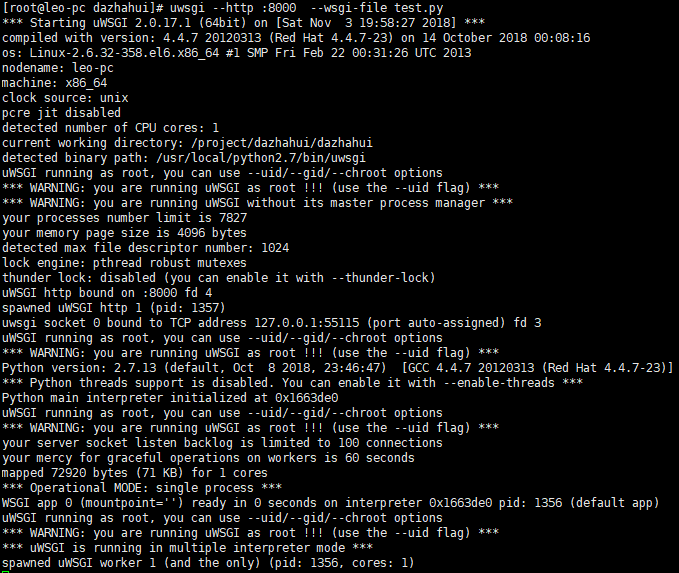
浏览器或者命令行访问http://127.0.0.1:8000/,如果成功,可以看到打印 Hello World

uwsgi常用命令选项:
常用选项:

http : 协议类型和端口号

processes : 开启的进程数量

workers : 开启的进程数量,等同于processes(官网的说法是spawn the specified number ofworkers / processes)

chdir : 指定运行目录(chdir to specified directory before apps loading)

wsgi-file : 载入wsgi-file(load .wsgi file)

stats : 在指定的地址上,开启状态服务(enable the stats server on the specified address)

threads : 运行线程。由于GIL的存在,我觉得这个真心没啥用。(run each worker in prethreaded mode with the specified number of threads)

master : 允许主进程存在(enable master process)

daemonize : 使进程在后台运行,并将日志打到指定的日志文件或者udp服务器(daemonize uWSGI)。实际上最常用的,还是把运行记录输出到一个本地文件上。(肯定要启用,要不刷屏!!)

pidfile : 指定pid文件的位置,记录主进程的pid号。   (生成pid文件,以便stop uwsgi)

vacuum : 当服务器退出的时候自动清理环境,删除unix socket文件和pid文件(try to remove all of the generated file/sockets)
3)uwsgi with django
新建一个Django project
 django-admin.py startproject project_name

 #在 windows 上,如果报错,尝试用 django-admin 代替 django-admin.py

 #project_name(你的项目名称)
django-admin startproject dazhahui,项目目录结构如下:
 dazhahui

 ├── manage.py

 └── dazhahui

     ├── __init__.py

     ├── settings.py

     ├── urls.py

     └── wsgi.py
新建一个applicaiton
python manage.py createapp app_name
 python manage.py createapp app_name

 # app_name(应用程序的名称)
python manage.py startapp app_test,应用程序目录结构如下:
 test_app/

 ├── __init__.py

 ├── admin.py

 ├── models.py

 ├── tests.py

 └── views.py
测试uwsgi with django是否关联成功
test_app应用程序下的view.py,新增一个index方法,打印 “欢迎光临 我的django”
 # -*- coding: utf-8 -*-

 from __future__ import unicode_literals

 from django.shortcuts import render

 from django.http import HttpResponse

 # Create your views here.

 def index(request):

  return HttpResponse(u'欢迎光临 我的django')
dazhahui项目下的urls.py, 添加一行 url(r'^$', test_app_views.index)
 """dazhahui URL Configuration

 The `urlpatterns` list routes URLs to views. For more information please see:

     https://docs.djangoproject.com/en/1.11/topics/http/urls/

 Examples:

 Function views

     1. Add an import:  from my_app import views

     2. Add a URL to urlpatterns:  url(r'^$', views.home, name='home')

 Class-based views

     1. Add an import:  from other_app.views import Home

     2. Add a URL to urlpatterns:  url(r'^$', Home.as_view(), name='home')

 Including another URLconf

     1. Import the include() function: from django.conf.urls import url, include

     2. Add a URL to urlpatterns:  url(r'^blog/', include('blog.urls'))

 """

 from django.conf.urls import url

 from django.contrib import admin

 from test_app import views as test_app_views

 urlpatterns = [

     url(r'^$', test_app_views.index),

     url(r'^admin/', admin.site.urls),
如果执行命令后,看到启动日志和访问日志,说明uwsgi和django关联成功
uwsgi --http :8001 --chdir /project/dazhahui/ --wsgi-file dazhahui/wsgi.py

浏览器中访问 http://127.0.0.1:8001/ 或 curl:http://127.0.0.1:8001,如果看到“欢迎光临 我的jango”,一切正常yeah

设置uwsgi自启动
在/etc/init.d/下创建文件,内容如下:
 #! /bin/sh

 # chkconfig:

 # Description: Startup script for uwsgi webserver on Debian. Place in /etc/init.d and

 # run 'update-rc.d -f uwsgi defaults', or use the appropriate command on your

 # distro. For CentOS/Redhat run: 'chkconfig --add uwsgi'

 ### BEGIN INIT INFO

 # Provides:          uwsgi

 # Required-Start:    $all

 # Required-Stop:      $all

 # Default-Start:

 # Default-Stop:

 # Short-Description: starts the uwsgi web server

 # Description:       starts uwsgi using start-stop-daemon

 ### END INIT INFO

 PATH=/usr/local/sbin:/usr/local/bin:/sbin:/bin:/usr/sbin:/usr/bin:/project/dazhahui

 DESC="uwsgi daemon"

 NAME=uwsgi

 DAEMON=/usr/bin/uwsgi

 # CONFIGFILE=/etc/$NAME.ini

 CONFIGFILE=/project/dazhahui/$NAME.ini

 PIDFILE=/run/$NAME.pid

 SCRIPTNAME=/etc/init.d/$NAME

 set -e

 [ -x "$DAEMON" ] || exit

 do_start() {

      $DAEMON $CONFIGFILE || echo -n "uwsgi already running"

 }

 do_stop() {

      $DAEMON --stop $PIDFILE || echo -n "uwsgi not running"

      rm -f $PIDFILE

      echo "$DAEMON STOPED."

 }

 do_reload() {

      $DAEMON --reload $PIDFILE || echo -n "uwsgi can't reload"

 }

 do_status() {

      ps aux|grep $DAEMON

 }

 case "$1" in

  status)

      echo -en "Status $NAME: \n"

      do_status

  ;;

  start)

      echo -en "Starting $NAME: \n"

      do_start

  ;;

  stop)

      echo -en "Stopping $NAME: \n"

      do_stop

  ;;

  reload|graceful)

      echo -en "Reloading $NAME: \n"

      do_reload

  ;;

  *)

      echo "Usage: $SCRIPTNAME {status|start|stop|reload}" >&

      exit

  ;;

 esac

 exit
设置权限 chmod +x uwsgi
添加开机启动
chkconfig uwsgi on
使用service进行管理
service uwsgi {status|start|stop|reload}
3、nginx安装与配置
安装nginx
使用yum安装nginx
yum install nginx
nginx常用命令
service nginx start
service nginx stop
service nginx restart
service ngixn reload 重新nginx配置文件
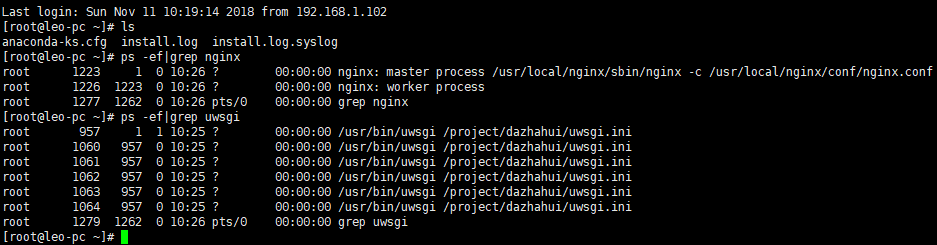
看到nginx启动成功日志,访问curl http://127.0.0.1/ 如果看到nginx的欢迎页面Welcome to nginx,说明nginx安装成功
设置nginx系统自启动
root用户登录,在 /etc/init.d/目录下新建一个nginx脚本文件。使用vi命令
vi /etc/init.d/nginx
 #!/bin/sh

 #

 # nginx - this script starts and stops the nginx daemon

 #

 # chkconfig:   -

 # description: Nginx is an HTTP(S) server, HTTP(S) reverse \

 #               proxy and IMAP/POP3 proxy server

 # processname: nginx

 # config:      /etc/nginx/nginx.conf

 # config:      /etc/sysconfig/nginx

 # pidfile:     /var/run/nginx.pid

 # Source function library.

 . /etc/rc.d/init.d/functions

 # Source networking configuration.

 . /etc/sysconfig/network

 # Check that networking is up.

 [ "$NETWORKING" = "no" ] && exit

 nginx="/usr/local/nginx/sbin/nginx"

 prog=$(basename $nginx)

 NGINX_CONF_FILE="/usr/local/nginx/conf/nginx.conf"

 [ -f /etc/sysconfig/nginx ] && . /etc/sysconfig/nginx

 lockfile=/var/lock/subsys/nginx

 start() {

     [ -x $nginx ] || exit

     [ -f $NGINX_CONF_FILE ] || exit

     echo -n $"Starting $prog: "

     daemon $nginx -c $NGINX_CONF_FILE

     retval=$?

     echo

     [ $retval -eq  ] && touch $lockfile

     return $retval

 }

 stop() {

     echo -n $"Stopping $prog: "

     killproc $prog -QUIT

     retval=$?

     echo

     [ $retval -eq  ] && rm -f $lockfile

     return $retval

 killall - nginx

 }

 restart() {

     configtest || return $?

     stop

     sleep

     start

 }

 reload() {

     configtest || return $?

     echo -n $"Reloading $prog: "

     killproc $nginx -HUP

 RETVAL=$?

     echo

 }

 force_reload() {

     restart

 }

 configtest() {

 $nginx -t -c $NGINX_CONF_FILE

 }

 rh_status() {

     status $prog

 }

 rh_status_q() {

     rh_status >/dev/null >&

 }

 case "$1" in

     start)

         rh_status_q && exit

     $

         ;;

     stop)

         rh_status_q || exit

         $

         ;;

     restart|configtest)

         $

         ;;

     reload)

         rh_status_q || exit

         $

         ;;

     force-reload)

         force_reload

         ;;

     status)

         rh_status

         ;;

     condrestart|try-restart)

         rh_status_q || exit

             ;;

     *)

       echo $"Usage: $0 {start|stop|status|restart|condrestart|try-restart|reload|force-reload|configtest}"

         exit

 esac
2)nginx with uwsgi
nginx.conf的目录下有uwsgi_params文件(/usr/local/nginx/conf/uwsgi_params),这个文件很重要,用于与nginx建立关联。
在自己的工程目录下,建立如dazhahui.conf(/project/dazhahui/dazhahui.conf)的配置文件;复制nginx.conf里面全部的内容,全部写入dazhahui.conf中。
然后按照下面写的,把dazhahui.conf配置文件中的server段部分全部替换掉。
   server {

         listen ;

         server_name 192.168.1.103;

         charset utf-;

         access_log  /project/dazhahui/logs/nginx_access.log;

         error_log   /project/dazhahui/logs/nginx_error.log;

         location / {

            uwsgi_connect_timeout ;

            uwsgi_pass  unix:/project/dazhahui/dazhahui.sock;

            include     /usr/local/nginx/conf/uwsgi_params;

       }

         location /media {

            alias /project/dazhahui/media;

       }

         location /static {

            alias /project/dazhahui/static;

       }

     }
listen 80表示服务器监听80端口;
server name 可以填写域名或者ip地址,我这里写上我的虚拟机分配的ip 192.168.1.103,在浏览器就用这个ip访问
access_log和error_log指定nginx的访问日志和错误日志的存放路径
location /表示项目的根目录,uwsgi_connect_timeout指定链接超时时间30秒,uwsgi_pass可以指定socket文件的绝对路径或者uwsgi监听的ip:端口
location /media和location /static存放静态文件目录,其中location /static指明项目引用的静态文件目录,浏览器中显示的静态资源所在的根目录名;用户在浏览器中查看到的所有image、css或js资源都是处在http://127.0.0.1/static下.
与Django settings.py配置文件静态文件目录一致
STATIC_ROOT = os.path.join(BASE_DIR, "static/")
每次启动uwsgi都要输一大串命令:uwsgi --http :8001 --chdir /project/dazhahui/ --wsgi-file dazhahui/wsgi.py,建议一个uWSGI配置文件,在自己的工程目录下创建uwsgi.ini
 [uwsgi]

 #

 Django-related settings

 #

 socket = /project/dazhahui/dazhahui.sock

 chmod-socket=

 # the base directory (project full path)

 chdir = /project/dazhahui/

 # Django's wsgi file

 wsgi-file = wsgi.py

 #module = dazhahui.wsgi # 新配置

 http=192.168.1.103:

 #

 process-related settings

 #

 # master

 master = true

 # maximum number of worker processes

 processes =

 threads =

 stats = 127.0.0.1:

 #uid = nobody

 #gid = nobody

 harakiri =

 # run process background and save log to daemonize

 daemonize = /project/dazhahui/logs/uwsgi.log

 pidfile = /var/run/uwsgi.pid

 #plugins = python

 pythonpath = /usr/local/python2./lib/python2./site-packages/
socket的字段值/project/dazhahui/dazhahui.sock必须要跟dazhahui.conf的uwsgi_pass的字段值完全一致,否则会出问题。
chdir指定项目的根目录;
wsgi-file指的是wsgi.py在自己工程中的相对路径,我的django工程的wsgi.py文件是在”/project/dazhahui/wsgi.py”,
daemonize指定uWSGI日志的存储路径。
列举下相关主要的文件路径:
 工程路径:                  /project/dazhahui

 工程静态文件路径:            /project/dazhahui/static

 wsgi.py的路径:             /project/dazhahui/wsgi.py

 uwsgi.ini的路径:           /project/dazhahui/uwsgi.ini

 uwsgi日志路径:             /project/dazhahui/logs/uwsgi.log

 destiny.conf的路径:        /project/dazhahui/dazhahui.conf

 uwsgi_params的路径:        /usr/local/nginx/conf/uwsgi_params

 nginx访问日志路径:          /project/dazhahui/logs/nginx_access.log

 nginx错误日志路径:          /project/dazhahui/logs/nginx_error.log
可以发现,我几乎把所有有关工程的配置文件和日志文件都放在工程目录下了,方便后期维护与查错。
启动uWSGI
uwsgi --ini /project/dazhahui/uwsgi.ini
启动nginx
在这之前,我们要先去nginx配置文件的根目录拷贝mime.types(/etc/nginx/conf/mime.types)到工程目录(/wwwroot/destiny/mime.types),和destiny.conf放在一起。
否则用配置文件启动nginx会报错:
nginx: [emerg] open() "/**/**/**/mime.types" failed (: No such file or directory)
当然,如果不想拷贝mime.types文件,也可以将配置文件中“include mime.types;”一项,改成绝对路径“include /etc/nginx/conf/mime.types;”
如果nginx已经开启,先关闭nginx(service nginx stop或nginx -s stop),再执行以下命令:
nginx -c /project/dazhahui/dazhahui.conf
这里的-c 表示加载配置文件启动
4、nginx+uwsgi+django原理解析
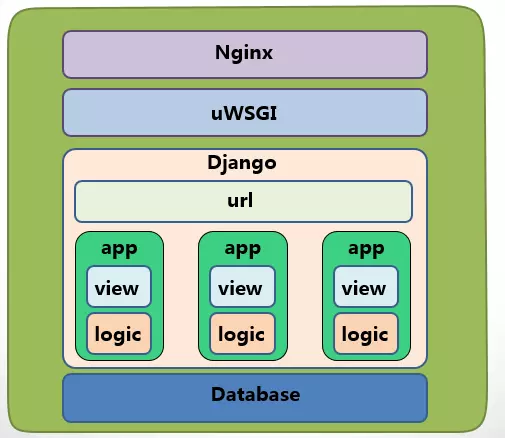
Nginx+uwsgi+django的结构图
浏览器发起一个请求,nginx监听端口并接收请求,nginx已加载的dazhahui.conf配置文件通过uwsgi_pass配置项,找到对应的uwsgi暴露的IP和端口,通过uwsgi协议转发给uWsgi Web服务器,uwsgi服务器通过wsgi.py文件的wsgi-file项找到Django项目,
Django接受并处理浏览器的请求,将处理结果返回给uWsgi Web服务器,uWsgi通知Nginx,Nginx把响应结果返回给浏览器。

Nginx+uWsgi+Django的通讯关系
参考:
https://blog.csdn.net/imphp/article/details/38232133
https://www.jianshu.com/p/1c50b15b143a
https://blog.csdn.net/ocean20/article/details/80496712
https://www.cnblogs.com/saolv/p/6963314.html
https://www.cnblogs.com/qingspace/p/6838747.html
centos7防火墙https://www.linuxidc.com/Linux/2015-05/117473.htm
nginx+uwsgi+django开发环境搭建的更多相关文章
- centos7.4+mysql5.6+virtualenv+python3.6+nginx+uwsgi+django生产环境搭建
一 更新yum # yum update 二 安装gcc lrzsz软件 # yum install gcc 用来编译python3.6源码 # yum install lrzsz 用来上传文件 三 ...
- django开发环境搭建(参考流程)
django开发环境搭建(参考流程) 2013-08-08 01:09:06 分类: LINUX 原文地址:django开发环境搭建(参考流程) 作者:bailiangcn 对于一个初学者,在实际的开 ...
- nginx 与 lua 开发环境搭建
首先下载最新版的 相关软件 的安装文件. nginx: http://nginx.org/en/download.html LuaJIT: http://luajit.org/download.htm ...
- Nginx+uWSGI+Django+Python+ MySQL 搭建可靠的Python Web服务器
一.安装所需工具 yum -y install gcc gcc-c++ rpm-build mysql* libtool-ltdl* libtool automake autoconf libtool ...
- Python+django开发环境搭建
Python目前主版本有2个,2.7+和3.4+ 新入手,决定还是从2.7开始 先从python官网https://www.python.org/下载python2.7.10,64位版本(这里注意,选 ...
- Django开发环境搭建
最近笔者使用了Django框架作为项目model层的数据对象处理. 关于Django的开发环境,需要安装以下内容: 1.安装python 2.安装VCForPython27.msi 3.安装pycha ...
- nginx+uwsgi<django web环境的搭建>
1.sudo pip install uwsgi 2.sudo apt install nginx 3.sudo /etc/init.d/nginx start 4.netstat -tpnl 5./ ...
- Django学习笔记 开发环境搭建
为什么使用django?1.支持快速开发:用python开发:数据库ORM系统,并不需要我们手动地构造SQL语句,而是用python的对象访问数据库,能够提升开发效率.2.大量内置应用:后台管理系统a ...
- Django之Django简介,开发环境搭建,项目应用创建
软件及Django框架简介 软件框架 一个软件框架是由其中各个软件模块组成的: 每一个模块都有特定的功能: 模块与模块之间通过相互配合来完成软件的开发. 软件框架是针对某一类软件设计问题而产生的. M ...
随机推荐
- Jmeter日志级别
转自:https://blog.csdn.net/gowhere_/article/details/78555068 Jmeter日志默认存放在%JMeter_HOME%\bin目录,文件名通常是JM ...
- git和github的学习
摘要:Git是个实用而流行的工具,我在网上找了很多教程,发现很多扯来扯去的,难消化,难吸收,而廖雪峰老师的这个教程最好,由浅入深,一步一步跟着做,记录巩固下.原作网址:https://www.liao ...
- CentOS 安装 Ansible 以及连接Windows server的办法
1. CentOS机器上面按住那ansible yum install ansible 2. 安装 pywinrm 如果不安装 这个的话 ansible 会提示 没有 winrm 模块 注意需要先 ...
- Spring中@Transactional用法
作者:bladestone 来源:CSDN 原文:https://blog.csdn.net/blueheart20/article/details/44654007 版权声明:本文为博主原创文章,转 ...
- 拒绝回调,拥抱async await
之前使用jquery中ajax,请求的结果需要写在回调函数里面,后面接触到了axios/fetch,使用了es6中Promise进行封装,这种链式结构调用,看起来比之前直观,可是还是没有解决回调的问题 ...
- LODOP获取打印成功,是否加入队列
之前博文介绍过获取打印机状态码 LODOP获取打印机状态码和状态码含义测试,但是打印机种类千差万别,状态码不一定准确,特别是打印成功的状态码,获取任务不在队列,可以判断打印成功,删除任务也是任务不在队 ...
- 【长期更新】迈向现代化的 .Net 配置指北
1. 欢呼 .NET Standard 时代 我现在已不大提 .Net Core,对于我来说,未来的开发将是基于 .NET Standard,不仅仅是 面向未来 ,也是 面向过去:不只是 .Net C ...
- Stars project
说明:收藏一些比较好的开源项目 Python实现了所有的排序算法 Github:https://github.com/TheAlgorithms/Python 该项目用Python实现了所有的排序算法 ...
- 安装php的lavavel框架的流程(亲测)
windows上安装配置laravel 初次接触laravel会觉得它的安装方式比较不一样,与Linux上安装软件的方式很相似. 学习laravel的最好方式当然是看官方文档,笔者就在这里讲官方文档上 ...
- Gitlab安装简明文档
1.关于Gitlab CE / GitLab EE版本的区别:Gitlab CE(Community Edition):Gitlab社区版,可以免费试用,无官方支持.GitLab EE(Enterpr ...