云计算OpenStack核心组件---nova计算服务(7)
一、nova介绍
Nova 是 OpenStack 最核心的服务,负责维护和管理云环境的计算资源。OpenStack 作为 IaaS 的云操作系统,虚拟机生命周期管理也就是通过 Nova 来实现的。
用途与功能:
1) 实例生命周期管理
2) 管理计算资源
3) 网络和认证管理
4) REST 风格的 API
5) 异步的一致性通信
6)Hypervisor 透明:支持Xen,XenServer/XCP,KVM, UML, VMware vSphere and Hyper-V
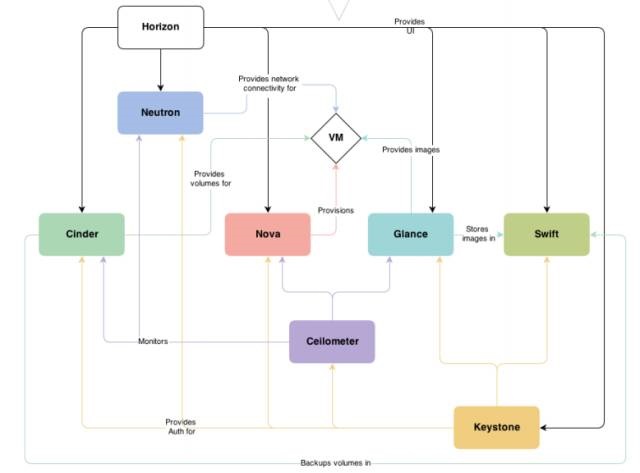
在上图中可以看到,Nova 处于 Openstak 架构的中心,其他组件都为 Nova 提供支持: Glance 为 VM 提供 image;Cinder 和 Swift 分别为 VM 提供块存储和对象存储;Neutron 为 VM 提供网络连接。
nova架构如下图:
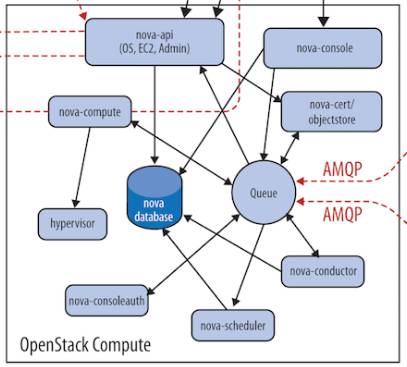
Nova 的架构比较复杂,包含很多组件。 这些组件以子服务(后台 deamon 进程)的形式运行,可以分为以下几类:
1、API
nova-api是整个Nova 组件的门户,接收和响应客户的 API 调用。所有对 Nova 的请求都首先由 nova-api 处理。nova-api 向外界暴露若干 HTTP REST API 接口 在 keystone 中我们可以查询 nova-api 的 endponits。

客户端可以将请求发送到 endponits 指定的地址,向 nova-api 请求操作。 当然,作为最终用户的我们不会直接发送 Rest AP I请求。 OpenStack CLI,Dashboard 和其他需要跟 Nova 交换的组件会使用这些 API。
Nova-api 对接收到的 HTTP API 请求会做如下处理:
(1)检查客户端传入的参数是否合法有效
(2)调用 Nova 其他子服务的处理客户端 HTTP 请求
(3)格式化 Nova 其他子服务返回的结果并返回给客户端
nova-api 接收哪些请求?
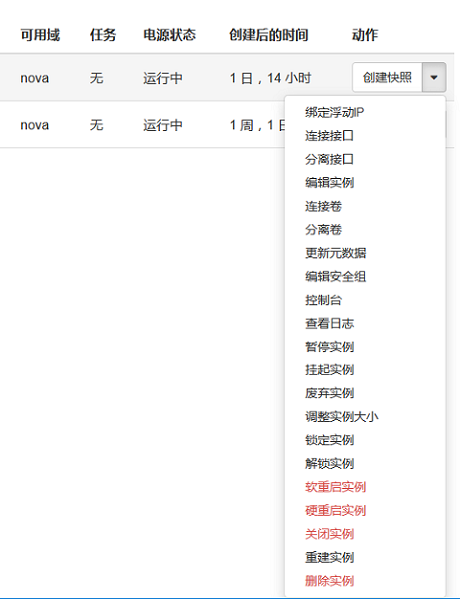
简单的说,只要是跟虚拟机生命周期相关的操作,nova-api 都可以响应。 大部分操作都可以在 Dashboard 上找到。打开Instance管理界面
除了提供 OpenStack 自己的API,nova-api 还支持 Amazon EC2 API。 也就是说,如果客户以前使用 Amazon EC2,并且用 EC2 的 API 开发了些工具来管理虚机,那么如果现在要换成 OpenStack,这些工具可以无缝迁移到 OpenStack,因为 nova-api 兼容 EC2 API,无需做任何修改。
2、Compute Core
(1)nova-scheduler:
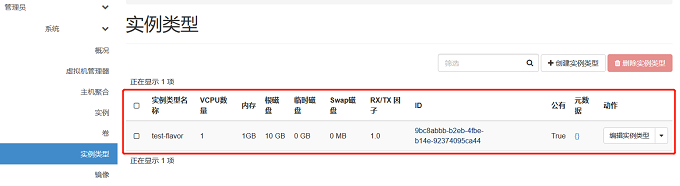
虚机调度服务,负责决定在哪个计算节点上运行虚机。创建 Instance 时,用户会提出资源需求,例如 CPU、内存、磁盘各需要多少。OpenStack 将这些需求定义在 flavor 中,用户只需要指定用哪个 flavor 就可以了。
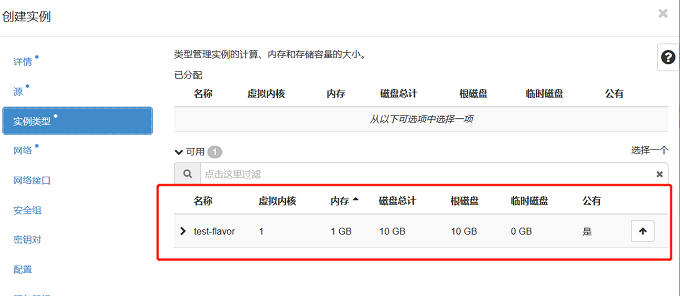
可用的 flavor 在 System->Flavors 中管理。
下面介绍 nova-scheduler 是如何实现调度的。在 /etc/nova/nova.conf 中,nova 通过 driver=filter_scheduler 这个参数来配置 nova-scheduler。
driver = filter_scheduler
Filter scheduler
Filter scheduler 是 nova-scheduler 默认的调度器,调度过程分为两步:
1) 通过过滤器(filter)选择满足条件的计算节点(运行 nova-compute)
2) 通过权重计算(weighting)选择在最优(权重值最大)的计算节点上创建 Instance。
Nova 允许使用第三方 scheduler,配置 scheduler_driver 即可。 这又一次体现了OpenStack的开放性。Scheduler 可以使用多个 filter 依次进行过滤,过滤之后的节点再通过计算权重选出最适合的节点。
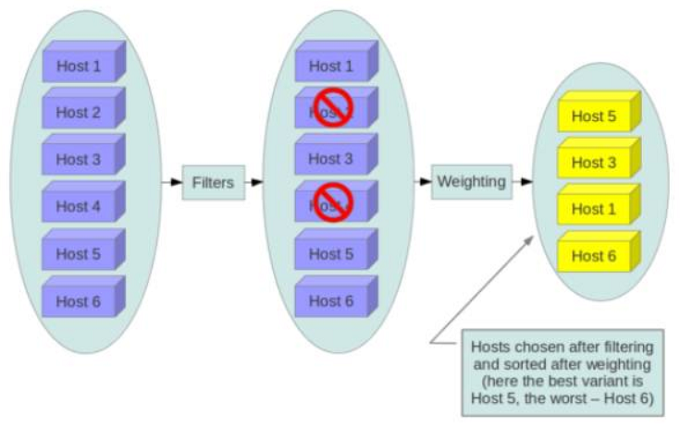
上图是调度过程的一个示例:
1) 最开始有 6 个计算节点 Host1-Host6
2) 通过多个 filter 层层过滤,Host2 和 Host4 没有通过,被刷掉了
3) Host1,Host3,Host5,Host6 计算权重,结果 Host5 得分最高,最终入选
当 Filter scheduler 需要执行调度操作时,会让 filter 对计算节点进行判断,filter 返回 True 或 False。经过前面一堆 filter 的过滤,nova-scheduler 选出了能够部署 instance 的计算节点。
如果有多个计算节点通过了过滤,那么最终选择哪个节点呢?
Scheduler 会对每个计算节点打分,得分最高的获胜。 打分的过程就是 weight,翻译过来就是计算权重值,那么 scheduler 是根据什么来计算权重值呢?
目前 nova-scheduler 的默认实现是根据计算节点空闲的内存量计算权重值: 空闲内存越多,权重越大,instance 将被部署到当前空闲内存最多的计算节点上。
(2)nova-compute:
nova-compute 是管理虚机的核心服务,在计算节点上运行。通过调用Hypervisor API实现节点上的 instance的生命周期管理。 OpenStack 对 instance 的操作,最后都是交给 nova-compute 来完成的。 nova-compute 与 Hypervisor 一起实现 OpenStack 对 instance 生命周期的管理。
Openstack中虚机默认的保存路径在:/var/lib/nova/instances
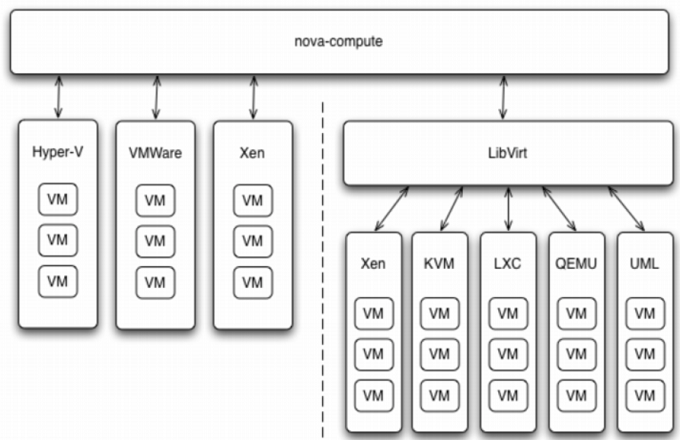
通过Driver架构支持多种Hypervisor
Hypervisor是计算节点上跑的虚拟化管理程序,虚机管理最底层的程序。 不同虚拟化技术提供自己的 Hypervisor。 常用的 Hypervisor 有 KVM,Xen, VMWare 等。nova-compute 为这些 Hypervisor 定义了统一的接口,Hypervisor 只需要实现这些接口,就可以 Driver 的形式即插即用到 OpenStack 系统中。 下面是Nova Driver的架构示意图:
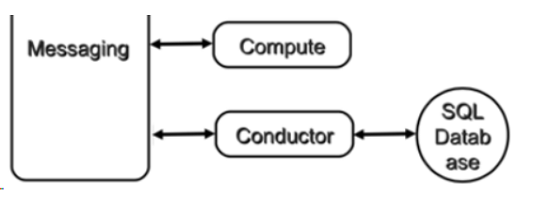
(3)nova-conductor:
nova-compute 经常需要更新数据库,比如更新和获取虚机的状态。 出于安全性和伸缩性的考虑,nova-compute 并不会直接访问数据库,而是将这个任务委托给 nova-conductor。
这样做有两个显著好处:
1)更高的系统安全性
2)更好的系统伸缩性
3、Console Interface
openstack-nova-api:nova门户
openstack-nova-conductor:帮助nova-compute访问数据库的
openstack-nova-console:提供多种方式访问虚机的控制台
openstack-nova-novncproxy:是基于web浏览器提供虚机的控制台
openstack-nova-scheduler:负责调度虚机启动到哪一个计算节点
openstack-nova-placement-api:资源使用情况追踪
openstack-nova-spicehtml5proxy: 基于 HTML5 浏览器的 SPICE 访问
openstack-nova-xvpnvncproxy: 基于 Java 客户端的 VNC 访问
openstack-nova-consoleauth: 负责对访问虚机控制台请求提供 Token 认证
openstack-nova-cert: 提供 x509 证书支持
4、Database
Nova 会有一些数据需要存放到数据库中,一般使用 MySQL。数据库安装在控制节点上。 Nova 使用命名为 “nova” 的数据库。
5、Message Queue
在前面我们了解到 Nova 包含众多的子服务,这些子服务之间需要相互协调和通信。为解耦各个子服务,Nova 通过 Message Queue 作为子服务的信息中转站。 所以在架构图上我们看到了子服务之间没有直接的连线,是通过 Message Queue 联系的。

OpenStack 默认是用 RabbitMQ 作为 Message Queue。 MQ 是 OpenStack 的核心基础组件,我们后面也会详细介绍。
二、Nova 组件如何协同工作
Nova 物理部署方案
下面我们可以看看实验环境的具体部署情况。 通过在计算节点和控制节点上运行
ps -elf | grep nova 来查看运行的 nova 子服务
计算节点compute只运行了nova-compute子服务

控制节点controller运行了若干nova-*子服务
RabbitMQ 和 MySQL 也是放在控制节点上的。可能细心的同学已经发现我们的控制节点上也运行了 nova-compute。 这实际上也就意味着 devstack-controller 既是一个控制节点,同时也是一个计算节点,也可以在上面运行虚机。

这也向我们展示了 OpenStack 这种分布式架构部署上的灵活性: 可以将所有服务都放在一台物理机上,作为一个 All-in-One 的测试环境; 也可以将服务部署在多台物理机上,获得更好的性能和高可用。
另外,也可以用 nova service-list 查看 nova-* 子服务都分布在哪些节点上
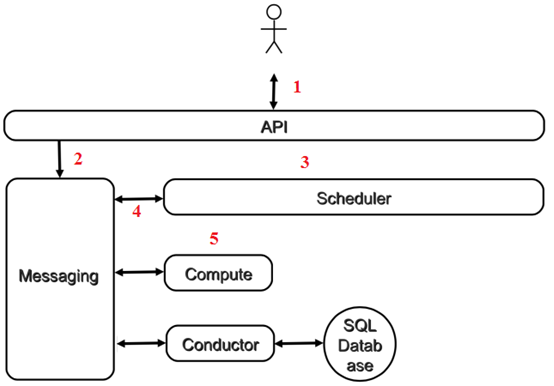
客户(可以是 OpenStack 最终用户,也可以是其他程序)向 API(nova-api)发送请求:“帮我创建一个虚机”
API 对请求做一些必要处理后,向 Messaging(RabbitMQ)发送了一条消息:“让 Scheduler 创建一个虚机”
Scheduler(nova-scheduler)从 Messaging 获取到 API 发给它的消息,然后执行调度算法,从若干计算节点中选出节点 A
Scheduler 向 Messaging 发送了一条消息:“在计算节点 A 上创建这个虚机”
计算节点 A 的 Compute(nova-compute)从 Messaging 中获取到 Scheduler 发给它的消息,然后在本节点的 Hypervisor 上启动虚机。
在虚机创建的过程中,Compute 如果需要查询或更新数据库信息,会通过 Messaging 向 Conductor(nova-conductor)发送消息,Conductor 负责数据库访问。
以上是创建虚机最核心的步骤, 这几个步骤向我们展示了 nova-* 子服务之间的协作的方式,也体现了 OpenStack 整个系统的分布式设计思想,掌握这种思想对我们深入理解 OpenStack 会非常有帮助。
三、nova创建虚拟机详细过程
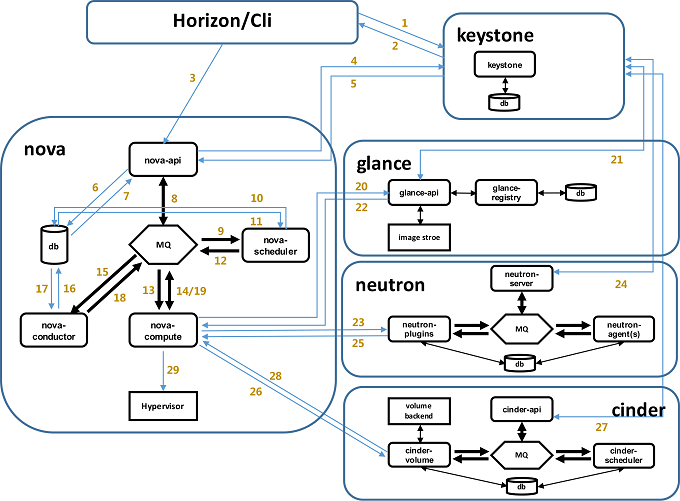
1、界面或命令行通过RESTful API向keystone获取认证信息。
2、keystone通过用户请求认证信息,并生成auth-token返回给对应的认证请求。
3、界面或命令行通过RESTful API向nova-api发送一个boot instance的请求(携带auth-token)。
4、nova-api接受请求后向keystone发送认证请求,查看token是否为有效用户和token。
5、keystone验证token是否有效,如有效则返回有效的认证和对应的角色(注:有些操作需要有角色权限才能操作)。
6、通过认证后nova-api和数据库通讯。
7、初始化新建虚拟机的数据库记录。
8、nova-api通过rpc.call向nova-scheduler请求是否有创建虚拟机的资源(Host ID)。
9、nova-scheduler进程侦听消息队列,获取nova-api的请求。
10、nova-scheduler通过查询nova数据库中计算资源的情况,并通过调度算法计算符合虚拟机创建需要的主机。
11、对于有符合虚拟机创建的主机,nova-scheduler更新数据库中虚拟机对应的物理主机信息。
12、nova-scheduler通过rpc.cast向nova-compute发送对应的创建虚拟机请求的消息。
13、nova-compute会从对应的消息队列中获取创建虚拟机请求的消息。
14、nova-compute通过rpc.call向nova-conductor请求获取虚拟机消息。(Flavor)
15、nova-conductor从消息队队列中拿到nova-compute请求消息。
16、nova-conductor根据消息查询虚拟机对应的信息。
17、nova-conductor从数据库中获得虚拟机对应信息。
18、nova-conductor把虚拟机信息通过消息的方式发送到消息队列中。
19、nova-compute从对应的消息队列中获取虚拟机信息消息。
20、nova-compute通过keystone的RESTfull API拿到认证的token,并通过HTTP请求glance-api获取创建虚拟机所需要镜像。
21、glance-api向keystone认证token是否有效,并返回验证结果。
22、token验证通过,nova-compute获得虚拟机镜像信息(URL)。
23、nova-compute通过keystone的RESTfull API拿到认证k的token,并通过HTTP请求neutron-server获取创建虚拟机所需要的网络信息。
24、neutron-server向keystone认证token是否有效,并返回验证结果。
25、token验证通过,nova-compute获得虚拟机网络信息。
26、nova-compute通过keystone的RESTfull API拿到认证的token,并通过HTTP请求cinder-api获取创建虚拟机所需要的持久化存储信息。
27、cinder-api向keystone认证token是否有效,并返回验证结果。
28、token验证通过,nova-compute获得虚拟机持久化存储信息。
29、nova-compute根据instance的信息调用配置的虚拟化驱动来创建虚拟机。
四、彻底删除nova-compute节点
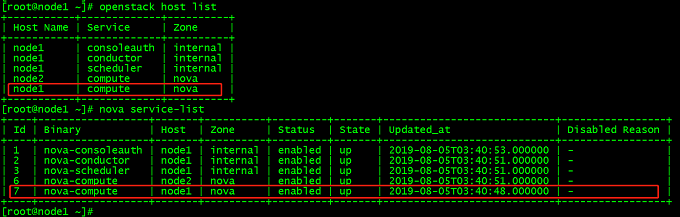
1、控制节点上操作查看计算节点,删除node1
openstack host list

nova service-list
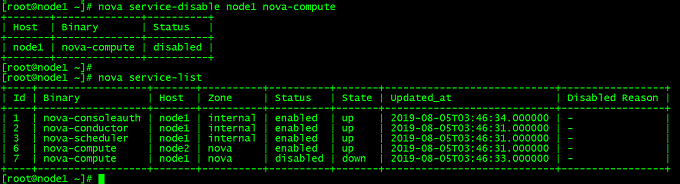
2、将node1上的计算服务设置为down,然后disabled
systemctl stop openstack-nova-compute

nova service-list

nova service-disable node1 nova-compute

nova service-list
3、在数据库里清理(nova库)
(1)查看现在数据库状态
[root@node1 ~]# mysql -u root -p

Enter password:

Welcome to the MariaDB monitor.  Commands end with ; or \g.

Your MariaDB connection id is 90

Server version: 10.1.20-MariaDB MariaDB Server

Copyright (c) 2000, 2016, Oracle, MariaDB Corporation Ab and others.

Type 'help;' or '\h' for help. Type '\c' to clear the current input statement.

MariaDB [(none)]> use nova;

Reading table information for completion of table and column names

You can turn off this feature to get a quicker startup with -A

Database changed

MariaDB [nova]> select host from nova.services;

+---------+

| host    |

+---------+

| 0.0.0.0 |

| 0.0.0.0 |

| node1   |

| node1   |

| node1   |

| node1   |

| node2   |

+---------+

7 rows in set (0.00 sec)

MariaDB [nova]> select hypervisor_hostname from compute_nodes;

+---------------------+

| hypervisor_hostname |

+---------------------+

| node1               |

| node2               |

+---------------------+

2 rows in set (0.00 sec)
(2)删除数据库中的node1节点信息
MariaDB [nova]> delete from nova.services where host="node1";

Query OK, 4 rows affected (0.01 sec)

MariaDB [nova]> delete from compute_nodes where hypervisor_hostname="node1";

Query OK, 1 row affected (0.00 sec)

MariaDB [nova]>

MariaDB [nova]>

MariaDB [nova]>

MariaDB [nova]> select host from nova.services;

+---------+

| host    |

+---------+

| 0.0.0.0 |

| 0.0.0.0 |

| node2   |

+---------+

3 rows in set (0.00 sec)

MariaDB [nova]> select hypervisor_hostname from compute_nodes;

+---------------------+

| hypervisor_hostname |

+---------------------+

| node2               |

+---------------------+

1 row in set (0.00 sec)
五、安装和配置nova计算服务
(一)安装和配置控制节点(ren3)
1、在数据库中创建nova计算服务的数据库,用户及授予权限
(1)使用root用户登录数据库:
[root@ren3 ~]# mysql -u root -proot
(2)创建nova_api、nova和nova_cell0数据库:
MariaDB [(none)]> CREATE DATABASE nova_api;

Query OK, 1 row affected (0.00 sec)

MariaDB [(none)]> CREATE DATABASE nova;

Query OK, 1 row affected (0.00 sec)

MariaDB [(none)]> CREATE DATABASE nova_cell0;

Query OK, 1 row affected (0.00 sec)

MariaDB [(none)]> show databases;

+--------------------+

| Database           |

+--------------------+

| glance             |

| information_schema |

| keystone           |

| mysql              |

| nova               |

| nova_api           |

| nova_cell0         |

| performance_schema |

+--------------------+

8 rows in set (0.01 sec)
(3)授予适当的数据库使用权限:
MariaDB [(none)]> GRANT ALL PRIVILEGES ON nova_api.* TO 'nova'@'localhost' \

       IDENTIFIED BY 'NOVA_DBPASS';

Query OK, 0 rows affected (0.05 sec)

MariaDB [(none)]> GRANT ALL PRIVILEGES ON nova_api.* TO 'nova'@'%' \

       IDENTIFIED BY 'NOVA_DBPASS';

Query OK, 0 rows affected (0.00 sec)

MariaDB [(none)]> GRANT ALL PRIVILEGES ON nova.* TO 'nova'@'localhost' \

       IDENTIFIED BY 'NOVA_DBPASS';

Query OK, 0 rows affected (0.00 sec)

MariaDB [(none)]> GRANT ALL PRIVILEGES ON nova.* TO 'nova'@'%' \

       IDENTIFIED BY 'NOVA_DBPASS';

Query OK, 0 rows affected (0.00 sec)

MariaDB [(none)]> GRANT ALL PRIVILEGES ON nova_cell0.* TO 'nova'@'localhost' \

       IDENTIFIED BY 'NOVA_DBPASS';

Query OK, 0 rows affected (0.00 sec)

MariaDB [(none)]> GRANT ALL PRIVILEGES ON nova_cell0.* TO 'nova'@'%' \

       IDENTIFIED BY 'NOVA_DBPASS';

Query OK, 0 rows affected (0.00 sec)
MariaDB [(none)]> select user,password,host from mysql.user;+----------+-------------------------------------------+-----------+

| user     | password                                  | host      |

+----------+-------------------------------------------+-----------+

| root     | *81F5E21E35407D884A6CD4A731AEBFB6AF209E1B | localhost |

| root     | *81F5E21E35407D884A6CD4A731AEBFB6AF209E1B | 127.0.0.1 |

| root     | *81F5E21E35407D884A6CD4A731AEBFB6AF209E1B | ::1       |

| glance   | *C0CE56F2C0C7234791F36D89700B02691C1CAB8E | localhost |

| keystone | *442DFE587A8B6BE1E9538855E8187C1EFB863A73 | localhost |

| keystone | *442DFE587A8B6BE1E9538855E8187C1EFB863A73 | %         |

| glance   | *C0CE56F2C0C7234791F36D89700B02691C1CAB8E | %         |

| nova     | *B79B482785488AB91D97EAFCAD7BA8839EF65AD3 | localhost |

| nova     | *B79B482785488AB91D97EAFCAD7BA8839EF65AD3 | %         |

+----------+-------------------------------------------+-----------+

9 rows in set (0.00 sec)
退出数据库
2、加载系统变量
[root@ren3 ~]# cat openrc

export OS_USERNAME=admin

export OS_PASSWORD=admin

export OS_PROJECT_NAME=admin

export OS_USER_DOMAIN_NAME=Default

export OS_PROJECT_DOMAIN_NAME=Default

export OS_AUTH_URL=http://ren3:35357/v3

export OS_IDENTITY_API_VERSION=3

[root@ren3 ~]# source openrc
3、创建计算服务凭证
(1)创建nova用户
[root@ren3 ~]# openstack user create --domain default --password=nova nova

+---------------------+----------------------------------+

| Field               | Value                            |

+---------------------+----------------------------------+

| domain_id           | default                          |

| enabled             | True                             |

| id                  | fb741e18c1f242cebc6a512c679a07a7 |

| name                | nova                             |

| options             | {}                               |

| password_expires_at | None                             |

+---------------------+----------------------------------+
(2)向nova用户添加管理角色:
[root@ren3 ~]# openstack role add --project service --user nova admin
(3)创建nova服务:
[root@ren3 ~]# openstack service create --name nova --description "OpenStack Compute" compute

+-------------+----------------------------------+

| Field       | Value                            |

+-------------+----------------------------------+

| description | OpenStack Compute                |

| enabled     | True                             |

| id          | 207e39b4617e4ac2ad6ec90e055342e3 |

| name        | nova                             |

| type        | compute                          |

+-------------+----------------------------------+

[root@ren3 ~]# openstack service list

+----------------------------------+----------+----------+

| ID                               | Name     | Type     |

+----------------------------------+----------+----------+

| 207e39b4617e4ac2ad6ec90e055342e3 | nova     | compute  |

| a7cf08799d4b4b509530ae6c21453b08 | glance   | image    |

| ab70227ae28c4fb7a774ed4808489e76 | keystone | identity |

+----------------------------------+----------+----------+
4、创建计算API服务端点:
[root@ren3 ~]# openstack endpoint create --region RegionOne \

   compute public http://ren3:8774/v2.1

+--------------+----------------------------------+

| Field        | Value                            |

+--------------+----------------------------------+

| enabled      | True                             |

| id           | a10ffd61f7a0467682325e930b384222 |

| interface    | public                           |

| region       | RegionOne                        |

| region_id    | RegionOne                        |

| service_id   | 207e39b4617e4ac2ad6ec90e055342e3 |

| service_name | nova                             |

| service_type | compute                          |

| url          | http://ren3:8774/v2.1            |

+--------------+----------------------------------+

[root@ren3 ~]# openstack endpoint create --region RegionOne \

   compute internal http://ren3:8774/v2.1

+--------------+----------------------------------+

| Field        | Value                            |

+--------------+----------------------------------+

| enabled      | True                             |

| id           | 79cf3dc0d9784eaf83fec84a74dd468d |

| interface    | internal                         |

| region       | RegionOne                        |

| region_id    | RegionOne                        |

| service_id   | 207e39b4617e4ac2ad6ec90e055342e3 |

| service_name | nova                             |

| service_type | compute                          |

| url          | http://ren3:8774/v2.1            |

+--------------+----------------------------------+

[root@ren3 ~]# openstack endpoint create --region RegionOne \

   compute admin http://ren3:8774/v2.1

+--------------+----------------------------------+

| Field        | Value                            |

+--------------+----------------------------------+

| enabled      | True                             |

| id           | d413124d690d44b8853f6c5b1dce9af1 |

| interface    | admin                            |

| region       | RegionOne                        |

| region_id    | RegionOne                        |

| service_id   | 207e39b4617e4ac2ad6ec90e055342e3 |

| service_name | nova                             |

| service_type | compute                          |

| url          | http://ren3:8774/v2.1            |

+--------------+----------------------------------+
5、创建placement用户
[root@ren3 ~]# openstack user create --domain default --password=placement placement

+---------------------+----------------------------------+

| Field               | Value                            |

+---------------------+----------------------------------+

| domain_id           | default                          |

| enabled             | True                             |

| id                  | 53e13c535c8648f58abcae149a44d816 |

| name                | placement                        |

| options             | {}                               |

| password_expires_at | None                             |

+---------------------+----------------------------------+
6、添加placement用户到service项目,并给它admin角色
[root@ren3 ~]# openstack role add --project service --user placement admin
7、创建placement服务
[root@ren3 ~]# openstack service create --name placement --description "Placement API" placement

+-------------+----------------------------------+

| Field       | Value                            |

+-------------+----------------------------------+

| description | Placement API                    |

| enabled     | True                             |

| id          | d421cabebb114dab9b5f1cd63900b910 |

| name        | placement                        |

| type        | placement                        |

+-------------+----------------------------------+

[root@ren3 ~]# openstack service list |grep placement

| d421cabebb114dab9b5f1cd63900b910 | placement | placement |
8、创建placement api端点:
[root@ren3 ~]# openstack endpoint create --region RegionOne placement public http://ren3:8778

+--------------+----------------------------------+

| Field        | Value                            |

+--------------+----------------------------------+

| enabled      | True                             |

| id           | bbf36665cd90488e9269a12bea3b839c |

| interface    | public                           |

| region       | RegionOne                        |

| region_id    | RegionOne                        |

| service_id   | d421cabebb114dab9b5f1cd63900b910 |

| service_name | placement                        |

| service_type | placement                        |

| url          | http://ren3:8778                 |

+--------------+----------------------------------+

[root@ren3 ~]# openstack endpoint create --region RegionOne placement internal http://ren3:8778

+--------------+----------------------------------+

| Field        | Value                            |

+--------------+----------------------------------+

| enabled      | True                             |

| id           | b50f00b3e45c4741856f300dce012dc2 |

| interface    | internal                         |

| region       | RegionOne                        |

| region_id    | RegionOne                        |

| service_id   | d421cabebb114dab9b5f1cd63900b910 |

| service_name | placement                        |

| service_type | placement                        |

| url          | http://ren3:8778                 |

+--------------+----------------------------------+

[root@ren3 ~]# openstack endpoint create --region RegionOne placement admin http://ren3:8778

+--------------+----------------------------------+

| Field        | Value                            |

+--------------+----------------------------------+

| enabled      | True                             |

| id           | 6e64d3f4f9cd4bfbaea80c975e92d03a |

| interface    | admin                            |

| region       | RegionOne                        |

| region_id    | RegionOne                        |

| service_id   | d421cabebb114dab9b5f1cd63900b910 |

| service_name | placement                        |

| service_type | placement                        |

| url          | http://ren3:8778                 |

+--------------+----------------------------------+

[root@ren3 ~]# openstack endpoint list | grep placement

| 6e64d3f4f9cd4bfbaea80c975e92d03a | RegionOne | placement    | placement    | True    | admin     | http://ren3:8778      |

| b50f00b3e45c4741856f300dce012dc2 | RegionOne | placement    | placement    | True    | internal  | http://ren3:8778      |

| bbf36665cd90488e9269a12bea3b839c | RegionOne | placement    | placement    | True    | public    | http://ren3:8778      |
9、安装nova软件包
[root@ren3 ~]# yum install openstack-nova-api openstack-nova-conductor openstack-nova-console openstack-nova-novncproxy openstack-nova-scheduler openstack-nova-placement-api -y
10、编辑/etc/nova/nova.conf文件
(1)在[DEFAULT]部分,启用计算和元数据api:
[DEFAULT]

# ...

enabled_apis = osapi_compute,metadata
(2)在[api_database]和[database]部分,配置数据库访问:
[api_database]

# ...

connection = mysql+pymysql://nova:NOVA_DBPASS@controller/nova_api

[database]

# ...

connection = mysql+pymysql://nova:NOVA_DBPASS@controller/nova
(3)在[DEFAULT]部分,配置RabbitMQ消息队列访问:
[DEFAULT]

# ...

transport_url = rabbit://openstack:RABBIT_PASS@controller
(4)在[api]和[keystone_authtoken]部分,配置身份服务访问:
[api]

# ...

auth_strategy = keystone

[keystone_authtoken]

# ...

auth_uri = http://controller:5000

auth_url = http://controller:35357

memcached_servers = controller:11211

auth_type = password

project_domain_name = default

user_domain_name = default

project_name = service

username = nova

password = NOVA_PASS
(5)在[DEFAULT]部分,配置my_ip选项来使用控制器节点的管理接口IP地址:
[DEFAULT]

# ...

my_ip = 10.0.0.11
(6)在[DEFAULT]部分,启用对网络服务的支持:
[DEFAULT]

# ...

use_neutron = True

firewall_driver = nova.virt.firewall.NoopFirewallDriver
(7)在[vnc]部分,配置vnc代理以使用控制节点的管理接口IP地址:
[vnc]

enabled = true

# ...

vncserver_listen = $my_ip

vncserver_proxyclient_address = $my_ip
(8)在[glance]部分,配置图像服务API的位置:
[glance]

# ...

api_servers = http://controller:9292
(9)在[oslo_concurrency]部分,配置锁路径:
[oslo_concurrency]

# ...

lock_path = /var/lib/nova/tmp
(10)在[placement]部分,配置放置API:
[placement]

# ...

os_region_name = RegionOne

project_domain_name = Default

project_name = service

auth_type = password

user_domain_name = Default

auth_url = http://controller:35357/v3

username = placement

password = PLACEMENT_PASS
修改后的配置文件:
[root@ren3 ~]# cd /etc/nova/

[root@ren3 nova]# ls

api-paste.ini  nova.conf  policy.json  release  rootwrap.conf

[root@ren3 nova]# cp nova.conf nova.conf.bak

[root@ren3 nova]# vim nova.conf
[DEFAULT]

my_ip = 192.168.11.3

use_neutron = True

firewall_driver = nova.virt.firewall.NoopFirewallDriver

enabled_apis=osapi_compute,metadata

transport_url = rabbit://openstack:admin@ren3

[api]

auth_strategy = keystone

[api_database]

connection = mysql+pymysql://nova:NOVA_DBPASS@ren3/nova_api

[barbican]

[cache]

[cells]

[cinder]

#os_region_name = RegionOne

[cloudpipe]

[conductor]

[console]

[consoleauth]

[cors]

[cors.subdomain]

[crypto]

[database]

connection = mysql+pymysql://nova:NOVA_DBPASS@ren3/nova

[ephemeral_storage_encryption]

[filter_scheduler]

[glance]

api_servers = http://ren3:9292

[guestfs]

[healthcheck]

[hyperv]

[image_file_url]

[ironic]

[key_manager]

[keystone_authtoken]

auth_uri = http://ren3:5000

auth_url = http://ren3:35357

memcached_servers = ren3:11211

auth_type = password

project_domain_name = default

user_domain_name = default

project_name = service

username = nova

password = nova

[libvirt]

#virt_type = qemu

[matchmaker_redis]

[metrics]

[mks]

[neutron]

#url = http://ren3:9696

#auth_url = http://ren3:35357

#auth_type = password

#project_domain_name = default

#user_domain_name = default

#region_name = RegionOne

#project_name = service

#username = neutron

#password = neutron

#service_metadata_proxy = true

#metadata_proxy_shared_secret = METADATA_SECRET

[notifications]

[osapi_v21]

[oslo_concurrency]

lock_path = /var/lib/nova/tmp

[oslo_messaging_amqp]

[oslo_messaging_kafka]

[oslo_messaging_notifications]

[oslo_messaging_rabbit]

[oslo_messaging_zmq]

[oslo_middleware]

[oslo_policy]

[pci]

[placement]

os_region_name = RegionOne

auth_type = password

auth_url = http://ren3:35357/v3

project_name = service

project_domain_name = Default

username = placement

password = placement

user_domain_name = Default

[quota]

[rdp]

[remote_debug]

[scheduler]

[serial_console]

[service_user]

[spice]

[ssl]

[trusted_computing]

[upgrade_levels]

[vendordata_dynamic_auth]

[vmware]

[vnc]

enabled = true

vncserver_listen = $my_ip

vncserver_proxyclient_address = $my_ip

#novncproxy_base_url = http://192.168.11.3:6080/vnc_auto.html

[workarounds]

[wsgi]

[xenserver]

[xvp]
11、由于打包错误必须通过将以下配置添加到/etc/httpd/conf.d/00-nova- placi - API .conf来启用对放置API的访问:
[root@ren3 ~]# vim /etc/httpd/conf.d/00-nova-placement-api.conf
<Directory /usr/bin>

   <IfVersion >= 2.4>

      Require all granted

   </IfVersion>

   <IfVersion < 2.4>

      Order allow,deny

      Allow from all

   </IfVersion>

</Directory>
重启httpd服务
[root@ren3 ~]# systemctl restart httpd
12、同步数据库数据(nova、nova-api、nova-cell0)
[root@ren3 ~]# su -s /bin/sh -c "nova-manage api_db sync" nova

[root@ren3 ~]# su -s /bin/sh -c "nova-manage cell_v2 map_cell0" nova

[root@ren3 ~]# su -s /bin/sh -c "nova-manage cell_v2 create_cell --name=cell1 --verbose" nova

e02ac651-4481-48ce-aed3-ff4dfc75b026

[root@ren3 ~]# su -s /bin/sh -c "nova-manage db sync" nova
13、验证nova cell0和cell1注册正确:
[root@ren3 ~]# nova-manage cell_v2 list_cells

+-------+--------------------------------------+

|  Name |                 UUID                 |

+-------+--------------------------------------+

| cell0 | 00000000-0000-0000-0000-000000000000 |

| cell1 | e02ac651-4481-48ce-aed3-ff4dfc75b026 |

+-------+--------------------------------------+
[root@ren3 ~]# mysql -u nova -pNOVA_DBPASS MariaDB [(none)]> show databases;
+--------------------+
| Database |
+--------------------+
| information_schema |
| nova |
| nova_api |
| nova_cell0 |
+--------------------+
4 rows in set (0.00 sec)
MariaDB [nova]> show tables;
+--------------------------------------------+
| Tables_in_nova |
+--------------------------------------------+
| agent_builds |
| aggregate_hosts |
| aggregate_metadata |
| aggregates |
| allocations |
| block_device_mapping |
| bw_usage_cache |
| cells |
| certificates |
| compute_nodes |
| console_auth_tokens |
| console_pools |
| consoles |
| dns_domains |
| fixed_ips |
| floating_ips |
| instance_actions |
| instance_actions_events |
| instance_extra |
| instance_faults |
| instance_group_member |
| instance_group_policy |
| instance_groups |
| instance_id_mappings |
| instance_info_caches |
| instance_metadata |
| instance_system_metadata |
| instance_type_extra_specs |
| instance_type_projects |
| instance_types |
| instances |
| inventories |
| key_pairs |
| migrate_version |
| migrations |
| networks |
| pci_devices |
| project_user_quotas |
| provider_fw_rules |
| quota_classes |
| quota_usages |
| quotas |
| reservations |
| resource_provider_aggregates |
| resource_providers |
| s3_images |
| security_group_default_rules |
| security_group_instance_association |
| security_group_rules |
| security_groups |
| services |
| shadow_agent_builds |
| shadow_aggregate_hosts |
| shadow_aggregate_metadata |
| shadow_aggregates |
| shadow_block_device_mapping |
| shadow_bw_usage_cache |
| shadow_cells |
| shadow_certificates |
| shadow_compute_nodes |
| shadow_console_pools |
| shadow_consoles |
| shadow_dns_domains |
| shadow_fixed_ips |
| shadow_floating_ips |
| shadow_instance_actions |
| shadow_instance_actions_events |
| shadow_instance_extra |
| shadow_instance_faults |
| shadow_instance_group_member |
| shadow_instance_group_policy |
| shadow_instance_groups |
| shadow_instance_id_mappings |
| shadow_instance_info_caches |
| shadow_instance_metadata |
| shadow_instance_system_metadata |
| shadow_instance_type_extra_specs |
| shadow_instance_type_projects |
| shadow_instance_types |
| shadow_instances |
| shadow_key_pairs |
| shadow_migrate_version |
| shadow_migrations |
| shadow_networks |
| shadow_pci_devices |
| shadow_project_user_quotas |
| shadow_provider_fw_rules |
| shadow_quota_classes |
| shadow_quota_usages |
| shadow_quotas |
| shadow_reservations |
| shadow_s3_images |
| shadow_security_group_default_rules |
| shadow_security_group_instance_association |
| shadow_security_group_rules |
| shadow_security_groups |
| shadow_services |
| shadow_snapshot_id_mappings |
| shadow_snapshots |
| shadow_task_log |
| shadow_virtual_interfaces |
| shadow_volume_id_mappings |
| shadow_volume_usage_cache |
| snapshot_id_mappings |
| snapshots |
| tags |
| task_log |
| virtual_interfaces |
| volume_id_mappings |
| volume_usage_cache |
+--------------------------------------------+
110 rows in set (0.00 sec) MariaDB [nova]> use nova_api MariaDB [nova_api]> show tables;
+------------------------------+
| Tables_in_nova_api |
+------------------------------+
| aggregate_hosts |
| aggregate_metadata |
| aggregates |
| allocations |
| build_requests |
| cell_mappings |
| flavor_extra_specs |
| flavor_projects |
| flavors |
| host_mappings |
| instance_group_member |
| instance_group_policy |
| instance_groups |
| instance_mappings |
| inventories |
| key_pairs |
| migrate_version |
| placement_aggregates |
| project_user_quotas |
| quota_classes |
| quota_usages |
| quotas |
| request_specs |
| reservations |
| resource_classes |
| resource_provider_aggregates |
| resource_providers |
+------------------------------+
27 rows in set (0.00 sec) MariaDB [nova_api]> use nova_cell0 MariaDB [nova_cell0]> show tables;
+--------------------------------------------+
| Tables_in_nova_cell0 |
+--------------------------------------------+
| agent_builds |
| aggregate_hosts |
| aggregate_metadata |
| aggregates |
| allocations |
| block_device_mapping |
| bw_usage_cache |
| cells |
| certificates |
| compute_nodes |
| console_auth_tokens |
| console_pools |
| consoles |
| dns_domains |
| fixed_ips |
| floating_ips |
| instance_actions |
| instance_actions_events |
| instance_extra |
| instance_faults |
| instance_group_member |
| instance_group_policy |
| instance_groups |
| instance_id_mappings |
| instance_info_caches |
| instance_metadata |
| instance_system_metadata |
| instance_type_extra_specs |
| instance_type_projects |
| instance_types |
| instances |
| inventories |
| key_pairs |
| migrate_version |
| migrations |
| networks |
| pci_devices |
| project_user_quotas |
| provider_fw_rules |
| quota_classes |
| quota_usages |
| quotas |
| reservations |
| resource_provider_aggregates |
| resource_providers |
| s3_images |
| security_group_default_rules |
| security_group_instance_association |
| security_group_rules |
| security_groups |
| services |
| shadow_agent_builds |
| shadow_aggregate_hosts |
| shadow_aggregate_metadata |
| shadow_aggregates |
| shadow_block_device_mapping |
| shadow_bw_usage_cache |
| shadow_cells |
| shadow_certificates |
| shadow_compute_nodes |
| shadow_console_pools |
| shadow_consoles |
| shadow_dns_domains |
| shadow_fixed_ips |
| shadow_floating_ips |
| shadow_instance_actions |
| shadow_instance_actions_events |
| shadow_instance_extra |
| shadow_instance_faults |
| shadow_instance_group_member |
| shadow_instance_group_policy |
| shadow_instance_groups |
| shadow_instance_id_mappings |
| shadow_instance_info_caches |
| shadow_instance_metadata |
| shadow_instance_system_metadata |
| shadow_instance_type_extra_specs |
| shadow_instance_type_projects |
| shadow_instance_types |
| shadow_instances |
| shadow_key_pairs |
| shadow_migrate_version |
| shadow_migrations |
| shadow_networks |
| shadow_pci_devices |
| shadow_project_user_quotas |
| shadow_provider_fw_rules |
| shadow_quota_classes |
| shadow_quota_usages |
| shadow_quotas |
| shadow_reservations |
| shadow_s3_images |
| shadow_security_group_default_rules |
| shadow_security_group_instance_association |
| shadow_security_group_rules |
| shadow_security_groups |
| shadow_services |
| shadow_snapshot_id_mappings |
| shadow_snapshots |
| shadow_task_log |
| shadow_virtual_interfaces |
| shadow_volume_id_mappings |
| shadow_volume_usage_cache |
| snapshot_id_mappings |
| snapshots |
| tags |
| task_log |
| virtual_interfaces |
| volume_id_mappings |
| volume_usage_cache |
+--------------------------------------------+
110 rows in set (0.00 sec)
14、启动nova服务
[root@ren3 ~]# systemctl enable openstack-nova-api.service \

   openstack-nova-consoleauth.service openstack-nova-scheduler.service \

   openstack-nova-conductor.service openstack-nova-novncproxy.service

[root@ren3 ~]# systemctl start openstack-nova-api.service \

   openstack-nova-consoleauth.service openstack-nova-scheduler.service \

   openstack-nova-conductor.service openstack-nova-novncproxy.service

[root@ren3 ~]# systemctl status openstack-nova-api.service \

   openstack-nova-consoleauth.service openstack-nova-scheduler.service \

   openstack-nova-conductor.service openstack-nova-novncproxy.service |grep active |wc -l

5
[root@ren3 ~]# firewall-cmd --list-ports

4369/tcp 5672/tcp 15672/tcp 25672/tcp 3306/tcp 11211/tcp 80/tcp 35357/tcp 5000/tcp 9292/tcp 9191/tcp

[root@ren3 ~]# ss -tnl

State      Recv-Q Send-Q Local Address:Port               Peer Address:Port

LISTEN     0      128      *:8775                 *:*

LISTEN     0      128      *:9191                 *:*

LISTEN     0      128    192.168.11.3:5672                 *:*

LISTEN     0      128      *:25672                *:*

LISTEN     0      128    192.168.11.3:3306                 *:*

LISTEN     0      128    192.168.11.3:11211                *:*

LISTEN     0      128    127.0.0.1:11211                *:*

LISTEN     0      128      *:9292                 *:*

LISTEN     0      128      *:4369                 *:*

LISTEN     0      128      *:22                   *:*

LISTEN     0      128      *:15672                *:*

LISTEN     0      100    127.0.0.1:25                   *:*

LISTEN     0      100      *:6080                 *:*

LISTEN     0      128      *:8774                 *:*

LISTEN     0      128     :::5000                :::*

LISTEN     0      128     :::8778                :::*

LISTEN     0      128    ::1:11211               :::*

LISTEN     0      128     :::80                  :::*

LISTEN     0      128     :::22                  :::*

LISTEN     0      100    ::1:25                  :::*

LISTEN     0      128     :::35357               :::*

[root@ren3 ~]# netstat -anp |grep 8775

tcp        0      0 0.0.0.0:8775            0.0.0.0:*               LISTEN      18175/python2

[root@ren3 ~]# netstat -anp |grep 6080

tcp        0      0 0.0.0.0:6080            0.0.0.0:*               LISTEN      18179/python2

[root@ren3 ~]# firewall-cmd --add-port=8774/tcp --permanent

success

[root@ren3 ~]# firewall-cmd --add-port=8775/tcp --permanent

success

[root@ren3 ~]# firewall-cmd --add-port=8778/tcp --permanent

success

[root@ren3 ~]# firewall-cmd --add-port=6080/tcp --permanent

success

[root@ren3 ~]# firewall-cmd --reload

success
(二)安装和配置计算节点(ren4)
1、安装nova软件包
第一次安装失败,需要解决依赖关系
在控制节点操作:
[root@ren3 ~]# ls

anaconda-ks.cfg  openrc                openstack-ocata

--description    openstack_app.tar.gz  yum-repo.sh

[root@ren3 ~]# cd openstack-ocata/

[root@ren3 openstack-ocata]# ls

cirros-0.3.3-x86_64-disk.img  openstack-compute-yilai

[root@ren3 openstack-ocata]# scp -r openstack-compute-yilai/ ren4:/root/

qemu-img-ev-2.9.0-16.el7_4.8.1.x86_64 100% 2276KB  50.4MB/s   00:00

qemu-kvm-common-ev-2.9.0-16.el7_4.8.1 100%  913KB  28.2MB/s   00:00

qemu-kvm-ev-2.9.0-16.el7_4.8.1.x86_64 100% 2914KB  39.2MB/s   00:00
在计算节点操作:
[root@ren4 ~]# ls

anaconda-ks.cfg  openstack-compute-yilai  yum-repo.sh

[root@ren4 ~]# cd openstack-compute-yilai/

[root@ren4 openstack-compute-yilai]# ls

qemu-img-ev-2.9.0-16.el7_4.8.1.x86_64.rpm

qemu-kvm-common-ev-2.9.0-16.el7_4.8.1.x86_64.rpm

qemu-kvm-ev-2.9.0-16.el7_4.8.1.x86_64.rpm

[root@ren4 openstack-compute-yilai]# yum localinstall ./* -y
[root@ren4 ~]# yum install openstack-nova-compute -y
2、编辑/etc/nova/nova.conf文件
(1)[DEFAULT]部分,启用计算和元数据api:
[DEFAULT]

# ...

enabled_apis = osapi_compute,metadata
(2)在[DEFAULT]部分,配置RabbitMQ消息队列访问:
[DEFAULT]

# ...

transport_url = rabbit://openstack:RABBIT_PASS@controller
(3)在[api]和[keystone_authtoken]部分,配置身份服务访问:
[api]

# ...

auth_strategy = keystone

[keystone_authtoken]

# ...

auth_uri = http://controller:5000

auth_url = http://controller:35357

memcached_servers = controller:11211

auth_type = password

project_domain_name = default

user_domain_name = default

project_name = service

username = nova

password = NOVA_PASS
(4)在[DEFAULT]部分,配置my_ip选项:
[DEFAULT]

# ...

my_ip = MANAGEMENT_INTERFACE_IP_ADDRESS
(5)在[DEFAULT]部分,启用对网络服务的支持:
[DEFAULT]

# ...

use_neutron = True

firewall_driver = nova.virt.firewall.NoopFirewallDriver
(6)在[vnc]部分,启用和配置远程控制台访问:
[vnc]

# ...

enabled = True

vncserver_listen = 0.0.0.0

vncserver_proxyclient_address = $my_ip

novncproxy_base_url = http://controller:6080/vnc_auto.html
(7)在[glance]部分,配置图像服务API的位置:
[glance]

# ...

api_servers = http://controller:9292
(8)在[oslo_concurrency]部分,配置锁路径:
[oslo_concurrency]

# ...

lock_path = /var/lib/nova/tmp
(9)在[placement]部分,配置放置API:
[placement]

# ...

os_region_name = RegionOne

project_domain_name = Default

project_name = service

auth_type = password

user_domain_name = Default

auth_url = http://controller:35357/v3

username = placement

password = PLACEMENT_PASS
(10)配置[libvirt]部分来使用QEMU
[libvirt]

# ...

virt_type = qemu
修改后的配置文件:
[root@ren4 ~]# cd /etc/nova/

[root@ren4 nova]# ls

api-paste.ini  nova.conf  policy.json  release  rootwrap.conf

[root@ren4 nova]# cp nova.conf nova.conf.bak

[root@ren4 nova]# vim nova.conf
[DEFAULT]

my_ip = 192.168.11.4

use_neutron = True

firewall_driver = nova.virt.firewall.NoopFirewallDriver

enabled_apis=osapi_compute,metadata

transport_url = rabbit://openstack:admin@ren3

[api]

auth_strategy = keystone

[api_database]

#connection = mysql+pymysql://nova:NOVA_DBPASS@ren3/nova_api

[barbican]

[cache]

[cells]

[cinder]

#os_region_name = RegionOne

[cloudpipe]

[conductor]

[console]

[consoleauth]

[cors]

[cors.subdomain]

[crypto]

[database]

#connection = mysql+pymysql://nova:NOVA_DBPASS@ren3/nova

[ephemeral_storage_encryption]

[filter_scheduler]

[glance]

api_servers = http://ren3:9292

[guestfs]

[healthcheck]

[hyperv]

[image_file_url]

[ironic]

[key_manager]

[keystone_authtoken]

auth_uri = http://ren3:5000

auth_url = http://ren3:35357

memcached_servers = ren3:11211

auth_type = password

project_domain_name = default

user_domain_name = default

project_name = service

username = nova

password = nova

[libvirt]

virt_type = qemu

[matchmaker_redis]

[metrics]

[mks]

[neutron]

#url = http://ren3:9696

#auth_url = http://ren3:35357

#auth_type = password

#project_domain_name = default

#user_domain_name = default

#region_name = RegionOne

#project_name = service

#username = neutron

#password = neutron

#service_metadata_proxy = true

#metadata_proxy_shared_secret = METADATA_SECRET

[notifications]

[osapi_v21]

[oslo_concurrency]

lock_path = /var/lib/nova/tmp

[oslo_messaging_amqp]

[oslo_messaging_kafka]

[oslo_messaging_notifications]

[oslo_messaging_rabbit]

[oslo_messaging_zmq]

[oslo_middleware]

[oslo_policy]

[pci]

[placement]

os_region_name = RegionOne

auth_type = password

auth_url = http://ren3:35357/v3

project_name = service

project_domain_name = Default

username = placement

password = placement

user_domain_name = Default

[quota]

[rdp]

[remote_debug]

[scheduler]

[serial_console]

[service_user]

[spice]

[ssl]

[trusted_computing]

[upgrade_levels]

[vendordata_dynamic_auth]

[vmware]

[vnc]

enabled = True

vncserver_listen = 0.0.0.0

vncserver_proxyclient_address = $my_ip

novncproxy_base_url = http://192.168.11.3:6080/vnc_auto.html

[workarounds]

[wsgi]

[xenserver]

[xvp]
3、启动服务
[root@ren4 ~]# systemctl enable libvirtd.service openstack-nova-compute.service

Created symlink from /etc/systemd/system/multi-user.target.wants/openstack-nova-compute.service to /usr/lib/systemd/system/openstack-nova-compute.service.

[root@ren4 ~]# systemctl start libvirtd.service openstack-nova-compute.service

[root@ren4 ~]# ss -tnl

State      Recv-Q Send-Q Local Address:Port               Peer Address:Port

LISTEN     0      128      *:111                  *:*

LISTEN     0      128      *:22                   *:*

LISTEN     0      100    127.0.0.1:25                   *:*

LISTEN     0      128     :::111                 :::*

LISTEN     0      128     :::22                  :::*

LISTEN     0      100    ::1:25                  :::*

[root@ren4 ~]# systemctl status libvirtd.service openstack-nova-compute.service |grep active |wc -l

2
[root@ren4 ~]# firewall-cmd --add-port=111/tcp

success

[root@ren4 ~]# firewall-cmd --add-port=111/tcp --permanent

success
4、将计算节点添加到cell数据库(在控制节点上运行)
(1)加载系统环境变量,并确认
[root@ren3 ~]# . openrc

[root@ren3 ~]# openstack hypervisor list

+----+---------------------+-----------------+--------------+-------+

| ID | Hypervisor Hostname | Hypervisor Type | Host IP      | State |

+----+---------------------+-----------------+--------------+-------+

|  1 | ren4                | QEMU            | 192.168.11.4 | up    |

+----+---------------------+-----------------+--------------+-------+
(2)发现计算主机:
[root@ren3 ~]# su -s /bin/sh -c "nova-manage cell_v2 discover_hosts --verbose" nova

Found 2 cell mappings.

Skipping cell0 since it does not contain hosts.

Getting compute nodes from cell 'cell1': e02ac651-4481-48ce-aed3-ff4dfc75b026

Found 1 computes in cell: e02ac651-4481-48ce-aed3-ff4dfc75b026

Checking host mapping for compute host 'ren4': 84f6b8ad-b130-41e3-bcf1-1b25cfad1d77

Creating host mapping for compute host 'ren4': 84f6b8ad-b130-41e3-bcf1-1b25cfad1d77
当添加新的计算节点时,必须在控制节点上运行 nova-manage cell_v2 discover_hosts 来注册这些新的计算节点。或者,可以在/etc/nova/nova.conf中设置一个适当的间隔:
[scheduler]

discover_hosts_in_cells_interval = 300
5、验证计算服务
(1)验证服务组件的启动
[root@ren3 ~]# openstack compute service list

+----+------------+------+----------+---------+-------+--------------+

| ID | Binary     | Host | Zone     | Status  | State | Updated At   |

+----+------------+------+----------+---------+-------+--------------+

|  1 | nova-conso | ren3 | internal | enabled | up    | 2019-10-12T1 |

|    | leauth     |      |          |         |       | 1:42:35.0000 |

|    |            |      |          |         |       | 00           |

|  2 | nova-      | ren3 | internal | enabled | up    | 2019-10-12T1 |

|    | conductor  |      |          |         |       | 1:42:34.0000 |

|    |            |      |          |         |       | 00           |

|  3 | nova-      | ren3 | internal | enabled | up    | 2019-10-12T1 |

|    | scheduler  |      |          |         |       | 1:42:35.0000 |

|    |            |      |          |         |       | 00           |

|  6 | nova-      | ren4 | nova     | enabled | up    | 2019-10-12T1 |

|    | compute    |      |          |         |       | 1:42:29.0000 |

|    |            |      |          |         |       | 00           |

+----+------------+------+----------+---------+-------+--------------+
[root@ren3 ~]# nova service-list

+----+------------------+------+----------+---------+-------+----------------------------+-----------------+

| Id | Binary           | Host | Zone     | Status  | State | Updated_at                 | Disabled Reason |

+----+------------------+------+----------+---------+-------+----------------------------+-----------------+

| 1  | nova-consoleauth | ren3 | internal | enabled | up    | 2019-10-14T02:10:33.000000 | -               |

| 2  | nova-conductor   | ren3 | internal | enabled | up    | 2019-10-14T02:10:42.000000 | -               |

| 3  | nova-scheduler   | ren3 | internal | enabled | up    | 2019-10-14T02:10:33.000000 | -               |

| 6  | nova-compute     | ren4 | nova     | enabled | up    | 2019-10-14T02:10:40.000000 | -               |

+----+------------------+------+----------+---------+-------+----------------------------+-----------------+
这个输出应该表明在控制节点上启用了三个服务组件,在计算节点上启用了一个服务组件。
(2)列出身份服务中的API端点,以验证与身份服务的连接性:
[root@ren3 ~]# openstack catalog list

+-----------+-----------+-----------------------------------+

| Name      | Type      | Endpoints                         |

+-----------+-----------+-----------------------------------+

| nova      | compute   | RegionOne                         |

|           |           |   internal: http://ren3:8774/v2.1 |

|           |           | RegionOne                         |

|           |           |   public: http://ren3:8774/v2.1   |

|           |           | RegionOne                         |

|           |           |   admin: http://ren3:8774/v2.1    |

|           |           |                                   |

| glance    | image     | RegionOne                         |

|           |           |   internal: http://ren3:9292      |

|           |           | RegionOne                         |

|           |           |   admin: http://ren3:9292         |

|           |           | RegionOne                         |

|           |           |   public: http://ren3:9292        |

|           |           |                                   |

| keystone  | identity  | RegionOne                         |

|           |           |   public: http://ren3:5000/v3/    |

|           |           | RegionOne                         |

|           |           |   internal: http://ren3:5000/v3/  |

|           |           | RegionOne                         |

|           |           |   admin: http://ren3:35357/v3/    |

|           |           |                                   |

| placement | placement | RegionOne                         |

|           |           |   admin: http://ren3:8778         |

|           |           | RegionOne                         |

|           |           |   internal: http://ren3:8778      |

|           |           | RegionOne                         |

|           |           |   public: http://ren3:8778        |

|           |           |                                   |

+-----------+-----------+-----------------------------------+
(3)验证镜像服务的镜像
[root@ren3 ~]# glance image-list

+--------------------------------------+--------+

| ID                                   | Name   |

+--------------------------------------+--------+

| d8e9a113-edef-41a6-9778-622edf76de39 | cirros |

+--------------------------------------+--------+
[root@ren3 ~]# openstack image list

+--------------------------------------+--------+--------+

| ID                                   | Name   | Status |

+--------------------------------------+--------+--------+

| d8e9a113-edef-41a6-9778-622edf76de39 | cirros | active |

+--------------------------------------+--------+--------+
(4)检查cells和placement API是否正常工作:
[root@ren3 ~]# nova-status upgrade check

+---------------------------+

| Upgrade Check Results     |

+---------------------------+

| Check: Cells v2           |

| Result: 成功              |

| Details: None             |

+---------------------------+

| Check: Placement API      |

| Result: 成功              |

| Details: None             |

+---------------------------+

| Check: Resource Providers |

| Result: 成功              |

| Details: None             |

+---------------------------+
云计算OpenStack核心组件---nova计算服务(7)的更多相关文章
- 云计算openstack核心组件——nova计算服务(7)
一.nova介绍: Nova 是 OpenStack 最核心的服务,负责维护和管理云环境的计算资源.OpenStack 作为 IaaS 的云操作系统,虚拟机生命周期管理也就是通过 Nova ...
- openstack核心组件——nova计算服务(7)
云计算openstack核心组件——nova计算服务(7) 一.nova介绍: Nova 是 OpenStack 最核心的服务,负责维护和管理云环境的计算资源.OpenStack 作为 ...
- OpenStack核心组件-nova计算服务
1. nova介绍 Nova 是 OpenStack 最核心的服务,负责维护和管理云环境的计算资源.OpenStack 作为 IaaS 的云操作系统,虚拟机生命周期管理也就是通过 Nova 来实现的. ...
- openstack核心组件--nova计算服务(3)
一.nova介绍: Nova 是 OpenStack 最核心的服务,负责维护和管理云环境的计算资源.OpenStack 作为 IaaS 的云操作系统,虚拟机生命周期管理也就是通过 Nova ...
- 云计算OpenStack核心组件---neutron网络服务(8)*****
一.neutron介绍 1.Neutron概述 传统的网络管理方式很大程度上依赖于管理员手工配置和维护各种网络硬件设备:而云环境下的网络已经变得非常复杂,特别是在多租户场景里,用户随时都可能需要创建. ...
- 云计算openstack核心组件——neutron网络服务(9)
一.虚拟机获取 ip: 用 namspace 隔离 DHCP 服务 Neutron 通过 dnsmasq 提供 DHCP 服务,而 dnsmasq 通过 Linux Network Namespa ...
- 云计算openstack核心组件——neutron网络服务(8)
一.neutron 介绍: Neutron 概述 传统的网络管理方式很大程度上依赖于管理员手工配置和维护各种网络硬件设备:而云环境下的网络已经变得非常复杂,特别是在多租户场景里,用户随时都可能需要 ...
- 云计算openstack核心组件——cinder存储服务(11)
一.cinder 介绍: 理解 Block Storage 操作系统获得存储空间的方式一般有两种: 通过某种协议(SAS,SCSI,SAN,iSCSI 等)挂接裸硬盘,然后分区.格式化.创建文件系 ...
- 云计算OpenStack核心组件---cinder存储服务(10)
一.cinder介绍 1.Block Storage 操作系统获得存储空间的方式一般有两种: (1)通过某种协议(SAS,SCSI,SAN,iSCSI 等)挂接裸硬盘,然后分区.格式化.创建文件系统: ...
随机推荐
- SSH 教程 ——阮一峰
SSH 教程 --阮一峰 文章出处 SSH 基本知识 SSH(Secure Shell 的缩写)是一种网络协议,用于加密两台计算机之间的通信,并且支持各种身份验证机制.实务中,它主要用于保证远程登录和 ...
- Vue3 封装第三方组件(一)做一个合格的传声筒
各种UI库的功能都是非常强大的,尤其对于我这种不会 css 的人来说,就更是帮了大忙了. 只是嘛,如果再封装一下的话,那么用起来就会更方便了. 那么如何封装呢? 封装三要素 -- 属性.插槽.事件.方 ...
- OLAP引擎:基于Presto组件进行跨数据源分析
一.Presto概述 1.Presto简介 Presto是一个开源的分布式SQL查询引擎,适用于交互式分析查询,数据量支持GB到PB字节,Presto虽然具备解析SQL的能力,但它并不属于标准的数据库 ...
- 消息中间件-RabbitMQ持久化机制、内存磁盘控制
RabbitMQ持久化机制 RabbitMQ内存控制 RabbitMQ磁盘控制 RabbitMQ持久化机制 重启之后没有持久化的消息会丢失 package com.study.rabbitmq.a13 ...
- GO-05-数据类型
基本数据类型: 整型.浮点型 float32 float64.复数型(数学中的复数).布尔型.字符串.字符(byte.rune). 复合数据类型: 数组(array).切片(slice).映射(map ...
- JDBC_14_使用JDBC工具类实现模糊查询
使用JDBC工具类实现模糊查询 代码: import java.sql.*; /** * 模糊查询 * 测试DBUtils */ public class JDBCTest09 { public st ...
- 【OO课下讨论】bug中的“二八定律”
bug中的"二八定律" 本文主要为讨论2020/3/17下午OO课讨论的第三个思考题设立 有一个经典的经验性原则,叫帕累托原则,也称为二八定律.这个原则在经济.社会和科技等多个领域 ...
- Python Basics with numpy (optional)
Python Basics with Numpy (optional assignment) Welcome to your first assignment. This exercise gives ...
- input.focus()在IOS上失效的解决方法
之前在iphone上做开发时遇到一个问题,在一般的正常浏览器上输入以下代码: 1 2 var apple = document.getElementById('abc'); apple.focus() ...
- [CTF]Brainfuck/Ook!编码
[CTF]Brainfuck/Ook!编码 --------------------- 作者:adversity` 来源:CSDN 原文:https://blog.csdn.net/qq_408 ...