从源码角度解析 Springboot 2.6.2 的启动过程
1. 概述
老话说的好:把简单的事情重复做,做到极致,你就成功了。
言归正传,Springboot的启动过程,一直都是面试的高频点,今天我们用当前最新的 Springboot 2.6.2 来聊一聊 Springboot 的启动过程。
2. 工程搭建
2.1 maven 依赖
    <parent>

        <groupId>org.springframework.boot</groupId>

        <artifactId>spring-boot-starter-parent</artifactId>

        <version>2.6.2</version>

        <relativePath/> <!-- lookup parent from repository -->

    </parent>
    <dependencies>

        <dependency>

            <groupId>org.springframework.boot</groupId>

            <artifactId>spring-boot-starter-web</artifactId>

        </dependency>

        <dependency>

            <groupId>org.projectlombok</groupId>

            <artifactId>lombok</artifactId>

            <optional>true</optional>

        </dependency>

        <dependency>

            <groupId>org.springframework.boot</groupId>

            <artifactId>spring-boot-starter-test</artifactId>

            <scope>test</scope>

        </dependency>

    </dependencies>
2.2 application.yml 配置文件
server:

  port: 30000

spring:

  application:

    name: my-springboot
2.3 启动类代码
@SpringBootApplication

public class MySpringbootApplication {

    public static void main(String[] args) {

        SpringApplication.run(MySpringbootApplication.class, args);

    }

}
3. Springboot 的启动主流程
3.1 入口
入口当然就是我们 Springboot 启动类中 main 方法里的这段代码,SpringApplication.run 方法

3.2 初始化 SpringApplication 实例
3.2.1 方法总览
我们进入 SpringApplication.run 这个静态方法

这里调用了 另一个重载的 run 方法,再进

此处会 new 一个 SpringApplication 对象,然后调用这个对象的 run 方法

我们来看一下 SpringApplication 对象实例化时做的事情,这个构造方法调用了另一个重载的构造方法,我们进去看下
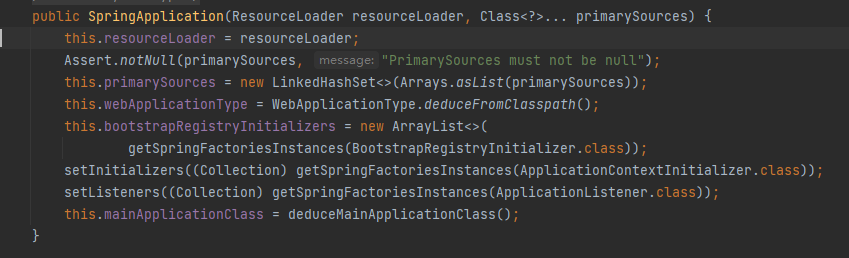
3.2.2
this.resourceLoader = resourceLoader; // resourceLoader 属性注入了 null
3.2.3
this.primarySources = new LinkedHashSet<>(Arrays.asList(primarySources)); // 将启动类从数组重新封装成了 Set,注入到 primarySources 属性
3.2.4
this.webApplicationType = WebApplicationType.deduceFromClasspath(); // 得到 web应用的类型,这里是 SERVLET
webApplicationType 有三种类型,REACTIVE、SERVLET、NONE
引入 spring-boot-starter-web 包,就是 SERVLET
引入 spring-boot-starter-webflux 包,是 REACTIVE
都没有就是 NONE
3.2.5
this.bootstrapRegistryInitializers = new ArrayList<>(getSpringFactoriesInstances(BootstrapRegistryInitializer.class));
从 META-INF/spring.factories 文件中得到 key 为 org.springframework.boot.BootstrapRegistryInitializer 的全类名集合,进行实例化,然后注入 bootstrapRegistryInitializers 属性
这里大家先记下 getSpringFactoriesInstances 方法,等下详细介绍
3.2.6
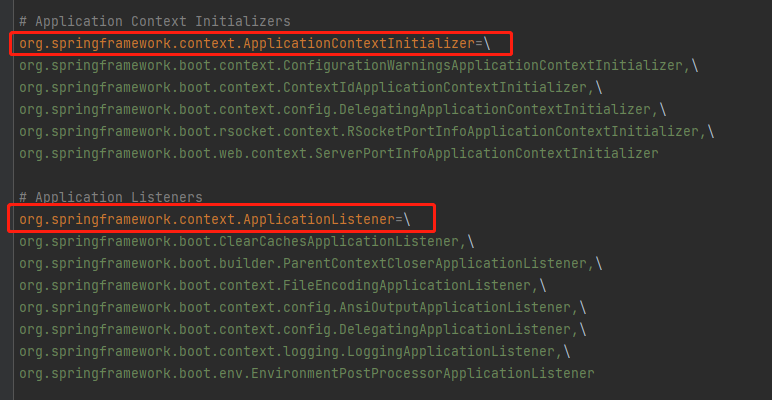
setInitializers((Collection) getSpringFactoriesInstances(ApplicationContextInitializer.class));


这一行代码,只是封装了一下,仍然还是调用 getSpringFactoriesInstances 方法,从 META-INF/spring.factories 文件中得到 key 为
org.springframework.context.ApplicationContextInitializer 的全类名集合,进行实例化,然后注入 initializers(初始化器集合) 属性。
3.2.7
setListeners((Collection) getSpringFactoriesInstances(ApplicationListener.class)); // 同理,得到监听器实例的集合,并注入
3.2.8
this.mainApplicationClass = deduceMainApplicationClass(); // 获取当前运行的 main 方法所在的类,也就是咱们的主类
3.3 执行 run 方法
3.3.1 方法总览

我们回到这个方法体,进入 run 方法

方法有点长。。。,没关系,我们捡重点看看
3.3.2
long startTime = System.nanoTime(); // 记录一个开始时间戳
3.3.3
DefaultBootstrapContext bootstrapContext = createBootstrapContext(); // 添加了一个默认的 Bootstrap 上下文

从代码看,就是 new 了一个 DefaultBootstrapContext 实例,然后遍历初始化了 bootstrapRegistryInitializers 中的所有初始化器
还记得 bootstrapRegistryInitializers 属性吗,3.2.5 章节中,实例化 SpringApplication 时通过 getSpringFactoriesInstances 方法获得并注入的。
3.3.4
configureHeadlessProperty(); // 配置Headless属性
3.3.5
SpringApplicationRunListeners listeners = getRunListeners(args); // 获得 RunListener 集合类

这里我们又看到了熟悉的 getSpringFactoriesInstances,这次的 key 是 org.springframework.boot.SpringApplicationRunListener
这里会得到 EventPublishingRunListener 对象
3.3.6
listeners.starting(bootstrapContext, this.mainApplicationClass); // 循环启动这些监听器

从代码看,会调用监听器的 starting 方法,我们看一下 EventPublishingRunListener 对象的 starting 方法

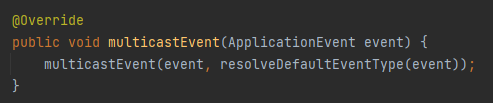
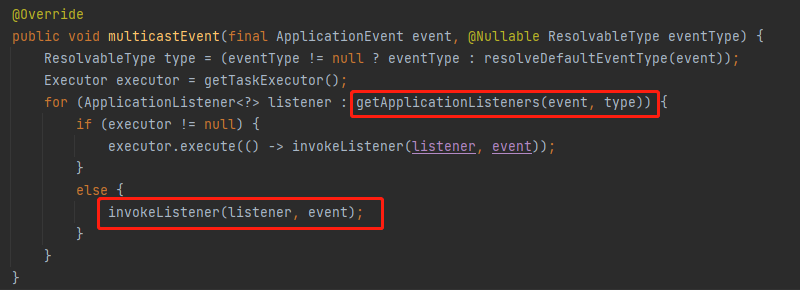
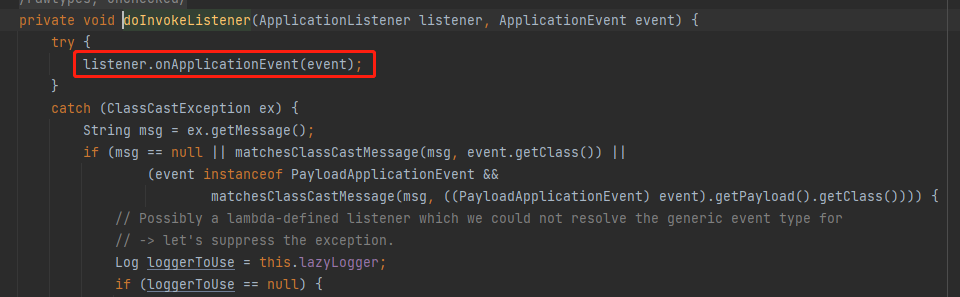
从代码看,在 EventPublishingRunListener 对象的 starting 方法中,做了一个广播,得到应用监听器后,循环调用监听器的 onApplicationEvent 方法
3.3.7
ApplicationArguments applicationArguments = new DefaultApplicationArguments(args); // 封装参数
3.3.8
ConfigurableEnvironment environment = prepareEnvironment(listeners, bootstrapContext, applicationArguments); // 创建并配置环境
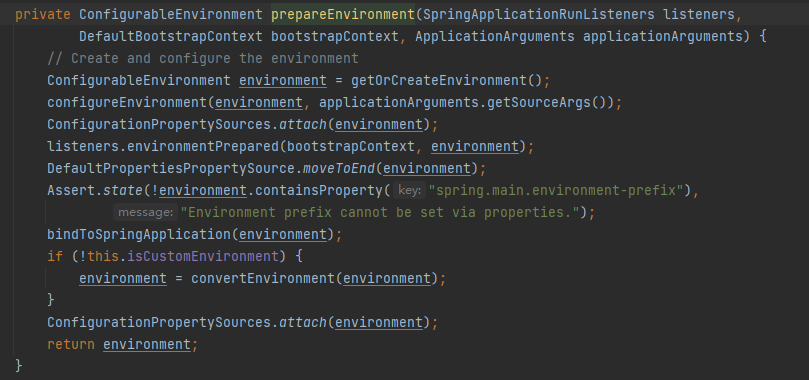
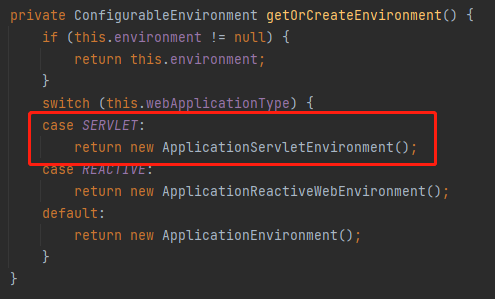
首先会创建环境,因为 webApplicationType 是 SERVLET,因此会创建 ApplicationServletEnvironment 对象
listeners.environmentPrepared(bootstrapContext, environment);
重点是这句

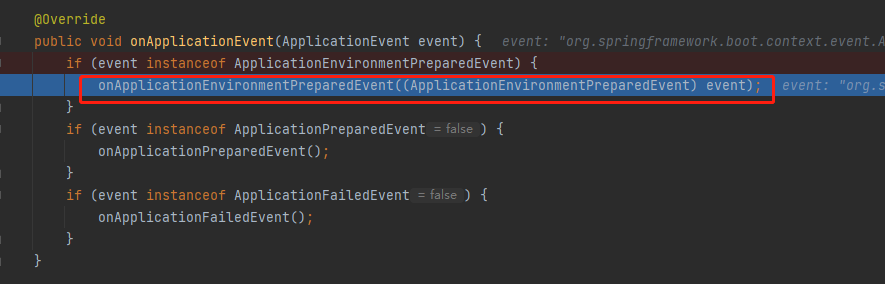
listeners.environmentPrepared 方法会执行 EventPublishingRunListener 对象的 environmentPrepared 方法

来到 EventPublishingRunListener 对象的方法,同样是一个广播,广播给合适的监听器,然后调用监听器的 onApplicationEvent 方法
其中在 EnvironmentPostProcessorApplicationListener 监听器中,会执行拿到所有系统的配置,包括我们在 application.yml 文件中配置的内容。
我们来看一下 EnvironmentPostProcessorApplicationListener 这个类
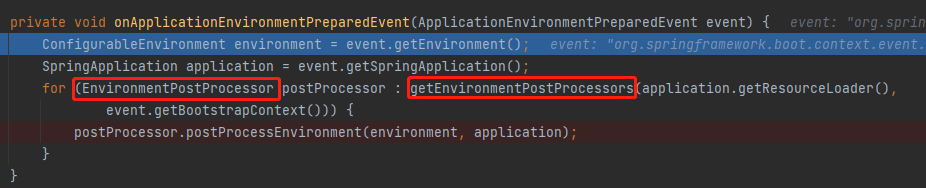
在 EnvironmentPostProcessorApplicationListener 中,会得到环境的处理器,然后循环执行他们
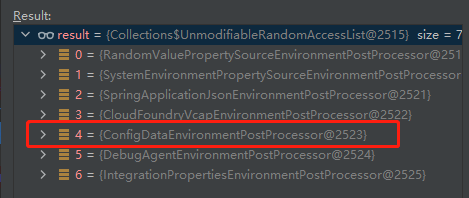
这里可以得到 7 个处理器,其中 ConfigDataEnvironmentPostProcessor 就是加载配置文件得到配置的,我们来看一下这个类的 postProcessEnvironment 方法
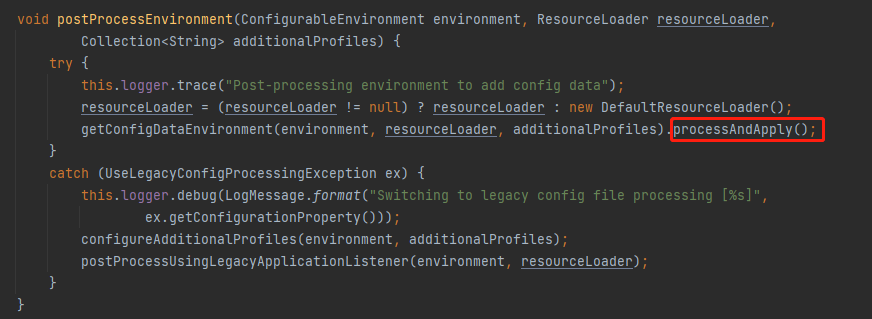
在方法中,执行 processAndApply() 方法,最终拿到配置
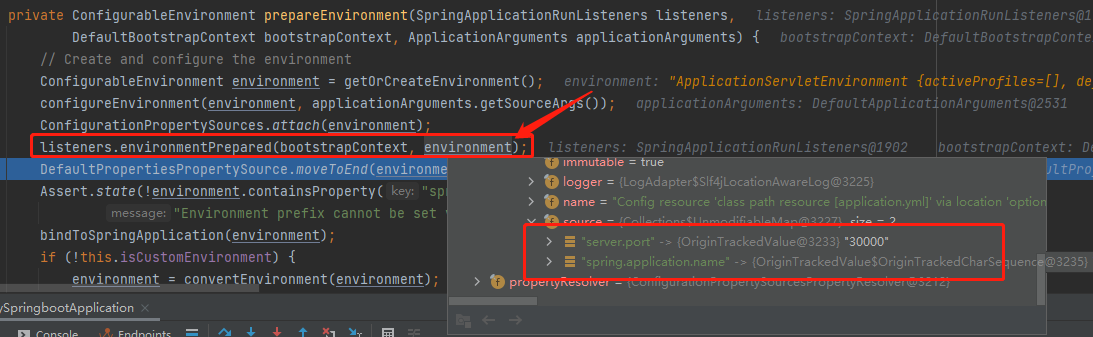
当 listeners.environmentPrepared(bootstrapContext, environment); 最终执行完,我们从 environment 对象中就可以找到我们在 yml 文件中配置的 端口 和 应用名称
3.3.9
Banner printedBanner = printBanner(environment); // 打印 Banner
3.3.10
context = createApplicationContext(); // 实例化上下文对象
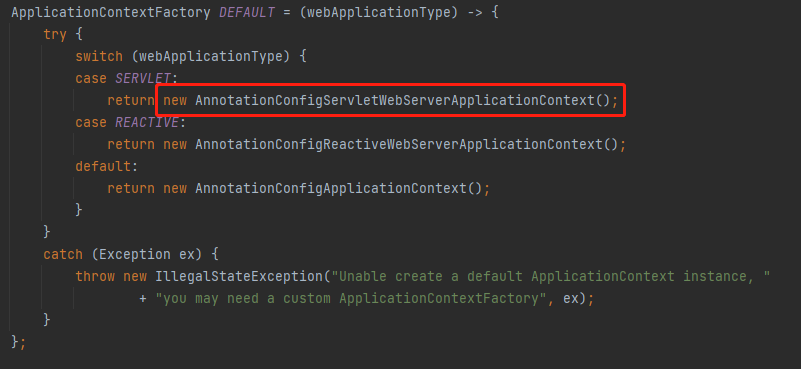
因为类型是 SERVLET,所以实例化的是 AnnotationConfigServletWebServerApplicationContext 对象
3.3.11
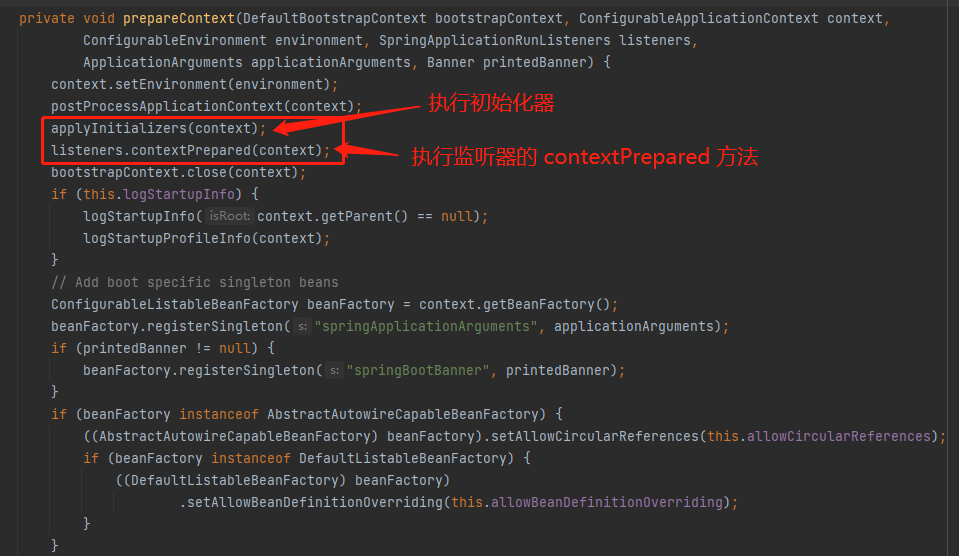
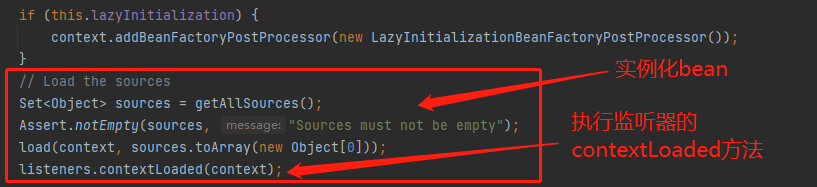
prepareContext(bootstrapContext, context, environment, listeners, applicationArguments, printedBanner); // 准备上下文
3.3.12
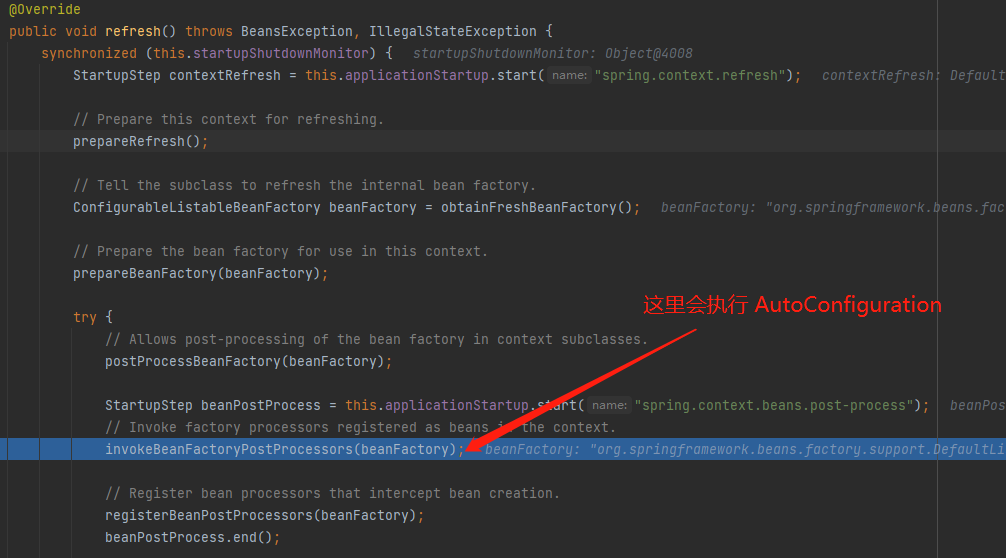
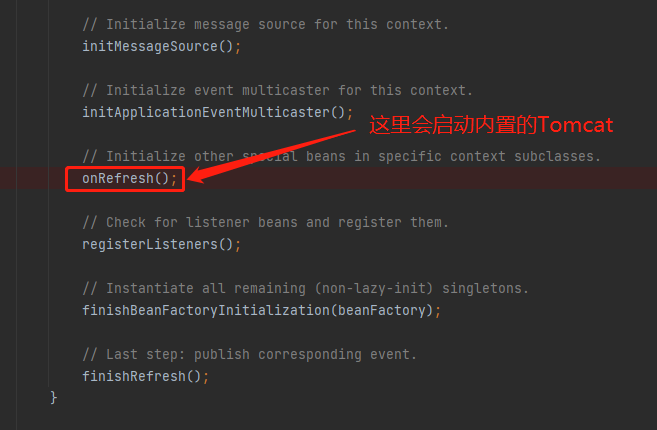
refreshContext(context); // 刷新上下文
主要逻辑在 AbstractApplicationContext 对象的 refresh 方法中
3.3.13
afterRefresh(context, applicationArguments); // 空方法
3.3.14
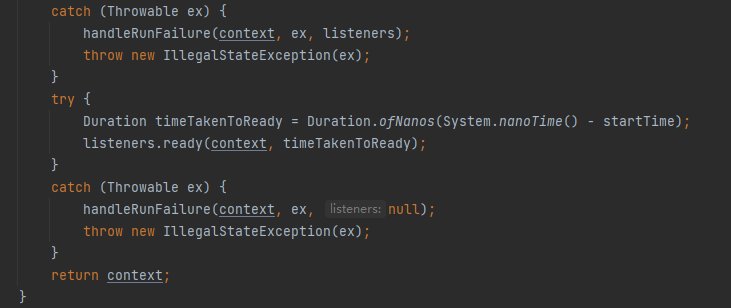
Duration timeTakenToStartup = Duration.ofNanos(System.nanoTime() - startTime); // 计算耗时
3.3.15
listeners.started(context, timeTakenToStartup); // 监听器执行 started 方法,表示启动成功
3.3.16
callRunners(context, applicationArguments); // 回调所有的ApplicationRunner和CommandLineRunner
3.3.17
listeners.ready(context, timeTakenToReady); // 监听器执行 ready 方法
4. 流程总结
1)实例化 SpringApplication 对象
2)得到 初始化器 和 监听器
3)调用 run 方法
4)记录开始时间
5)得到 runListeners
6)runListeners 执行 starting
7)准备环境
8)打印 banner
9)实例化上下文对象
10)准备上下文,执行之前得到的初始化器的初始化方法,load主bean
11)刷新上下文,在其中加载 autoConfiguration,并启动 Tomcat
12)计算耗时
13)打印耗时
14)通知监听器启动完成
15)通知监听器 ready
5. getSpringFactoriesInstances 方法详解

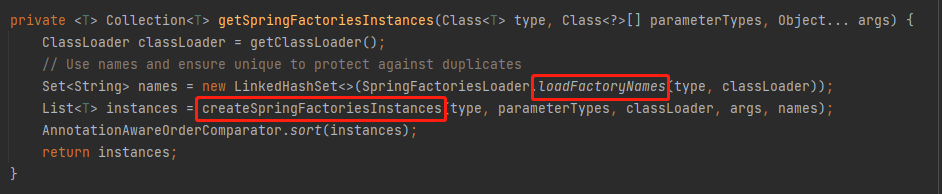
这里面比较关键的逻辑是 得到类的全类名集合 和 实例化类

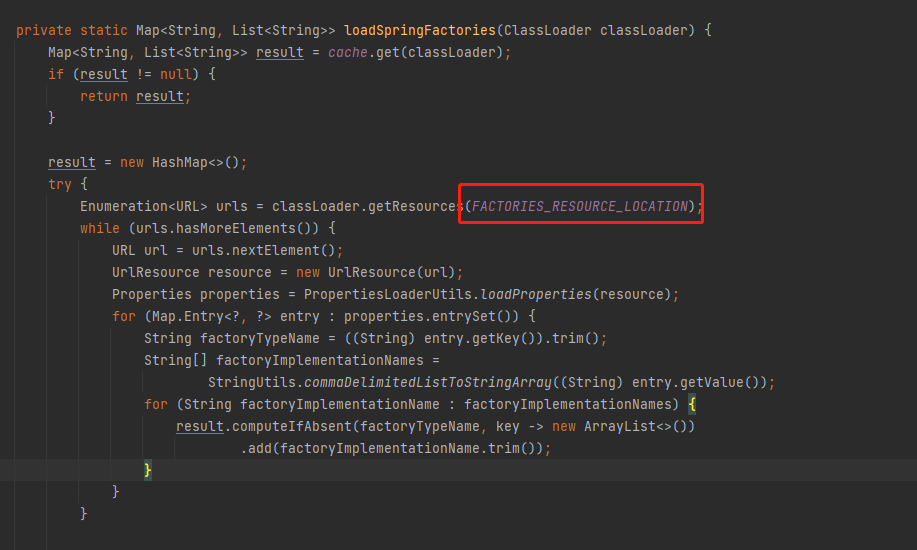

从这些代码我们可以得知,会从 META-INF/spring.factories 文件中找到 key 匹配的类,并把类的全路径集合得到
例如实例化 SpringApplication 对象时,获得 初始化器 和 监听器
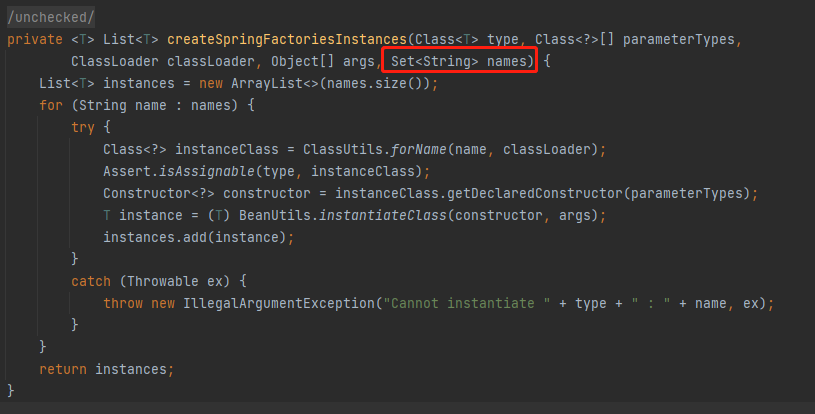
之后通过全类名,使用反射技术,实例化类,最终得到想要的集合
6. 综述
今天聊了一下 Springboot 2.6.2 的启动过程,希望可以对大家的工作有所帮助
欢迎帮忙点赞、评论、转发、加关注 :)
关注追风人聊Java,每天更新Java干货。
7. 个人公众号
追风人聊Java,欢迎大家关注

从源码角度解析 Springboot 2.6.2 的启动过程的更多相关文章
- 从源码角度解析Netty的React模式是如何工作的
Netty 支持多种实现方式,比如nio,epoll 等,本文以nio的实现方式进行讲解. 1.EventLoop : 事件循环看,简单来说就是一个死循环监听事件,如果事件来了,处理掉.通常做法就是开 ...
- spring源码学习之:spring容器的applicationContext启动过程
Spring 容器像一台构造精妙的机器,我们通过配置文件向机器传达控制信息,机器就能够按照设定的模式进行工作.如果我们将Spring容器比喻为一辆汽车,可以将 BeanFactory看成汽车的发动机, ...
- SpringBoot源码学习1——SpringBoot自动装配源码解析+Spring如何处理配置类的
系列文章目录和关于我 一丶什么是SpringBoot自动装配 SpringBoot通过SPI的机制,在我们程序员引入一些starter之后,扫描外部引用 jar 包中的META-INF/spring. ...
- 消息队列高手课,带你从源码角度全面解析MQ的设计与实现
消息队列中间件的使用并不复杂,但如果你对消息队列不熟悉,很难构建出健壮.稳定并且高性能的企业级系统,你会面临很多实际问题: 如何选择最适合系统的消息队列产品? 如何保证消息不重复.不丢失? 如果你掌握 ...
- 从template到DOM(Vue.js源码角度看内部运行机制)
写在前面 这篇文章算是对最近写的一系列Vue.js源码的文章(https://github.com/answershuto/learnVue)的总结吧,在阅读源码的过程中也确实受益匪浅,希望自己的这些 ...
- mybatis 3.x源码深度解析与最佳实践(最完整原创)
mybatis 3.x源码深度解析与最佳实践 1 环境准备 1.1 mybatis介绍以及框架源码的学习目标 1.2 本系列源码解析的方式 1.3 环境搭建 1.4 从Hello World开始 2 ...
- Android布局性能优化—从源码角度看ViewStub延迟加载技术
在项目中,难免会遇到这种需求,在程序运行时需要动态根据条件来决定显示哪个View或某个布局,最通常的想法就是把需要动态显示的View都先写在布局中,然后把它们的可见性设为View.GONE,最后在代码 ...
- Universal-Image-Loader源码解解析---display过程 + 获取bitmap过程
Universal-Image-Loader在github上的地址:https://github.com/nostra13/Android-Universal-Image-Loader 它的基本使用请 ...
- SpringBoot源码分析之SpringBoot的启动过程
SpringBoot源码分析之SpringBoot的启动过程 发表于 2017-04-30 | 分类于 springboot | 0 Comments | 阅读次数 SpringB ...
随机推荐
- mount 挂载详解
挂接命令(mount) 首先,介绍一下挂接(mount)命令的使用方法,mount命令参数非常多,这里主要讲一下今天我们要用到的. 命令格式:mount [-t vfstype] [-o option ...
- Shell中 ##%% 操作变量名
在linxu平台下少不了对变量名的处理,今天记录下shell中 ##%% 对变量名的操作. #操作左侧,%操作右侧. #号处理方式: 对于单个#,处理对象为变量中指定的第一个符号左侧字符串, 对于两个 ...
- X-MagicBox-820的luatOS之路连载系列6
继上次用Qt实现了显示地图和MQTT通信之后(X-MagicBox-820的luatOS之路连载系列5),说是要研究下地图的开放接口,也看了标记点和线的方法(地图上自定义标记点和轨迹线的实现).这次就 ...
- 利用charles映射解决夜神模拟器安装xposed-v89-sdk25-x86.zip
最近在玩xposed框架,前前后后搞了两天,浪费一个周末,总算把踩过的坑都踩了一遍.. 比如大家肯定遇到的的一个问题:夜神模拟器打开xposed安装器之后,为什么下载不了xposed-v89-sdk2 ...
- HDC2021技术分论坛:异构组网如何解决共享资源冲突?
作者:lijie,HarmonyOS软总线领域专家 相信大家对HarmonyOS的"超级终端"比较熟悉了.那么,您知道超级终端场景下的多种设备在不同环境下是如何组成一个网络的吗?这 ...
- 【STM32】晶振,主时钟,外设频率介绍
首先,我用的是STM32F407,下方所有图片都是出自这芯片的文档,如果型号和我不同,需要找到对应的芯片说明文档,也许会有出入 先看一张时钟图 这里会着重说明高速的部分,低速(不管内部还是外部)只给R ...
- Linux:$i 和 ${i}区别
例如你要把有个变量的值和其他字符串连接起来,就需要用到{},以明示{}中的是一个变量. 例如: export var1=ABC export var2=var1=${var1} echo $var2 ...
- Spring Cloud简单项目创建
一.Zuul 原文链接 Zuul的主要功能是路由转发和过滤器.路由功能是微服务的一部分,比如/api/user转发到到user服务,/api/shop转发到到shop服务.zuul默认和Ribbon结 ...
- 二叉搜索树、平衡二叉树、红黑树、B树、B+树
完全二叉树: 空树不是完全二叉树,叶子结点只能出现在最下层和次下层,且最下层的叶子结点集中在树的左部.如果遇到一个结点,左孩子不为空,右孩子为空:或者左右孩子都为空:则该节点之后的队列中的结点都为叶子 ...
- markDodn使用技巧
markdown 标题 一级标题书写语法: 井符(#)加上空格加上标题名称 二级标题书写语法: 两个井符(#)加上空格加上标题名称 三级标题书写语法: 三个井符(#)加上空格加上标题名称 字体 字体加 ...