编译安装&打包压缩&定时任务
内容概要
- 编译安装
- 打包压缩
- 定时任务
内容详细
一、编译安装
1、特点
使用源代码,编译打包软件。
1、可以自定制软件
2、按需构建软件啊
2、步骤
下载安装包
	wget 下载网址

	如果没有 wget : yum install wget

[root@localhost ~]# wget https://nginx.org/download/nginx-1.20.2.tar.gz

[root@localhost ~]# ll

total 1044

-rw-------. 1 root root    1691 Dec  8 17:25 anaconda-ks.cfg

-rw-r--r--. 1 root root 1062124 Nov 16 22:51 nginx-1.20.2.tar.gz
解压安装包
	tar -xf <安装包名>

[root@localhost ~]# tar -xf nginx-1.20.2.tar.gz

[root@localhost ~]# ll

total 1044

-rw-------. 1 root root    1691 Dec  8 17:25 anaconda-ks.cfg

drwxr-xr-x. 8 1001 1001     158 Nov 16 22:44 nginx-1.20.2

-rw-r--r--. 1 root root 1062124 Nov 16 22:51 nginx-1.20.2.tar.gz
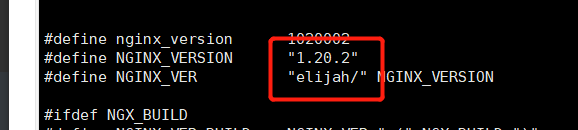
修改参数
    1、cd nginx-1.20.2

    2、vim src/core/nginx.h		# 修改NGINX_VER参数

    3、.configure

[root@localhost ~]# cd nginx-1.20.2

[root@localhost nginx-1.20.2]# ll

total 792

drwxr-xr-x. 6 1001 1001   4096 Dec 17 16:13 auto

drwxr-xr-x. 2 1001 1001    168 Dec 17 16:13 conf

-rwxr-xr-x. 1 1001 1001   2590 Nov 16 22:44 configure

drwxr-xr-x. 9 1001 1001     91 Dec 17 16:13 src

[root@localhost nginx-1.20.2]# vim src/core/nginx.h

[root@localhost nginx-1.20.2]# ./configure

# 如果报错 : ./configure: error: the HTTP rewrite module requires the PCRE library.

执行 : yum install pcre pcre-devel zlib zlib-devel -y
编译
make
安装
make install
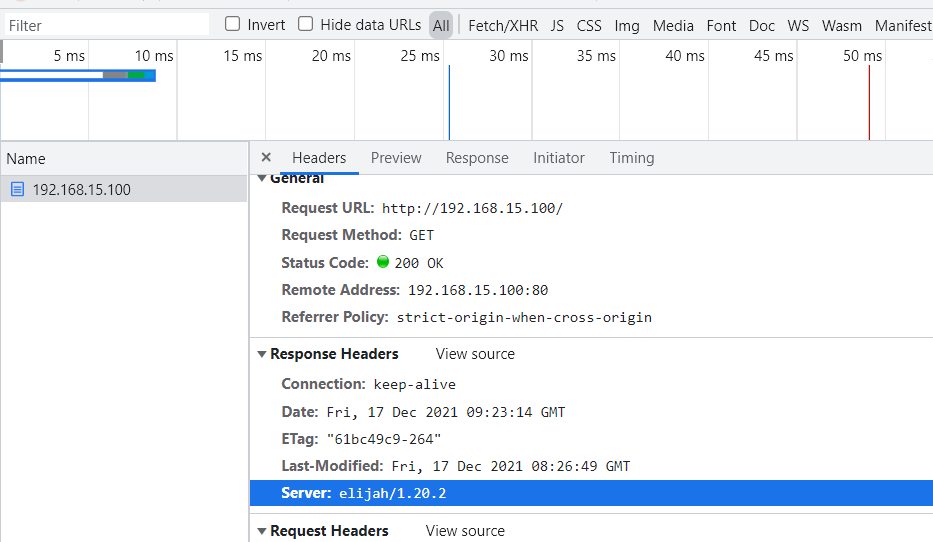
启动软件并访问虚拟机网址测试
# 执行 nginx

/usr/local/nginx/sbin/nginx

# 如果启动失败

    将可执行文件路径添加到PATH(方便启动nginx)

    vim ~/.bashrc

    #在bashrc配置文件末尾追加nginx守护进程的路径

    export PATH=$PATH:/usr/local/nginx/sbin

    #保存退出后使配置文件生效

    source ~/.bashrc

# 还是启动失败

	1、

    [root@server /]# nginx

    nginx: [emerg] still could not bind()

     查看80端口是否被占用

    [root@server /]# usr/sbin/lsof -i :80

    COMMAND   PID   USER   FD   TYPE DEVICE SIZE/OFF NODE NAME

    httpd    1326   root    4u  IPv6  26961      0t0  TCP *:http (LISTEN)

    httpd   10589 apache    4u  IPv6  26961      0t0  TCP *:http (LISTEN)

    httpd   10591 apache    4u  IPv6  26961      0t0  TCP *:http (LISTEN)

    httpd   10593 apache    4u  IPv6  26961      0t0  TCP *:http (LISTEN)

    httpd   10594 apache    4u  IPv6  26961      0t0  TCP *:http (LISTEN)

    httpd   10595 apache    4u  IPv6  26961      0t0  TCP *:http (LISTEN)

    #关闭httpd服务

    [root@server /]# systemctl stop httpd

    2、解决办法:

    根据Nginx配置文件查看配置的端口(本文中使用的是80端口),然后根据端口查看端口占用情况

    [root@xyw-cyck-cms-3 ~]# netstat -ntlp|grep 80

    tcp        0      0 0.0.0.0:80              0.0.0.0:*               		LISTEN      7043/nginx: worker

    使用kill命令杀死占用进程,之后重新启动Nginx

system start nginx
如果访问网址失败,应该是防火墙和selinux没关掉
关闭selinux和firewalld

	systemctl disable --now firewalld

[root@localhost ~]# systemctl disable --now firewalld

[root@localhost ~]# setenforce 0
二·、打包压缩
1、常见压缩工具与压缩命令
压缩工具
windows : zip 、rar

Linux : gzip 、 bzip2
操作命令
前提 :压缩操作只能压缩文件,不能压缩文件夹,文件夹需要经过打包之后才能进行压缩
压缩 : gzip <文件名>

解压 : gzip -d <压缩包>

压缩 : bzip2 <文件名>

解压 : bzip2 -d <压缩包>

小文件压缩可能内存反而变大,因为要加入压缩算法

无法压缩目录

原文件:

	-rw-------. 1 root root    1691 Dec  8 17:25 anaconda-ks.cfg

压缩后:文件变小

[root@localhost ~]# gzip anaconda-ks.cfg

[root@localhost ~]# ll

total 1044

-rw-------. 1 root root     883 Dec  8 17:25 anaconda-ks.cfg.gz

解压:

[root@localhost ~]# gzip -d anaconda-ks.cfg.gz

[root@localhost ~]# ll

total 1044

-rw-------. 1 root root    1691 Dec  8 17:25 anaconda-ks.cfg
2、打包文件
打包命令
	命令 : tar

	需要指定参数,因为 tar 既有打包又有解包的功能,

	打包 : -c

    tar -c -f <压缩后名称> <目录名>

    目录名不能用绝对路径,会报错

# 打包

[root@localhost ~]# tar -c -f nginx-1.tar nginx-1.20.2

[root@localhost ~]# ll

total 20004

drwxr-xr-x. 9 1001 1001      186 Dec 17 16:23 nginx-1.20.2

-rw-r--r--. 1 root root 19415040 Dec 17 19:17 nginx-1.tar

# 压缩

[root@localhost ~]# gzip nginx-1.tar

[root@localhost ~]# ll

total 6196

drwxr-xr-x. 9 1001 1001     186 Dec 17 16:23 nginx-1.20.2

-rw-r--r--. 1 root root 5273306 Dec 17 19:17 nginx-1.tar.gz	< -- 压缩过后

# 打包后用 zip 压缩,并显示压缩过程, 压缩参数 -z 得和打包 -c 一起使用,单独无法使用

[root@localhost ~]# tar -c -v -z -f nginx-1.2.tar nginx-1.20.2

注意 : -f 参数后面一定要跟着压缩后的 压缩包名

# 用 tar 命令解压:

[root@localhost ~]# tar -xf nginx-1.20.2.tar.gz

[root@localhost ~]# ll

total 25156

drwxr-xr-x. 8 1001 1001      158 Nov 16 22:44 nginx-1.20.2
参数
参数:

    -f : 指定打包的包名称

    -c : 打包

    -v : 显示打包的过程

    -z : 使用gzip压缩压缩包

    -j : 使用bzip2压缩压缩包

    -x : 解压(解压不需要指定压缩类型)

    -t : 查看压缩包内部的内容

    -P :忽略使用绝对路径时报出的错误

注意:

    1、压缩时是什么路径,解压缩时就是什么路径,所以为了安全不要使用绝对路径压缩。

    2、-f参数后面永远跟压缩包名称
三、定时任务
1、定时应用
在工作中,有些执行脚本需要在凌晨或者一些固定的时间点执行,可以给脚本设置定时任务,到点直接执行程序,无须人工手动操作
2、定时配置文件目录与格式
定时文件目录
/etc/crontab
格式
* * * * * crontab

分  时  天  月  周几
3、定时使用
编译安装&打包压缩&定时任务的更多相关文章
- Linux 编译安装、压缩打包、定时任务
目录 Linux 编译安装 知识储备: wget命令 编译安装 Linux 压缩打包 gzip压缩 bzip2压缩 tar打包 Linux 定时任务 相关文件及操作 Linux 编译安装 编译安装就是 ...
- Linux的编译安装、压缩打包、定时任务
昨日内容回顾 # 1.搭建yum私有仓库 1.安装必须的工具 yum install createrepo yum-utils nginx -y 2.创建目录 mkdir /opt/test 3.创建 ...
- 9、Linux基础--编译安装、压缩打包、定时任务
笔记 1.晨考 1.搭建yum私有仓库的步骤 1.安装工具 yum install createrepo yum-utils nginx -y 2.创建目录 mkdir /opt/test 3.创建包 ...
- Linux编译安装、压缩打包、定时任务管理
编译安装 压缩打包 定时任务管理 一.编译安装 使用源代码,编译打包软件 1.特点 1.可以定制软件 2.按需构建软件 2.编译安装 1.下载源代码包 wget https://nginx.org/d ...
- 阿里云服务器Linux CentOS安装配置(九)shell编译、打包、部署
阿里云服务器Linux CentOS安装配置(九)shell编译.打包.部署 1.查询当前目录以及子目录下所有的java文件,并显示查询结果 find . -name *.java -type f - ...
- CentOS6.7下使用非root用户(普通用户)编译安装与配置mysql数据库并使用shell脚本定时任务方式实现mysql数据库服务随机自动启动
CentOS6.7下使用非root用户(普通用户)编译安装与配置mysql数据库并使用shell脚本定时任务方式实现mysql数据库服务随机自动启动1.关于mysql?MySQL是一个关系型数据库管理 ...
- Linux打包压缩与安装卸载
一.打包压缩 (1)tar:打包拆包命令 tar -cxzjvf 打包后的文件 欲打包的目录 -c:打包文件夹 -x:拆开文件夹 -z:以gzip格式压缩,默认压缩倍数为6倍 -j:以bzi ...
- Maven01 环境准备、maven项目结构、编译/测试/打包/清除、安装、
0 前提准备 0.1 安装java开发环境 0.2 安装maven工具 1 maven项目基本结构 如图所示,整个maven项目有业务文件.测试文件.POM依赖管理文件:其实还有一个资源文件resou ...
- Spark入门实战系列--2.Spark编译与部署(下)--Spark编译安装
[注]该系列文章以及使用到安装包/测试数据 可以在<倾情大奉送--Spark入门实战系列>获取 .编译Spark .时间不一样,SBT是白天编译,Maven是深夜进行的,获取依赖包速度不同 ...
随机推荐
- java 短路与(||)时报错The operator || is undefined for the argument type(s) int, boolean
今天在使用短路与时,报错The operator || is undefined for the argument type(s) int, boolean 代码如下: 最后发现是少了一个=,比较要使 ...
- [Docker] 在CentOS6.8 安装 Docker
运行docker Linux内核版本需要在3.8以上,针对centos6.5 内核为2.6的系统需要先升级内核.不然会特别卡,退出容器. # 查看当前版本: cat /etc/issue # 导入pu ...
- js 关于 data.xuNum = xuNum++; 赋值写法 的探讨
1 .源码 let xuNum = 0; let data = []; data.xuNum = xuNum++; console.log(data.xuNum) 2.打印结果 // 0 3.原因 ...
- POJ 1664 放苹果 (递推思想)
原题链接:http://poj.org/problem?id=1664 思路:苹果m个,盘子n个.假设 f ( m , n ) 代表 m 个苹果,n个盘子有 f ( m , n ) 种放法. 根据 n ...
- Java基础-JNI入门示例
1.JNI是什么? JNI(Java Native Interface) Java本地接口,又叫Java原生接口.它允许Java调用C/C++的代码,同时也允许在C/C++中调用Java的代码. 可以 ...
- 【刷题-LeetCode】240. Search a 2D Matrix II
Search a 2D Matrix II Write an efficient algorithm that searches for a value in an m x n matrix. Thi ...
- 【刷题-LeetCode】203. Remove Linked List Elements
Remove Linked List Elements Remove all elements from a linked list of integers that have value *val* ...
- NAO机器人开发环境配置
python python2.7用于NAO开发 https://www.python.org/downloads/release/python-2718/ python3.6用于其他程序测试. htt ...
- gin中的SecureJSON 防止 json 劫持
使用 SecureJSON 防止 json 劫持.如果给定的结构是数组值或map,则默认预置 "while(1)," 到响应体. package main import ( &qu ...
- 返回值List是JsonArray
MyController中: index.jsp中