【springcloud】springcloud Greenwich SR4版本笔记
springcloud Greenwich SR4版本笔记
本文只记录实际版本,配置,pom,代码以及注意事项。别的在其他springcloud 的F版本中已有详述。
示例代码地址:https://github.com/wjqhuaxia/springcloud-greenwich-sr4.git
目录:
2、feign调用
3、网关zuul
3.1、过滤器实现权限校验
3.2、智能路由
3.3、跨域处理
4、hystrix服务降级、熔断、限流
4.2、zuul-hystrix服务降级
4.3、hystrix服务熔断
5、ribbon客户端负载匀衡
6、config
6.1、config server
6.2、config client
1. eureka server
详细描述请查看另一文章。路径【springcloud】Eureka服务注册中心搭建
1.1 版本选择
jdk:    1.8

springcloud:    Greenwich.SR4

springboot:    2.1.9.RELEASE
1.2 pom
1.2.1 项目父pom
<parent>

    <groupId>org.springframework.boot</groupId>

    <artifactId>spring-boot-starter-parent</artifactId>

    <version>2.1.9.RELEASE</version>

  </parent>

  <properties>

    <project.build.sourceEncoding>UTF-8</project.build.sourceEncoding>

    <project.reporting.outputEncoding>UTF-8</project.reporting.outputEncoding>

    <java.version>1.8</java.version>

  </properties>

  <dependencyManagement>

    <dependencies>

        <dependency>

            <groupId>org.springframework.cloud</groupId>

            <artifactId>spring-cloud-dependencies</artifactId>

            <version>Greenwich.SR4</version>

            <type>pom</type>

            <scope>import</scope>

        </dependency>

    </dependencies>

  </dependencyManagement>

  <dependencies>

  	<dependency>

		<groupId>org.springframework.cloud</groupId>

		<artifactId>spring-cloud-netflix-eureka-client</artifactId>

	</dependency>

	<dependency>

		<groupId>org.springframework.cloud</groupId>

		<artifactId>spring-cloud-starter-netflix-eureka-server</artifactId>

	</dependency>

  </dependencies>

    <repositories>

        <repository>

            <id>spring-milestones</id>

            <name>Spring Milestones</name>

            <url>https://repo.spring.io/libs-milestone</url>

            <snapshots>

                <enabled>false</enabled>

            </snapshots>

        </repository>

    </repositories>
1.2.2 eureka server pom
<dependencies>

  	<dependency>

		<groupId>org.springframework.cloud</groupId>

		<artifactId>spring-cloud-starter-netflix-eureka-server</artifactId>

	</dependency>
     <dependency>

  		<groupId>org.springframework.boot</groupId>

    	     <artifactId>spring-boot-starter-security</artifactId>

  	</dependency>
</dependencies>
1.3 配置
1.3.1 单节点配置
application.yml中配置如下:
server:

  port: 8761

eureka:

  instance:

    hostname: localhost

  client:

    registerWithEureka: false

    fetchRegistry: false

    serviceUrl:

      defaultZone: http://${eureka.instance.hostname}:${server.port}/eureka/
1.4 代码
eureka server 中起动类代类如下:
@SpringBootApplication

@EnableEurekaServer

public class EurekaServerApplication {

    public static void main(String[] args) {

    	SpringApplication.run(EurekaServerApplication.class, args);

    }

}
1.5 安全校验
1.5.1 pom增加项
        <dependency>

  		<groupId>org.springframework.boot</groupId>

  		<artifactId>spring-boot-starter-security</artifactId>

  	</dependency>
1.5.2 eureka server
配置修改如下
server:

  port: 8761

user: huaxia

password: huaxia

spring:

  security:

    user:

      name: ${user}

      password: ${password}

eureka:

  instance:

    hostname: localhost

  client:

    registerWithEureka: false

    fetchRegistry: false

    serviceUrl:

      defaultZone: http://${user}:${password}@{eureka.instance.hostname}:${server.port}/eureka/
1.5.3 eureka client
配置时修改如下
eureka:

  client:

    service-url:

      defaultZone:http://${user}:${password}@{eureka.instance.hostname}:${server.port}/eureka/
1.5.4 注意项
A、由于默认是开启CSRF,所以需要将其关闭,不然会出现如下错误:
javax.ws.rs.WebApplicationException: com.fasterxml.jackson.databind.exc.MismatchedInputException:
Root name 'timestamp' does not match expected ('instance') for type [simple type, class com.netflix.appinfo.InstanceInfo]
在eureka服务端,创建一个WebSecurityConfig类,代码如下:
// WebSecurityConfig.java

@EnableWebSecurity

@Configuration

public class WebSecurityConfig extends WebSecurityConfigurerAdapter {

    @Override

    protected void configure(HttpSecurity http) throws Exception {

        http.csrf().disable(); //关闭csrf

        super.configure(http); //开启认证

    }

}
B、spring-boot-starter-security包只能放在eureka server项目的pom中,如果放在其他服务的pom中,在调用接口时会报401,Unauthorized

1.5.5 总结
1、如果在eureka服务端增加上安全认证,客户端无法注册成功,先看看有没有WebSecurityConfig。
2、客户端也需要用户名和密码认证注册的,服务端改成安全认证,客户端不要忘了改。
3、如果服务端是安全认证的集群服务,客户端注册时每个地址都需要用户名和密码安全认证
安全配置参考:https://blog.csdn.net/wgh100817/article/details/101719042
2、feign调用
详细请查看另一文章:【springcloud】模拟RPC调用(Feign)
2.1 pom文件修改
添加feign依赖
<!-- Feign 依赖 -->

     <dependency>

         <groupId>org.springframework.cloud</groupId>

         <artifactId>spring-cloud-starter-openfeign</artifactId>

     </dependency>
2.2 feign代码实现
2.2.1 feign接口
@FeignClient(name = "stock-service", fallback = StockMsgClientFallback.class)

public interface StockMsgClient {

	@GetMapping("/stock/getStockMsg")

	public String getStockMsg();

}
2.2.2 feign接口调用
@RestController

public class HelloOrderController {

	@Autowired

	private StockMsgClient stockMsgClient;

	@Autowired

	private IntegralMsgClient integralMsgClient;

	@GetMapping("/testStockRequest")

	@ResponseBody

	public String testStockRequest(){

		return "order service: " + stockMsgClient.getStockMsg();

	}

	@GetMapping("/testIntegralRequest")

	@ResponseBody

	public String testIntegralRequest(){

		return "order service: " + integralMsgClient.getIntegralMsg();

	}

	@RequestMapping(value = "/hello")

	@ResponseBody

	public String hello(){

		return "Hello Order Controller!";

	}

}
2.3 feign-hystrix服务降级
2.3.1 feignclient调用

2.3.2 fallback实现
@Component

public class StockMsgClientFallback implements StockMsgClient{

	@Override

	public String getStockMsg() {

		return "getStockMsg 服务异常,请稍后再试!";

	}

}
3、网关zuul
zuul相关详细描述请移步:
【springcloud】API Gateway 的路由和过滤(Zuul--1)
【springcloud】Zuul高级配置(zuul--2)
【springcloud】Zuul高级配置(zuul--3)
3.1 pom配置
        <dependency>

  		<groupId>org.springframework.cloud</groupId>

  		<artifactId>spring-cloud-starter-netflix-zuul</artifactId>

  	</dependency>
3.2 智能路由实现
配置即可
zuul:

  prefix: /api  #zuul.prefix 配置项可以为所有的路由地址都添加一个前缀

  routes:

    order-service: /order-service/**

    stock-service: /stock-service/**
3.3 zuul-hystrix服务降级
订单服务-服务降级处理
@Component

public class OrderServiceFallbackProvider implements FallbackProvider {

    @Override

    public String getRoute() {

        return "order-service";

    }

    @Override

    public ClientHttpResponse fallbackResponse(String route, final Throwable cause) {

        if (cause instanceof HystrixTimeoutException) {

            return response(HttpStatus.GATEWAY_TIMEOUT);

        } else {

            return response(HttpStatus.INTERNAL_SERVER_ERROR);

        }

    }

    private ClientHttpResponse response(final HttpStatus status) {

        return new ClientHttpResponse() {

            @Override

            public HttpStatus getStatusCode() throws IOException {

                return status;

            }

            @Override

            public int getRawStatusCode() throws IOException {

                return status.value();

            }

            @Override

            public String getStatusText() throws IOException {

                return status.getReasonPhrase();

            }

            @Override

            public void close() {

            }

            @Override

            public InputStream getBody() throws IOException {

                return new ByteArrayInputStream("订单服务暂时不可用,请稍后重试!".getBytes());

            }

            @Override

            public HttpHeaders getHeaders() {

                HttpHeaders headers = new HttpHeaders();

                headers.setContentType(MediaType.APPLICATION_JSON);

                return headers;

            }

        };

    }

}
3.4 过滤器实现权限校验
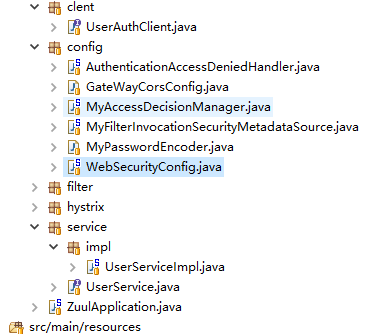
本示例中使用的是spring security安全框架实现安全管理。spring security的springboot集成可参考:springboot集成security
具体代码已上传github。以下记录简略步骤:
3.4.1 pom修改
       <!-- security依赖 -->

       <dependency>

		<groupId>org.springframework.boot</groupId>

		<artifactId>spring-boot-starter-security</artifactId>

	</dependency>
3.4.2 配置项
package cn.com.wjqhuaxia.config;

import java.io.IOException;

import java.io.PrintWriter;

import javax.servlet.ServletException;

import javax.servlet.http.HttpServletRequest;

import javax.servlet.http.HttpServletResponse;

import org.slf4j.Logger;

import org.slf4j.LoggerFactory;

import org.springframework.beans.factory.annotation.Autowired;

import org.springframework.context.annotation.Bean;

import org.springframework.context.annotation.Configuration;

import org.springframework.security.authentication.BadCredentialsException;

import org.springframework.security.config.annotation.ObjectPostProcessor;

import org.springframework.security.config.annotation.authentication.builders.AuthenticationManagerBuilder;

import org.springframework.security.config.annotation.method.configuration.EnableGlobalMethodSecurity;

import org.springframework.security.config.annotation.web.builders.HttpSecurity;

import org.springframework.security.config.annotation.web.builders.WebSecurity;

import org.springframework.security.config.annotation.web.configuration.WebSecurityConfigurerAdapter;

import org.springframework.security.core.Authentication;

import org.springframework.security.core.AuthenticationException;

import org.springframework.security.core.userdetails.UsernameNotFoundException;

import org.springframework.security.crypto.password.PasswordEncoder;

import org.springframework.security.web.access.intercept.FilterSecurityInterceptor;

import org.springframework.security.web.authentication.AuthenticationFailureHandler;

import org.springframework.security.web.authentication.AuthenticationSuccessHandler;

import cn.com.wjqhuaxia.service.impl.UserServiceImpl;

/**

 * spring-security权限管理的核心配置

 * @author wjqhuaxia

 *

 */

@Configuration

@EnableGlobalMethodSecurity(prePostEnabled = true) //全局

public class WebSecurityConfig extends WebSecurityConfigurerAdapter {

	private final Logger logger = LoggerFactory.getLogger(getClass());

    @Autowired

    private UserServiceImpl userService;//实现了UserDetailsService接口

    @Autowired

    private MyFilterInvocationSecurityMetadataSource myFilterInvocationSecurityMetadataSource;//权限过滤器(当前url所需要的访问权限)

    @Autowired

    private MyAccessDecisionManager myAccessDecisionManager;//权限决策器

    @Autowired

    private AuthenticationAccessDeniedHandler authenticationAccessDeniedHandler;//自定义错误(403)返回数据

    /**

     * 自定义的加密算法

     * @return

     */

    @Bean

    public PasswordEncoder myPasswordEncoder() {

    	return new MyPasswordEncoder();

    }

    /**

     *  配置userDetails的数据源,密码加密格式

     */

    @Override

    protected void configure(AuthenticationManagerBuilder auth) throws Exception {

        auth.userDetailsService(userService).passwordEncoder(myPasswordEncoder());

    }

    /**

     * 配置放行的资源

     */

    @Override

    public void configure(WebSecurity web) throws Exception {

        web.ignoring()

           .antMatchers("/index.html", "/static/**","/loginPage","/register")

           // 给 swagger 放行;不需要权限能访问的资源

           .antMatchers("/swagger-ui.html", "/swagger-resources/**", "/images/**", "/webjars/**", "/v2/api-docs",

        		   "/configuration/ui", "/configuration/security", "/swagger-ui.html#!");

    }

    /**

     * 这段配置,我认为就是配置Security的认证策略, 每个模块配置使用and结尾。

		authorizeRequests()配置路径拦截,表明路径访问所对应的权限,角色,认证信息。

		formLogin()对应表单认证相关的配置

		logout()对应了注销相关的配置

		httpBasic()可以配置basic登录

     */

    /**

     * HttpSecurity包含了原数据(主要是url)

     * 1.通过withObjectPostProcessor将MyFilterInvocationSecurityMetadataSource和MyAccessDecisionManager注入进来

     * 2.此url先被MyFilterInvocationSecurityMetadataSource处理,然后 丢给 MyAccessDecisionManager处理

     * 3.如果不匹配,返回 MyAccessDeniedHandler

     */

    @Override

    protected void configure(HttpSecurity http) throws Exception {

    		// authorizeRequests()配置路径拦截,表明路径访问所对应的权限,角色,认证信息

        	http.authorizeRequests()

                .withObjectPostProcessor(new ObjectPostProcessor<FilterSecurityInterceptor>() {

                    @Override

                    public <O extends FilterSecurityInterceptor> O postProcess(O o) {

                        o.setSecurityMetadataSource(myFilterInvocationSecurityMetadataSource);

                        o.setAccessDecisionManager(myAccessDecisionManager);

                        return o;

                    }

                })

                .and()

            // formLogin()对应表单认证相关的配置

            .formLogin()

            	//.loginPage("/loginPage.html")

            	.loginProcessingUrl("/login")

            	.usernameParameter("username")

            	.passwordParameter("password")

            	.permitAll()

            .failureHandler(new AuthenticationFailureHandler() {

	            @Override

	            public void onAuthenticationFailure(HttpServletRequest httpServletRequest, HttpServletResponse httpServletResponse, AuthenticationException e) throws IOException, ServletException {

	            	logger.error("onAuthenticationFailure error. e: {}", e);

	            	httpServletResponse.setContentType("application/json;charset=utf-8");

	                PrintWriter out = httpServletResponse.getWriter();

	                StringBuffer sb = new StringBuffer();

	                sb.append("{\"status\":\"error\",\"msg\":\"");

	                if (e instanceof UsernameNotFoundException || e instanceof BadCredentialsException) {

	                    sb.append("用户名或密码输入错误,登录失败!");

	                } else {

	                    sb.append("登录失败!");

	                }

	                sb.append("\"}");

	                out.write(sb.toString());

	                out.flush();

	                out.close();

	            }

            }).successHandler(new AuthenticationSuccessHandler() {

            @Override

	            public void onAuthenticationSuccess(HttpServletRequest httpServletRequest, HttpServletResponse httpServletResponse, Authentication authentication) throws IOException, ServletException {

	                httpServletResponse.setContentType("application/json;charset=utf-8");

	                PrintWriter out = httpServletResponse.getWriter();

	                String s = "{\"status\":\"success\",\"msg\":\"登陆成功\"}";

	                out.write(s);

	                out.flush();

	                out.close();

	            }

            }).and()

            // logout()对应了注销相关的配置

            .logout()

            	.permitAll()

            	.and()

            	.csrf()

            	.disable()

        	.exceptionHandling()

        		.accessDeniedHandler(authenticationAccessDeniedHandler);

    }

}
3.4.3 权限数据源信息
详细信息见github代码以及springboot集成security,此处仅做简略记录。

4、springcloud config
4.1 config server
4.1.1 pom
添加 spring-cloud-config-server 依赖。
  <parent>

    <groupId>cn.com.wjqhuaxia</groupId>

    <artifactId>greenwich-sr4-master</artifactId>

    <version>0.0.1-SNAPSHOT</version>

  </parent>

  <artifactId>greenwich-sr4-config</artifactId>

  <dependencies>

  	<dependency>

		<groupId>org.springframework.cloud</groupId>

		<artifactId>spring-cloud-config-server</artifactId>

	</dependency>

  </dependencies>
4.1.2 启动类
添加 @EnableConfigServer 注解。
package cn.com.wjqhuaxia;

import org.springframework.boot.SpringApplication;

import org.springframework.boot.autoconfigure.SpringBootApplication;

import org.springframework.cloud.config.server.EnableConfigServer;

import org.springframework.cloud.netflix.eureka.EnableEurekaClient;

@SpringBootApplication

@EnableConfigServer

@EnableEurekaClient

public class ConfigServerApplication {

    public static void main(String[] args) {

    	SpringApplication.run(ConfigServerApplication.class, args);

    }

}
4.1.3 配置项
application.yml,其中uri为git远程库地址。
spring:

  application:

    name: config-center

  cloud:

    config:

      server:

        git:

          uri: https://github.com/wjqhuaxia/config.git

          username: xx

          password: xx

server:

  port: 8000  # 端口号默认8080

# 服务注册

eureka:

  client:

    serviceUrl:

      defaultZone: http://huaxia:huaxia@localhost:8761/eureka/
4.2 config client
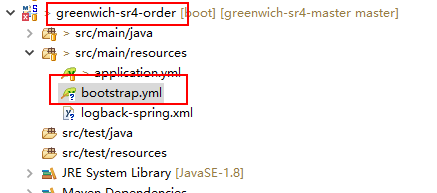
示例代码中order项目,修改application.yml文件,并添加bootstrap.yml文件

4.2.1 pom
添加config-client依赖
        <dependency>

		<groupId>org.springframework.cloud</groupId>

		<artifactId>spring-cloud-config-client</artifactId>

	</dependency>
4.2.2 配置文件内容
spring:

  application:

    name: order-service

  cloud:

    config:

      discovery:

        enabled: true

        service-id: config-center  # 指定用于获取配置的配置中心服务(应用)名称

      profile: test

      label: master

eureka:

  client:

    serviceUrl:

      defaultZone: http://huaxia:huaxia@localhost:8761/eureka/
【springcloud】springcloud Greenwich SR4版本笔记的更多相关文章
- SpringCloud(一)版本选择
Springboot版本 官网:https://spring.io/projects/spring-boot 在官网上 springboot已经更新到最新2.2.6 Spingcloud版本 官网:h ...
- 【springcloud】springcloud与springboot的版本对应关系
官方网址:https://start.spring.io/actuator/info 更新时间:2019-12-01 spring-cloud: "Finchley.M2": &q ...
- Spring Cloud Greenwich.SR4 发布了,跟不上了……
前几天 Spring Cloud Greenwich.SR4 发布了: https://spring.io/blog/2019/11/19/spring-cloud-greenwich-sr4-rel ...
- Greenwich.SR2版本的Spring Cloud Config+BUS实例
Spring Cloud Config统一的配置中心同注册中心Eureka一样,也分服务端和客户端.服务端用来保存配置信息,客户端用来读取.它的优势是基于Git仓库,支持多环境.多分支配置.动态刷新. ...
- Greenwich.SR2版本的Spring Cloud Zuul实例
网关作为对外服务,在微服务架构中是一个很重要的组件,主要体现在动态路由和接入鉴权这两个功能上.现在我们通过Spring Cloud Zuul来实现对之前a-feign-client(参见Greenwi ...
- Greenwich.SR2版本的Spring Cloud Feign实例
前面我们了解了Spring Cloud Ribbon和Hystrix,在使用上它们基本上会成队出现,那么是不是可以把它们组合起来使用?而且我们发现,在服务消费方a-beautiful-client里通 ...
- Greenwich.SR2版本的Spring Cloud Hystrix实例
之前我们在eureka(参见Greenwich.SR2版本的Spring Cloud Eureka实例)中,服务消费方a-beautiful-client调用服务提供方a-bootiful-clien ...
- Greenwich.SR2版本的Spring Cloud Ribbon实例
上次我们了解了eureka(参见Greenwich.SR2版本的Spring Cloud Eureka实例),里面的服务消费方(服务实例a-beautiful-client)我们其实已经用到了ribb ...
- Greenwich.SR2版本的Spring Cloud Eureka实例
作为微服务架构中最为核心和基础的服务治理,注册中心提供了微服务实例的自动化注册与发现.而作为一个服务注册中心,eureka的作用与传统的zk.etcd的作用是一样的,同样也支持高可用(集群).不同之处 ...
随机推荐
- Python爬取网易云热歌榜所有音乐及其热评
获取特定歌曲热评: 首先,我们打开网易云网页版,击排行榜,然后点击左侧云音乐热歌榜,如图: 关于如何抓取指定的歌曲的热评,参考这篇文章,很详细,对小白很友好: 手把手教你用Python爬取网易云40万 ...
- 【论文阅读】Motion Planning through policy search
想着CSDN还是不适合做论文类的笔记,那里就当做技术/系统笔记区,博客园就专心搞看论文的笔记和一些想法好了,[]以后中框号中间的都算作是自己的内心OS 有时候可能是问题,有时候可能是自问自答,毕竟是笔 ...
- IO编程之NIO
从jdk1.4开始,java提供了一系列改进的输入/输出处理的新功能,这些功能被统称为新IO(New IO,简称NIO),这些类都被放在java.nio包以及子包中,并且对原java.io包中的很多类 ...
- 单细胞分析实录(19): 基于CellPhoneDB的细胞通讯分析及可视化 (下篇)
在上一篇帖子中,我介绍了CellPhoneDB的原理.实际操作,以及一些值得注意的地方.这一篇继续细胞通讯分析的可视化. 公众号后台回复20210723获取本次演示的测试数据,以及主要的可视化代码. ...
- UBUNTU 16.04 LTS SERVER 手动升级 MariaDB 到最新版 10.2
UBUNTU 16.04 LTS SERVER 手动升级 MariaDB 到最新版 10.2 1. 起因 最近因为不同软件的数据问题本来只是一些小事弄着弄着就越弄越麻烦了,期间有这么个需求,没看到有中 ...
- linux服务器安装svn超详细介绍
#!/bin/sh REPOS="$1" REV="$2" export LANG=en_US.UTF-8 LOG_PATH=/tmp/svn.log echo ...
- P2491 消防/P1099 树网的核
P2491 消防/P1099 树网的核 双倍经验,双倍快乐. 题意 在一个树上选择一段总长度不超过\(s\)的链使所有点到该链距离的最大值最小. 输出这个最小的值. 做法 Define:以下\(s\) ...
- VM安装kali操作系统
工具:VMware Workstation 15 Pro(15.5.6 build-16341506),kali-linux-2020.2-installer-amd64.iso vm15下载链接:h ...
- videojs踩过的坑
1.videojs-contrib-hls 在webpack中不能用,解决方法:window.videojs = videojs:出处 https://github.com/videojs/video ...
- SpringCloud升级之路2020.0.x版-7.从Bean到SpringCloud
本系列为之前系列的整理重启版,随着项目的发展以及项目中的使用,之前系列里面很多东西发生了变化,并且还有一些东西之前系列并没有提到,所以重启这个系列重新整理下,欢迎各位留言交流,谢谢!~ 在理解 Spr ...
