[Python]爬虫获取知乎某个问题下所有图片并去除水印
获取URL
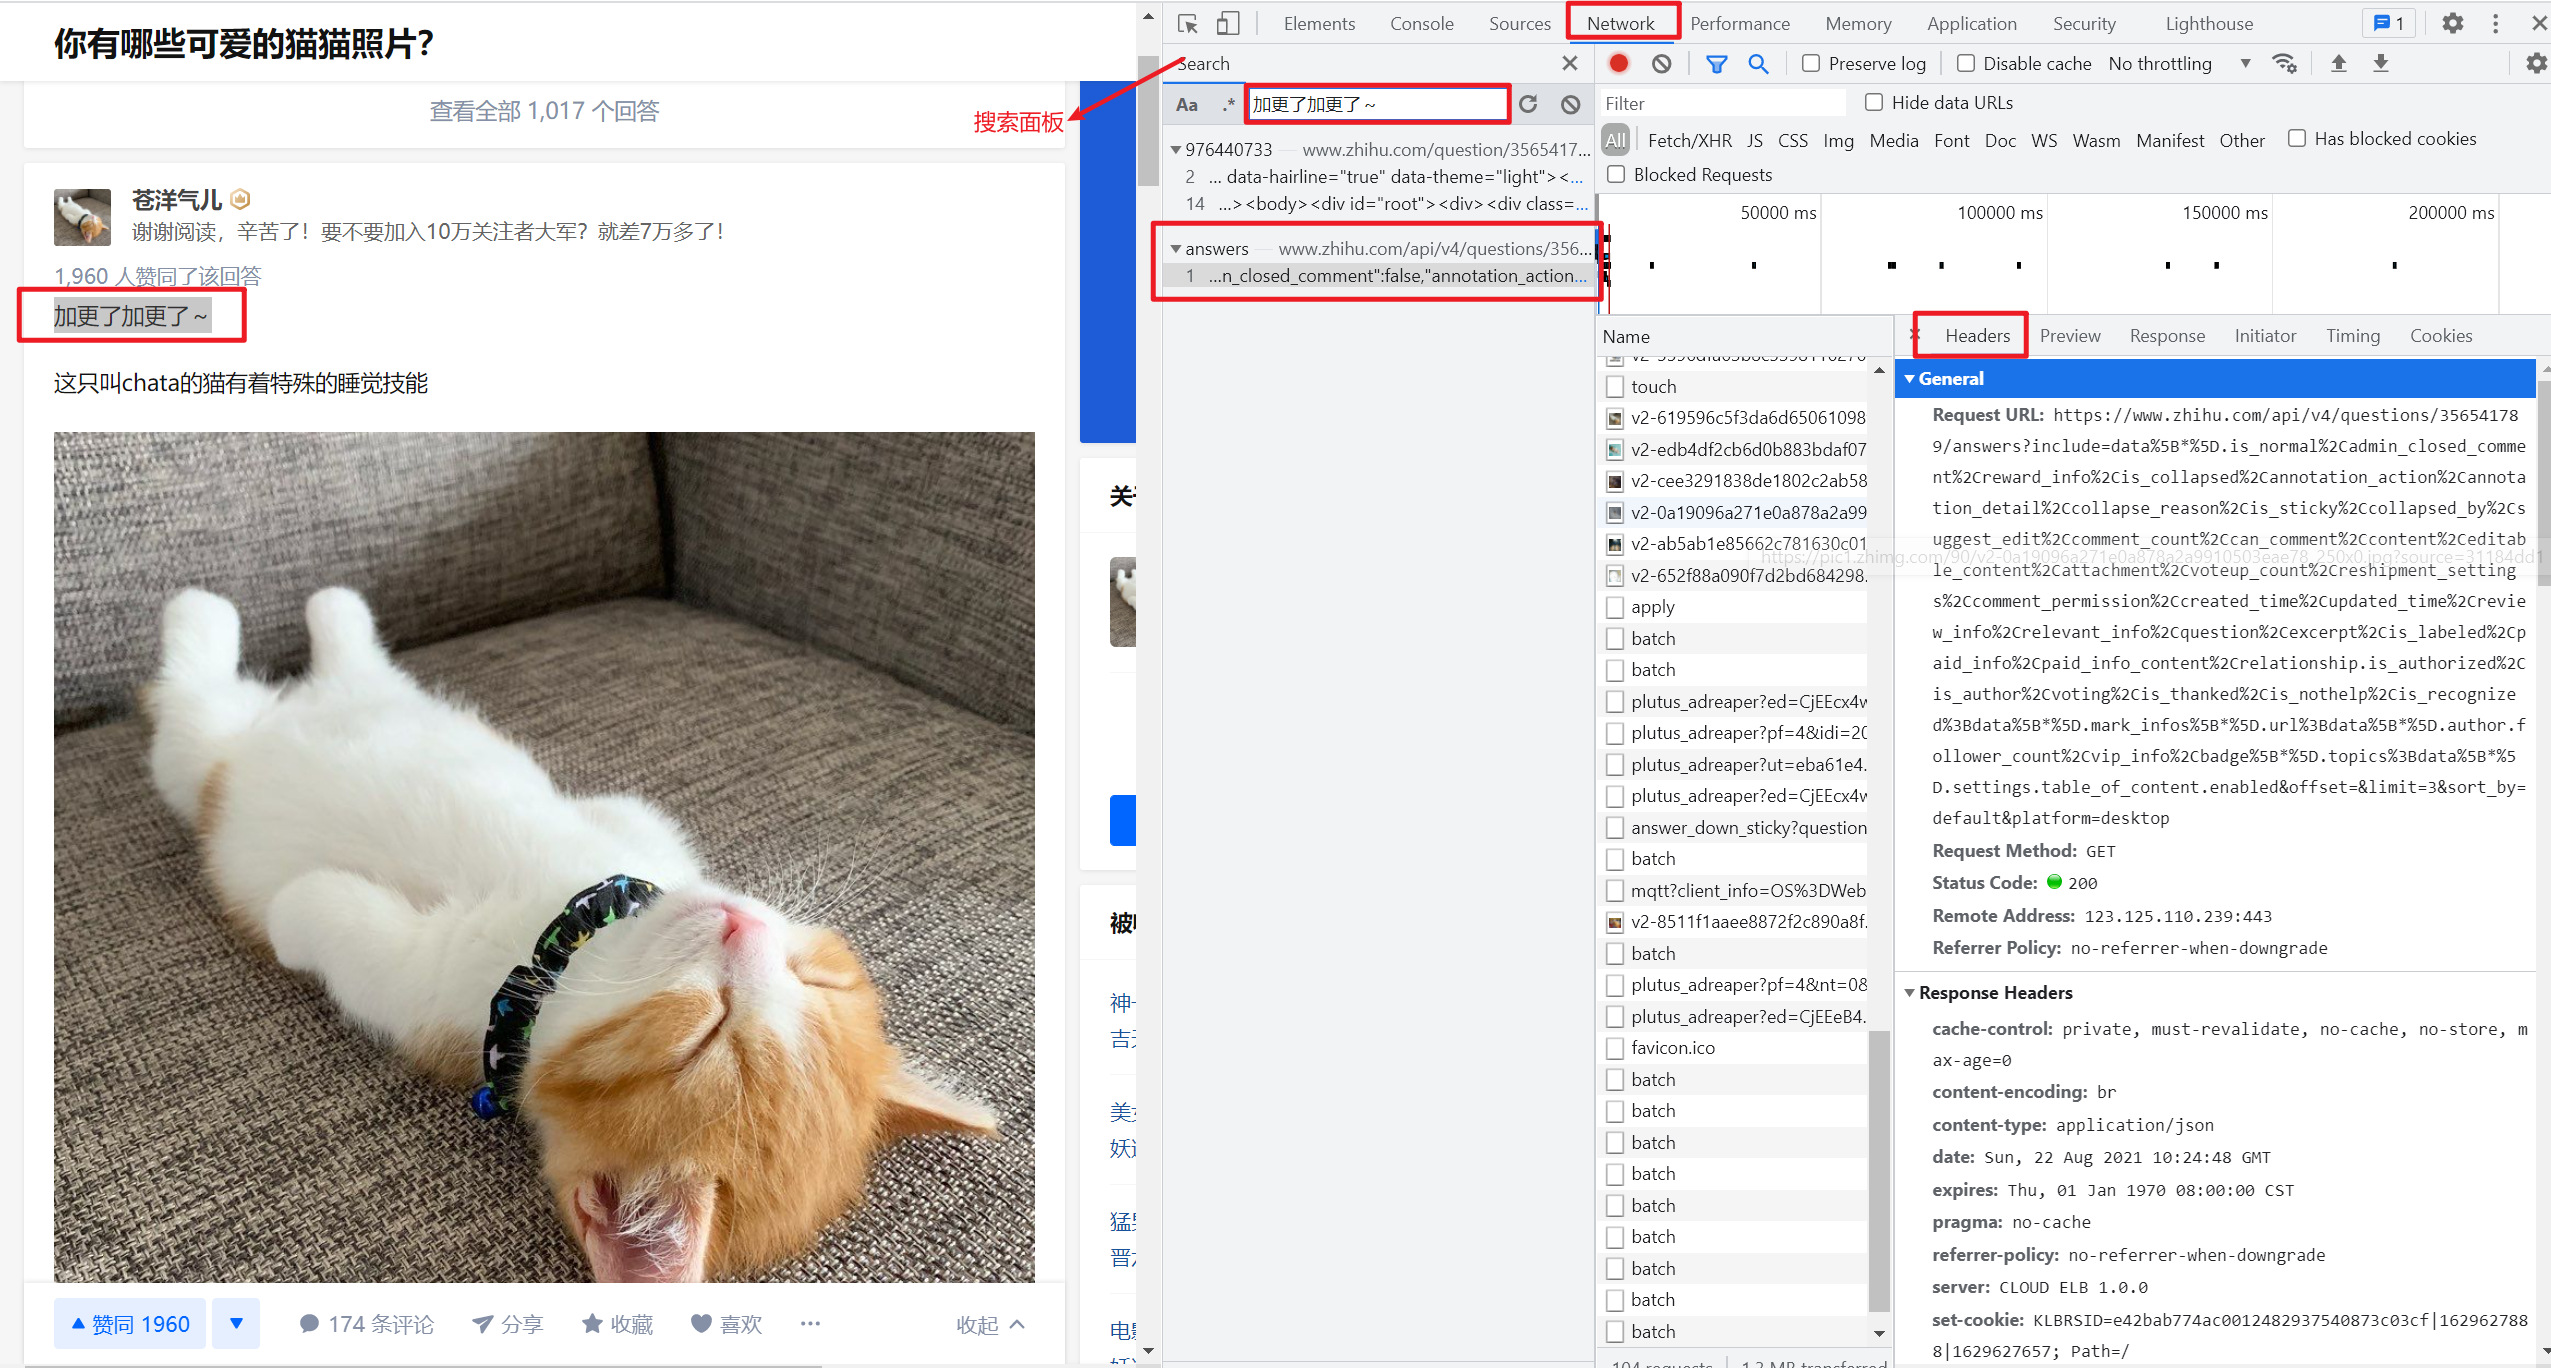
进入某个知乎问题的主页下,按F12打开开发者工具后查看network面板。
network面板可以查看页面向服务器请求的资源、资源的大小、加载资源花费的时间以及哪些资源加载失败等信息。还可以查看HTTP的请求头,返回内容等。
以“你有哪些可爱的猫猫照片?”问题为例,我们可以看到network面板如下:

按一下快捷键Ctrl + F在搜索面板中直接搜索对应的答案出现的文字,可以找到对应的目标url及其response:
安装对应的package,其他包都比较简单,需要注意的是python图像处理的包cv2安装命令如下:
pip install opencv-python
URL分析
1. 参数分析
我们刚才获取的URL如下:
https://www.zhihu.com/api/v4/questions/356541789/answers?include=data%5B*%5D.is_normal%2Cadmin_closed_comment%2Creward_info%2Cis_collapsed%2Cannotation_action%2Cannotation_detail%2Ccollapse_reason%2Cis_sticky%2Ccollapsed_by%2Csuggest_edit%2Ccomment_count%2Ccan_comment%2Ccontent%2Ceditable_content%2Cattachment%2Cvoteup_count%2Creshipment_settings%2Ccomment_permission%2Ccreated_time%2Cupdated_time%2Creview_info%2Crelevant_info%2Cquestion%2Cexcerpt%2Cis_labeled%2Cpaid_info%2Cpaid_info_content%2Crelationship.is_authorized%2Cis_author%2Cvoting%2Cis_thanked%2Cis_nothelp%2Cis_recognized%3Bdata%5B*%5D.mark_infos%5B*%5D.url%3Bdata%5B*%5D.author.follower_count%2Cvip_info%2Cbadge%5B*%5D.topics%3Bdata%5B*%5D.settings.table_of_content.enabled&offset=&limit=3&sort_by=default&platform=desktop
其中包含的参数为:
- limit: 一页显示的答案条数
- offset:页面的偏移量
- sort_by:答案的排序方式,支持默认排序或者按时间排序
2.解析Response
尝试着发一个请求并截获http response:
# python3

import requests

import json

if __name__ == '__main__':

    target_url = "https://www.zhihu.com/api/v4/questions/356541789/answers?include=data%5B*%5D.is_normal%2Cadmin_closed_comment%2Creward_info%2Cis_collapsed%2Cannotation_action%2Cannotation_detail%2Ccollapse_reason%2Cis_sticky%2Ccollapsed_by%2Csuggest_edit%2Ccomment_count%2Ccan_comment%2Ccontent%2Ceditable_content%2Cattachment%2Cvoteup_count%2Creshipment_settings%2Ccomment_permission%2Ccreated_time%2Cupdated_time%2Creview_info%2Crelevant_info%2Cquestion%2Cexcerpt%2Cis_labeled%2Cpaid_info%2Cpaid_info_content%2Crelationship.is_authorized%2Cis_author%2Cvoting%2Cis_thanked%2Cis_nothelp%2Cis_recognized%3Bdata%5B*%5D.mark_infos%5B*%5D.url%3Bdata%5B*%5D.author.follower_count%2Cvip_info%2Cbadge%5B*%5D.topics%3Bdata%5B*%5D.settings.table_of_content.enabled&offset=&limit=3&sort_by=default&platform=desktop"

    headers = {

        'user-agent': 'Mozilla/5.0 (Windows NT 10.0; Win64; x64) AppleWebKit/537.36 (KHTML, like Gecko) Chrome/72.0.3626.119 Safari/537.36',

    }

    response = requests.get(url = target_url, headers = headers)

    html = response.text

    print(html)
获取到的response如下,我们需要做的是找到所有图片对应的链接,使用Json工具解析后可以从http返回值json中找到图片所在的位置,后续就是通过爬虫解析到下载地址即可:

Tips:值得注意的是网站的返回值样式经常变动,而且不同网站返回值的组织样式也不一样,所以不可盲目借鉴。
3.获取所有答案url
仍然使用在“开发者工具中”查找答案关键字的方法,我们可以拿到多个答案对应的url,我们需要从这些url中找到规律:
https://www.zhihu.com/api/v4/questions/356541789/answers?include=data%5B%2A%5D.is_normal%2Cadmin_closed_comment%2Creward_info%2Cis_collapsed%2Cannotation_action%2Cannotation_detail%2Ccollapse_reason%2Cis_sticky%2Ccollapsed_by%2Csuggest_edit%2Ccomment_count%2Ccan_comment%2Ccontent%2Ceditable_content%2Cattachment%2Cvoteup_count%2Creshipment_settings%2Ccomment_permission%2Ccreated_time%2Cupdated_time%2Creview_info%2Crelevant_info%2Cquestion%2Cexcerpt%2Cis_labeled%2Cpaid_info%2Cpaid_info_content%2Crelationship.is_authorized%2Cis_author%2Cvoting%2Cis_thanked%2Cis_nothelp%2Cis_recognized%3Bdata%5B%2A%5D.mark_infos%5B%2A%5D.url%3Bdata%5B%2A%5D.author.follower_count%2Cvip_info%2Cbadge%5B%2A%5D.topics%3Bdata%5B%2A%5D.settings.table_of_content.enabled&limit=3&offset=3&platform=desktop&sort_by=default

https://www.zhihu.com/api/v4/questions/356541789/answers?include=data%5B%2A%5D.is_normal%2Cadmin_closed_comment%2Creward_info%2Cis_collapsed%2Cannotation_action%2Cannotation_detail%2Ccollapse_reason%2Cis_sticky%2Ccollapsed_by%2Csuggest_edit%2Ccomment_count%2Ccan_comment%2Ccontent%2Ceditable_content%2Cattachment%2Cvoteup_count%2Creshipment_settings%2Ccomment_permission%2Ccreated_time%2Cupdated_time%2Creview_info%2Crelevant_info%2Cquestion%2Cexcerpt%2Cis_labeled%2Cpaid_info%2Cpaid_info_content%2Crelationship.is_authorized%2Cis_author%2Cvoting%2Cis_thanked%2Cis_nothelp%2Cis_recognized%3Bdata%5B%2A%5D.mark_infos%5B%2A%5D.url%3Bdata%5B%2A%5D.author.follower_count%2Cvip_info%2Cbadge%5B%2A%5D.topics%3Bdata%5B%2A%5D.settings.table_of_content.enabled&limit=3&offset=0&platform=desktop&sort_by=default
尽管url的格式不尽相同,但是我发现基本都遵循如下格式,只需要变更offset参数即可
https://www.zhihu.com/api/v4/questions/356541789/answers?include=data%5B%2A%5D.is_normal%2Cadmin_closed_comment%2Creward_info%2Cis_collapsed%2Cannotation_action%2Cannotation_detail%2Ccollapse_reason%2Cis_sticky%2Ccollapsed_by%2Csuggest_edit%2Ccomment_count%2Ccan_comment%2Ccontent%2Ceditable_content%2Cattachment%2Cvoteup_count%2Creshipment_settings%2Ccomment_permission%2Ccreated_time%2Cupdated_time%2Creview_info%2Crelevant_info%2Cquestion%2Cexcerpt%2Cis_labeled%2Cpaid_info%2Cpaid_info_content%2Crelationship.is_authorized%2Cis_author%2Cvoting%2Cis_thanked%2Cis_nothelp%2Cis_recognized%3Bdata%5B%2A%5D.mark_infos%5B%2A%5D.url%3Bdata%5B%2A%5D.author.follower_count%2Cvip_info%2Cbadge%5B%2A%5D.topics%3Bdata%5B%2A%5D.settings.table_of_content.enabled&limit=3&offset=0&platform=desktop&sort_by=default
Code
1. 模拟请求
简单加上headers即可,知乎的校验没有其他网站来得严格,访问过于频繁时会限制访问一段时间,我这里简单使用随机请求头和代理IP来处理:
def get_http_content(number, offset):

    """读取知乎某问题下的答案url, 返回对应json

    Args:

        number: 知乎问题唯一标识

        offset: 偏移量

    """

    target_url = "https://www.zhihu.com/api/v4/questions/{number}/answers?include=data%5B*%5D.is_normal%2Cadmin_closed_comment%2" \

        "Creward_info%2Cis_collapsed%2Cannotation_action%2Cannotation_detail%2Ccollapse_reason%2Cis_sticky%2Ccollapsed_by%2" \

        "Csuggest_edit%2Ccomment_count%2Ccan_comment%2Ccontent%2Ceditable_content%2Cvoteup_count%2Creshipment_settings%2Ccomment_permission%2" \

        "Ccreated_time%2Cupdated_time%2Creview_info%2Crelevant_info%2Cquestion%2Cexcerpt%2Crelationship.is_authorized%2Cis_author%2Cvoting%2" \

        "Cis_thanked%2Cis_nothelp%2Cis_labeled%2Cis_recognized%2Cpaid_info%2Cpaid_info_content%3Bdata%5B*%5D.mark_infos%5B*%5D.url%3Bdata%5B*%5" \

        "D.author.follower_count%2Cbadge%5B*%5D.topics&offset={offset}&limit={limit}&sort_by=default&platform=desktop".format(

            number=number, offset=offset, limit=limit)

    logger.info("target_url:{}", target_url)

    headers = {

        'User-Agent': fake_useragent.get_random_useragent(),

    }

    ip = IPPool().get_random_key()

    proxies = {"http": "http://" + ip}

    response = requests.get(target_url, headers=headers, proxies=proxies)

    if (response is None) or (response.status_code != 200):

        logger.warning("http response is None, number={}, offset={}, status_code={}".format(

            number, offset, response.status_code))

        return None

    html = response.text

    return json.loads(html)
2. 解析出图片地址
def start_crawl():

    """开始爬虫获取图片

    """

    for i in range(0, max_pages):

        offset = limit * i

        logger.info("download pictures with offset {}". format(offset))

        # 获取html

        content_dict = get_http_content(number, offset)

        if content_dict is None:

            logger.error(

                "get http resp fail, number={} offset={}", number, offset)

            continue

        # content_dict['data']存储了答案列表

        if 'data' not in content_dict:

            logger.error("parse data from http resp fail, dict={}", dict)

            continue

        for answer_text in content_dict['data']:

            logger.info(

                "get pictures from answer: https://www.zhihu.com/question/{}/answer/{}", number, answer_text['id'])

            if 'content' not in answer_text:

                logger.error(

                    "parse content from answer text fail, text={}", answer_text)

                continue

            answer_content = pq(answer_text['content'])

            img_urls = answer_content.find('noscript').find('img')

            # 此篇问答不包含图片时打印对应信息, 方便debug

            if len(list(img_urls)) <= 0:

                logger.warning(

                    "this answer has no pictures, url:https://www.zhihu.com/question/{}/answer/{}", number, answer_text['id'])

                continue

            for img_url in img_urls.items():

                # src例子: https://pic2.zhimg.com/50/v2-c970108cd260ea095383627362c1d04f_720w.jpg?source=1940ef5c

                src = img_url.attr("src")

                # 解析出图片格式后缀: .jpeg 或者 .gif等

                source_index = src.rfind('?source')

                if source_index == -1:

                    logger.error("find source index fail, src:{} source_index{}",

                                 src, source_index)

                suffix = src[0:source_index]

                suffix_index = src.rfind('.')

                if source_index == -1:

                    logger.error("find suffix fail, src:{} suffix_index{}".format(

                        src, suffix_index))

                suffix = suffix[suffix_index:]

                logger.info("get picture url, src:{} suffix:{}", src, suffix)

                store_picture(src, suffix)

                time.sleep(1)
3. 将图片存储到本地
def store_picture(img_url, suffix):

    """将图片存储到文件夹中

    Args:

        img_url: 图片链接

        suffix: 图片后缀, 比如'.jpg', '.gif'等

    """

    headers = {

        'User-Agent': fake_useragent.get_random_useragent(),

    }

    ip = IPPool().get_random_key()

    proxies = {"http": "http://" + ip}

    http_resp = requests.get(img_url, headers=headers, proxies=proxies)

    if (http_resp is None) or (http_resp.status_code != 200):

        logger.warning("get http resp fail, url={} http_resp={}",

                       img_url, http_resp)

        return

    content = http_resp.content

    with open(f"{picture_path}/{uuid.uuid4()}{suffix}", 'wb') as f:

        f.write(content)
4. 去除图片水印
本来打算使用图像识别进行抠图去除水印的(因为知乎的水印比较简单而且样式统一),无奈最近需要处理的事情比较多,因此就简单通过opencv包进行裁剪:
def crop_watermark(ori_dir, adjusted_dir):

    """通过裁剪图片的方式来去除水印, 注意无法处理gif格式的图片

    Args:

        ori_dir: 图片所在的文件夹

        adjusted_dir: 去除水印后存放的文件夹

    """

    img_path_list = os.listdir(ori_dir)  # 获取目录下的所有文件

    total = len(img_path_list)

    cnt = 1

    for img_path in img_path_list:

        logger.info(

            "the overall process::{}/{}, now handle the picture:{}", cnt, total, img_path)

        img_abs_path = ori_dir + '/' + img_path

        img = cv2.imread(img_abs_path)

        if img is None:

            logger.error("cv2.imread fail, picture:{}", img_path)

            continue

        height, width = img.shape[0:2]

        cropped = img[0:height-40, 0:width]

        adjusted_img_abs_path = adjusted_dir + '/' + img_path

        cv2.imwrite(adjusted_img_abs_path, cropped)

        cnt += 1
写在最后
写这个程序主要还是为了学习html解析和锤炼一下python编程,虽然写完了之后回过头来看确实没啥值得称道的地方,就把代码放这里供大家一起参考了:
另外此程序的主要目的仅仅是将我搜集图片和剔除水印的过程自动化而已,还是再告诫大家一下不要因为爬虫给别人的服务器带来压力。
Reference
[1] https://www.cnblogs.com/jxlsblog/p/10445066.html
[Python]爬虫获取知乎某个问题下所有图片并去除水印的更多相关文章
- Python爬虫获取知乎图片
前段时间想抓点知乎问题中的图片,了解了下爬虫,发现还是Python的简单方便,于是做了点尝试. #coding=utf-8 import urllib import re def getHtml(ur ...
- python 爬虫必知必会
#python爬虫 #新闻数据 #机器学习:股票数据获取及分析 #网络搜索引擎的一个部件 #Http协议 #正则表达式 #多线程,分布式 #http报文展示 #Http 应答报文介绍 #1.应答码 # ...
- python爬虫获取下一页
from time import sleep import faker import requests from lxml import etree fake = faker.Faker() base ...
- 如何科学地蹭热点:用python爬虫获取热门微博评论并进行情感分析
前言:本文主要涉及知识点包括新浪微博爬虫.python对数据库的简单读写.简单的列表数据去重.简单的自然语言处理(snowNLP模块.机器学习).适合有一定编程基础,并对python有所了解的盆友阅读 ...
- Python爬虫获取异步加载站点pexels并下载图片(Python爬虫实战3)
1. 异步加载爬虫 对于静态页面爬虫很容易获取到站点的数据内容,然而静态页面需要全量加载站点的所有数据,对于网站的访问和带宽是巨大的挑战,对于高并发和大访问访问量的站点来说,需要使用AJAX相关的技术 ...
- Python爬取知乎单个问题下的回答
前言 本文的文字及图片来源于网络,仅供学习.交流使用,不具有任何商业用途,版权归原作者所有,如有问题请及时联系我们以作处理. 作者: 努力学习的渣渣哦 PS:如有需要Python学习资料的小伙伴可以加 ...
- 用 python 抓取知乎指定回答下的视频
前言 现在知乎允许上传视频,奈何不能下载视频,好气哦,无奈之下研究一下了,然后撸了代码,方便下载视频保存. 接下来以 猫为什么一点也不怕蛇? 回答为例,分享一下整个下载过程. 调试一下 打开 F12, ...
- python爬虫获取百度图片(没有精华,只为娱乐)
python3.7,爬虫技术,获取百度图片资源,msg为查询内容,cnt为查询的页数,大家快点来爬起来.注:现在只能爬取到百度的小图片,以后有大图片的方法,我会陆续发贴. #!/usr/bin/env ...
- Python爬虫获取迅雷会员帐号
代码如下: import re import urllib.request import urllib import time from collections import deque head = ...
随机推荐
- Tengine2.3+openssl1.1.1支持TLS1.3
安装包下载: openssl1.1.1 链接:https://pan.baidu.com/s/1-qCDhkLtlkT0fdwKdVuh2g 提取码:0ncc pcre3.2.1 链接:https:/ ...
- 用Python爬取《王者荣耀》英雄皮肤数据并可视化分析,用图说话
大家好,我是辰哥~ 今天辰哥带大家分析一波当前热门手游<王者荣耀>英雄皮肤,比如皮肤上线时间.皮肤类型(勇者:史诗:传说等).价格. 1.获取数据 数据来源于<王者荣耀官方网站> ...
- MySQL学习06(事务和索引)
事务 概述 什么是事务 事务就是将一组SQL语句放在同一批次内去执行 如果一个SQL语句出错,则该批次内的所有SQL都将被取消执行 MySQL事务处理只支持InnoDB和BDB数据表类型 事务的ACI ...
- Golang语言系列-02-常用数据类型
Go语言常用数据类型 Go 语言中有丰富的数据类型,除了基本的整型.浮点型.布尔型.字符串.byte/rune 之外, 还有数组.切片.函数.map.通道(channel).结构体等. Go语言的基本 ...
- MySQL索引篇之索引存储模型
本文重点介绍下索引的存储模型 二分查找 给定一个1~100的自然数,给你5次机会,你能猜中这个数字吗? 你会从多少开始猜? 为什么一定是50呢?这个就是二分查找的一种思想,也叫折半查找,每 ...
- Windows提权小结
摸鱼的时候,想想内网这部分还有什么地方适合水一下,翻翻往期,开始填坑 总结一下Windows提权的部分,以后有时间再补一下Linux提权 这仍然是一篇思路总结类的随笔,具体细节内容不展开,也展开不了. ...
- FTP三种访问模式
FTP匿名访问模式是比较不安全的服务模式,尤其在真实的工作环境中千万不要存放敏感的数据,以免泄露. vsftpd程序默认已经允许匿名访问模式,我们要做的就是开启匿名用户的上传和写入权限,写入下面的参数 ...
- Java MyEclipse:The type java.lang.CharSequence cannot be resolved. It is indirectly referen
从svn上下载项目后配置weblogic后启动报错: myeclipse The type java.lang.CharSequence cannot be resolved. It is indi ...
- 一文搞懂B树、B-树、B+树
前言 B树和B-树是同一种数据结构,如果不清楚的话,会被面试官忽悠,所以本文介绍两种数据结构,B树和B+树,废话不多数咱们开干. B树 介绍 在计算机科学中,B树是一种自平衡的树,能够保持数据有序.这 ...
- IOC概念和原理:BeanFactory 接口与ApplicationContext
IOC(概念和原理)1.什么是 IOC(1)控制反转,把对象创建和对象之间的调用过程,交给 Spring 进行管理(2)使用 IOC 目的:为了耦合度降低(3)做入门案例就是 IOC 实现2.IOC ...