springMVC+mybatis用户登录实例
1.整体结构
2.准备工作
数据库:
--Mysql 5.6
创建数据库 wolf
|
1
|
CREATE DATABASE wolf; |
创建用户表 user
|
1
2
3
4
5
6
|
create table user(id int AUTO_INCREMENT primary key,name varchar(25) not null,pwd varchar(20) not null,create_time date) |
向表中插入测试数据
|
1
2
3
4
|
insert into user(name,pwd,create_time) values("wangxin","123","2014-02-14");insert into user(name,pwd,create_time) values("Tom","123456","2014-02-14");insert into user(name,pwd,create_time) values("Jack","123","2014-02-14");insert into user(name,pwd,create_time) values("Bob","123","2014-02-14"); |
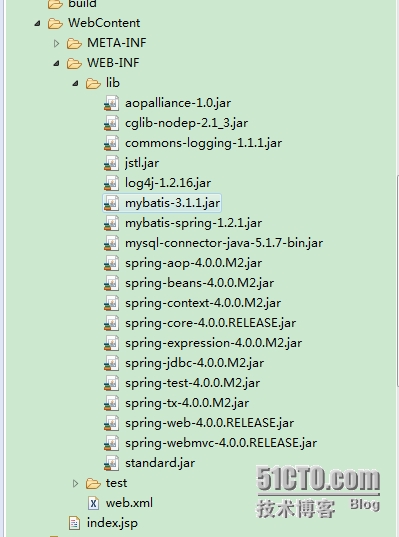
所需Jar包
我们先文字,后图吧 ,细心的你,看完所有内容会发现,这里的东西在哪里也有哦,别想多了,肯定在这里,你猜猜猜..
jar:
1.驱动:mysql-connector-java-5.1.7-bin.jar
2.jstl 的
jstl.jar
standard.jar
3.spring 的
spring-aop-4.0.0.M2.jar
spring-beans-4.0.0.M2.jar
spring-context-4.0.0.M2.jar
spring-core-4.0.0.M2.jar
(若出现问题,可以替换 spring-core-4.0.0.RELEASE.jar)
spring-expression-4.0.0.M2.jar
spring-jdbc-4.0.0.M2.jar
spring-test-4.0.0.M2.jar
spring-tx-4.0.0.M2.jar
4.mybatis 的
mybatis-3.1.1.jar
log4j-1.2.16.jar
mybatis-spring-1.2.1.jar
5.以及spring-depend
aopalliance-1.0.jar
cglib-nodep-2.1_3.jar
commons-logging-1.1.1.jar
6.web 相关的
spring-web-4.0.0.RELEASE.jar
spring-webmvc-4.0.0.RELEASE.jar
下面是jar包在项目中的结构图
3.项目代码及简析
Bean类
User.java
|
1
2
3
4
5
6
7
8
9
10
11
12
13
14
15
16
17
18
19
20
21
22
23
24
25
26
27
28
29
30
31
32
33
34
35
36
37
38
39
40
41
42
43
44
45
46
47
48
49
50
51
52
53
54
55
56
57
58
59
60
61
62
63
64
65
66
67
68
69
70
71
72
|
package com.springmvc_mybatis.bean;import java.io.Serializable;import java.util.Date;import org.springframework.format.annotation.DateTimeFormat;public class User implements Serializable { private static final long serialVersionUID = 1L; private Integer id; private String name; private String password; @DateTimeFormat(pattern = "yyyy-MM-dd") private Date time; public User() { super(); } public User(String name, String password) { super(); this.name = name; this.password = password; } public User(Integer id, String name, String password, Date time) { super(); this.id = id; this.name = name; this.password = password; this.time = time; } public Integer getId() { return id; } public void setId(Integer id) { this.id = id; } public String getName() { return name; } public void setName(String name) { this.name = name; } public String getPassword() { return password; } public void setPassword(String password) { this.password = password; } public Date getTime() { return time; } public void setTime(Date time) { this.time = time; } @Override public String toString() { return "User [id=" + id + ", name=" + name + ", password=" + password + ", time=" + time + "]"; }} |
接口(如果你用了mappers 那么接口以及配置文件最后都带有Mapper,且名字一致)
UserMapper.java
|
1
2
3
4
5
6
7
8
9
10
11
12
13
14
|
package com.springmvc_mybatis.mapper;import java.util.List;import org.apache.ibatis.annotations.Param;import com.springmvc_mybatis.bean.User;//userMapper只能传入一个参数,多个的话需要注解public interface UserMapper { // value 必须与Bean 属性一致! User login(@Param(value = "name") String name, @Param(value = "password") String password); List<User> getAllUsers();} |
UserMapper.xml
|
1
2
3
4
5
6
7
8
9
10
11
12
13
14
15
16
17
18
19
20
21
22
23
|
<?xml version="1.0" encoding="UTF-8" ?><!DOCTYPE mapper PUBLIC "-//mybatis.org//DTD Mapper 3.0//EN" "http://mybatis.org/dtd/mybatis-3-mapper.dtd"><mapper namespace="com.springmvc_mybatis.mapper.UserMapper"> <resultMap type="User" id="userResult"> <result column="id" property="id" /> <result column="name" property="name" /> <result column="pwd" property="password" /> <result column="create_time" property="time" /> </resultMap> <select id="login" resultMap="userResult"> select * from user where name=#{name} and pwd=#{password} </select> <select id="getAllUsers" resultMap="userResult"> select * from user </select></mapper><!-- error ,,,,resultMap wrong to resultType... --> |
下面该干嘛了?╮(╯▽╰)╭好吧,我们先来配置下在木有服务器的环境下,看看Mybatis是否能正确运行。
所以我们先来配置哪个呢?
哦是她,
spring 配置
beans_wolf.xml 哈哈,wolf 哦,够那个啥吧。。。
|
1
2
3
4
5
6
7
8
9
10
11
12
13
14
15
16
17
18
19
20
21
22
23
24
25
26
27
28
29
30
31
32
33
34
35
36
37
38
39
40
41
42
43
44
45
46
47
48
|
<?xml version="1.0" encoding="UTF-8"?><beans xmlns="http://www.springframework.org/schema/beans" xmlns:xsi="http://www.w3.org/2001/XMLSchema-instance" xmlns:p="http://www.springframework.org/schema/p" xmlns:context="http://www.springframework.org/schema/context" xmlns:tx="http://www.springframework.org/schema/tx" xsi:schemaLocation=" http://www.springframework.org/schema/beans http://www.springframework.org/schema/beans/spring-beans-3.2.xsd http://www.springframework.org/schema/context http://www.springframework.org/schema/context/spring-context-3.2.xsd http://www.springframework.org/schema/tx http://www.springframework.org/schema/tx/spring-tx-3.2.xsd"> <!-- 1. 数据源 : DriverManagerDataSource --> <bean id="datasource" class="org.springframework.jdbc.datasource.DriverManagerDataSource"> <property name="driverClassName" value="com.mysql.jdbc.Driver"/> <property name="url" value="jdbc:mysql://localhost:3307/wolf"/> <property name="username" value="root"/> <property name="password" value="root"/> </bean> <!-- 2. mybatis的SqlSession的工厂: SqlSessionFactoryBean dataSource / typeAliasesPackage --> <bean id="sqlSessionFactory" class="org.mybatis.spring.SqlSessionFactoryBean"> <property name="dataSource" ref="datasource"/> <property name="typeAliasesPackage" value="com.springmvc_mybatis.bean"/> <property name="configLocation" value="classpath:mybatis-config.xml" /> </bean> <!-- 3. mybatis自动扫描加载Sql映射文件 : MapperScannerConfigurer sqlSessionFactory / basePackage --> <bean class="org.mybatis.spring.mapper.MapperScannerConfigurer"> <property name="basePackage" value="com.springmvc_mybatis.mapper"/> <property name="sqlSessionFactory" ref="sqlSessionFactory"/> </bean> <!-- 4. 事务管理 : DataSourceTransactionManager --> <bean id="manager" class="org.springframework.jdbc.datasource.DataSourceTransactionManager"> <property name="dataSource" ref="datasource"/> </bean> <!-- 5. 使用声明式事务 --> <tx:annotation-driven transaction-manager="manager" /></beans> |
Spring 基本配置都在上面咯,数据库如果想读入配置文件的话,自己新建属性文件配置下下了
哦,差点过了,现在我们就可以来测试下咯,后面的mvc配置主要是为web服务的哈,不急!!
TestSimpleMyBatis.java
|
1
2
3
4
5
6
7
8
9
10
11
12
13
14
15
16
17
18
19
20
21
22
23
24
25
26
27
28
29
30
31
32
33
34
35
36
37
38
39
40
41
|
package com.springmvc_mybatis.test;import java.util.List;import org.junit.Test;import org.junit.runner.RunWith;import org.springframework.beans.factory.annotation.Autowired;import org.springframework.test.context.ContextConfiguration;import org.springframework.test.context.junit4.SpringJUnit4ClassRunner;import com.springmvc_mybatis.bean.User;import com.springmvc_mybatis.mapper.UserMapper;@RunWith(SpringJUnit4ClassRunner.class)@ContextConfiguration("/beans_wolf.xml")public class TestSimpleMyBatis { @Autowired private UserMapper userMapper; @Test public void findAll() { List<User> users = userMapper.getAllUsers(); System.out.println(users); } @Test public void login() { // User user = new User(null, "wx", "123456", new Date()); // User user = new User(null, "wangxin", "123456", new Date()); // User loginExit = userMapper.login(user); // User loginExit = userMapper.login("wx", "123456"); User loginExit = userMapper.login("wangxin", "123456"); if (loginExit == null) { System.out.println("用户不存在"); } else { System.out.println(loginExit); System.out.println("登录成功!"); } }} |
如果你成功了,恭喜你可以继续咯!如果出现问题那么尝试在配置一个哈,
mybatis-config.xml,特意把她放到下下个咯,就看你细心嘛
Let`s go...
applicationContext-mvc.xml
|
1
2
3
4
5
6
7
8
9
10
11
12
13
14
15
16
17
18
19
20
21
22
23
24
|
<?xml version="1.0" encoding="UTF-8"?><beans xmlns="http://www.springframework.org/schema/beans" xmlns:xsi="http://www.w3.org/2001/XMLSchema-instance" xmlns:context="http://www.springframework.org/schema/context" xmlns:mvc="http://www.springframework.org/schema/mvc" xsi:schemaLocation=" http://www.springframework.org/schema/beans http://www.springframework.org/schema/beans/spring-beans-3.0.xsd http://www.springframework.org/schema/context http://www.springframework.org/schema/context/spring-context-3.0.xsd http://www.springframework.org/schema/mvc http://www.springframework.org/schema/mvc/spring-mvc-3.0.xsd"> <!-- Scans the classpath of this application for @Components to deploy as beans --> <context:component-scan base-package="com.springmvc_mybatis.controller" /> <!-- Configures the @Controller programming model --> <mvc:annotation-driven /> <!-- Resolves view names to protected .jsp resources within the /WEB-INF/views directory --> <bean id="viewResolver" class="org.springframework.web.servlet.view.InternalResourceViewResolver"> <property name="prefix" value="/WEB-INF/test/" /> <property name="suffix" value=".jsp" /> </bean></beans> |
mybatis-config.xml
|
1
2
3
4
5
6
7
8
9
10
11
12
13
14
15
16
17
18
|
<?xml version="1.0" encoding="UTF-8" ?><!DOCTYPE configuration PUBLIC "-//mybatis.org//DTD Config 3.0//EN" "http://mybatis.org/dtd/mybatis-3-config.dtd"><configuration> <!-- Spring整合myBatis后,这个配置文件基本可以不要了 --> <!-- 设置外部配置文件 --> <!-- 设置类别名 --> <typeAliases> <typeAlias type="com.springmvc_mybatis.bean.User" alias="User" /></typeAliases> <!-- 设置数据库连接环境 --> <!-- 映射文件 --> <mappers> <mapper resource="com/springmvc_mybatis/mapper/userMapper.xml" /> </mappers></configuration> |
到此配置工作基本完成了,为了页面数据提交和查找,再弄个Handler吧,这个也可以叫做Controller吧,反正都是流程数据处理的哈
UserController.java
|
1
2
3
4
5
6
7
8
9
10
11
12
13
14
15
16
17
18
19
20
21
22
23
24
25
26
27
28
29
30
31
32
33
34
35
36
37
38
39
40
41
42
43
44
45
46
|
package com.springmvc_mybatis.controller;import java.util.List;import javax.servlet.http.HttpServletRequest;import org.springframework.beans.factory.annotation.Autowired;import org.springframework.stereotype.Controller;import org.springframework.ui.Model;import org.springframework.web.bind.annotation.RequestMapping;import com.springmvc_mybatis.bean.User;import com.springmvc_mybatis.mapper.UserMapper;@Controller@RequestMapping("/user")public class UserController { @Autowired private UserMapper usermapper; @RequestMapping("/login") public String login(HttpServletRequest request, Model model) { String name = request.getParameter("username"); String password = request.getParameter("password"); System.out.println("login"); User user_login = usermapper.login(name, password); System.out.println(user_login); if (user_login == null) { System.out.println("Error login!"); return "fail"; } else { model.addAttribute("user", user_login); return "success"; } } @RequestMapping("/list") public String getAllUsers(Model model) { List<User> users = usermapper.getAllUsers(); model.addAttribute("users", users); System.out.println(users); return "list"; }} |
下面我们该弄什么咯???
前端显示了,当然是。
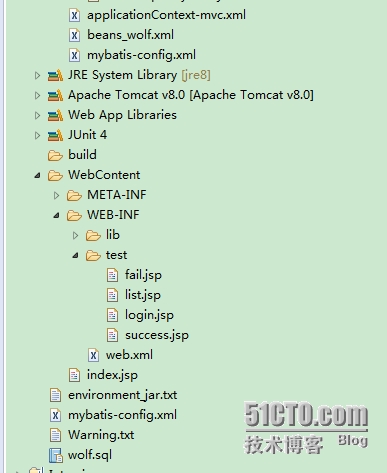
先给出结构图吧,挺简单的!
你,你,看到了神马 ,jre8,Tomcat 8 ,
神啊,你未来来的吧,我还在5,啊,6啊,7都少用,你都,,,,,
WEB
index.jsp
|
1
|
<jsp:forward page="/WEB-INF/test/login.jsp"></jsp:forward> |
 这么长啊,我的神。。。
login.jsp
|
1
2
3
4
5
6
7
8
9
10
11
12
13
14
15
16
17
18
19
20
21
22
23
24
25
26
|
<%@ page language="java" contentType="text/html; charset=UTF-8" pageEncoding="UTF-8"%><!DOCTYPE html PUBLIC "-//W3C//DTD HTML 4.01 Transitional//EN" "http://www.w3.org/TR/html4/loose.dtd"><html><head><meta http-equiv="Content-Type" content="text/html; charset=UTF-8"><title>login</title></head><body> <form action="user/login.action" method="post"> <table align="left"> <tr> <td>用户名:</td> <td><input id="userName" type="text" name="username"></td> </tr> <tr> <td>密码:</td> <td><input id="password" type="password" name="password"></td> </tr> <tr> <td><button type="submit" name="Submit">登录</button></td> </tr> </table> </form></body></html> |
success.jsp 登录成功
|
1
2
3
4
5
6
7
8
9
10
11
12
13
14
15
16
|
<%@ page language="java" contentType="text/html; charset=UTF-8" pageEncoding="UTF-8"%><!DOCTYPE html PUBLIC "-//W3C//DTD HTML 4.01 Transitional//EN" "http://www.w3.org/TR/html4/loose.dtd"><html><head><meta http-equiv="Content-Type" content="text/html; charset=UTF-8"><title>Success</title></head><body> Welcome <font color="red">${requestScope.user.name} </font>! <br> <br> <a href="list.action">用户信息列表</a></body></html> |
fail.jsp
|
1
2
3
4
5
6
7
8
9
10
11
12
13
14
15
16
17
18
|
<%@ page language="java" contentType="text/html; charset=UTF-8" pageEncoding="UTF-8"%><!DOCTYPE html PUBLIC "-//W3C//DTD HTML 4.01 Transitional//EN" "http://www.w3.org/TR/html4/loose.dtd"><html><head><meta http-equiv="Content-Type" content="text/html; charset=UTF-8"><title>Insert title here</title></head><body> <h3> <font color="red">fail login!</font> </h3> <h2> <a href="${pageContext.request.contextPath}">return the Login Page!</a> </h2></body></html> |
list.jsp
|
1
2
3
4
5
6
7
8
9
10
11
12
13
14
15
16
17
18
19
20
21
22
23
24
25
26
27
28
29
30
31
32
33
34
35
36
37
38
39
40
41
42
43
44
45
46
47
48
|
<%@ page language="java" contentType="text/html; charset=UTF-8" pageEncoding="UTF-8"%><%@ taglib prefix="c" uri="http://java.sun.com/jsp/jstl/core"%><%@taglib prefix="fmt" uri="http://java.sun.com/jsp/jstl/fmt"%><%@taglib prefix="spring" uri="http://www.springframework.org/tags"%><!DOCTYPE html PUBLIC "-//W3C//DTD HTML 4.01 Transitional//EN" "http://www.w3.org/TR/html4/loose.dtd"><html><head><meta http-equiv="Content-Type" content="text/html; charset=UTF-8"><title>Insert title here</title></head><body> <c:if test="${empty requestScope.users }"> <font color="red">没有员工信息!</font> </c:if> <c:if test="${!(empty requestScope.users)}"> <table border="1" cellpadding="10" cellspacing="0"> <tr> <th>Num</th> <th>Id</th> <th>Name</th> <th>Create_Time</th> <th>Password</th> <th colspan="2">OP</th> </tr> <c:forEach items="${requestScope.users }" var="user" varStatus="s"> <tr> <td>${s.count}</td> <td>${user.id}</td> <td>${user.name }</td> <td><fmt:formatDate value="${user.time}" pattern="yyyy-MM-dd" /> </td> <td>${user.password}</td> <td><a onclick="return false" href="${pageContext.request.contextPath}/user/save.action?id=${user.id}"><font color="blue">edit</font></a></td> <td><a onclick="return false" href="${pageContext.request.contextPath}/user/delete/${user.id}.action"><font color="blue">delete</font></a></td> </tr> </c:forEach> </table> </c:if> <br> <a href="${pageContext.request.contextPath}">goto login</a></body></html> |
页面终于完蛋了,,但是能运行吗????????
好像少了个吧
web.xml
|
1
2
3
4
5
6
7
8
9
10
11
12
13
14
15
16
17
18
19
20
21
22
23
24
25
26
27
|
<?xml version="1.0" encoding="UTF-8"?><web-app xmlns:xsi="http://www.w3.org/2001/XMLSchema-instance" xmlns="http://java.sun.com/xml/ns/javaee" xsi:schemaLocation="http://java.sun.com/xml/ns/javaee http://java.sun.com/xml/ns/javaee/web-app_2_5.xsd" id="WebApp_ID" version="2.5"> <display-name>Demo_SpringMVC_MyBatis</display-name> <context-param> <param-name>contextConfigLocation</param-name> <param-value>classpath:beans_wolf.xml</param-value> </context-param> <listener> <listener-class>org.springframework.web.context.ContextLoaderListener</listener-class> </listener> <servlet> <servlet-name>springDispatcherServlet</servlet-name> <servlet-class>org.springframework.web.servlet.DispatcherServlet</servlet-class> <init-param> <param-name>contextConfigLocation</param-name> <param-value>classpath:applicationContext-mvc.xml</param-value> </init-param> <load-on-startup>1</load-on-startup> </servlet> <servlet-mapping> <servlet-name>springDispatcherServlet</servlet-name> <url-pattern>*.action</url-pattern> </servlet-mapping></web-app> |
至此完工了,终于!

4.其他
下面简单说下项目中的xml文件哦
XML文件
|
1
2
3
4
5
6
7
8
9
10
11
12
13
14
15
16
17
18
19
20
21
22
23
24
25
26
27
28
29
30
31
32
33
34
35
36
37
38
39
40
41
42
43
44
45
46
47
48
49
|
1.Spring基本的ApplicationContext.xml 本例中用的是 beans_wolf.xml(名字一定要注意,尽量用前面的) 配置了: <!-- 1. 数据源 : DriverManagerDataSource --> <!-- 2. mybatis的SqlSession的工厂: SqlSessionFactoryBean dataSource / typeAliasesPackage --> <!-- 3. mybatis自动扫描加载Sql映射文件 : MapperScannerConfigurer sqlSessionFactory / basePackage /configLocation--> <!-- 4. 事务管理 : DataSourceTransactionManager --> <!-- 5. 使用声明式事务 --> 其中配置了数据库的具体信息,所以不在另外用属性文件了! 2.Spring MVC 的applicationContext-mvc.xml 配置了:自动扫描包,注解驱动,视图解析器 3.mybatis-config.xml 这个具体配置根据你的实际来弄! 4.web.xml 配置了: <!-- needed for ContextLoaderListener --> <context-param> <param-name>contextConfigLocation</param-name> <param-value>classpath:beans_wolf.xml</param-value> </context-param> <!-- Bootstraps the root web application context before servlet initialization --> <listener> <listener-class> org.springframework.web.context.ContextLoaderListener </listener-class> </listener> <!-- DispatcherServlet--> <servlet> <servlet-name>springDispatcherServlet</servlet-name> <servlet-class> org.springframework.web.servlet.DispatcherServlet </servlet-class> <init-param> <!-- 配置 SpringMVC 配置文件的位置 --> <param-name>contextConfigLocation</param-name> <param-value>classpath:applicationContext-mvc.xml</param-value> </init-param> <load-on-startup>1</load-on-startup> </servlet> <servlet-mapping> <servlet-name>springDispatcherServlet</servlet-name> <!-- 配置什么样的请求交由 SpringMVC 处理 --> <url-pattern>*.action</url-pattern></servlet-mapping> |
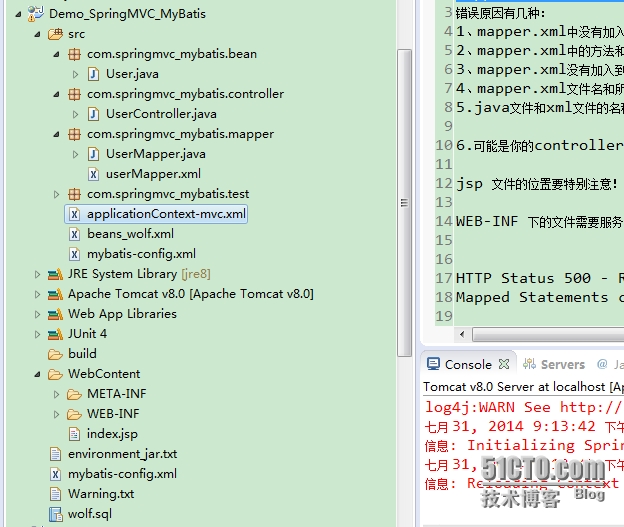
遇到的一个很不咋地的问题
HTTP Status 500 - Request processing failed; nested exception is java.lang.IllegalArgumentException:
Mapped Statements collection does not contain value for com.springmvc_mybatis.mapper.UserMapper.login
!!!少了这个<property name="configLocation" value="classpath:mybatis-config.xml" />
|
1
2
3
4
5
|
<bean id="sqlSessionFactory" class="org.mybatis.spring.SqlSessionFactoryBean"><property name="dataSource" ref="datasource"/><property name="typeAliasesPackage" value="com.springmvc_mybatis.bean"/><property name="configLocation" value="classpath:mybatis-config.xml" /></bean> |
网友的一些问题及解决方法。。。
|
1
2
3
4
5
6
7
8
|
Mapped Statements collection does not contain value for后面是什么类什么方法之类的: 错误原因有几种: 1、mapper.xml中没有加入namespace !!!!2、mapper.xml中的方法和接口mapper的方法不对应 !!!3、mapper.xml没有加入到mybatis-config.xml中(即总的配置文件),例外:配置了mapper文件的包路径的除外 !!!4、mapper.xml文件名和所写的mapper名称不相同。 !!5.java文件和xml文件的名称不一致 !6.可能是你的controller 或者说是handler 有问题!! |
另外:jsp 文件的位置要特别注意! index,一般在WebContent下!!!
那个xml文件出现问题一般是你的dtd约束,taglib等没弄好,自己细细品味下嘛,不知道度娘娘,实在不行在一起讨论哦!
5.完整Demo项目下载地址
|
|
| SpringMVC MyBatis 相关jar包下载 |

如果无法下载,请留言索取,因为上传可能出现问题!
水平不咋地,就爱瞎折腾,欢迎大家一起折腾( ⊙ o ⊙ )啊!
springMVC+mybatis用户登录实例的更多相关文章
- SpringMVC实现用户登录实例
今天分享一下SpringMVC的一个登陆小案例 准备工作 创建一个Dynamic Web Project(本人是Eclipse) 添加相关的jar包,构建路径 创建springMVC-servlet. ...
- Django:用户登录实例
Django:用户登录实例 一.源代码 1,login.html代码(登录界面): <!DOCTYPE html> <html lang="zh-CN"> ...
- 基于Servlet的MVC模式用户登录实例
关于MVC模式的简单解释 M Model,模型层,例如登录实例中,用于处理登录操作的类: V View,视图层,用于展示以及与用户交互.使用html.js.css.jsp.jQuery等前端技术实现: ...
- Servlet——简单用户登录实例+http协议解析
编写项目.用户登录系统1.0版本号 登录界面Servlet: package com.gavin.view; import java.io.IOException; import java.io.Pr ...
- centos7 设置grub密码及单用户登录实例
centos7与centos6在设置grub密码的操作步骤上有很大的差别,特此记录供以后查用 grub加密的目的: 防止不法分子利用单用户模式修改root密码 给grub加密可以采用明文或者加密的密文 ...
- springmvc+mybatis 实现登录、注册、邮件激活等功能
原创作品, 转载请注明来源
- Jmeter服务器性能压测-用户登录实例CSV方式
为什么用CSV方式压测,因为用jdbc链接数据库,我发现数据库数据量量大的情况下,Jmeter会内存溢出 第一步:数据准备,根据登录接口需要的参数准备测试数据 例子中,测试的登录接口需要4个参数化数据 ...
- 使用Spring框架实现用户登录实例
以下要讲的案例来自于<Spring 3.X 企业应用开发实战>这本书. 针对我一周的摸索,现在总结几个易错点,当然,这是在我自己犯过错误的前提下总结出来的,如果有说的不到位的地方,欢迎大家 ...
- Django之用户登录实例
1,django目录结构(需要用到的文件用红箭头标记): 2,首先在templates模版目录下创建login.html文件 3,将bootstrap导入到static/plugins目录下 PS ...
随机推荐
- Vue + vue-router
搞了一天的element-ui,vue-router,把侧栏的导航菜单搞了出来后,试着在菜单上加入链接,研究了下官方提供的文档,发现要使用vue-route. 在项目中安装好vue-route, 对照 ...
- AngularJs学习笔记1——入门知识
1.什么是AngularJs AngularJs 诞生于2009年,由Misko Hevery 等人创建,后被Google收购,是一个优秀的Js框架,用于SPA(single pag ...
- MongoDB 操作手冊CRUD插入
插入操作 插入记录 1.插入一条记录 db.testData.insert({num:1,name:'a'}); 结果 WriteResult({ "nInserted" : 1 ...
- QtWebkit2.2.0 HTML5.0支持情况
Canvas: 支持element, 2d context以及文本 解析规则:支持 HTML5 tokenizer/tree building, SVG in text/html, MathML ...
- sql 根据时间获取数据
获取当月数据 MONTH(时间字段)=MONTH(GETDATE()) and year(时间字段)=year(GETDATE()) 计算两个时间差了多少分钟 DATEDIFF(mi,'7:00',c ...
- webrtc之视频显示模块--video_render
在上一篇博文中,简单介绍了webrtc为我们提供了跨平台的视频采集模块,这篇博文也简单介绍下webrtc为我们提供的跨平台的视频显示模块:video_render. 该模块的源码结构如下: 如上图,我 ...
- BZOJ4195 NOI2015 程序自动分析
4195: [Noi2015]程序自动分析 Time Limit: 10 Sec Memory Limit: 512 MB Description 在实现程序自动分析的过程中,常常需要判定一些约束条件 ...
- c++11 auto
auto 关键字指示编译器使用已声明变量的初始化表达式或 lambda 表达式参数来推导其类型. 在大多情况下,建议您使用 auto 关键字(除非您确实需要转换),因为此关键字可提供以下好处: 可靠性 ...
- OpenCV-ubuntu-install
1.安装一些依赖库 sudo apt-get install build-essential libgtk2.0-dev libavcodec-dev libavformat-dev libjpeg6 ...
- poj 1037 A decorative fence
题目链接:http://poj.org/problem?id=1037 Description Richard just finished building his new house. Now th ...