消息队列(四)--- RocketMQ-消息发送
概述
RocketMQ 发送普通消息有三种
- 可靠同步发送
- 可靠异步发送
- 单向(oneway)发送 :只管发送,直接返回,不等待消息服务器的结果,也不注册回调函数,简单地说,就是只管发,不管信息是否发送到了消息服务器中。
发送消息示例
        /*

         * Instantiate with a producer group name.

         */

        DefaultMQProducer producer = new DefaultMQProducer("please_rename_unique_group_name");

        /*

         * Specify name server addresses.

         * <p/>

         *

         * Alternatively, you may specify name server addresses via exporting environmental variable: NAMESRV_ADDR

         * <pre>

         * {@code

         * producer.setNamesrvAddr("name-server1-ip:9876;name-server2-ip:9876");

         * }

         * </pre>

         */

        /*

         * Launch the instance.

         */

        producer.start();

        for (int i = 0; i < 1000; i++) {

            try {

                /*

                 * Create a message instance, specifying topic, tag and message body.

                 */

                Message msg = new Message("TopicTest" /* Topic */,

                    "TagA" /* Tag */,

                    ("Hello RocketMQ " + i).getBytes(RemotingHelper.DEFAULT_CHARSET) /* Message body */

                );

                /*

                 * Call send message to deliver message to one of brokers.

                 */

                SendResult sendResult = producer.send(msg);

                System.out.printf("%s%n", sendResult);

            } catch (Exception e) {

                e.printStackTrace();

                Thread.sleep(1000);

            }

        }

        /*

         * Shut down once the producer instance is not longer in use.

         */

        producer.shutdown();
可以看到创建一个 DefaultMQProducer ,之后调用 start 方法后就可以使用send 方法发送消息了。
源码阅读
来看一下 Message 的结构,几个字段的作用
- topic : 主题
- tag : 用于消息过滤
- key : Message 索引键,RocketMQ可以利用这些key快速检索到消息。
- body: 消息内容
public class Message implements Serializable {

    private static final long serialVersionUID = 8445773977080406428L;

    private String topic;

    private int flag;

    private Map<String, String> properties;

    private byte[] body;

    public Message(String topic, String tags, String keys, int flag, byte[] body, boolean waitStoreMsgOK) {

        this.topic = topic;

        this.flag = flag;

        this.body = body;

        if (tags != null && tags.length() > 0)

            this.setTags(tags);

        if (keys != null && keys.length() > 0)

            this.setKeys(keys);

        this.setWaitStoreMsgOK(waitStoreMsgOK);

    }

    public void setWaitStoreMsgOK(boolean waitStoreMsgOK) {

        this.putProperty(MessageConst.PROPERTY_WAIT_STORE_MSG_OK, Boolean.toString(waitStoreMsgOK));

    }

    ...

    ...

}
DefaultMQProducer
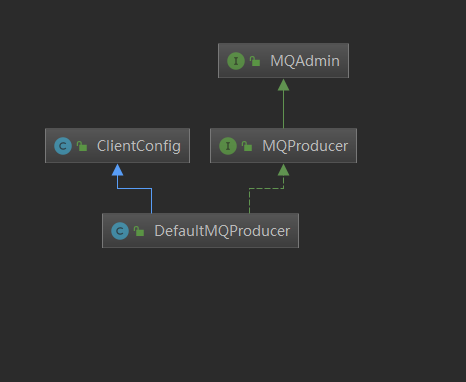
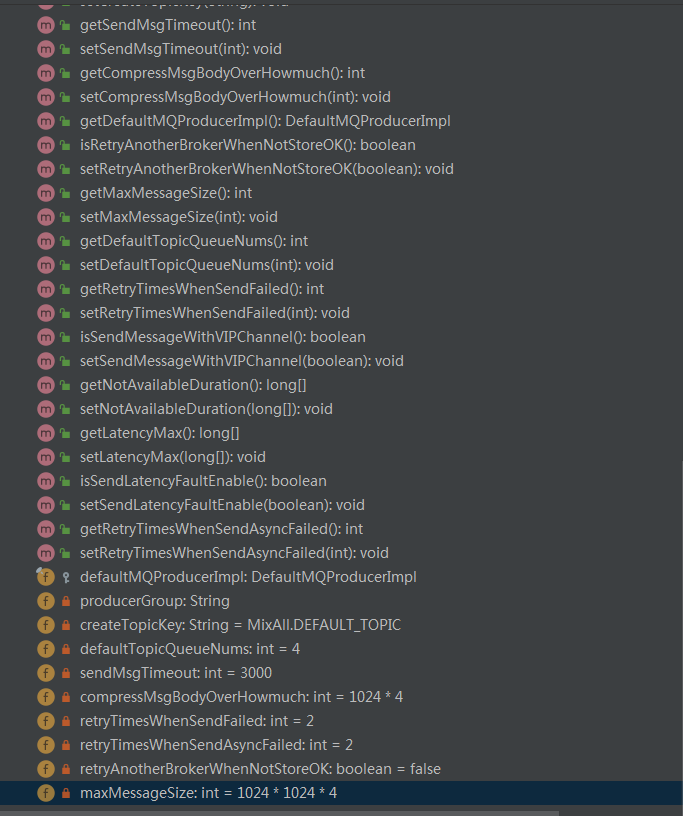
先看一下类结构和主要字段,可以知道 DefaultMQProducer 使用委托模式,维护重要的几个属性字段,其他的逻辑实现依靠 DefaultMQProducerImpl 来处理。 在一个我们可以学习类结构,继承实体类或是抽象类用于扩展,继承接口用于规范固有的功能和方法。


看一下 start 方法
    @Override

    public void start() throws MQClientException {

        this.defaultMQProducerImpl.start();

    }

    //defaultMQProducerImpl#start

    public void start() throws MQClientException {

        this.start(true);

    }

    public void start(final boolean startFactory) throws MQClientException {

        switch (this.serviceState) {

            case CREATE_JUST:

                this.serviceState = ServiceState.START_FAILED;

                //No.1 检查配置,更改instanceName 为 PID

                this.checkConfig();

                if (!this.defaultMQProducer.getProducerGroup().equals(MixAll.CLIENT_INNER_PRODUCER_GROUP)) {

                    this.defaultMQProducer.changeInstanceNameToPID();

                }

                //No.2  获取一个 MQClientInstance

                this.mQClientFactory = MQClientManager.getInstance().getAndCreateMQClientInstance(this.defaultMQProducer, rpcHook);

                //No.3  向 MQClientInstance 注册,将当前生产者加入到 MQClientInstance 管理中,方便后续调用网络请求,进行心跳检测等

                boolean registerOK = mQClientFactory.registerProducer(this.defaultMQProducer.getProducerGroup(), this);

                if (!registerOK) {

                    this.serviceState = ServiceState.CREATE_JUST;

                    throw new MQClientException("The producer group[" + this.defaultMQProducer.getProducerGroup()

                        + "] has been created before, specify another name please." + FAQUrl.suggestTodo(FAQUrl.GROUP_NAME_DUPLICATE_URL),

                        null);

                }

                //放置一个默认的topic 到 topicPublishInfoTable 中去

                this.topicPublishInfoTable.put(this.defaultMQProducer.getCreateTopicKey(), new TopicPublishInfo());

                if (startFactory) {

                    //No.4 启动 MQClientInstance

                    mQClientFactory.start();

                }

                log.info("the producer [{}] start OK. sendMessageWithVIPChannel={}", this.defaultMQProducer.getProducerGroup(),

                    this.defaultMQProducer.isSendMessageWithVIPChannel());

                this.serviceState = ServiceState.RUNNING;

                break;

            case RUNNING:

            case START_FAILED:

            case SHUTDOWN_ALREADY:

                throw new MQClientException("The producer service state not OK, maybe started once, "

                    + this.serviceState

                    + FAQUrl.suggestTodo(FAQUrl.CLIENT_SERVICE_NOT_OK),

                    null);

            default:

                break;

        }

        //No.5  看名字可以知道发送心跳包给所有的 Broker 并且是带锁的

        this.mQClientFactory.sendHeartbeatToAllBrokerWithLock();

    }
public class MQClientManager {

    private final static Logger log = ClientLogger.getLog();

    private static MQClientManager instance = new MQClientManager();

    private AtomicInteger factoryIndexGenerator = new AtomicInteger();

    private ConcurrentMap<String/* clientId */, MQClientInstance> factoryTable =

        new ConcurrentHashMap<String, MQClientInstance>();

    private MQClientManager() {

    }

    public static MQClientManager getInstance() {

        return instance;

    }

    public MQClientInstance getAndCreateMQClientInstance(final ClientConfig clientConfig) {

        return getAndCreateMQClientInstance(clientConfig, null);

    }

    public MQClientInstance getAndCreateMQClientInstance(final ClientConfig clientConfig, RPCHook rpcHook) {

        // clientId为客户端IP+instance+(unitname可选)

        String clientId = clientConfig.buildMQClientId();

        MQClientInstance instance = this.factoryTable.get(clientId);

        if (null == instance) {

            instance =

                new MQClientInstance(clientConfig.cloneClientConfig(),

                    this.factoryIndexGenerator.getAndIncrement(), clientId, rpcHook);

            MQClientInstance prev = this.factoryTable.putIfAbsent(clientId, instance);

            if (prev != null) {

                instance = prev;

                log.warn("Returned Previous MQClientInstance for clientId:[{}]", clientId);

            } else {

                log.info("Created new MQClientInstance for clientId:[{}]", clientId);

            }

        }

        return instance;

    }

    public void removeClientFactory(final String clientId) {

        this.factoryTable.remove(clientId);

    }

}
MQClientManager 使用单例模式,维护一系列的 MQClientInstance
    // MQClientInstance#start 方法

    public void start() throws MQClientException {

        synchronized (this) {

            switch (this.serviceState) {

                case CREATE_JUST:

                    this.serviceState = ServiceState.START_FAILED;

                    // If not specified,looking address from name server

                    if (null == this.clientConfig.getNamesrvAddr()) {

                        this.mQClientAPIImpl.fetchNameServerAddr();

                    }

                    // Start request-response channel

                    this.mQClientAPIImpl.start();

                    // Start various schedule tasks

                    this.startScheduledTask();

                    // Start pull service

                    this.pullMessageService.start();

                    // Start rebalance service

                    this.rebalanceService.start();

                    // Start push service

                    this.defaultMQProducer.getDefaultMQProducerImpl().start(false);

                    log.info("the client factory [{}] start OK", this.clientId);

                    this.serviceState = ServiceState.RUNNING;

                    break;

                case RUNNING:

                    break;

                case SHUTDOWN_ALREADY:

                    break;

                case START_FAILED:

                    throw new MQClientException("The Factory object[" + this.getClientId() + "] has been created before, and failed.", null);

                default:

                    break;

            }

        }

    }
可以看到 MQClientInstance 的start方法才是重中之重,连接获取信息变化的逻辑都是在 start 方法中开启的。MQClientInstance 封装了网络处理 API ,是生产者,消费者与 NameServer,Broker打交道的网络通道。
消息发送
以下面发送方法为例
    public void send(Message msg, SendCallback sendCallback, long timeout)

        throws MQClientException, RemotingException, InterruptedException {

        try {

            this.sendDefaultImpl(msg, CommunicationMode.ASYNC, sendCallback, timeout);

        } catch (MQBrokerException e) {

            throw new MQClientException("unknownn exception", e);

        }

    }

    private SendResult sendDefaultImpl(

        Message msg,

        final CommunicationMode communicationMode,

        final SendCallback sendCallback,

        final long timeout

    ) throws MQClientException, RemotingException, MQBrokerException, InterruptedException {

        this.makeSureStateOK();

        Validators.checkMessage(msg, this.defaultMQProducer);

        final long invokeID = random.nextLong();

        long beginTimestampFirst = System.currentTimeMillis();

        long beginTimestampPrev = beginTimestampFirst;

        long endTimestamp = beginTimestampFirst;

        // No.1 在缓冲中寻找是否有该TopicPublishInfo ,没有(第一次)则在NameServer中获取路由信息,封装,配置最后返回一个 TopicPublishInfo

        TopicPublishInfo topicPublishInfo = this.tryToFindTopicPublishInfo(msg.getTopic());

        if (topicPublishInfo != null && topicPublishInfo.ok()) {

            MessageQueue mq = null;

            Exception exception = null;

            SendResult sendResult = null;

            //重试次数

            int timesTotal = communicationMode == CommunicationMode.SYNC ? 1 + this.defaultMQProducer.getRetryTimesWhenSendFailed() : 1;

            int times = 0;

            String[] brokersSent = new String[timesTotal];

            for (; times < timesTotal; times++) {

                String lastBrokerName = null == mq ? null : mq.getBrokerName();

                //No.2 选择一个消息发送队列

                MessageQueue mqSelected = this.selectOneMessageQueue(topicPublishInfo, lastBrokerName);

                if (mqSelected != null) {

                    mq = mqSelected;

                    brokersSent[times] = mq.getBrokerName();

                    try {

                        beginTimestampPrev = System.currentTimeMillis();

                        //No.3 最后进行发送核心方法

                        sendResult = this.sendKernelImpl(msg, mq, communicationMode, sendCallback, topicPublishInfo, timeout);

                        endTimestamp = System.currentTimeMillis();

                        this.updateFaultItem(mq.getBrokerName(), endTimestamp - beginTimestampPrev, false);

                        switch (communicationMode) {

                            case ASYNC:

                                return null;

                            case ONEWAY:

                                return null;

                            case SYNC:

                                if (sendResult.getSendStatus() != SendStatus.SEND_OK) {

                                    if (this.defaultMQProducer.isRetryAnotherBrokerWhenNotStoreOK()) {

                                        continue;

                                    }

                                }

                                return sendResult;

                            default:

                                break;

                        }

                    } catch (RemotingException e) {

       		...

       		...

       		(异常处理相关)

	}

    private TopicPublishInfo tryToFindTopicPublishInfo(final String topic) {

        TopicPublishInfo topicPublishInfo = this.topicPublishInfoTable.get(topic);

        //第一次找不到会插入一个

        if (null == topicPublishInfo || !topicPublishInfo.ok()) {

            this.topicPublishInfoTable.putIfAbsent(topic, new TopicPublishInfo());

            //更新到NameServer

            this.mQClientFactory.updateTopicRouteInfoFromNameServer(topic);

            topicPublishInfo = this.topicPublishInfoTable.get(topic);

        }

        if (topicPublishInfo.isHaveTopicRouterInfo() || topicPublishInfo.ok()) {

            return topicPublishInfo;

        } else {

            this.mQClientFactory.updateTopicRouteInfoFromNameServer(topic, true, this.defaultMQProducer);

            topicPublishInfo = this.topicPublishInfoTable.get(topic);

            return topicPublishInfo;

        }

    }

    public boolean updateTopicRouteInfoFromNameServer(final String topic) {

        return updateTopicRouteInfoFromNameServer(topic, false, null);

    }

    public boolean updateTopicRouteInfoFromNameServer(final String topic, boolean isDefault,

        DefaultMQProducer defaultMQProducer) {

        try {

            if (this.lockNamesrv.tryLock(LOCK_TIMEOUT_MILLIS, TimeUnit.MILLISECONDS)) {

                try {

                    TopicRouteData topicRouteData;

                    if (isDefault && defaultMQProducer != null) {

                        //使用默认 topic 去查询

                        topicRouteData = this.mQClientAPIImpl.getDefaultTopicRouteInfoFromNameServer(defaultMQProducer.getCreateTopicKey(),

                            1000 * 3);

                        if (topicRouteData != null) {

                            for (QueueData data : topicRouteData.getQueueDatas()) {

                                int queueNums = Math.min(defaultMQProducer.getDefaultTopicQueueNums(), data.getReadQueueNums());

                                data.setReadQueueNums(queueNums);

                                data.setWriteQueueNums(queueNums);

                            }

                        }

                    } else {

                        //使用 topic 去查询

                        topicRouteData = this.mQClientAPIImpl.getTopicRouteInfoFromNameServer(topic, 1000 * 3);

                    }

                    if (topicRouteData != null) {

                        TopicRouteData old = this.topicRouteTable.get(topic);

                        boolean changed = topicRouteDataIsChange(old, topicRouteData);

                        if (!changed) {

                            changed = this.isNeedUpdateTopicRouteInfo(topic);

                        } else {

                            log.info("the topic[{}] route info changed, old[{}] ,new[{}]", topic, old, topicRouteData);

                        }

                        if (changed) {

                            TopicRouteData cloneTopicRouteData = topicRouteData.cloneTopicRouteData();

                            for (BrokerData bd : topicRouteData.getBrokerDatas()) {

                                this.brokerAddrTable.put(bd.getBrokerName(), bd.getBrokerAddrs());

                            }

                            // Update Pub info

                            {

                                //使 topicRouteData 封装成 TopicPublishInfo

                                TopicPublishInfo publishInfo = topicRouteData2TopicPublishInfo(topic, topicRouteData);

                                publishInfo.setHaveTopicRouterInfo(true);

                                Iterator<Entry<String, MQProducerInner>> it = this.producerTable.entrySet().iterator();

                                while (it.hasNext()) {

                                    Entry<String, MQProducerInner> entry = it.next();

                                    MQProducerInner impl = entry.getValue();

                                    if (impl != null) {

                                        impl.updateTopicPublishInfo(topic, publishInfo);

                                    }

                                }

                            }

                            // Update sub info

                            {

                                Set<MessageQueue> subscribeInfo = topicRouteData2TopicSubscribeInfo(topic, topicRouteData);

                                Iterator<Entry<String, MQConsumerInner>> it = this.consumerTable.entrySet().iterator();

                                while (it.hasNext()) {

                                    Entry<String, MQConsumerInner> entry = it.next();

                                    MQConsumerInner impl = entry.getValue();

                                    if (impl != null) {

                                        impl.updateTopicSubscribeInfo(topic, subscribeInfo);

                                    }

                                }

                            }

                            log.info("topicRouteTable.put. Topic = {}, TopicRouteData[{}]", topic, cloneTopicRouteData);

                            this.topicRouteTable.put(topic, cloneTopicRouteData);

                            return true;

                        }

                  ...

                  ...

                  ...

                  (异常处理)

    }
篇幅太长,后续继续源码分析
参考资料
- 《RocketMQ技术内幕》
消息队列(四)--- RocketMQ-消息发送的更多相关文章
- 消息队列之事务消息,RocketMQ 和 Kafka 是如何做的?
每个时代,都不会亏待会学习的人. 大家好,我是 yes. 今天我们来谈一谈消息队列的事务消息,一说起事务相信大家都不陌生,脑海里蹦出来的就是 ACID. 通常我们理解的事务就是为了一些更新操作要么都成 ...
- 消息队列之-RocketMQ入门
简介 RocketMQ是阿里开源的消息中间件,目前已经捐献个Apache基金会,它是由Java语言开发的,具备高吞吐量.高可用性.适合大规模分布式系统应用等特点,经历过双11的洗礼,实力不容小觑. 官 ...
- 剖析nsq消息队列(四) 消息的负载处理
剖析nsq消息队列-目录 实际应用中,一部分服务集群可能会同时订阅同一个topic,并且处于同一个channel下.当nsqd有消息需要发送给订阅客户端去处理时,发给哪个客户端是需要考虑的,也就是我要 ...
- 分布式消息队列RocketMQ--事务消息--解决分布式事务
说到分布式事务,就会谈到那个经典的”账号转账”问题:2个账号,分布处于2个不同的DB,或者说2个不同的子系统里面,A要扣钱,B要加钱,如何保证原子性? 一般的思路都是通过消息中间件来实现“最终一致性” ...
- 几种MQ消息队列对比与消息队列之间的通信问题
消息队列 开发语言 协议支持 设计模式 持久化支持 事务支持 负载均衡支持 功能特点 缺点 RabbitMQ Erlang AMQP,XMPP,SMTP,STOMP 代理(Broker)模式(消息在发 ...
- 阿里消息队列中间件 RocketMQ源码解析:Message发送&接收
- [分布式学习]消息队列之rocketmq笔记
文档地址 RocketMQ架构 哔哩哔哩上的视频 mq有很多,近期买了<分布式消息中间件实践>这本书,学习关于mq的相关知识.mq大致有有4个功能: 异步处理.比如业务端需要给用户发送邮件 ...
- 消息队列之--RocketMQ
序言 资料 https://github.com/alibaba/RocketMQ http://rocketmq.apache.org/
- 消息队列中间件 RocketMQ 源码分析 —— Message 存储
- 阿里消息队列中间件 RocketMQ 源码分析 —— Message 拉取与消费(上)
随机推荐
- MySQL数据库重点监控指标
MySQL数据库重点监控指标 QPS queries per seconds 每秒中查询数量 show global status like 'Question%'; Queries/seconds ...
- C++-指针阅读能力提升
下面的标识符你肯定在工程中看不到,但是在面试题中却非常常见,掌握掌握还是不错的. int (*p1)(int*, int (*f)(int*)); int (*p2[5])( ...
- 删除空目录命令 - rmdir
(1) 命令名称:rmdir (2) 英文原意:remove empty directories (3) 命令所在路径:/bin/rmdir (4) 执行权限:所有用户 (5) 功能描述:删除空目录( ...
- LitElement(四)属性
1.概述 LitElement管理您声明的属性及其对应的属性.默认情况下,LitElement将: 确保在任何声明的属性更改时进行元素更新. 捕获已声明属性的实例值.在浏览器注册自定义元素定义之前设置 ...
- ASP.NET + MVC5 入门完整教程七 -—-- MVC基本工具(下)
https://blog.csdn.net/qq_21419015/article/details/80493633 Visual Stdio 的单元测试
- span标签间距
最近在做的一个项目里面碰到这么一个问题: <p> <span>块1</span> <span>块2</span> </p> 在“ ...
- 马路 树链剖分/线段树/最近公共祖先(LCA)
题目 [问题描述] 小迟生活的城市是⼀棵树(树指的是⼀个含有 \(n\) 个节点以及 \(n-1\) 条边的⽆向连通图),节点编号从 \(1\) 到 \(n\),每条边拥有⼀个权值 \(value\) ...
- python 字符串的一些函数
split()函数 split() 以 空格 为分割符分割字符串,返回列表 split('_') 以'_'为分割符分割字符串,返回列表 strip() 函数 去掉前后的空格 下面是字符 ...
- C语言数据结构——第三章 栈和队列
三.栈和队列 栈和队列是两种重要的线性结构.从数据结构的角度来看,栈和队列也是线性表,它的特殊性在于栈和队列的基本操作是线性表操作的子集,它们的操作相对于线性表来说是受到限制的,因此,可以称其为限定性 ...
- MyBatis(7)——使用注解开发
说明:注解就是利用接口实现的,因此转为面向接口编程,使用接口开发拓展性好.分层开发时上层不用管理具体的实现.更加标准化更加规范.使得各个层的耦合度更低. 注:有了注释语句就不需要实体类的mapper文 ...
