Linux-2.6驱动程序分层分离概念
下面以一个按键的实验作为驱动分离时间简单学习:
 #include <linux/module.h>

 #include <linux/version.h>

 #include <linux/init.h>

 #include <linux/kernel.h>

 #include <linux/types.h>

 #include <linux/interrupt.h>

 #include <linux/list.h>

 #include <linux/timer.h>

 #include <linux/init.h>

 #include <linux/serial_core.h>

 #include <linux/platform_device.h>

 /* 分配/设置/注册一个platform_device */

 static struct resource led_resource[] = {

     [] = {

         .start = 0x56000050,

         .end   = 0x56000050 +  - ,

         .flags = IORESOURCE_MEM,

     },

     [] = {

         .start = ,

         .end   = ,

         .flags = IORESOURCE_IRQ,

     }

 };

 static void led_release(struct device * dev)

 {

 }

 static struct platform_device led_dev = {

     .name         = "myled",

     .id       = -,

     .num_resources    = ARRAY_SIZE(led_resource),

     .resource     = led_resource,

     .dev = {

         .release = led_release,

     },

 };

 static int led_dev_init(void)

 {

     platform_device_register(&led_dev);

     return ;

 }

 static void led_dev_exit(void)

 {

     platform_device_unregister(&led_dev);

 }

 module_init(led_dev_init);

 module_exit(led_dev_exit);

 MODULE_LICENSE("GPL");
led_dev.c
 /* 分配/设置/注册一个platform_driver */

 #include <linux/module.h>

 #include <linux/version.h>

 #include <linux/init.h>

 #include <linux/fs.h>

 #include <linux/interrupt.h>

 #include <linux/irq.h>

 #include <linux/sched.h>

 #include <linux/pm.h>

 #include <linux/sysctl.h>

 #include <linux/proc_fs.h>

 #include <linux/delay.h>

 #include <linux/platform_device.h>

 #include <linux/input.h>

 #include <linux/irq.h>

 #include <asm/uaccess.h>

 #include <asm/io.h>

 static int major;

 static struct class *cls;

 static volatile unsigned long *gpio_con;

 static volatile unsigned long *gpio_dat;

 static int pin;

 static int led_open(struct inode *inode, struct file *file)

 {

     //printk("first_drv_open\n");

     /* 配置为输出 */

     *gpio_con &= ~(0x3<<(pin*));

     *gpio_con |= (0x1<<(pin*));

     return ;

 }

 static ssize_t led_write(struct file *file, const char __user *buf, size_t count, loff_t * ppos)

 {

     int val;

     //printk("first_drv_write\n");

     copy_from_user(&val, buf, count); //    copy_to_user();

     if (val == )

     {

         // 点灯

         *gpio_dat &= ~(<<pin);

     }

     else

     {

         // 灭灯

         *gpio_dat |= (<<pin);

     }

     return ;

 }

 static struct file_operations led_fops = {

     .owner  =   THIS_MODULE,    /* 这是一个宏,推向编译模块时自动创建的__this_module变量 */

     .open   =   led_open,

     .write    =    led_write,

 };

 static int led_probe(struct platform_device *pdev)

 {

     struct resource        *res;

     /* 根据platform_device的资源进行ioremap */

     res = platform_get_resource(pdev, IORESOURCE_MEM, );

     gpio_con = ioremap(res->start, res->end - res->start + );

     gpio_dat = gpio_con + ;

     res = platform_get_resource(pdev, IORESOURCE_IRQ, );

     pin = res->start;

     /* 注册字符设备驱动程序 */

     printk("led_probe, found led\n");

     major = register_chrdev(, "myled", &led_fops);

     cls = class_create(THIS_MODULE, "myled");

     class_device_create(cls, NULL, MKDEV(major, ), NULL, "led"); /* /dev/led */

     return ;

 }

 static int led_remove(struct platform_device *pdev)

 {

     /* 卸载字符设备驱动程序 */

     /* iounmap */

     printk("led_remove, remove led\n");

     class_device_destroy(cls, MKDEV(major, ));

     class_destroy(cls);

     unregister_chrdev(major, "myled");

     iounmap(gpio_con);

     return ;

 }

 struct platform_driver led_drv = {

     .probe        = led_probe,

     .remove        = led_remove,

     .driver        = {

         .name    = "myled",

     }

 };

 static int led_drv_init(void)

 {

     platform_driver_register(&led_drv);

     return ;

 }

 static void led_drv_exit(void)

 {

     platform_driver_unregister(&led_drv);

 }

 module_init(led_drv_init);

 module_exit(led_drv_exit);

 MODULE_LICENSE("GPL");
led_drv.c
 #include <sys/types.h>

 #include <sys/stat.h>

 #include <fcntl.h>

 #include <stdio.h>

 /* led_test on

  * led_test off

  */

 int main(int argc, char **argv)

 {

     int fd;

     int val = ;

     fd = open("/dev/led", O_RDWR);

     if (fd < )

     {

         printf("can't open!\n");

     }

     if (argc != )

     {

         printf("Usage :\n");

         printf("%s <on|off>\n", argv[]);

         return ;

     }

     if (strcmp(argv[], "on") == )

     {

         val  = ;

     }

     else

     {

         val = ;

     }

     write(fd, &val, );

     return ;

 }
led_test.c
Linux-2.6驱动程序分层分离概念的更多相关文章
- 驱动程序分层分离概念_总线驱动设备模型_P
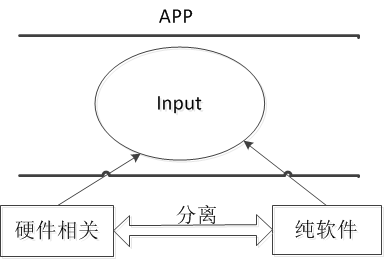
分层概念: 驱动程序向上注册的原理: 比如:输入子程序一个input.c作为一层,下层为Dev.c和Dir.c,分别编写Dev.c和Dir.c向上Input.c注册:如图所示 分离概念: 分离概念主要 ...
- 嵌入式Linux驱动学习之路(十七)驱动程序分层分离概念-平台设备驱动
平台设备驱动: 包含BUS(总线).DEVICE.DRIVER. DEVICE:硬件相关的代码 DRIVER:比较稳定的代码 BUS有一个driver链表和device链表. ①把device放入bu ...
- linux驱动分离分层的概念
这个分离分层的概念和输入子系统有点像,但不是完全一样的.为什么会再弄一个这个模型出来我也没有搞懂,现在我的学习还停留在把知识学懂的层面上.至于为什么会产生这种知识,现在我还无从解释,还需时日成长. 这 ...
- 【linux】驱动-5-驱动框架分层分离&实战
目录 前言 5. 分离分层 5.1 回顾-设备驱动实现 5.2 分离分层 5.3 设备 5.4 驱动 5.5 系统,模块 5.6 Makefile 参考: 前言 5. 分离分层 本章节记录实现LED驱 ...
- python selenium自动化测试之路(1)--分层测试概念、selenium工具介绍
1.分层自动化测试概念 传统的自动化市场更关注产品UI层的自动化测试,而分层的自动化测试倡导产品开发的不同阶段都需要自动化测试 大多公司与研发团队其实是忽略了单元测试与集成测试阶段的自动化测试工作,所 ...
- linux设备驱动的分层设计思想--input子系统及RTC
转自:linux设备驱动的分层设计思想 宋宝华 http://blog.csdn.net/21cnbao/article/details/5615493 1.1 设备驱动核心层和例化 在面向对象的程序 ...
- Linux DM9000网卡驱动程序完全分析
Linux DM9000网卡驱动程序完全分析http://blog.csdn.net/ypoflyer/article/details/6209922
- Linux下触摸屏驱动程序分析
[摘要: 本文以linux3.5--Exynos4412仄台,剖析触摸屏驱动焦点内容.Linux下触摸屏驱动(以ft5x06_ts为例)须要懂得以下学问: 1. I2C协定 2. Exynos4412 ...
- Linux学习之CentOS(三)--初识linux的文件系统以及用户组等概念
Linux学习之CentOS(三)--初识linux的文件系统以及用户组等概念 进入到了Linux学习之CentOS第三篇了,这篇文章主要记录下对linux文件系统的初步认识,以及用户组.用户权限.文 ...
随机推荐
- JSON学习笔记-3
JSON 对象 1.对象语法 JSON 对象使用在大括号({})中书写. 对象可以包含多个 key/value(键/值)对. key 必须是字符串,value 可以是合法的 JSON 数据类型(字符串 ...
- 解决升级PHP7.1后,发邮件时提示“fsockopen(): Peer certificate CN=`xxx.xx.com' did not match expected CN=`113.x.xx.98”
把项目环境升级到PHP7.1后,发现在不使用SSL时可以使用IP发邮件,可设置成SSL时就只能使用hostname发送,PHP提示的错误信息大致意思是说,IP与hostname无法通过SSL验证,修改 ...
- CDH5.11安装spark2.x详细步骤
简介: 在我的CDH5.11集群中,默认安装的spark是1.6版本,这里需要将其升级为spark2.x版本.经查阅官方文档,发现spark1.6和2.x是可以并行安装的,也就是说可以不用删除默认的1 ...
- 009_svn配置多仓库与权限控制(Alpha)
1,配置多仓库 实际项目中,我们会同时开发多个项目,通过SVNserve进行仓库监管,但是监管命令只能同时监管一个文件夹,而不能同时监管多个仓库. 解决方法: 可以通过监管总目录来监管所有仓库 SVN ...
- flask的orm操作
django是有orm操作的 可想而知 那么flask也是有orm操作的,其实flask的orm操作的使用和djnago的是差不多的 django的orm操作进行条件筛选的时候后面跟着的是objec ...
- 由于使用JDBC ResultSet的滚动功能而导致的内存溢出
前天一去公司,老大说,服务器全挂了! 最后排查了半天,结论是内存溢出! 在WAS的DUMP日志中,看得我头晕眼花,终于找到了罪魁祸首,原来是有同事写代码的时候使用了可滚动的结果集导致内存溢出. 什么是 ...
- [翻译] IDMPhotoBrowser
IDMPhotoBrowser IDMPhotoBrowser is a new implementation based on MWPhotoBrowser. IDMPhotoBrowser实现了图 ...
- Python学习---IO的异步[tornado模块]
tornado是一个异步非阻塞的WEB框架.它的异步非阻塞实际上就是用事件循环写的. 主要体现在2点: 1. 作为webserver可以接收请求,同时支持异步处理请求.Django只能处理完成上一个请 ...
- 一、初识MySQL数据库 二、搭建MySQL数据库(重点) 三、使用MySQL数据库 四、认识MySQL数据库的数据类型 五、操作MySQL数据库的数据(重点)
一.初识MySQL数据库 ###<1>数据库概述 1. 数据库 长期存储在计算机内的,由组织的可共享的数据集合 存储数据的仓库 文件 ...
- Automapper实现自动映射
出于安全考虑,在后台与前台进行数据传输时,往往不会直接传输实体模型,而是使用Dto(Data transfer object 数据传输对象),这样在后台往前台传递数据时可以省略不必要的信息,只保留必要 ...