Android中UI设计的一些技巧!!!
出处:http://blog.csdn.net/android_tutor/article/details/5995759
大家好,今天给大家分享的是Android中UI设计的一些技巧,本节内容主要有两点:一是Android按钮(Button)的UI设计,二是:ListView以及GridView的UI设计。
按钮的状态:
我们一般搞UI设计,按钮通常有三个状态:normal(正常状态);focus(焦点状态),pressed(按下状态)。如下图所示:


我们会在res/drawable目录下定义一个资源文件,比如我们本例中要用到的handle.xml,在里面定义三种状态,每种状态对应一张图片:
代码如下:
- <?xml version="1.0" encoding="utf-8"?>
- <selector xmlns:android="http://schemas.android.com/apk/res/android">
- <item android:state_window_focused="false" android:drawable="@drawable/handle_normal" />
- <item android:state_focused="true" android:drawable="@drawable/handle_focused" />
- <item android:state_pressed="true" android:drawable="@drawable/handle_pressed" />
- </selector>
而我们使用这个资源文件的用法只需要引用drawable里的资源文件(android:background="@drawable/handle")代码如下:
- <Button
- android:id="@+id/handle"
- android:layout_width="wrap_content"
- android:layout_height="fill_parent"
- android:background="@drawable/handle"
- />
Android中的层:
看过《盗梦空间》的人都知道,梦境有多少层,而Android中也有层次之分,在Android中第一层"梦境",我们可以认为是壁纸。第二层就是应用的Activity,第三层就是放在Activity上的容器(ViewGroup以及它的子类FrameLayout,LinearLayout等布局对象),当然容器中还可以放容器,你也可以放到N层(最多放多少我还没验证过),总之最后一层就是那些继承于View的控件了(诸如,Button,TextView等.)
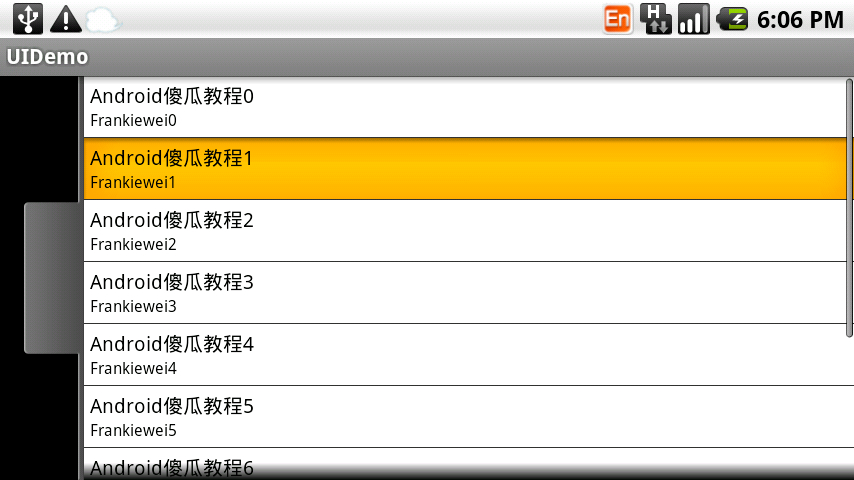
而ListView以及GridView中UI是怎么设计的呢,下面我们看一下效果图:
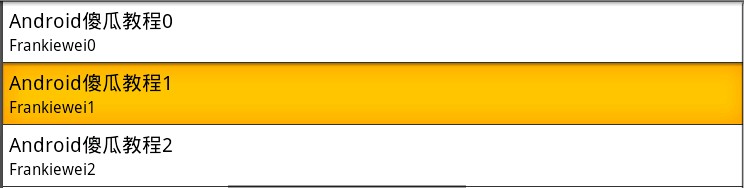
上图是一个ListView的效果图,正常状态下是白色背景黑色字体,当我们点击一列时会出现黄色背景。这一效果是如何做到的呢?
ListView单元格显示的内容其实是我们事先定义在Layout目录下的一个布局文件,从这个效果来看,我们可以看出它一共有三个“层”
第一层容器(LinearLayout) 背景色为白色:
第二层也是容器(LinearLayout)当按下时,背景色为黄色,把第一层挡住(具体做法可以参照按钮):
第三层是控件(TextView)。
实例 :
上面说了一些,有些人肯定会云里雾里,所以我们直接来个实例,实例做完后,再看一下,效果会更好,大家按照步骤跟我来:
第一步:首先准备素材,准备三个按钮,以及ListView的背景图(上面三个按钮已经有了,下面我只贴一个ListView背景图片):

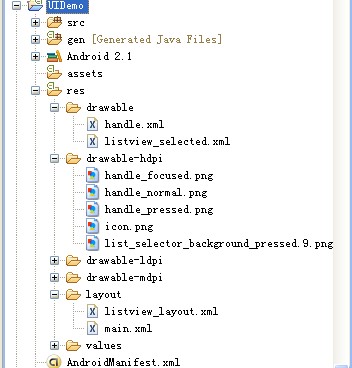
第二步:新建一个Android工程,命名为UIDemo.目录结构如下图所示:
第三步:在res目录下新建一个drawable文件夹,定义两个资源文件一个是handle.xml另一个为listview_selected.xml,其中handle.xml代码已经在上面贴出,listview_selected.xml代码如下:
- <?xml version="1.0" encoding="utf-8"?>
- <selector xmlns:android="http://schemas.android.com/apk/res/android">
- <item android:state_pressed="true" android:drawable="@drawable/list_selector_background_pressed" />
- </selector>
第四步:修改main.xml布局文件,这里我用到了SliddingDrawer控件,代码如下:
- <?xml version="1.0" encoding="utf-8"?>
- <LinearLayout xmlns:android="http://schemas.android.com/apk/res/android"
- android:orientation="vertical"
- android:layout_width="fill_parent"
- android:layout_height="fill_parent"
- >
- <SlidingDrawer
- android:id="@+id/slidingdrawer"
- android:layout_width="fill_parent"
- android:layout_height="fill_parent"
- android:orientation="horizontal"
- android:handle="@+id/handle"
- android:content="@+id/content">
- <Button
- android:id="@+id/handle"
- android:layout_width="wrap_content"
- android:layout_height="fill_parent"
- android:background="@drawable/handle"
- />
- <ListView
- android:id="@+id/content"
- android:layout_width="fill_parent"
- android:layout_height="wrap_content"
- />
- </SlidingDrawer>
- </LinearLayout>
我们这里用到了ListView控件,而我们ListView控件显示的内容我事先在layout目录下定义两个TextView,命名为listview_layout.xml,代码如下(这里有三层哦!):
- <?xml version="1.0" encoding="utf-8"?>
- <LinearLayout xmlns:android="http://schemas.android.com/apk/res/android"
- android:orientation="vertical"
- android:layout_width="fill_parent"
- android:layout_height="fill_parent"
- android:background="#ffffff"
- >
- <LinearLayout
- android:orientation="vertical"
- android:layout_width="fill_parent"
- android:layout_height="fill_parent"
- android:background="@drawable/listview_selected"
- android:padding="6px"
- >
- <TextView
- android:id="@+id/bookname"
- android:layout_width="fill_parent"
- android:layout_height="wrap_content"
- android:textSize="20px"
- android:textColor="#000000"
- />
- <TextView
- android:id="@+id/author"
- android:layout_width="fill_parent"
- android:layout_height="wrap_content"
- android:textSize="16px"
- android:textColor="#000000"
- />
- </LinearLayout>
- </LinearLayout>
第五步:修改主核心程序UIDemo.java,代码如下:
- package com.tutor.uidemo;
- import android.app.Activity;
- import android.os.Bundle;
- import android.view.LayoutInflater;
- import android.view.View;
- import android.view.ViewGroup;
- import android.widget.BaseAdapter;
- import android.widget.ListView;
- import android.widget.TextView;
- public class UIDemo extends Activity {
- private ListView mListView;
- @Override
- public void onCreate(Bundle savedInstanceState) {
- super.onCreate(savedInstanceState);
- setContentView(R.layout.main);
- setupViews();
- }
- private void setupViews(){
- mListView = (ListView)findViewById(R.id.content);
- mListView.setAdapter(new ListViewAdapter());
- }
- private class ListViewAdapter extends BaseAdapter{
- //这里返回10行,ListView有多少行取决于getCount()方法
- public int getCount() {
- return 10;
- }
- public Object getItem(int arg0) {
- return null;
- }
- public long getItemId(int arg0) {
- return 0;
- }
- public View getView(int position, View v, ViewGroup parent) {
- final LayoutInflater inflater = LayoutInflater.from(getApplicationContext());
- if(v == null){
- v = inflater.inflate(R.layout.listview_layout, null);
- }
- TextView mBookName = (TextView)v.findViewById(R.id.bookname);
- TextView mBookAuthor = (TextView)v.findViewById(R.id.author);
- mBookName.setText("Android傻瓜教程" + position);
- mBookAuthor.setText("Frankiewei" + position);
- return v;
- }
- }
- }
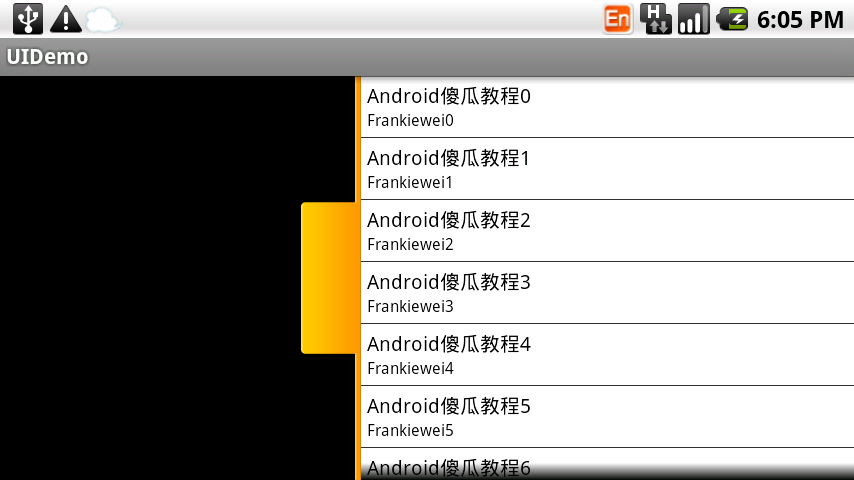
第六步:运行上述工程,查看效果:
运行效果1:

点击按钮效果2:
ListView正常效果3:
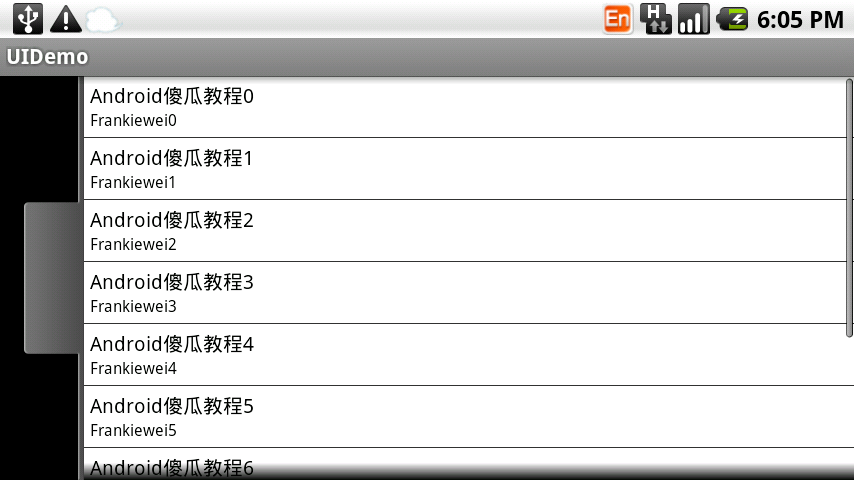
ListView点击效果4:
Android中UI设计的一些技巧!!!的更多相关文章
- Android 高级UI设计笔记07:RecyclerView 的详解
1. 使用RecyclerView 在 Android 应用程序中列表是一个非常重要的控件,适用场合非常多,如新闻列表.应用列表.消息列表等等,但是从Android 一出生到现在并没有非常 ...
- Android应用UI设计流程
Android应用UI设计流程 设计原理 1.在移动设计中,使用环境是最关键的因素.原型设计方法必须考虑尺寸因素 2.用户测试必须涵盖运动.声音和多点触控等方面: 进行移动设计和测试时,请将你知道的有 ...
- Android中的对话框AlertDialog使用技巧合集-转载
Android中的对话框AlertDialog使用技巧合集 文章来自:http://blog.csdn.net/blue6626/article/details/6641105 今天我用自 ...
- Android中UI线程与后台线程交互设计的5种方法
我想关于这个话题已经有很多前辈讨论过了.今天算是一次学习总结吧. 在android的设计思想中,为了确保用户顺滑的操作体验.一 些耗时的任务不能够在UI线程中运行,像访问网络就属于这类任务.因此我们必 ...
- Android中UI线程与后台线程交互设计的6种方法
在android的设计思想中,为了确保用户顺滑的操作体验.一些耗时的任务不能够在UI线程中运行,像访问网络就属于这类任务.因此我们必须要重新开启 一个后台线程运行这些任务.然而,往往这些任务最终又会直 ...
- 【Android开发经验】Android举UI设计经验
转载请注明出处:http://blog.csdn.net/zhaokaiqiang1992 1.Android眼下的主流设备分辨率为480×800.720×1280.1080×1920,单位是像素.在 ...
- Android 高级UI设计笔记09:Android如何实现无限滚动列表
ListView和GridView已经成为原生的Android应用实现中两个最流行的设计模式.目前,这些模式被大量的开发者使用,主要是因为他们是简单而直接的实现,同时他们提供了一个良好,整洁的用户体验 ...
- Android 高级UI设计笔记08:Android开发者常用的7款Android UI组件(转载)
Android开发是目前最热门的移动开发技术之一,随着开发者的不断努力和Android社区的进步,Android开发技术已经日趋成熟,当然,在Android开源社区中也涌现了很多不错的开源UI项目,它 ...
- Android 高级UI设计笔记09:Android实现无限滚动列表
1. 无限滚动列表应用场景: ListView和GridView已经成为原生的Android应用实现中两个最流行的设计模式.目前,这些模式被大量的开发者使用,主要是因为他们是简单而直接的实现,同时他们 ...
随机推荐
- Oracle学习笔记:wm_concat函数合并字段
在Oracle中使用wm_concat(column)可以实现字段的分组合并,逗号分隔. 例如,现有表temp_cwh_test: -- 创建临时表 create table temp_cwh_tes ...
- information_schema Introduction
information_schema介绍 information_schema数据库是MySQL自带的,里面的“表”保存着服务器当前的实时信息.它提供了访问数据库元数据的方式.元数据是关于数据的数据, ...
- Kubernetes1.6集群上(开启了TLS)安装Dashboard
本节内容: 配置dashboard 执行所有定义的文件 检查执行结果 访问dashboard 这是接着上一篇<二进制方式部署Kubernetes 1.6.0集群(开启TLS)>写的.Kub ...
- Rookey.Frame之菜单设置
在上一篇博文 Rookey.Frame企业级快速开发框架开源了 中我们介绍了Rookey.Frame极速开发框架的最新更新及开源介绍,后面慢慢介绍该框架的使用方法,本人文笔不好,写得不够好的地方请大家 ...
- C#实现盛大盛付通充值卡状态查询
今天有这样一需求,要求能够查询盛付通卡的状态,官网如下 http://www.801335.com/status/index.htm 刚一打开网址,发现两个输入框加一个验证码,心中一喜不是小 cas ...
- Tomcat基于MSM+Memcached实现Session共享
简述 上一篇文章,分别演示了session sticky 和 session cluster来实现会话保持的问题,但是它们缺点都不少,实际中用的很少,所以这篇文章我们还是通过Tomcat来演示一下实际 ...
- 修改linux系统编码
方法1: vi /etc/sysconfig/i18n 默认为: LANG="en_US.UTF-8"SYSFONT="latarcyrheb-sun16" ...
- Android 中的广播(Broadcast)
Android 广播(broadcast) 饮水思源 本文章内容学习和总结自 郭霖大神:<Android第一行代码> Overview 就像我们的学校里的喇叭一样,是用来通知的.而Andr ...
- 1002 A+B for Polynomials (25)(25 point(s))
problem 1002 A+B for Polynomials (25)(25 point(s)) This time, you are supposed to find A+B where A a ...
- python opencv3 视频文件的读写
git: https://github.com/linyi0604/Computer-Vision # coding:utf8 import cv2 """ 读取视频文件 ...