OpenWRT使用wifidog实现强制认证的WIFI热点
首先安装wifidog到OpenWRT的路由器:
opkg update
opkg install wifidog
wifidog依赖下面这些模块:
iptables-mod-extra
iptables-mod-ipopt
kmod-ipt-nat
iptables-mod-nat-extra
libpthread
由于trunk的固件更新会比较频繁,会导致直接opkg install wifidog安装不了,如果你凑巧又没有备份与固件对应的Packages的话,就需要到http://downloads.openwrt.org/snapshots/trunk升级固件,然后再安装wifidog。我备份了一个2013年7月份(kernel =3.10.3-1-9da5017d589c0594e545ab00a51eecea)的版本的Packages,需要的话拿去用:
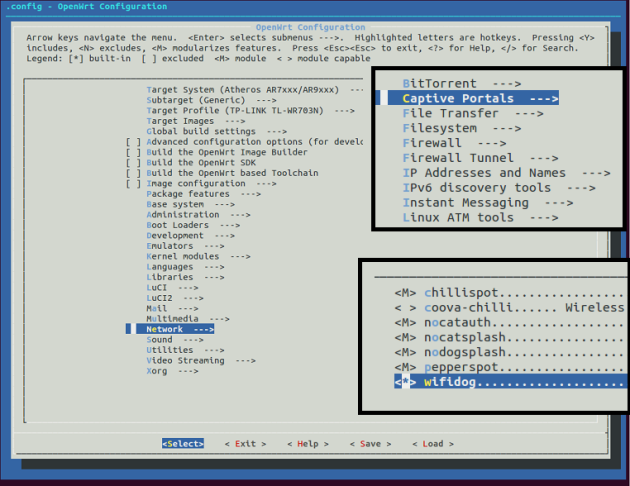
如果你的路由器不是openwrt官方支持的版本的话,那就需要自己编译固件。make menuconfig后,在Network–>Captive Portals中选择wifidog.
安装完成后,
/etc/init.d/wifidog enable
/etc/init.d/wifidog start
这时会抛出一个错误,因为我们还没有设置AuthServer的信息。关于安装wifidog更多的信息可以参考:http://wiki.openwrt.org/doc/howto/wireless.hotspot.wifidog
下面安装Auth Server,按照官方的说法:
AuthPuppy is the next generation authentication server for Wifidog networks.
源文档 <http://www.authpuppy.org/>
不过貌似这wifidog和Authpuppy都已经N久没更新了。。。
AuthPutty是需要安装apache2, php5和MySQL。详细介绍在这里:http://www.authpuppy.org/doc/Getting_Started (Windows版点这里)。
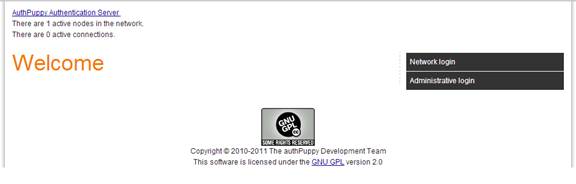
安装成功后,访问AuthPuppy会要求设置一些数据库信息,全部设置完成后能看到首页:
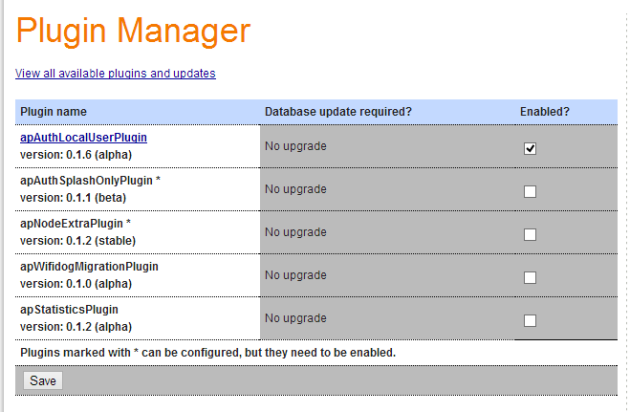
当然了,我们还需要设置管理员的账号。
进入Manage plugins,Install apAuthLocalUserPlugin,记得要enable这个插件。
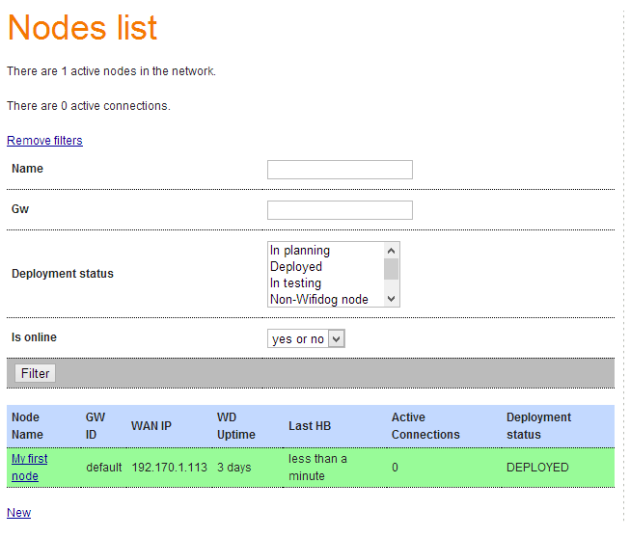
然后,点击Manage Nodes,把默认节点的status改成deployed。这个GW(Gateway) ID default后面配置wifidog.conf的时候需要使用。
到这里,AuthPuppy就基本配置完毕了。
下面回到路由器,编辑wifidog.conf,一般情况下,我们之后配置ExternalInterface,GatewayInterface和AuthServer这三项就可以,其他默认。下面是我的配置:
GatewayIDdefault #注意这个ID必须跟AuthPuppy的GW ID一致
# Parameter: ExternalInterface
# Default: NONE
# Optional
#
# Set this to the external interface (the one going out to the Inernet or your larger LAN).
# Typically vlan1 for OpenWrt, and eth0 or ppp0 otherwise,
# Normally autodetected
ExternalInterface eth0 #路由器外网的物理接口
# Parameter: GatewayInterface
# Default: NONE
# Mandatory
#
# Set this to the internal interface (typically your wifi interface).
# Typically br-lan for OpenWrt, and eth1, wlan0, ath0, etc. otherwise
GatewayInterface wlan0 #路由器内网的物理接口
AuthServer {
Hostname 192.170.1.104
SSLAvailable no
Path /
}
CheckInterval 60
ClientTimeout 5
FirewallRuleSet global {
}
FirewallRuleSet validating-users {
FirewallRule allow to 0.0.0.0/0
}
FirewallRuleSet known-users {
FirewallRule allow to 0.0.0.0/0
}
FirewallRuleSet unknown-users {
FirewallRule allow udp port 53
FirewallRule allow tcp port 53
FirewallRule allow udp port 67
FirewallRule allow tcp port 67
}
FirewallRuleSet locked-users {
FirewallRule block to 0.0.0.0/0
}
注意这个Interface是物理接口,而不是下面OpenWRT web界面中看到的interface。注意不是下面这个:
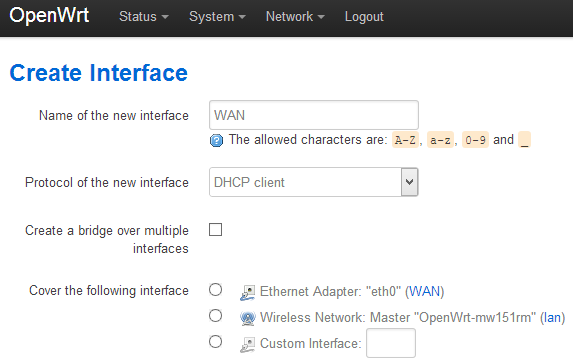
可以看到我的Interface里面没有wlan0之类的选项,/etc/config/network里面也看不到。
root@OpenWrt:~# cat /etc/config/network
config interface ‘loopback’
option ifname ‘lo’
option proto ‘static’
option ipaddr ‘127.0.0.1’
option netmask ‘255.0.0.0’
config globals ‘globals’
option ula_prefix ‘fd09:fd03:490d::/48′
config interface ‘lan’
option proto ‘static’
option ipaddr ‘192.168.1.1’
option netmask ‘255.255.255.0’
option ip6assign ’60’
option _orig_ifname ‘eth0′
option _orig_bridge ‘false’
config interface ‘WAN’
option proto ‘dhcp’
option _orig_ifname ‘gretap0′
option _orig_bridge ‘false’
option ifname ‘eth0′
之前我用gretap0和eth0设置ExternalInterface和GatewayInterface,不行。反着来也不行。网上搜了一圈,找到下面的方法来获取physical interface:
root@OpenWrt:~# ls -l /sys/class/net
lrwxrwxrwx 1 root root 0 Jan 1 1970 eth0 -> ../../devices/platform/ag71xx.0/net/eth0
lrwxrwxrwx 1 root root 0 Jan 1 1970 lo -> ../../devices/virtual/net/lo
lrwxrwxrwx 1 root root 0 Aug 2 15:58 wlan0 -> ../../devices/platform/ar933x_wmac/net/wlan0
OK,原来我这边也是有wlan0这个interface的,找到之后添加在wifidog.conf上。重启wifidog,成功。
另外:
You can also run wifidog in foreground/debug mode:
wifidog -f -d 7
-f means to run in foreground (do not become a background daemon)
-d 7 increases debug output level to the maximum
源文档 <http://wiki.openwrt.org/doc/howto/wireless.hotspot.wifidog>
OpenWRT使用wifidog实现强制认证的WIFI热点的更多相关文章
- [转载]OpenWRT使用wifidog实现强制认证的WIFI热点 | 半个橙子
首先安装wifidog到OpenWRT的路由器: opkg update opkg install wifidog wifidog依赖下面这些模块: iptables-mod-extra iptabl ...
- OpenWRT TP_LINK703N 校园网 锐捷认证解决办法
OpenWRT TP_LINK703N 校园网 锐捷认证解决办法 一.准备的工具 1) SSH登录工具,推荐使用MobaXterm_Personal下载链接https://moba.en.s ...
- 一行代码实现笔记本跳过微信认证连接WIFI
一行代码实现笔记本跳过微信认证连接WIFI 本文作者原创,没有参考其他文章,方法很简单但是很实用,转载请注明出处,谢谢! 问题 有一些WIFI需要通过微信认证才能连接,手机当然是可以的,但是我们手头的 ...
- Android 开发 创建WiFi、WiFi热点 ---开发集合
WIFI 权限 <uses-permission android:name="android.permission.CHANGE_WIFI_STATE" /> < ...
- 创建假的wifi热点
本帖介绍怎么创建假的wifi热点,然后抓取连接到这个wifi用户的敏感数据.我们还会给周围的无线路由器发送未认证的包,使这些路由器瘫痪,强迫用户连接(或自动连接)我们创建的假wifi热点. 这种攻击也 ...
- Android WiFi开发教程(一)——WiFi热点的创建与关闭
相对于BlueTooth,WiFi是当今使用最广的一种无线网络传输技术, 几乎所有智能手机.平板电脑和笔记本电脑都支持Wi-Fi上网.因此,掌握基本的WiFI开发技术是非常必要的.本教程将围绕一个小D ...
- 用DD-WRT自建计费WiFi热点
架设无线网络(Wlan)向周围的用户有偿共享网络. 传统的方法,能够使用专业的无线与宽带计费网关设备和软件.比方MikroTik等. 只是,对于个人架设WiFi热点来说.这些方案太过昂贵,安装设置也很 ...
- 树莓派搭建钓鱼wifi热点
我们连接的公共wifi其实是非常不安全的网络,骇客可以利用wifi路由设备进行中间人攻击,劫持DNS伪造钓鱼网站.接下来我会做个简单的实验,伪造中国电信的路由ChinaNet并发射出热点wifi等待别 ...
- Linux创建WiFi热点
手机流量用完,需要开WiFi,由于是LinuxMint,感觉配置还算容易,找到一个不错的教程,收藏一下,以备后用.除了修改配置文件那步在我的电脑不需要外其他基本正确,而且Mint本来就衍生自Ubunt ...
随机推荐
- delphi DockPresident
作为Delphi的忠实用户,我想大家对Delphi中的停靠窗体应该比较熟悉吧,是不是也希望自己编的程序也具有这样的功能?使她看起来更漂亮,更专业,更方便. 本人做的一套停靠控件DockPresiden ...
- hbase经常使用的shell命令样例
1.hbase shell 进入hbase [hadoop@mdw ~]$ hbase shell HBase Shell; enter 'help<RETURN>' for lis ...
- Ioc:Autofac Registration Concepts
Reflection Components When using reflection-based components, Autofac automatically uses the constru ...
- java把指定文字输出为图片流,支持文字换行
public class IamgeUtils { private static final int WIDTH = 350; private static final int HEIGHT = 10 ...
- <A>标签锚标记
链接到本页面 – 锚记标签用于使用户“跳”到文档的某个部分 – HTML 的NAME 属性用于创建锚标记 <A NAME = “marker”>主题名称</A> – 为达到这种 ...
- [Android Security] 反编译常用工具
copy : https://down.52pojie.cn/Tools/Disassemblers/
- Unicode 和 UTF-8 的区别
作者:于洋链接:https://www.zhihu.com/question/23374078/answer/69732605来源:知乎著作权归作者所有.商业转载请联系作者获得授权,非商业转载请注明出 ...
- Failed to register: Error: fabric-ca request register failed with errors [[{"code":0,"message":"No identity type provided. Please provide identity type"}]]解决方案
I try to run sample application as stated here : http://hyperledger-fabric.readthedocs.io/en/release ...
- Bias(偏差),Error(误差),和Variance(方差)的区别和联系
准: bias描述的是根据样本拟合出的模型的输出预测结果的期望与样本真实结果的差距,简单讲,就是在样本上拟合的好不好.要想在bias上表现好,low bias,就得复杂化模型,增加模型的参数,但这样容 ...
- 使用jstl标签时提示The absolute uri: http://java.sun.com/jsp/jstl/core cannot
http://www.360doc.com/content/11/1219/15/1007797_173395882.shtml 检查应用目录下WEB-INF的lib里是否有jstl.jar和stan ...