[py]django上线部署-uwsgi+nginx+py3/django1.10
https://github.com/lannyMa/django-uwsgi-nginx.git
单机调试启动-确保项目代码没问题
- 克隆代码进入项目

git clone https://github.com/lannyMa/django-blog-tutorial.git

cd django-blog-tutorial

- 创建并进入虚拟环境

pip install virtualenv

virtualenv blogproject_env

- 如果需要mysql-devel

yum install -y python-devel mysql-devel

pip install MySQL-python

- 安装项目依赖

pip install -r requirements.txt

- 同步数据库,创建超级管理员

python manage.py migrate

python manage.py createsuperuser

- 运行

python manage.py runserver

- 访问

http://127.0.0.1:8000

http://127.0.0.1:8000/admin

代码没问题后,考虑部署到生产
生产部署-nginx+uwsgi+django10
部署详情说明
项目源代码: https://github.com/lannyMa/django-blog-tutorial-deploy.git
项目基于Django 1.10 和 Python 3.5
uwsgi+nginx,nginx反代static目录
自己打docker image,容器化部署
dockerfile有py3和py3的环境, supervisor启动nginx+uwsgi
docker镜像(baseimage+code)代码我放到镜像里了,直接run镜像就可以跑起来直接访问了. 先快速跑一下吧.
docekr pull lanny/blog-uwsgi-py3-django1.10

docker run -d -p 8080:80 lanny/blog-uwsgi-py3-django1.10

http://x:8080 来访问,已测过没问题
探究下怎么制作docker镜像
- 先搞清楚nginx+uwsgi+django物理机上是怎么配合工作的,确保手动一步步启动完成没问题,然后再做镜像
- nginx启动 /usr/sbin/nginx
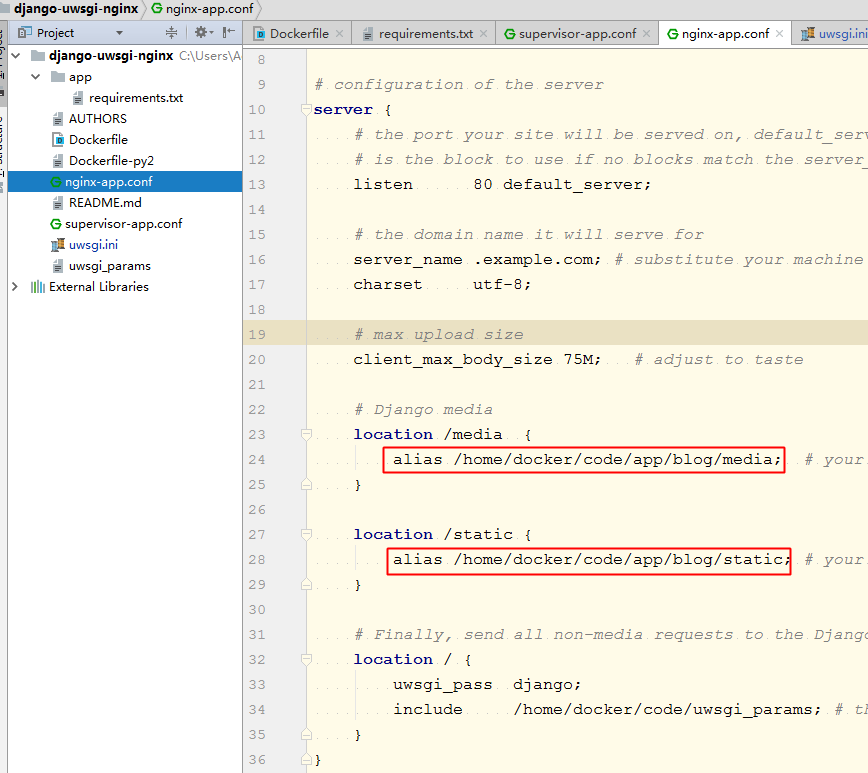
看下nginx.conf配置
# Django media
location /media {
alias /home/docker/code/app/blog/media; # your Django project's media files - amend as required
}
location /static {
alias /home/docker/code/app/blog/static; # your Django project's static files - amend as required
}
# Finally, send all non-media requests to the Django server.
location / {
uwsgi_pass django;
include /home/docker/code/uwsgi_params; # the uwsgi_params file you installed
}
- 原来nginx把归py处理的uwsgi_pass发给了django的uwsgi,uwsgi用uwsgi_params解析
uwsgi.ini配置文件
[base]
chdir = %dapp/
module=blogproject.wsgi:application
chmod-socket=666
- uwsgi启动
/usr/local/bin/uwsgi --ini /home/docker/code/uwsgi.ini #启动后会监听端口供与nginx通信
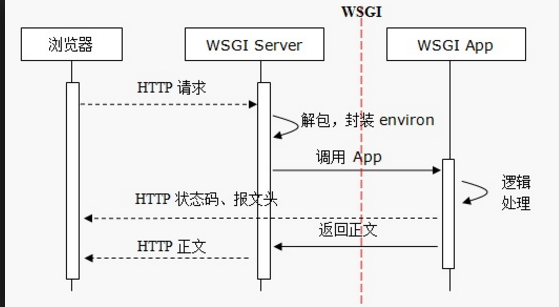
- 文末附录有nginx与wsgi通信原理介绍.
搞清楚了这些后,更近一步着手制作uwsgi+django的docker镜像.
定制属于自己项目的docker镜像
参考地址:这里有python2 和python3版本的环境.可以满足日常需求了.
https://hub.docker.com/r/dockerfiles/django-uwsgi-nginx/
https://github.com/dockerfiles/django-uwsgi-nginx
- 先下载dockerfile: 目录如下
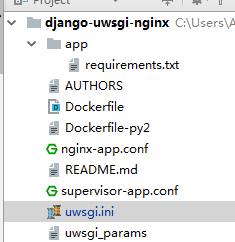
完整的dockerfile和相关配置的关键部分如下
- dockerfile

FROM ubuntu:16.04

MAINTAINER Dockerfiles

# Install required packages and remove the apt packages cache when done.

RUN apt-get update && \

    apt-get upgrade -y && \

    apt-get install -y \

    git \

    python3 \

    python3-dev \

    python3-setuptools \

    python3-pip \

    python3-dev \

    libmysqlclient-dev \

    nginx \

    supervisor \

    sqlite3 && \

    pip3 install -U pip setuptools && \

   rm -rf /var/lib/apt/lists/*

# install uwsgi now because it takes a little while

RUN pip3 install uwsgi

# setup all the configfiles

RUN echo "daemon off;" >> /etc/nginx/nginx.conf

COPY nginx-app.conf /etc/nginx/sites-available/default

COPY supervisor-app.conf /etc/supervisor/conf.d/

# COPY requirements.txt and RUN pip install BEFORE adding the rest of your code, this will cause Docker's caching mechanism

# to prevent re-installing (all your) dependencies when you made a change a line or two in your app.

COPY app/requirements.txt /home/docker/code/app/

RUN pip3 install -r /home/docker/code/app/requirements.txt

# add (the rest of) our code

COPY . /home/docker/code/

RUN git clone https://github.com/lannyMa/django-blog-tutorial-deploy.git tmp && \

    mv tmp/* /home/docker/code/app/ && \

    rm -rf tmp

# install django, normally you would remove this step because your project would already

# be installed in the code/app/ directory

#RUN django-admin.py startproject website /home/docker/code/app/

EXPOSE 80

CMD ["supervisord", "-n"]

- supervisor配置

[program:app-uwsgi]

command = /usr/local/bin/uwsgi --ini /home/docker/code/uwsgi.ini

[program:nginx-app]

command = /usr/sbin/nginx

uwsgi.ini配置文件

[base]

chdir = %dapp/

module=blogproject.wsgi:application

chmod-socket=666
- 修改上面docekrfile的这部分为自己的git项目地址
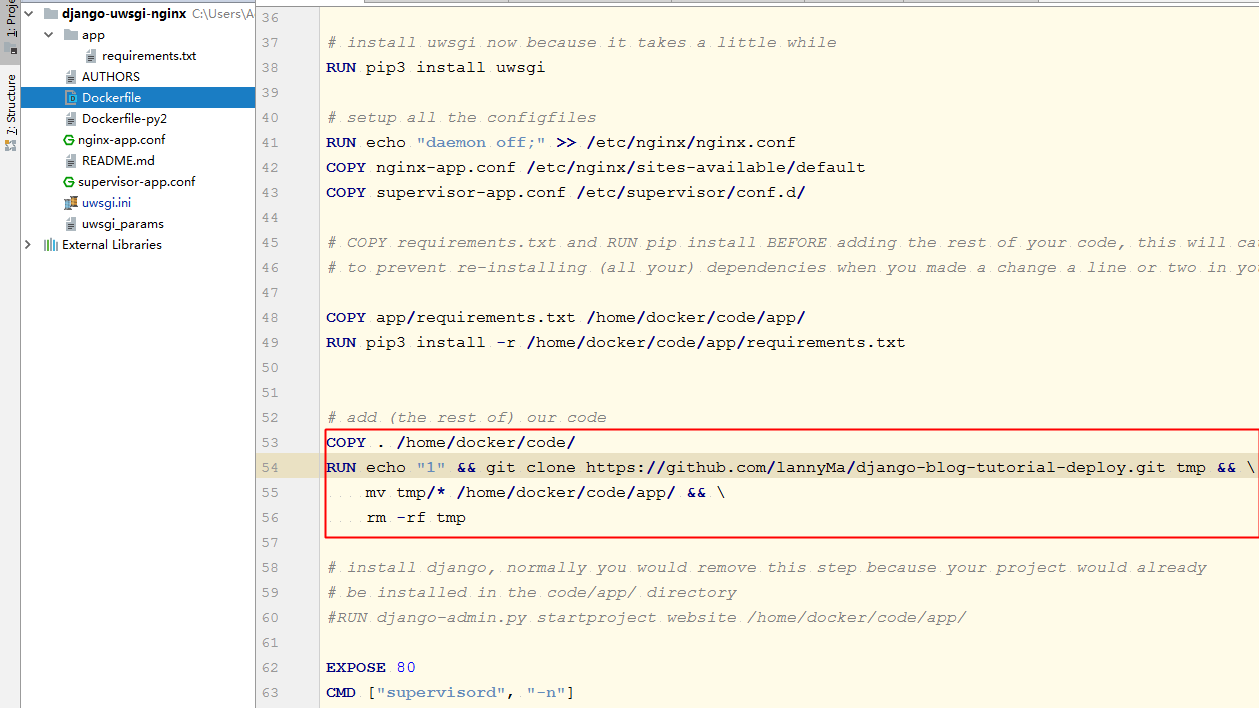
即可修改:
Dockerfile

RUN git clone https://github.com/lannyMa/django-blog-tutorial-deploy.git tmp && \

    mv tmp/* /home/docker/code/app/ && \

    rm -rf tmp
- 修改项目settings.py为

settings.py

ALLOWED_HOSTS = ['*']
- 修改nginx-app.conf的(django项目)static路径.
nginx.conf

    location /media  {

        alias /home/docker/persistent/media;  # your Django project's media files - amend as required

    }

    location /static {

        alias /home/docker/volatile/static; # your Django project's static files - amend as required

    }
等这一切修改完成后,开始构建镜像
- 构建docker镜像并运行
docker build -t webapp .

docker run -d -p 80:80 webapp

- 运行后访问即可

docker run -d -p 8080:80 webapp
遇到的问题
界面乱码,css未加载成功

解决: 修改nginx配置为自己项目static的地址
    location /media  {

        alias /home/docker/persistent/media;  # your Django project's media files - amend as required

    }

    location /static {

        alias /home/docker/volatile/static; # your Django project's static files - amend as required

    }
不允许访问,权限拒绝
解决: 修改settings.py
ALLOWED_HOSTS = ['写自己服务器的ip即可']
uwsgi启动失败,扫描不到项目
修改uwsgi.ini

修改为自己项目的地址,
module=blogproject.wsgi:application
这里uwsgi调用的是项目的这个

nginx调用uwsgi.ini

nginx-app.conf
# nginx-app.conf

# the upstream component nginx needs to connect to

upstream django {

    server unix:/home/docker/code/app.sock; # for a file socket

    # server 127.0.0.1:8001; # for a web port socket (we'll use this first)

}

# configuration of the server

server {

    # the port your site will be served on, default_server indicates that this server block

    # is the block to use if no blocks match the server_name

    listen      80 default_server;

    # the domain name it will serve for

    server_name .example.com; # substitute your machine's IP address or FQDN

    charset     utf-8;

    # max upload size

    client_max_body_size 75M;   # adjust to taste

    # Django media

    location /media  {

        alias /home/docker/code/app/blog/media;  # your Django project's media files - amend as required

    }

    location /static {

        alias /home/docker/code/app/blog/static; # your Django project's static files - amend as required

    }

    # Finally, send all non-media requests to the Django server.

    location / {

        uwsgi_pass  django;

        include     /home/docker/code/uwsgi_params; # the uwsgi_params file you installed

    }

}
uwsgi.ini
[uwsgi]

# this config will be loaded if nothing specific is specified

# load base config from below

ini = :base

# %d is the dir this configuration file is in

socket = %dapp.sock

master = true

processes = 4

[dev]

ini = :base

# socket (uwsgi) is not the same as http, nor http-socket

socket = :8001

[local]

ini = :base

http = :8000

# set the virtual env to use

home=/Users/you/envs/env

[base]

chdir = %dapp/

module=blogproject.wsgi:application

chmod-socket=666
附: 什么是wsgi,和django/flask有什么关系
the web client <-> the web server(nginx) <-> the socket <-> uwsgi <-> Django

gunicorn vs uwsgi是两种不同的appserver

gunicorn vs uwsgi: http://fatelei.github.io/2015/07/05/Gunicorn-vs-uwsgi/

uwsgi在高并发下比gunicorn有更好的吞吐量和更少的错误数


[py]django上线部署-uwsgi+nginx+py3/django1.10的更多相关文章
- Django 部署 uwsgi + nginx + supervisor
Django 部署 uwsgi + nginx + supervisor https://hacpai.com/article/1460607620615?p=1&m=0 zonghua • ...
- django 本地项目部署uwsgi 以及云服务器部署 uwsgi+Nginx+Docker+MySQL主从
一 .django 本地项目部署uwsgi 1 本地部署项目 uwsgi安装测试 通过uwsgi 进行简单部署 安装uwsgi命令:pip install uwsgi -i http://pypi.d ...
- django项目在uwsgi+nginx上部署遇到的坑
本文来自网易云社区 作者:王超 问题背景 django框架提供了一个开发调试使用的WSGIServer, 使用这个服务器可以很方便的开发web应用.但是 正式环境下却不建议使用这个服务器, 其性能.安 ...
- django自带wsgi server vs 部署uwsgi+nginx后的性能对比
一.下面先交代一下测试云主机 cpu: root@alexknight:/tmp/webbench-1.5# cat /proc/cpuinfo |grep model model : model n ...
- Django应用部署:nginx+uwsgi方式
环境准备 nginx+uwsgi方式部署顾名思义,需要nginx和uwsgi两个软件包. nginx不用说,是必备的,关于nginx的安装本文不再赘述,详情可以自行搜索或者参考我以前的文章: Debi ...
- (转) 解决django项目部署到nginx+uwsgi服务器后 admin页面样式消失的问题
原贴地址:https://blog.csdn.net/qq_42571805/article/details/80862455 摘要 uwsgi为主要服务器,nginx为反向代理服务器部署完成之后发现 ...
- Django上线部署之uWSGI
环境: 1.CentOS 7.2 64位 2.SQL Server 2016 Enterprise 64位 3.Python 3.6.5 64位 4.root用户 要求: 按照顺序部署 1.Windo ...
- CentOS 傻瓜式部署uWSGI + nginx + flask
交代背景 这篇帖子是为了提供我自己的July Novel站点的小说数据支撑.解决分布式部署爬虫程序的繁琐过程,由于本人对shell编程并不熟悉,故而先逐步记录操作步骤,通过以下操作达到节省时间的方式. ...
- Django上线部署之IIS
环境: 1.Windows Server 2016 Datacenter 64位 2.SQL Server 2016 Enterprise 64位 3.Python 3.6.0 64位 4.admin ...
随机推荐
- composer安装指定版本的laravel
composer create-project laravel/laravel blog 4.2.*
- C# mvc 500 内部服务器访问异常
20161018 项目发布到IIS上后,无法访问,由于页面默认跳转到异常处理去了,所以详细信息一直查看不了. 在找寻无果,异常信息日志记录无效的情况下,只好一点点来测试了 在异常处理前,就已经试过,a ...
- C语言预处理命令详解
一 前言 预处理(或称预编译)是指在进行编译的第一遍扫描(词法扫描和语法分析)之前所作的工作.预处理指令指示在程序正式编译前就由编译器进行的操作,可放在程序中任何位置. 预处理是C语言的一个重要功能 ...
- Android SAX、DOM、Pull解析xml文件剖析与案例讲解
XML介绍 XML(Extensible Markup Language) 即可扩展标记语言,与HTML一样,都是SGML(Standard Generalized Markup Language,标 ...
- ubuntu 用aptitude代替apt-get处理依赖性问题
aptitude 与 apt-get 一样,是 Debian 及其衍生系统中功能极其强大的包管理工具.与 apt-get 不同的是,aptitude 在处理依赖问题上更佳一些.举例来说,aptitud ...
- java(8) HashMap源码
系统环境: JDK1.7 HashMap的基本结构:数组 + 链表.主数组不存储实际的数据,存储的是链表首地址. 成员变量 //默认数组的初始化大小为16 static final int DEFAU ...
- Apache Shiro 反序列化RCE漏洞
漏洞介绍 漏洞类型 :JAVA反序列化(RCE) 影响版本 :Apache Shiro 1.2.4及其之前版本 漏洞评级 :高危 漏洞分析 #: 下载漏洞环境: git clone https://g ...
- block 的细节和本质
案例1: 普通的局部变量,block内部只会引用它初始的值(block定义那一刻),不能跟踪它的改变 输出:1 案例2: block内部能够一直引用被__block修饰的变量 输出:2 案例3: bl ...
- Js中对id和class属性进行模糊查询
如题,从例子说明: <div id="divid" class="divclass" > <a id="divid-a" ...
- BC32206 错误
出现这种情况的话 排除代码引入dll版本的原因 看下是不是 你之前用net reflector 生成了pdb文件 导致项目引入的版本都是他生成的文件 处理方案就是 用everything 找到这个dl ...