Django+Bootstrap+Mysql 搭建个人博客 (六)
6.1.comments插件
(1)安装
pip install django-contrib-comments
(02)settings
INSTALLED_APPS = [

          'django.contrib.sites',

          'django_comments',

]
SITE_ID =1

(3)website/url
url(r'^comments/', include('django_comments.urls')),
(4)修改源码
django_comments/abstracts.py第36行
原代码
site = models.ForeignKey(Site, on_delete=models.CASCADE)
修改后
site = models.ForeignKey(Site,default=None,blank=True,null=True,on_delete=models.CASCADE)
(5)修改源码
django_comments/abstracts.py第52行
修改和增加了几个字段
class CommentAbstractModel(BaseCommentAbstractModel):

    """

    A user comment about some object.

    """

    # Who posted this comment? If ``user`` is set then it was an authenticated

    # user; otherwise at least user_name should have been set and the comment

    # was posted by a non-authenticated user.

    user = models.ForeignKey(settings.AUTH_USER_MODEL, verbose_name=_('user'),

                             blank=True, null=True, related_name="%(class)s_comments",

                             on_delete=models.SET_NULL)

    # Explicit `max_length` to apply both to Django 1.7 and 1.8+.

    user_email = models.EmailField(_("user's email address"), max_length=254,

                                   blank=True,null=True,default='xxx@xxx.com')

    user_url = models.URLField(_("user's URL"), blank=True,null=True,default='https://xxx.xxx.xxx.xxx')

    user_name = models.CharField(_("user's name"), max_length=50, blank=True)

    user_img = models.ImageField(upload_to="user_images", blank=True,null=True,verbose_name="用户图像")

    comment_title = models.CharField(max_length=256,default="无标题", blank=True,null=True,verbose_name="评论标题")

    parent_comment = models.ForeignKey('self',default=None, blank=True,null=True,related_name="child_comment",on_delete=models.CASCADE)
    level = models.PositiveIntegerField(default=0, blank=True,null=True,verbose_name='评论层级') comment = models.TextField(_('comment'), max_length=COMMENT_MAX_LENGTH)
    .
    .
    .
    .
(6)修改源码
django_comments/admin.py第29和37行
_('Content'),

            {'fields': ('user', 'user_name', 'user_email', 'user_url', 'comment','comment_title','parent_comment')}
list_display = ('comment_title','name', 'content_type', 'object_pk', 'ip_address', 'submit_date', 'is_public', 'is_removed')
(7)修改源码
django_comments/forms.py第97行表单
    class CommentDetailsForm(CommentSecurityForm):
     """
    Handles the specific details of the comment (name, comment, etc.).

      """

    # name = forms.CharField(label=pgettext_lazy("Person name", "Name"), max_length=50)

    # email = forms.EmailField(label=_("Email address"))

    # url = forms.URLField(label=_("URL"), required=False)

    # Translators: 'Comment' is a noun here.

    comment = forms.CharField(label=_('Comment'), widget=forms.Textarea,

                              max_length=COMMENT_MAX_LENGTH)

    comment_title = forms.CharField(max_length=256,label=_('标题'))

    parent_id = forms.IntegerField(min_value=-1,label=_('父评论的id'))

    level = forms.IntegerField(min_value=0,label=_('层级'),)
  .
  .
  .


    def get_comment_create_data(self, site_id=None):

        """

        Returns the dict of data to be used to create a comment. Subclasses in

        custom comment apps that override get_comment_model can override this

        method to add extra fields onto a custom comment model.

        """

        parent_id = self.cleaned_data['parent_id']

        if parent_id <= 0:

            parent = None

            _level = self.cleaned_data['level']

        else:

            parent = get_model().objects.get(id=parent_id)

            _level = self.cleaned_data['level'] + 4    # 4是缩进

        return dict(

            content_type=ContentType.objects.get_for_model(self.target_object),

            object_pk=force_text(self.target_object._get_pk_val()),

            # user_name=self.cleaned_data["name"],

            # user_email=self.cleaned_data["email"],

            # user_url=self.cleaned_data["url"],

            comment_title = self.cleaned_data['comment_title'],

            parent_comment = parent,

            level = _level,

            comment=self.cleaned_data["comment"],

            submit_date=timezone.now(),

            site_id=site_id or getattr(settings, "SITE_ID", None),

            is_public=True,

            is_removed=False,

        )
(8)修改源码
django_comments/views/comments.py第97行表单
52行
  # 添加

    if not request.session.get('login', None) and not user_is_authenticated:

        return redirect("/")
116行
   # if user_is_authenticated:

    #     comment.user = request.user

    #添加

    if request.session.get('login',None):

        comment.user_name = request.session['screen_name']

        comment.user_img = request.session['profile_image_url']
以上都修改完后
python manage.py makemigtations

python manage.py migrate
6.2.评论表单
detail.html
<div class="row">
<hr />
{% get_comment_form for entry as form %}
{% get_comment_count for entry as comment_count %}
<h3 >评论总数: {{ comment_count }}</h3>
<hr />
</div> <div class="row">
<form class="form-horizontal" action="{% comment_form_target %}" method="post">
{% csrf_token %}
<div class="form-group">
<label for="input_title" class="pull-left control-label">评论标题:</label>
<div class="col-sm-6">
<input class="form-control" name="comment_title" id="input_title" placeholder="请输入标题" required />
</div>
</div>
<div class="form-group">
<label for="input_comment" class="pull-left control-label">评论内容:</label>
<div class="col-sm-6">
<textarea style="resize:none;" class="form-control" rows=6 name="comment" id="input_comment" placeholder="在此输入评论" required></textarea>
</div>
</div>
<span style="display: none;">{{ form.honeypot }}</span>
{{ form.content_type }}
{{ form.object_pk }}
{{ form.timestamp }}
{{ form.security_hash }}
<input type="hidden" name="next" value="{% url 'blog:blog_detail' entry.id %}" />
<input name="parent_id" type="hidden" value="-1" />
<input name="level" type="hidden" value="" /> <div class="form-group col-sm-7">
<div class="pull-left" style="margin-left: 68px;">
<button type="reset" class="btn btn-default"><span class="glyphicon glyphicon-repeat"></span> 重置</button>
</div>
<div class="pull-right" style="margin-right: 12px;">
<button type="submit" class="btn btn-success" id="id_submit"><span class="glyphicon glyphicon-send"></span> 评论</button>
</div>
</div>
</form>
</div>
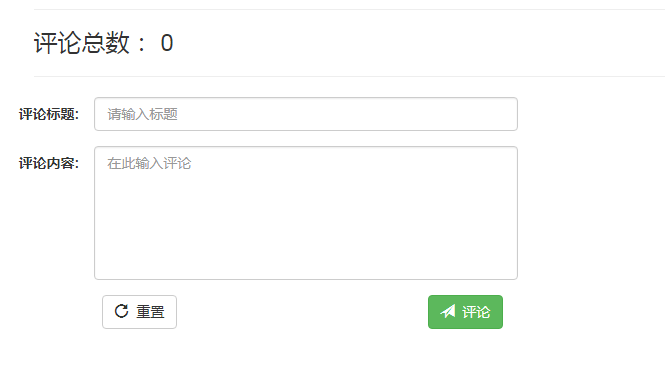
效果:

现在测试评论,可以添加成功,但是还不能显示
6.3.显示评论
(1)views.py
from django_comments.models import Comment

def detail(request,blog_id):

    # entry = models.Entry.objects.get(id=blog_id)

    entry = get_object_or_404(models.Entry,id=blog_id)

    md = markdown.Markdown(extensions=[

        'markdown.extensions.extra',

        'markdown.extensions.codehilite',

        'markdown.extensions.toc',

    ])

    entry.body = md.convert(entry.body)

    entry.toc = md.toc

    entry.increase_visiting()

    comment_list = list()

    def get_comment_list(comments):

        for comment in comments:

            comment_list.append(comment)

            children = comment.child_comment.all()

            if len(children) > 0:

                get_comment_list(children)

    top_comments = Comment.objects.filter(object_pk=blog_id, parent_comment=None,

                                          content_type__app_label='blog').order_by('-submit_date')

    get_comment_list(top_comments)

    return render(request, 'blog/detail.html', locals())
(2)detail.html
<div class="row">
<hr />
{% get_comment_form for entry as form %}
{% get_comment_count for entry as comment_count %}
<h3 >评论总数: {{ comment_count }}</h3>
<hr />
</div> {# 评论表单#}
{% if request.session.login or request.user.is_authenticated %}
<div class="row">
<form class="form-horizontal" action="{% comment_form_target %}" method="post">
{% csrf_token %}
<div class="form-group">
<label for="input_title" class="pull-left control-label">评论标题:</label>
<div class="col-sm-6">
<input class="form-control" name="comment_title" id="input_title" placeholder="请输入标题" required />
</div>
</div>
<div class="form-group">
<label for="input_comment" class="pull-left control-label">评论内容:</label>
<div class="col-sm-6">
<textarea style="resize:none;" class="form-control" rows=6 name="comment" id="input_comment" placeholder="在此输入评论" required></textarea>
</div>
</div>
<span style="display: none;">{{ form.honeypot }}</span>
{{ form.content_type }}
{{ form.object_pk }}
{{ form.timestamp }}
{{ form.security_hash }}
<input type="hidden" name="next" value="{% url 'blog:blog_detail' entry.id %}" />
<input name="parent_id" type="hidden" value="-1" />
<input name="level" type="hidden" value="0" /> <div class="form-group col-sm-7">
<div class="pull-left" style="margin-left: 68px;">
<button type="reset" class="btn btn-default"><span class="glyphicon glyphicon-repeat"></span> 重置</button>
</div>
<div class="pull-right" style="margin-right: 12px;">
<button type="submit" class="btn btn-success" id="id_submit"><span class="glyphicon glyphicon-send"></span> 评论</button>
</div>
</div> </form>
</div>
{% else %}
<h3>登陆后才可以评论</h3>
{% endif %}
<hr /> {# 评论显示区#}
<div class="row">
{% for comment in comment_list %}
<div class="single_comment" style="margin-left: {{ comment.level }}em">
<div>
{% if comment.user_img %}
<img src="{{ comment.user_img }}" alt="user_image" />
{% else %}
<img src="{% static 'blog/images/cl.jpg' %}" />
{% endif %}
</div>
<div class="col-md-11 comment-content" style="margin-bottom: 10px;">
<strong>{{ comment.comment_title }}</strong>
<div>
{% if comment.parent_comment %}
{{ comment.user_name }}{{ request.user }}
<i class="glyphicon glyphicon-share-alt"></i>
{{ comment.parent_comment.user_name }}{{ request.user }}
{% else %}
By
{{ comment.user_name }}{{ request.user }}
On
{% endif %}
<em>{{ comment.submit_date }}</em>
{% if request.session.login or request.user.is_authenticated %}
<a href="#">回复</a>
{% endif %}
</div>
<br />
<p>{{ comment.comment }}</p>
</div>
</div>
{% endfor %}
</div>
</div>
(3)static/blog/images/cl.jpg
设置默认图片(如果没有登录就显示默认图片,为了测试评论)

(4)blog/blog_comment.css
hr {

    border-top: 1px solid lightgrey;

    border-bottom: 1px solid #fff;

}

.single_comment {

    margin-bottom: 20px;

    font-family: "Microsoft Yahei","微软雅黑",Arial,Helvetica,STHeiti,sans-serif,"Apple Color Emoji","Segoe UI Emoji","Segoe UI Symbol";

}

.single_comment img {

    width:50px;

    height:50px;

    border-radius:50%;

    overflow:hidden;

    float: left;

    margin-left: 10px;

    margin-top: 5px;

}

.single_comment p {

    margin-bottom:;

}

.comment-content {

    border-bottom: 1px dashed lightgrey;

    border-left: 1px dashed #2d7da4;

    padding-bottom: 5px;

}
detail.html引用
{% block css %}

    <link rel="stylesheet" href="{% static 'blog/css/github.css' %}">

    <link rel="stylesheet" href="{% static 'blog/css/blog_comment.css' %}">

{% endblock %}
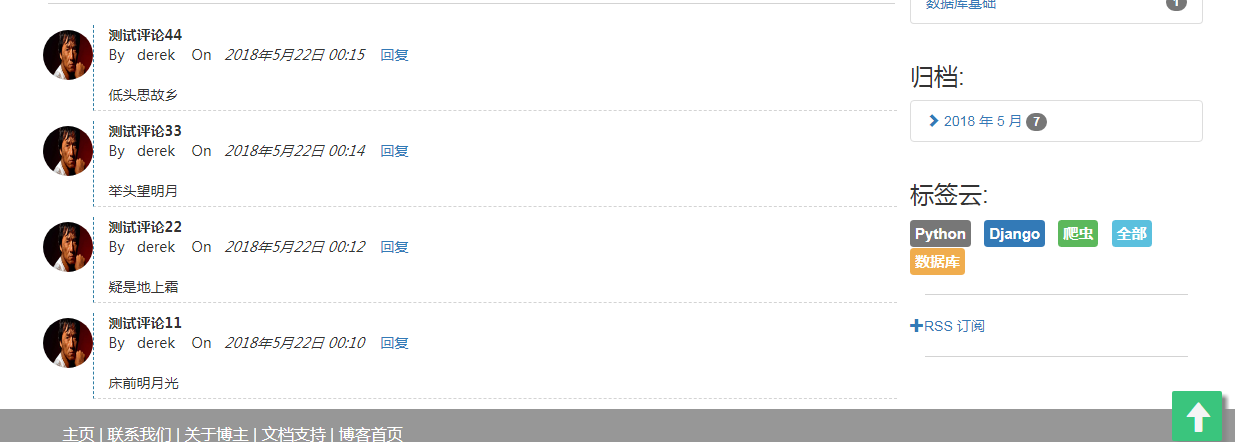
效果:

6.4.评论回复
(1)blog/urls.py
url(r'^reply/(?P<comment_id>\d+)/$', views.reply, name='comment_reply'),
(2)views.py
from django_comments import models as comment_models

def reply(request, comment_id):

    if not request.session.get('login', None) and not request.user.is_authenticated():

        return redirect('/')

    parent_comment = get_object_or_404(comment_models.Comment, id=comment_id)

    return render(request, 'blog/reply.html', locals())
(3)blog/reply.html
{% extends 'blog/base.html' %}
{% load comments %}
{% load static %}
{% block title %}回复评论{% endblock %}
{% block css %}
<link rel="stylesheet" href="{% static 'blog/css/blog_comment.css' %}">
{% endblock %}
{% block content %}
<div class="container-fluid" style="margin: 30px 50px 0 50px;min-height: 450px;">
<div class="row">
<div class="single_comment">
<div>
{% if request.session.login %}
<img src="{{ parent_comment.user_img }}" alt="user_img" />
{% else %}
<img src="{% static 'blog/images/cl.jpg' %}" alt="admin_img" />
{% endif %}
</div>
<div class="col-md-11">
<strong>{{ parent_comment.comment_title }}</strong>
<div class="small">
<strong>{{ parent_comment.username }} {{ request.user }}</strong>
<em>{{ parent_comment.submit_date }}</em>
</div>
<br />
<p>{{ parent_comment.comment }}</p>
</div>
</div>
</div>
<br />
{% if request.session.login or request.user.is_authenticated %}
<div class="row" style="margin-left: 30px;">
<h3>回复 {{ parent_comment.username }}{{ request.user }} 的评论:</h3>
{% get_comment_form for parent_comment.content_object as form %}
<form class="form-horizontal" action="{% comment_form_target %}" method="post">
{% csrf_token %}
<div class="form-group">
<label for="input_title" class="pull-left control-label">评论标题:</label>
<div class="col-sm-6">
<input class="form-control" name="comment_title" id="input_title" placeholder="请输入标题" required />
</div>
</div>
<div class="form-group">
<label for="input_comment" class="pull-left control-label">评论内容:</label>
<div class="col-sm-6">
<textarea style="resize:none;" class="form-control" rows=6 name="comment" id="input_comment" placeholder="在此输入评论" required></textarea>
</div>
</div>
<span style="display: none;">{{ form.honeypot }}</span>
{{ form.content_type }}
{{ form.object_pk }}
{{ form.timestamp }}
{{ form.security_hash }}
<input type="hidden" name="next" value="{% url 'blog:blog_detail' parent_comment.content_object.id %}" />
<input name="parent_id" type="hidden" value="{{ parent_comment.id }}" />
<input name="level" type="hidden" value="{{ parent_comment.level }}" />
<div class="form-group col-sm-7">
<div class="pull-left" style="margin-left: 68px;">
<button type="reset" class="btn btn-default"><span class="glyphicon glyphicon-repeat"></span> 重置</button>
</div>
<div class="pull-right" style="margin-right: 12px;">
<button type="submit" class="btn btn-success" id="id_submit"><span class="glyphicon glyphicon-send"></span> 评论</button>
</div>
</div>
</form>
</div>
{% else %}
<h3>登陆后才可以评论</h3>
{% endif %}
<br />
<div>
<a href="{% url 'blog:blog_detail' parent_comment.content_object.id %}">暂时不评论,返回先前页面!</a>
</div>
</div>
{% endblock %}
(4)detail.html
<a href="{% url 'blog:comment_reply' comment.id %}">回复</a>
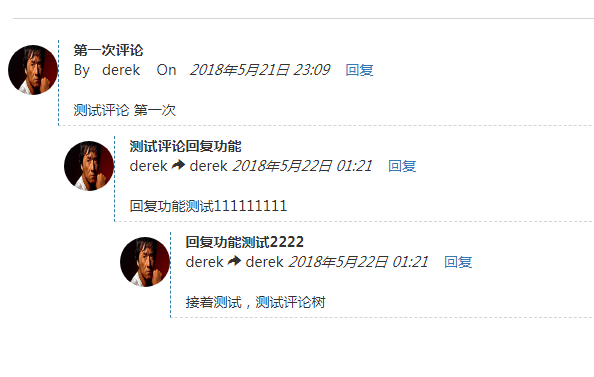
测试回复功能如下:

6.5.新浪微博登录
(1)settings
CLIENT_ID = 224188xxx

APP_SECRET = '76daf2e9e424xxxx71144154f5xx32xx'
(2)website/urls.py
url(r'^login/$', blog_views.login),

url(r'^logout/$', blog_views.logout),
(3)views.py
def login(request):

    import requests

    import json

    from django.conf import settings

    code = request.GET.get('code', None)

    if code is None:

        return redirect('/')

    access_token_url = 'https://api.weibo.com/oauth2/access_token?client_id=%s&client_secret=%s&grant_type=authorization_code&redirect_uri=http://127.0.0.1:8000/login&code=%s'\

                        %(settings.CLIENT_ID, settings.APP_SECRET, code)

    ret = requests.post(access_token_url)

    data = ret.text    #微博返回的数据是json格式的

    data_dict = json.loads(data)   #转换成python字典格式

    token = data_dict['access_token']

    uid = data_dict['uid']

    request.session['token'] = token

    request.session['uid'] = uid

    request.session['login'] = True

    user_info_url = 'https://api.weibo.com/2/users/show.json?access_token=%s&uid=%s' % (token, uid)

    user_info = requests.get(user_info_url)

    user_info_dict = json.loads(user_info.text)   #获取微博用户的信息

    request.session['screen_name'] = user_info_dict['screen_name']

    request.session['profile_image_url'] = user_info_dict['profile_image_url']

    return redirect(request.GET.get('next', '/'))

def logout(request):

    if request.session['login']:

        del request.session['login']

        del request.session['uid']

        del request.session['token']

        del request.session['screen_name']

        del request.session['profile_image_url']

        return redirect(request.Get.get('next', '/'))

    else:

        return redirect('/')
(4)base.html
<ul class="nav navbar-nav navbar-right">
{% if request.session.login %}
<li>{{ request.session.screen_name }}<a href="/logout/?next={{ request.path }}">
<i class="glyphicon glyphicon-log-out"></i>注销</a></li>
{% else %}
<li>
<a href="https://api.weibo.com/oauth2/authorize?client_id=2241881638&response_type=code&redirect_uri=http://127.0.0.1:8000/login/?next={{ request.path }}">
<i class="glyphicon glyphicon-log-in"></i> 登录</a></li>
{% endif %}
</ul>
6.6.部署
(1)settings
STATIC_ROOT = os.path.join(BASE_DIR,'all_static_files')
(2)uwsgi.ini
[uwsgi]

socket =127.0.0.1 :8000

chdir = /home/github_project/Myblog

module = Myblog.wsgi

master = true

processes = 4

vacuum = true

virtualenv = /root/.virtualenvs/myblog

logto = /tmp/mylog.log
(3)Myblog.conf
# the upstream component nginx needs to connect to

upstream django {

# server unix:///path/to/your/mysite/mysite.sock; # for a file socket

server 127.0.0.1:8000; # for a web port socket (we'll use this first)

}

# configuration of the server

server {

# the port your site will be served on

listen      80;

# the domain name it will serve for

server_name 116.85.52.205; # substitute your machine's IP address or FQDN

charset     utf-8;

# max upload size

client_max_body_size 75M;   # adjust to taste

# Django media

location /media  {

    alias /home/github_project/Myblog/media;  # 指向django的media目录

}

location /static {

    alias /home/github_project/Myblog/all_static_files; # 指向django的static目录

}

# Finally, send all non-media requests to the Django server.

location / {

    uwsgi_pass  django;

    include     uwsgi_params; # the uwsgi_params file you installed

}

}
Django+Bootstrap+Mysql 搭建个人博客 (六)的更多相关文章
- Django+Bootstrap+Mysql 搭建个人博客(一)
1.1.环境搭建 (1)虚拟环境 mkvirtualenv website pip install django==1.11.7 (2)创建项目和app:website和blog (3)设置中文set ...
- Django+Bootstrap+Mysql 搭建个人博客(五)
5.1.自定义403,404和500页面 (1)website/urls.py from blog import views as blog_views handler403 = blog_views ...
- Django+Bootstrap+Mysql 搭建个人博客(四)
4.1.博客分类 (1)blog_tags.py @register.simple_tag def get_categories(): return Category.objects.all() @r ...
- Django+Bootstrap+Mysql 搭建个人博客(三)
3.1.分页功能 (1)views.py from django.core.paginator import Paginator,EmptyPage,PageNotAnInteger def make ...
- Django+Bootstrap+Mysql 搭建个人博客(二)
2.1.博客首页设计 (1)settings.py MEDIA_ROOT = os.path.join(BASE_DIR,'media').replace("//","/ ...
- Django+Bootstrap+Mysql 搭建个人博客(六)
6.1.comments插件 (1)安装 pip install django-contrib-comments (02)settings INSTALLED_APPS = [ 'django.con ...
- Python Web开发:Django+BootStrap实现简单的博客项目
创建blog的项目结构 关于如何创建一个Django项目,请查看[Python Web开发:使用Django框架创建HolleWorld项目] 创建blog的数据模型 创建一个文章类 所有开发都是数据 ...
- django入门--django-blog-zinnia搭建个人博客
1.安装python 选择合适python2.7及以上版本安装https://www.python.org/downloads/ 2.建立虚拟环境 这不是必须的,但是建议使用,为每个项目单独引入依赖, ...
- Django两天搭建个人博客
传送门:https://github.com/1417766861/django-blog(可直接运行,上面有步骤) 效果: 首页: 侧栏: 详情页面: 修改头像,资料,文章发布: 支持添加标签拖拽 ...
随机推荐
- Bloom filter 2
1 Bloom filter 计算方法 如需要判断一个元素是不是在一个集合中,我们通常做法是把所有元素保存下来,然后通过比较知道它是不是在集合内,链表.树都是基于这种思路,当集合内元素个数的变大,我们 ...
- window配置mongodb集群(副本集)
参数解释: dbpath:数据存放目录 logpath:日志存放路径 pidfilepath:进程文件,有利于关闭服务 logappend:以追加的方式记录日志(boolean值) replSet:副 ...
- 前端mv框架下(目前写的是vue),对组件抽象的思考
前沿: 抽象是门大学问.前端mv框架中,以组件化的概念为主.经常会考虑抽象到组件级别,进行复用.合理的抽象,能提高效率,减少业务逻辑视图的耦合程度.不合理的抽象,则会增加代码的复杂程度. 遇到的问题 ...
- Qt与FFmpeg联合开发指南(三)——编码(1):代码流程演示
前两讲演示了基本的解码流程和简单功能封装,今天我们开始学习编码.编码就是封装音视频流的过程,在整个编码教程中,我会首先在一个函数中演示完成的编码流程,再解释其中存在的问题.下一讲我们会将编码功能进行封 ...
- 转载一篇makefile,说的很详细
March 3, 2015 8:19 PM 原文见:https://www.cnblogs.com/OpenShiFt/p/4313351.html Makefile 文件的编写 学习前的准备 需要准 ...
- 2017 Gartner数据科学魔力象限出炉,16位上榜公司花落谁家?
https://www.leiphone.com/news/201703/iZGuGfnER4Sv2zRe.html 2017年Gartner数据科学平台(在2016年被称作“高级分析平台”)的魔力象 ...
- 基于puppeteer模拟登录抓取页面
关于热图 在网站分析行业中,网站热图能够很好的反应用户在网站的操作行为,具体分析用户的喜好,对网站进行针对性的优化,一个热图的例子(来源于ptengine) 上图中能很清晰的看到用户关注点在那,我们不 ...
- 解决ExtJs Uncaught TypeError: c is not a constructor错误
ExtJs项目使用sencha app build编译以后,浏览时很容易抛出Uncaught TypeError: c is not a constructor的错误,而且会加载没有名称的js,例如 ...
- Xapth 添加注释头
private static void updateMybatisXml(String url, String username, String password) { DocumentBuilder ...
- cocos2d-x高级学习
弱联网开发技术: libcurl 添加lib文件:libcurl_imp.lib pthreadVCE2.lib 添加头文件:#include"curl/curl.h" curl ...
