python 关于操作文件的相关模块(os,sys,shutil,subprocess,configparser)
关于文件操作请参考:https://www.cnblogs.com/wj-1314/p/8476315.html
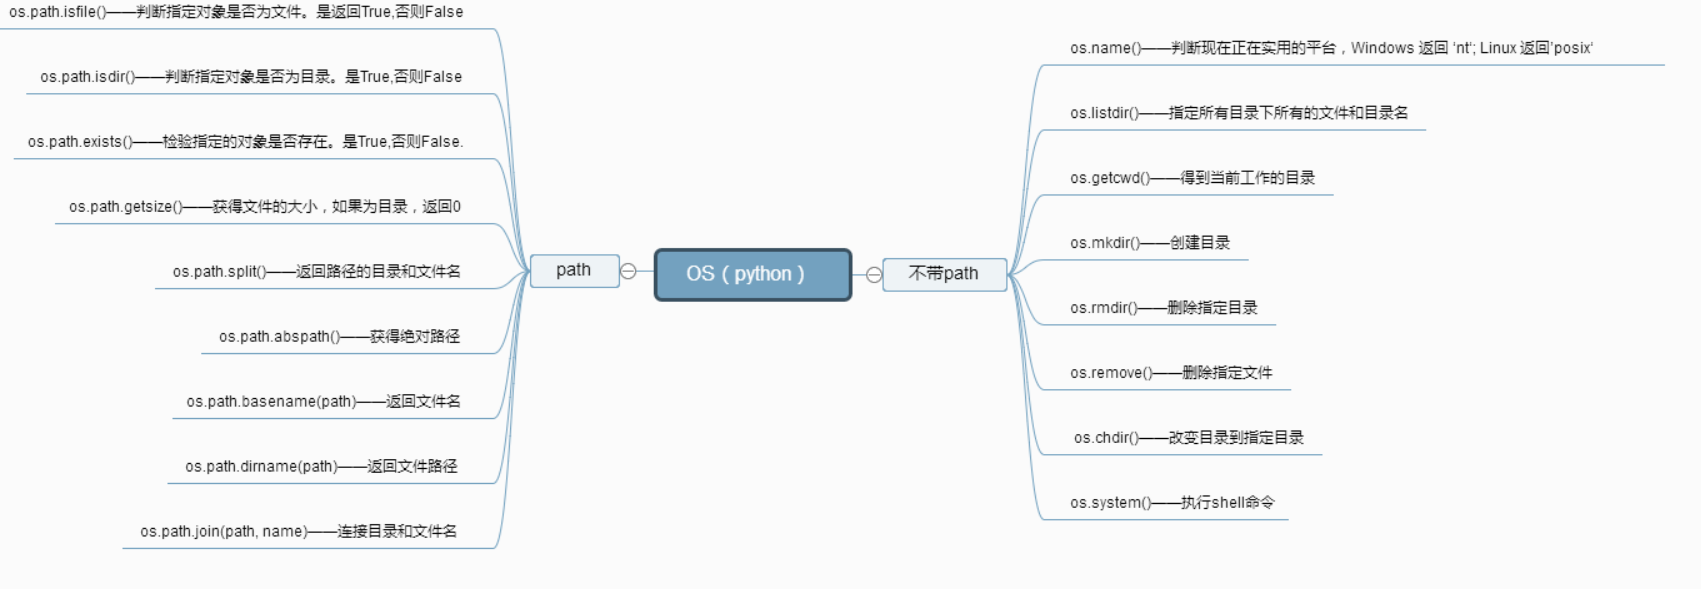
一:os模块
os模块提供了许多允许你程序与操作系统直接交互的功能
os.getcwd() 获取当前工作目录,即当前python脚本工作的目录路径

os.chdir("dirname")  改变当前脚本工作目录;相当于shell下cd

os.curdir  返回当前目录: ('.')

os.pardir  获取当前目录的父目录字符串名:('..')

os.makedirs('dirname1/dirname2')    可生成多层递归目录

os.removedirs('dirname1')    若目录为空,则删除,并递归到上一级目录,如若也为空,则删除,依此类推

os.mkdir('dirname')    生成单级目录;相当于shell中mkdir dirname

os.rmdir('dirname')    删除单级空目录,若目录不为空则无法删除,报错;相当于shell中rmdir dirname

os.listdir('dirname')    列出指定目录下的所有文件和子目录,包括隐藏文件,并以列表方式打印

os.remove()  删除一个文件

os.rename("oldname","newname")  重命名文件/目录

os.stat('path/filename')  获取文件/目录信息

os.sep    输出操作系统特定的路径分隔符,win下为"\\",Linux下为"/"

os.linesep    输出当前平台使用的行终止符,win下为"\t\n",Linux下为"\n"

os.pathsep    输出用于分割文件路径的字符串 win下为;,Linux下为:

os.name    输出字符串指示当前使用平台。win->'nt'; Linux->'posix'

os.system("bash command")  运行shell命令,直接显示

os.environ  获取系统环境变量

os.path.abspath(path)  返回path规范化的绝对路径

os.path.split(path)  将path分割成目录和文件名二元组返回

os.path.dirname(path)  返回path的目录。其实就是os.path.split(path)的第一个元素

os.path.basename(path)  返回path最后的文件名。如何path以/或\结尾,那么就会返回空值。即         os.path.split(path)的第二个元素

os.path.exists(path)  如果path存在,返回True;如果path不存在,返回False

os.path.isabs(path)  如果path是绝对路径,返回True

os.path.isfile(path)  如果path是一个存在的文件,返回True。否则返回False

os.path.isdir(path)  如果path是一个存在的目录,则返回True。否则返回False

os.path.join(path1[, path2[, ...]])  将多个路径组合后返回,第一个绝对路径之前的参数将被忽略

os.path.getatime(path)  返回path所指向的文件或者目录的最后存取时间

os.path.getmtime(path)  返回path所指向的文件或者目录的最后修改时间
1,当前路径及路径下的文件
- os.getcwd():查看当前所在路径。
- os.listdir(path):列举目录下的所有文件。返回的是列表类型。
>>> import os

>>> os.getcwd()

'D:\\pythontest\\ostest'

>>> os.listdir(os.getcwd())

['hello.py', 'test.txt']
2,绝对路径
- os.path.abspath(path):返回path的绝对路径。
>>> os.path.abspath('.')

'D:\\pythontest\\ostest'

>>> os.path.abspath('..')

'D:\\pythontest'
3,查看路径的文件夹部分和文件名部分
- os.path.split(path):将路径分解为(文件夹,文件名),返回的是元组类型。可以看出,若路径字符串最后一个字符是\,则只有文件夹部分有值;若路径字符串中均无\,则只有文件名部分有值。若路径字符串有\,且不在最后,则文件夹和文件名均有值。且返回的文件夹的结果不包含\.
- os.path.join(path1,path2,...):将path进行组合,若其中有绝对路径,则之前的path将被删除。
>>> os.path.split('D:\\pythontest\\ostest\\Hello.py')

('D:\\pythontest\\ostest', 'Hello.py')

>>> os.path.split('.')

('', '.')

>>> os.path.split('D:\\pythontest\\ostest\\')

('D:\\pythontest\\ostest', '')

>>> os.path.split('D:\\pythontest\\ostest')

('D:\\pythontest', 'ostest')

>>> os.path.join('D:\\pythontest', 'ostest')

'D:\\pythontest\\ostest'

>>> os.path.join('D:\\pythontest\\ostest', 'hello.py')

'D:\\pythontest\\ostest\\hello.py'

>>> os.path.join('D:\\pythontest\\b', 'D:\\pythontest\\a')

'D:\\pythontest\\a'
- os.path.dirname(path):返回path中的文件夹部分,结果不包含'\'
>>> os.path.dirname('D:\\pythontest\\ostest\\hello.py')

'D:\\pythontest\\ostest'

>>> os.path.dirname('.')

''

>>> os.path.dirname('D:\\pythontest\\ostest\\')

'D:\\pythontest\\ostest'

>>> os.path.dirname('D:\\pythontest\\ostest')

'D:\\pythontest'
- os.path.basename(path):返回path中的文件名。
>>> os.path.basename('D:\\pythontest\\ostest\\hello.py')

'hello.py'

>>> os.path.basename('.')

'.'

>>> os.path.basename('D:\\pythontest\\ostest\\')

''

>>> os.path.basename('D:\\pythontest\\ostest')

'ostest'
4,查看文件时间
- os.path.getmtime(path):文件或文件夹的最后修改时间,从新纪元到访问时的秒数。
- os.path.getatime(path):文件或文件夹的最后访问时间,从新纪元到访问时的秒数。
- os.path.getctime(path):文件或文件夹的创建时间,从新纪元到访问时的秒数。
>>> os.path.getmtime('D:\\pythontest\\ostest\\hello.py')

1481695651.857048

>>> os.path.getatime('D:\\pythontest\\ostest\\hello.py')

1481687717.8506615

>>> os.path.getctime('D:\\pythontest\\ostest\\hello.py')

1481687717.8506615
5,查看文件大小
- os.path.getsize(path):文件或文件夹的大小,若是文件夹返回0。
>>> os.path.getsize('D:\\pythontest\\ostest\\hello.py')

58L

>>> os.path.getsize('D:\\pythontest\\ostest')

0L
6,查看文件是否存在
- os.path.exists(path):文件或文件夹是否存在,返回True 或 False。
>>> os.listdir(os.getcwd())

['hello.py', 'test.txt']

>>> os.path.exists('D:\\pythontest\\ostest\\hello.py')

True

>>> os.path.exists('D:\\pythontest\\ostest\\Hello.py')

True

>>> os.path.exists('D:\\pythontest\\ostest\\Hello1.py')

False
7,一些表现形式参数
- os中定义了一组文件、路径在不同操作系统中的表现形式参数,如:
>>> os.sep

'\\'

>>> os.extsep

'.'

>>> os.pathsep

';'

>>> os.linesep

'\r\n'
8 在读文件的时候往往需要遍历文件夹,下面写一下遍历文件夹操作的方法
import os

txt_rootdir = 'txt_result'

filename_list = os.listdir(txt_rootdir)

for i in range(0,len(filename_list)):

    file_path = os.path.join(txt_rootdir,filename_list[i])

    if os.path.isfile(file_path):

        print("ok running")

        # 删除一个文件

        # os.remove()
9,os.listdir和os.walk获得文件路径的区别
参考文献:https://www.cnblogs.com/jiaxin359/p/7324077.html
情况一:在一个目录下面只有文件,没有文件夹的时候,这个时候可以使用os.listdir
情况二:在递归的情况,一个目录下面既有目录也有文件,使用os.walk
9.1 情况1详解
在我们的桌面上有一个file目录(文件夹),里面有三个文件,如下:
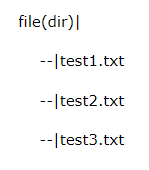
用下面的程序获得文件的绝对路径:
import os

path = r'C:\Users\Administrator\Desktop\file'

for filename in os.listdir(path):

    print(os.path.join(path,filename))
使用os.listdir读取到一个目录下面所有的文件,然后使用os.path.join 把目录和路径和文件结合起来,就得到了文件的绝对路径,结果如下:
C:\Users\Administrator\Desktop\file\test1.txt

C:\Users\Administrator\Desktop\file\test2.txt

C:\Users\Administrator\Desktop\file\test3.txt
9.2 情况2详解
我们首先在桌面上建立一个file目录,里面的组织结构如下:
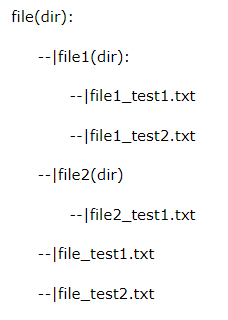
运行一下代码:
import os

path = r'C:\Users\Administrator\Desktop\file'

for dirpath,dirnames,filenames in os.walk(path):

    print(dirpath,dirnames,filenames)
输出结果如下:
C:\Users\Administrator\Desktop\file ['file1', 'file2'] ['file_test1.txt', 'file_test2 .txt']

C:\Users\Administrator\Desktop\file\file1 [] ['file1_test1.txt', 'file1_test2.txt']

C:\Users\Administrator\Desktop\file\file2 [] ['file2_test1.txt']
os.walk输入一个路径名称,以yield的方式(其实是一个生成器)返回一个三元组 dirpath, dirnames, filenames,
dirpath为目录的路径,为一个字符串。比如上面的 C:\Users\Administrator\Desktop\fileC:\Users\Administrator\Desktop\file\file1等。
dirnames列出了目录路径下面所有存在的目录的名称。比如在 C:\Users\Administrator\Desktop\file下面有两个目录:file1和file2,那么它就列出了这个目录路径下的目录名称。
filenames列出了目录路径下面所有文件的名称。同样在 C:\Users\Administrator\Desktop\file下面有两个文件file_test1.txt和file_test2 .txt,那么程序将会列出这两个文件名。
如何获得一个路径下面所有的文件路径:
import os

path = r'C:\Users\Administrator\Desktop\file'

for dirpath,dirnames,filenames in os.walk(path):

    for filename in filenames:

        print(os.path.join(dirpath,filename))
得到的结果如下:
C:\Users\Administrator\Desktop\file\file_test1.txt

C:\Users\Administrator\Desktop\file\file_test2 .txt

C:\Users\Administrator\Desktop\file\file1\file1_test1.txt

C:\Users\Administrator\Desktop\file\file1\file1_test2.txt

C:\Users\Administrator\Desktop\file\file2\file2_test1.txt
二,sys模块
sys.argv           命令行参数List,第一个元素是程序本身路径

sys.exit(n)        退出程序,正常退出时exit(0)

sys.version        获取Python解释程序的版本信息

sys.maxint         最大的Int值

sys.path           返回模块的搜索路径,初始化时使用PYTHONPATH环境变量的值

sys.platform       返回操作系统平台名称

sys.stdout.write('please:')  #标准输出 , 引出进度条的例子, 注,在py3上不行,可以用print代替

val = sys.stdin.readline()[:-1] #标准输入

sys.getrecursionlimit() #获取最大递归层数

sys.setrecursionlimit(1200) #设置最大递归层数

sys.getdefaultencoding()  #获取解释器默认编码

sys.getfilesystemencoding  #获取内存数据存到文件里的默认编码
1,sys.path :返回模块的搜索路径,初始化使用pythonpath环境变量的值
sys.path.append("自定义模块路径)
>>> import os

>>> import sys

>>> sys.path

['', 'D:\\python3\\python36.zip', 'D:\\python3\\DLLs', 'D:\\python3\\lib', 'D:\\python3', 'D:\\python3\\lib\\site-packages', 'D:\\python3\\lib\\site-packages\\win32', 'D:\\python3\\lib\\site-packages\\win32\\lib', 'D:\\python3\\lib\\site-packages\\Pythonwin']

>>>
2,进度条:
#=========知识储备==========

#进度条的效果

[#             ]

[##            ]

[###           ]

[####          ]

#指定宽度

print('[%-15s]' %'#')

print('[%-15s]' %'##')

print('[%-15s]' %'###')

print('[%-15s]' %'####')

#打印%

print('%s%%' %(100)) #第二个%号代表取消第一个%的特殊意义

#可传参来控制宽度

print('[%%-%ds]' %50) #[%-50s]

print(('[%%-%ds]' %50) %'#')

print(('[%%-%ds]' %50) %'##')

print(('[%%-%ds]' %50) %'###')

#=========实现打印进度条函数==========

import sys

import time

def progress(percent,width=50):

    if percent >= 1:

        percent=1

    show_str=('[%%-%ds]' %width) %(int(width*percent)*'#')

    print('\r%s %d%%' %(show_str,int(100*percent)),file=sys.stdout,flush=True,end='')

#=========应用==========

data_size=1025

recv_size=0

while recv_size < data_size:

    time.sleep(0.1) #模拟数据的传输延迟

    recv_size+=1024 #每次收1024

    percent=recv_size/data_size #接收的比例

    progress(percent,width=70) #进度条的宽度70

打印进度条
3,练习
import sys

sys.platform

'win32'

sys.stdout

<_io.TextIOWrapper name='<stdout>' mode='w' encoding='UTF-8'>

sys.argv

['D:\\pycharm专业版\\PyCharm 2017.1.4\\helpers\\pydev\\pydevconsole.py', '49701', '49702']

sys.version

'3.6.3 (v3.6.3:2c5fed8, Oct  3 2017, 18:11:49) [MSC v.1900 64 bit (AMD64)]'

sys.stdin.readline()

'the line is write'

"'the line is write'\n"
三,shutil模块
高级的 文件、文件夹、压缩包 处理模块
shutil.copyfileobj(fsrc, fdst[, length])
将文件内容拷贝到另一个文件中
import shutil

shutil.copyfileobj(open('old.xml','r'), open('new.xml', 'w'))
shutil.copyfile(src, dst)
拷贝文件
shutil.copyfile('f1.log', 'f2.log') #目标文件无需存在
shutil.copymode(src, dst)
仅拷贝权限。内容、组、用户均不变
shutil.copymode('f1.log', 'f2.log') #目标文件必须存在
shutil.copystat(src, dst)
仅拷贝状态的信息,包括:mode bits, atime, mtime, flags
shutil.copystat('f1.log', 'f2.log') #目标文件必须存在
shutil.copy(src, dst)
拷贝文件和权限
import shutil

shutil.copy('f1.log', 'f2.log')
shutil.copy2(src, dst)
拷贝文件和状态信息
import shutil

shutil.copy2('f1.log', 'f2.log')
shutil.ignore_patterns(*patterns)
shutil.copytree(src, dst, symlinks=False, ignore=None)
递归的去拷贝文件夹
import shutil

shutil.copytree('folder1', 'folder2', ignore=shutil.ignore_patterns('*.pyc', 'tmp*'))

#目标目录不能存在,注意对folder2目录父级目录要有可写权限,ignore的意思是排除
shutil.rmtree(path[, ignore_errors[, onerror]])
递归的去删除文件
import shutil

shutil.rmtree('folder1')
shutil.move(src, dst)
递归的去移动文件,它类似mv命令,其实就是重命名。
import shutil

shutil.move('folder1', 'folder3')
shutil.make_archive(base_name, format,...)
创建压缩包并返回文件路径,例如:zip、tar
创建压缩包并返回文件路径,例如:zip、tar
- base_name: 压缩包的文件名,也可以是压缩包的路径。只是文件名时,则保存至当前目录,否则保存至指定路径,
如 data_bak =>保存至当前路径
如:/tmp/data_bak =>保存至/tmp/
- format: 压缩包种类,“zip”, “tar”, “bztar”,“gztar”
- root_dir: 要压缩的文件夹路径(默认当前目录)
- owner: 用户,默认当前用户
- group: 组,默认当前组
- logger: 用于记录日志,通常是logging.Logger对象
#将 /data 下的文件打包放置当前程序目录

import shutil

ret = shutil.make_archive("data_bak", 'gztar', root_dir='/data')

#将 /data下的文件打包放置 /tmp/目录

import shutil

ret = shutil.make_archive("/tmp/data_bak", 'gztar', root_dir='/data')
shutil 对压缩包的处理是调用 ZipFile 和 TarFile 两个模块来进行的,详细:
zipfile压缩&解压缩
import zipfile

# 压缩

z = zipfile.ZipFile('laxi.zip', 'w')

z.write('a.log')

z.write('data.data')

z.close()

# 解压

z = zipfile.ZipFile('laxi.zip', 'r')

z.extractall(path='.')

z.close()
tarfile压缩&解压缩
import tarfile

# 压缩

>>> t=tarfile.open('/tmp/egon.tar','w')

>>> t.add('/test1/a.py',arcname='a.bak')

>>> t.add('/test1/b.py',arcname='b.bak')

>>> t.close()

# 解压

>>> t=tarfile.open('/tmp/egon.tar','r')

>>> t.extractall('/egon')

>>> t.close()
四,subprocess模块
我们经常需要通过Python去执行一条系统命令或脚本,系统的shell命令是独立于你的python进程之外的,每执行一条命令,就是发起一个新进程,通过python调用系统命令或脚本的模块在python2有os.system,
>> os.system('uname -a')

Darwin Alexs-MacBook-Pro.local 15.6.0 Darwin Kernel Version 15.6.0: Sun Jun  4 21:43:07 PDT 2017; root:xnu-3248.70.3~1/RELEASE_X86_64 x86_64

0
这条命令的实现原理是什么呢?(视频中讲,解释进程间通信的问题...)
除了os.system可以调用系统命令,,commands,popen2等也可以,比较乱,于是官方推出了subprocess,目地是提供统一的模块来实现对系统命令或脚本的调用
The subprocess module allows you to spawn new processes, connect to their input/output/error pipes, and obtain their return codes. This module intends to replace several older modules and functions:
- os.system
- os.spawn*
The recommended approach to invoking subprocesses is to use the run() function for all use cases it can handle. For more advanced use cases, the underlying Popen interface can be used directly.
The run() function was added in Python 3.5; if you need to retain compatibility with older versions, see the Older high-level API section.
三种执行命令的方法
subprocess.run(*popenargs, input=None, timeout=None, check=False, **kwargs) #官方推荐
subprocess.call(*popenargs, timeout=None, **kwargs) #跟上面实现的内容差不多,另一种写法
subprocess.Popen() #上面各种方法的底层封装
run()方法
Run command with arguments and return a CompletedProcess instance.The returned instance will have attributes args, returncode, stdout and stderr. By default, stdout and stderr are not captured, and those attributes will be None. Pass stdout=PIPE and/or stderr=PIPE in order to capture them.
If check is True and the exit code was non-zero, it raises a CalledProcessError. The CalledProcessError object will have the return code in the returncode attribute, and output & stderr attributes if those streams were captured.
If timeout is given, and the process takes too long, a TimeoutExpired exception will be raised.
The other arguments are the same as for the Popen constructor.
使用参数运行命令并返回一个CompletedProcess实例。返回的实例将具有属性args、returncode、stdout和stderr。默认情况下,stdout和stderr没有被捕获,这些属性将是None。通过stdout=管道和/或stderr=管道来捕获它们。
如果检查为真,退出代码为非零,则会产生一个称为processerror。CalledProcessError对象将在returncode属性和output & stderr中拥有返回代码。
属性,如果这些流被捕获。
如果给定了超时,并且进程花费的时间太长,将会抛出一个超时过期的异常。
其他参数与Popen构造函数相同。
标准写法
subprocess.run(['df','-h'],stderr=subprocess.PIPE,stdout=subprocess.PIPE,check=True)
涉及到管道|的命令需要这样写
subprocess.run('df -h|grep disk1',shell=True) #shell=True的

意思是这条命令直接交给系统去执行,不需要python负责解析
call()方法
#执行命令,返回命令执行状态 , 0 or 非0

>>> retcode = subprocess.call(["ls", "-l"])

#执行命令,如果命令结果为0,就正常返回,否则抛异常

>>> subprocess.check_call(["ls", "-l"])

0

#接收字符串格式命令,返回元组形式,第1个元素是执行状态,第2个是命令结果

>>> subprocess.getstatusoutput('ls /bin/ls')

(0, '/bin/ls')

#接收字符串格式命令,并返回结果

>>> subprocess.getoutput('ls /bin/ls')

'/bin/ls'

#执行命令,并返回结果,注意是返回结果,不是打印,下例结果返回给res

>>> res=subprocess.check_output(['ls','-l'])

>>> res

b'total 0\ndrwxr-xr-x 12 alex staff 408 Nov 2 11:05 OldBoyCRM\n'
、
Popen()方法
常用参数:
args:shell命令,可以是字符串或者序列类型(如:list,元组)

stdin, stdout, stderr:分别表示程序的标准输入、输出、错误句柄

preexec_fn:只在Unix平台下有效,用于指定一个可执行对象(callable object),

它将在子进程运行之前被调用

shell:同上

cwd:用于设置子进程的当前目录

env:用于指定子进程的环境变量。如果env = None,子进程的环境变量将从父进程中继承。
下面这2条语句执行会有什么区别?
a=subprocess.run('sleep 10',shell=True,stdout=subprocess.PIPE)

a=subprocess.Popen('sleep 10',shell=True,stdout=subprocess.PIPE)
区别是Popen会在发起命令后立刻返回,而不等命令执行结果。这样的好处是什么呢?
如果你调用的命令或脚本 需要执行10分钟,你的主程序不需卡在这里等10分钟,可以继续往下走,干别的事情,每过一会,通过一个什么方法来检测一下命令是否执行完成就好了。
Popen调用后会返回一个对象,可以通过这个对象拿到命令执行结果或状态等,该对象有以下方法
poll()

    Check if child process has terminated. Returns returncode

wait()

    Wait for child process to terminate. Returns returncode attribute.

terminate()

    终止所启动的进程Terminate the process with SIGTERM

kill()

    杀死所启动的进程 Kill the process with SIGKILL

communicate()

    与启动的进程交互,发送数据到stdin,并从stdout接收输出,然后等待任务结束

send_signal(signal.xxx)

  发送系统信号

pid

  拿到所启动进程的进程号
>>> a = subprocess.Popen('python3 guess_age.py',stdout=subprocess.PIPE,stderr=subprocess.PIPE,stdin=subprocess.PIPE,shell=True)

>>> a.communicate(b'22')

(b'your guess:try bigger\n', b'')
五,configparser模块
此模块用于生成和修改常见配置文档,当前模块的名称在 python 3.x 版本中变更为 configparser。
configparser用于处理特定格式的文件,其本质上是利用open来操作文件。
来看一个好多软件的常见配置文件格式如下
配置文件的格式与windows ini文件类似,可以包含一个或多个节(section),每个节可以有多个参数(键=值)
[DEFAULT]

ServerAliveInterval = 45

Compression = yes

CompressionLevel = 9

ForwardX11 = yes

[bitbucket.org]

User = hg

[topsecret.server.com]

Port = 50022

ForwardX11 = no
想要生成这样一个文档怎么做?
import configparser

config = configparser.ConfigParser()

config["DEFAULT"] = {'ServerAliveInterval': '45',

                      'Compression': 'yes',

                     'CompressionLevel': '9'}

config['bitbucket.org'] = {}

config['bitbucket.org']['User'] = 'hg'

config['topsecret.server.com'] = {}

topsecret = config['topsecret.server.com']

topsecret['Host Port'] = '50022'     # mutates the parser

topsecret['ForwardX11'] = 'no'  # same here

config['DEFAULT']['ForwardX11'] = 'yes'

with open('example.ini', 'w') as configfile:

   config.write(configfile)
Config Parser方法
1、config=ConfigParser.ConfigParser()

创建ConfigParser实例

2、config.sections()

返回配置文件中节序列

3、config.options(section)

返回某个项目中的所有键的序列

4、config.get(section,option)

返回section节中,option的键值

5、config.add_section(str)

添加一个配置文件节点(str)

6、config.set(section,option,val)

设置section节点中,键名为option的值(val)

7、config.read(filename)

读取配置文件

8、config.write(obj_file)

写入配置文件
常见异常
| 异常 | 描述 |
|---|---|
| ConfigParser.Error | 所有异常的基类 |
| ConfigParser.NoSectionError | 指定的section没有找到 |
| ConfigParser.DuplicateSectionError | 调用add_section() 时,section名称已经被使用 |
| ConfigParser.NoOptionError | 指定的参数没有找到 |
| ConfigParser.InterpolationError | 当执行字符串插值时出现问题时,出现异常的基类 |
| ConfigParser.InterpolationDepthError | 当字符串插值无法完成时,因为迭代次数超过了最大的范围,所以无法完成。InterpolationError的子类 |
| InterpolationMissingOptionError | 当引用的选项不存在时,会出现异常。InterpolationError的子类 |
| ConfigParser.InterpolationSyntaxError | 当产生替换的源文本不符合所需的语法时,就会出现异常。InterpolationError的子类。 |
| ConfigParser.MissingSectionHeaderError | 当试图解析一个没有分段标题的文件时,会出现异常。 |
| ConfigParser.ParsingError | 当试图解析文件时发生错误时,会出现异常 |
| ConfigParser.MAX_INTERPOLATION_DEPTH | 当raw参数为false时,get()的递归插值的最大深度。这只适用于ConfigParser类 |
练习:
>>> import configparser

>>> config = configparser.ConfigParser()

>>> config.sections()

[]

>>> config.read('example.ini')

['example.ini']

>>> config.sections()

['bitbucket.org', 'topsecret.server.com']

>>> 'bitbucket.org' in config

True

>>> 'bytebong.com' in config

False

>>> config['bitbucket.org']['User']

'hg'

>>> config['DEFAULT']['Compression']

'yes'

>>> topsecret = config['topsecret.server.com']

>>> topsecret['ForwardX11']

'no'

>>> topsecret['Port']

'50022'

>>> for key in config['bitbucket.org']: print(key)

...

user

compressionlevel

serveraliveinterval

compression

forwardx11

>>> config['bitbucket.org']['ForwardX11']

'yes'
其他增删该查语法
import configparser

config = configparser.ConfigParser()

#---------------------------------------------查

print(config.sections())   #[]

config.read('example.ini')

print(config.sections())   #['bitbucket.org', 'topsecret.server.com']

print('bytebong.com' in config)# False

print(config['bitbucket.org']['User']) # hg

print(config['DEFAULT']['Compression']) #yes

print(config['topsecret.server.com']['ForwardX11'])  #no

for key in config['bitbucket.org']:

    print(key)

# user

# serveraliveinterval

# compression

# compressionlevel

# forwardx11

print(config.options('bitbucket.org'))#['user', 'serveraliveinterval', 'compression', 'compressionlevel', 'forwardx11']

print(config.items('bitbucket.org'))  #[('serveraliveinterval', '45'), ('compression', 'yes'), ('compressionlevel', '9'), ('forwardx11', 'yes'), ('user', 'hg')]

print(config.get('bitbucket.org','compression'))#yes

#---------------------------------------------删,改,增(config.write(open('i.cfg', "w")))

config.add_section('yuan')

config.remove_section('topsecret.server.com')

config.remove_option('bitbucket.org','user')

config.set('bitbucket.org','k1','11111')

config.write(open('i.cfg', "w"))

增删改查
[group1]

k1 = v1

k2:v2

[group2]

k1 = v1

import ConfigParser

config = ConfigParser.ConfigParser()

config.read('i.cfg')

# ########## 读 ##########

#secs = config.sections()

#print secs

#options = config.options('group2')

#print options

#item_list = config.items('group2')

#print item_list

#val = config.get('group1','key')

#val = config.getint('group1','key')

# ########## 改写 ##########

#sec = config.remove_section('group1')

#config.write(open('i.cfg', "w"))

#sec = config.has_section('wupeiqi')

#sec = config.add_section('wupeiqi')

#config.write(open('i.cfg', "w"))

#config.set('group2','k1',11111)

#config.write(open('i.cfg', "w"))

#config.remove_option('group2','age')

#config.write(open('i.cfg', "w"))
python 关于操作文件的相关模块(os,sys,shutil,subprocess,configparser)的更多相关文章
- python关于操作文件的相关模块(os,sys,shutil,subprocess,configparser)
一:os模块 os模块提供了许多允许你程序与操作系统直接交互的功能 功能 说明 os.getcwd() 获取当前工作目录,即当前python脚本工作的目录路径 os.chdir("dirna ...
- Python常用模块os & sys & shutil模块
OS模块 import os ''' os.getcwd() 获取当前工作目录,即当前python脚本工作的目录路径 os.chdir("dirname") 改变当前脚本工作目录: ...
- Python常用模块(logging&re&时间&random&os&sys&shutil&序列化&configparser&&hashlib)
一. logging(日志模块) 二 .re模块 三. 时间模块 四. random模块 五. os模块 六. sys模块 七. shutil模块 八. 序列化模块(json&pickle&a ...
- Python模块 - os , sys.shutil
os 模块是与操作系统交互的一个接口 os.getcwd() 获取当前工作目录,即当前python脚本工作的目录路径 os.chdir("dirname") 改变当前脚本工作目录: ...
- Python与CSV文件(CSV模块)
Python与CSV文件(CSV模块) 1.CSV文件 CSV(逗号分隔值)格式是电子表格和数据库最常用的导入和导出格式.没有“CSV标准”,因此格式由许多读写的应用程序在操作上定义.缺乏标准意味 ...
- 字符编码和Python代码操作文件
字符编码和Python代码操作文件 读写模式之a模式 # a模式 只追加模式 # 路径不存在:自动创建 with open(r'a.txt','a',encoding='utf8') as f: pa ...
- Python中操作mysql的pymysql模块详解
Python中操作mysql的pymysql模块详解 前言 pymsql是Python中操作MySQL的模块,其使用方法和MySQLdb几乎相同.但目前pymysql支持python3.x而后者不支持 ...
- 在Python中操作文件之truncate()方法的使用教程
在Python中操作文件之truncate()方法的使用教程 这篇文章主要介绍了在Python中操作文件之truncate()方法的使用教程,是Python入门学习中的基础知识,需要的朋友可以参考下 ...
- 模块random+os+sys+json+subprocess
模块random+os+sys+json+subprocess 1. random 模块 (产生一个随机值) import random 1 # 随机小数 2 print(random.rando ...
随机推荐
- (一)UI设计的一些常识
一.概述 新版本的Xcode似乎框架不明示. UIView:屏幕上看得见摸得着的东西.视图.控件.组件. UIView是一个容器,能容纳其他UIView. UIViewController用来控制UI ...
- Android Studio JNI javah遇到的问题
好久没写博客了.持之以恒的勋章也被收回了.以后要好好坚持.. 最近在学习jni,但是遇到了一点麻烦的问题.好在终于解决了,便记下来解决一下. 其他入门的jni文章有很多,这里便不在累赘,直接上我遇到的 ...
- Smarty学习笔记(二)
1.引用 {include file="xxx.xxx" sitename="xxx"} 向引入的文件传入变量: {include file="xxx ...
- C#数据库连接操作大全
一:数据库连接代码: SqlConnection objSqlConnection = new SqlConnection ("server = 127.0.0.1;uid = sa; pw ...
- Make3D Convert your image into 3d model
Compiling and Running Make3D on your own computer source: http://make3d.cs.cornell.edu/code_linux.ht ...
- 轻量级网络库libevent概况
Libevent is a library for writing fast portable nonblocking IO. libevent是一个为编写快速可移植的非阻塞IO程序而设计的. lib ...
- Linux 套接字编程中的 5 个隐患(转)
本文转自IBM博文Linux 套接字编程中的 5 个隐患. “在异构环境中开发可靠的网络应用程序”. Socket API 是网络应用程序开发中实际应用的标准 API.尽管该 API 简单,但是开发新 ...
- mtk camera 移植步骤
mtk camera 移植步骤: 1, Kernel层驱动代码文件添加 /mediatek/custom/doov92_wet_tdd/kernel/imgsensor/下添加imx179_mipi_ ...
- Shell Scripts - 循环while,until,for
while...do...done until...do...done for...do...done
- BP 神经网络
BP(Back Propagation)网络是1986年由Rumelhart和McCelland为首的科学家小组提出,是一种按误差逆传播算法训练的多层前馈网络,是目前应用最广泛的神经网络模型之一.BP ...