android Window(一)从setConetView说起
Activity的源码
首先从setContentView这里调用的mWindow的 setConetView()
private Window mWindow;

public void setContentView(View view) {

        getWindow().setContentView(view);

        initWindowDecorActionBar();

    }

public Window getWindow() {

    return mWindow;

}
那么这mWindow什么时候初始化?
final void attach(...) {

        attachBaseContext(context);

        mFragments.attachHost(null /*parent*/);

        mWindow = new PhoneWindow(this, window, activityConfigCallback);

        mWindow.setWindowControllerCallback(this);

        mWindow.setCallback(this);

        mWindow.setOnWindowDismissedCallback(this);

        mWindow.getLayoutInflater().setPrivateFactory(this);

        if (info.softInputMode != WindowManager.LayoutParams.SOFT_INPUT_STATE_UNSPECIFIED) {

            mWindow.setSoftInputMode(info.softInputMode);

        }

        if (info.uiOptions != 0) {

            mWindow.setUiOptions(info.uiOptions);

        }

        //...

        //给window设置windowManger

        mWindow.setWindowManager(

           (WindowManager)context.getSystemService(Context.WINDOW_SERVICE),

                mToken, mComponent.flattenToString(),

                (info.flags & ActivityInfo.FLAG_HARDWARE_ACCELERATED) != 0);

        if (mParent != null) {

            mWindow.setContainer(mParent.getWindow());

        }

        mWindowManager = mWindow.getWindowManager();

        mCurrentConfig = config;

        mWindow.setColorMode(info.colorMode);

    }
可以看到这个mWindow 其实是一个PhoneWindow的实例,那么phoneWindow干了什么
可以查看PhoneWindow的源码
152    // This is the view in which the window contents are placed. It is either

153    // mDecor itself, or a child of mDecor where the contents go.

154    private ViewGroup mContentParent;

390    @Override

391    public void setContentView(View view, ViewGroup.LayoutParams params) {

392        // Note: FEATURE_CONTENT_TRANSITIONS may be set in the process of installing the window

393        // decor, when theme attributes and the like are crystalized. Do not check the feature

394        // before this happens.

395        if (mContentParent == null) {

396            installDecor();

397        } else if (!hasFeature(FEATURE_CONTENT_TRANSITIONS)) {

398            mContentParent.removeAllViews();

399        }

400

401        if (hasFeature(FEATURE_CONTENT_TRANSITIONS)) {

402            view.setLayoutParams(params);

403            final Scene newScene = new Scene(mContentParent, view);

404            transitionTo(newScene);

405        } else {

406            mContentParent.addView(view, params);

407        }

408        final Callback cb = getCallback();

409        if (cb != null && !isDestroyed()) {

410            cb.onContentChanged();

411        }

412    }
这里setContentView 主要是 先判断mContentParent是否初始化如果没有初始化调用installDecor 。然后将view添加到mContentParent的ViewGroup中
那么 installDecor 做了些什么
        private DecorView mDecor;

3551    private void installDecor() {

3552        if (mDecor == null) {

3553            mDecor = generateDecor();

3554            mDecor.setDescendantFocusability(ViewGroup.FOCUS_AFTER_DESCENDANTS);

3555            mDecor.setIsRootNamespace(true);

3556            if (!mInvalidatePanelMenuPosted && mInvalidatePanelMenuFeatures != 0) {

3557                mDecor.postOnAnimation(mInvalidatePanelMenuRunnable);

3558            }

3559        }

3560        if (mContentParent == null) {

3561            mContentParent = generateLayout(mDecor);

3562

3563            // Set up decor part of UI to ignore fitsSystemWindows if appropriate.

3564            mDecor.makeOptionalFitsSystemWindows();

3565

3566            final DecorContentParent decorContentParent = (DecorContentParent) mDecor.findViewById(

3567                    R.id.decor_content_parent);

3568

3569            if (decorContentParent != null) {

3570                mDecorContentParent = decorContentParent;

3571                mDecorContentParent.setWindowCallback(getCallback());

3572                if (mDecorContentParent.getTitle() == null) {

3573                    mDecorContentParent.setWindowTitle(mTitle);

3574                }

3575

3576                final int localFeatures = getLocalFeatures();

3577                for (int i = 0; i < FEATURE_MAX; i++) {

3578                    if ((localFeatures & (1 << i)) != 0) {

3579                        mDecorContentParent.initFeature(i);

3580                    }

3581                }

3582

3583                mDecorContentParent.setUiOptions(mUiOptions);

3584

            //setIcon,setLogo ...

3608            } else {

            //setTitle ...3627

             }

             //...

             }

3686    }
installDecor 主要干两件事情
- 如果mDecor没有初始化generateDecor()初始化
- 如果mContentParent 没有初始化generateLayout()初始化
generateDecor 就是返回一个新的DecorView
3199    protected DecorView generateDecor() {

3200        return new DecorView(getContext(), -1);

3201    }
这里实例化了DecorView,而DecorView则是PhoneWindow类的一个内部类,继承于FrameLayout,由此可知它也是一个ViewGroup。
那么DecroView到底充当了什么样的角色呢?
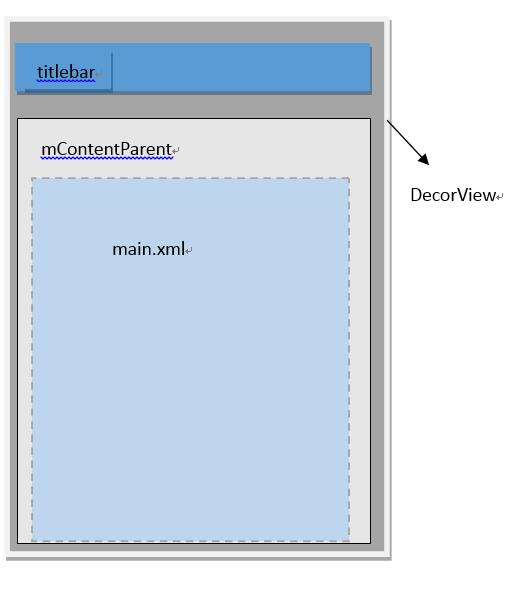
其实,DecorView是整个ViewTree的最顶层View,它是一个FrameLayout布局,代表了整个应用的界面。在该布局下面,有标题view和内容view这两个子元素,而内容view则是上面提到的mContentParent

DecorView
 private final class DecorView extends FrameLayout implements RootViewSurfaceTaker{

//...

}
generateLayout()给activity的根布设置各种属性
protected ViewGroup generateLayout(DecorView decor) {

        // Apply data from current theme.

        // 从主题文件中获取样式信息

        TypedArray a = getWindowStyle();

        //...

        if (a.getBoolean(R.styleable.Window_windowNoTitle, false)) {

            requestFeature(FEATURE_NO_TITLE);

        } else if (a.getBoolean(R.styleable.Window_windowActionBar, false)) {

            // Don't allow an action bar if there is no title.

            requestFeature(FEATURE_ACTION_BAR);

        }

        if(...){

            ...

        }

        // Inflate the window decor.

        // 加载窗口布局

        int layoutResource;

        int features = getLocalFeatures();

        // System.out.println("Features: 0x" + Integer.toHexString(features));

        if ((features & (1 << FEATURE_SWIPE_TO_DISMISS)) != 0) {

            layoutResource = R.layout.screen_swipe_dismiss;

        } else if(...){

            ...

        }

        View in = mLayoutInflater.inflate(layoutResource, null);    //加载layoutResource

        decor.addView(in, new ViewGroup.LayoutParams(MATCH_PARENT, MATCH_PARENT)); //往DecorView中添加子View,即mContentParent

        mContentRoot = (ViewGroup) in;

        ViewGroup contentParent = (ViewGroup)findViewById(ID_ANDROID_CONTENT); // 这里获取的就是mContentParent

        if (contentParent == null) {

            throw new RuntimeException("Window couldn't find content container view");

        }

        if ((features & (1 << FEATURE_INDETERMINATE_PROGRESS)) != 0) {

            ProgressBar progress = getCircularProgressBar(false);

            if (progress != null) {

                progress.setIndeterminate(true);

            }

        }

        if ((features & (1 << FEATURE_SWIPE_TO_DISMISS)) != 0) {

            registerSwipeCallbacks();

        }

        // Remaining setup -- of background and title -- that only applies

        // to top-level windows.

        //...

        return contentParent;

    }
根据设置的主题样式来设置DecorView的风格,比如说有没有titlebar之类的,接着为DecorView添加子View,而这里的子View则是上面提到的mContentParent,如果上面设置了FEATURE_NO_ACTIONBAR,那么DecorView就只有mContentParent一个子View,所以mContentParent是DecorView本身或者是DecorView的一个子元素。
用一幅图来表示DecorView的结构如下:

小结:DecorView是顶级View,内部有titlebar和contentParent两个子元素,contentParent的id是content,而我们设置的main.xml布局则是contentParent里面的一个子元素。
setConetViewz就是把view 添加到顶层的DecorView里面的contentParent里面
将DecorView添加至Window
每一个Activity组件都有一个关联的Window对象,用来描述一个应用程序窗口。每一个应用程序窗口内部又包含有一个View对象,用来描述应用程序窗口的视图。上文分析了创建DecorView的过程,现在则要把DecorView添加到Window对象中。而要了解这个过程,我们首先要简单先了解一下Activity的创建过程:
首先,在ActivityThread#handleLaunchActivity中启动Activity,在这里面会调用到Activity#onCreate方法,从而完成上面所述的DecorView创建动作,当onCreate()方法执行完毕,在handleLaunchActivity方法会继续调用到ActivityThread#handleResumeActivity方法,我们看看这个方法的源码:
final void handleResumeActivity(IBinder token, boolean clearHide, boolean isForward) {

    //...

    ActivityClientRecord r = performResumeActivity(token, clearHide); // 这里会调用到onResume()方法

    if (r != null) {

        final Activity a = r.activity;

        //...

        if (r.window == null && !a.mFinished && willBeVisible) {

            r.window = r.activity.getWindow(); // 获得window对象

            View decor = r.window.getDecorView(); // 获得DecorView对象

            decor.setVisibility(View.INVISIBLE);

            ViewManager wm = a.getWindowManager(); // 获得windowManager对象

            WindowManager.LayoutParams l = r.window.getAttributes();

            a.mDecor = decor;

            l.type = WindowManager.LayoutParams.TYPE_BASE_APPLICATION;

            l.softInputMode |= forwardBit;

            if (a.mVisibleFromClient) {

                a.mWindowAdded = true;

                wm.addView(decor, l); // 调用addView方法

            }

            //...

        }

    }

}
android Window(一)从setConetView说起的更多相关文章
- Android Window 9问9答
1.简述一下window是什么?在android体系里 扮演什么角色? 答:window就是一个抽象类,他的实现类是phoneWindow.我们一般通过windowManager 来访问window. ...
- android window(二)从getSystemService到WindowManagerGlobal
在Activity调用getSystemService(WINDOW_SERVICE) 调用的是父类ContextThemeWrapper package android.view; public c ...
- android window类
Android的Window类(一) Android的GUI层并不复杂.它的复杂度类似于WGUI这类基于布局和对话框的GUI,与MFC.QT等大型框架没有可比性,甚至飞漫魏永明的MiniGUI都比它复 ...
- android window(四)WindowToken
在WindowManagerService中有两种常见的Token,WindowToken,和AppWindowToken. WindowToken http://androidxref.com/6. ...
- android window(三)lWindow添加流程
http://androidxref.com/6.0.1_r10/xref/frameworks/base/services/core/java/com/android/server/wm/Windo ...
- JS判断请求来自Android手机还是iPhone手机,根据不同的手机跳转到不同的链接。
<script type="text/javascript">var browser = {versions: function () {var u = navigat ...
- 判断iPhone/android手机
JS判断请求来自Android手机还是iPhone手机,根据不同的手机跳转到不同的链接. var browser = {versions: function () {var u = navigator ...
- 一个二维码-->网址-->iOS/Android跳转
view-source:https://dpx.shopo.com.cn/down.html lmxmn117:~ will.wei$ curl https://dpx.shopo.com.cn/do ...
- Android KITKAT 以上实现沉浸式状态栏
extends:http://www.jianshu.com/p/f8374d6267ef 代码未行,效果先上 Flyme4.2 Android4.4.4上运行效果 如何实现 在 KITKAT 之后, ...
随机推荐
- Python程序设计6——面向对象
面向对象有三大特征:多态(对应方法覆写).封装.继承(对应方法重载),这个在Java中已经说得很详细了,这里面只是介绍Python在这三个特性方面的实现. 1 创建自定义类 Python和Java一样 ...
- 形式化验证工具(PAT)Reader-Writers Problem学习
经过前几次的学习,我们应该对PAT有一点点的了解了,我们加下来就直接看例子中的一个问题,这个问题比较简单. 看代码: //The classic Readers/Writers Example mod ...
- java全栈day02案例
商场库存清单案例 A: 案例分析. * a:观察清单后,可将清单分解为三个部分(清单顶部.清单中部.清单底部) * b:清单顶部为固定的数据,直接打印即可 * c:清单中部为商品,为变化的数据,需要记 ...
- Python入门:模拟登录(二)或注册之requests处理带token请求
转自http://blog.csdn.net/foryouslgme/article/details/51822209 首先说一下使用Python模拟登录或注册时,对于带token的页面怎么登录注册模 ...
- C#去边框以及无边框窗体移动
1.去边框 : 1) 选中要去除边框的窗体,按F4调出窗体属性. 2)在属性框中找到FormBorderStyle选择none. 2.去掉边框后实现对窗口程序的拖动 1)双击窗体,进入程序设计界面 ...
- UWP&WP8.1 基础控件——Border
border 是边框控件 border是UWP和WP8.1最常用的控件之一. border字面意义是用来添加边框的. 基础用法 <border BorderThickness="1&q ...
- 【探讨】linux环境,执行重启了php后php.ini依然不生效
背景: 一个linux环境配置了多个php版本的环境,同时修改了多个php.ini,执行service php-fpm restart 之后,依然不生效 原因: 没有设置好启动php.ini 参考链接 ...
- 高产的母猪之 python __init__全解
python __init__.py python 识别是不是一个模块的标准是目录下有无 __init__.py 模糊导入 模糊导入中的*中的模块是由__all__来定义的,__init__.py的 ...
- 安装 zookeeper
https://www.w3cschool.cn/zookeeper/zookeeper_cli.html ZooKeeper是一种分布式协调服务,用于管理大型主机.在分布式环境中协调和管理服务是一个 ...
- Navicat12破解
Navicat12破解 http://www.sdbeta.com/xiazai/2017/0818/209765.html
