Spring Security 实现记住我
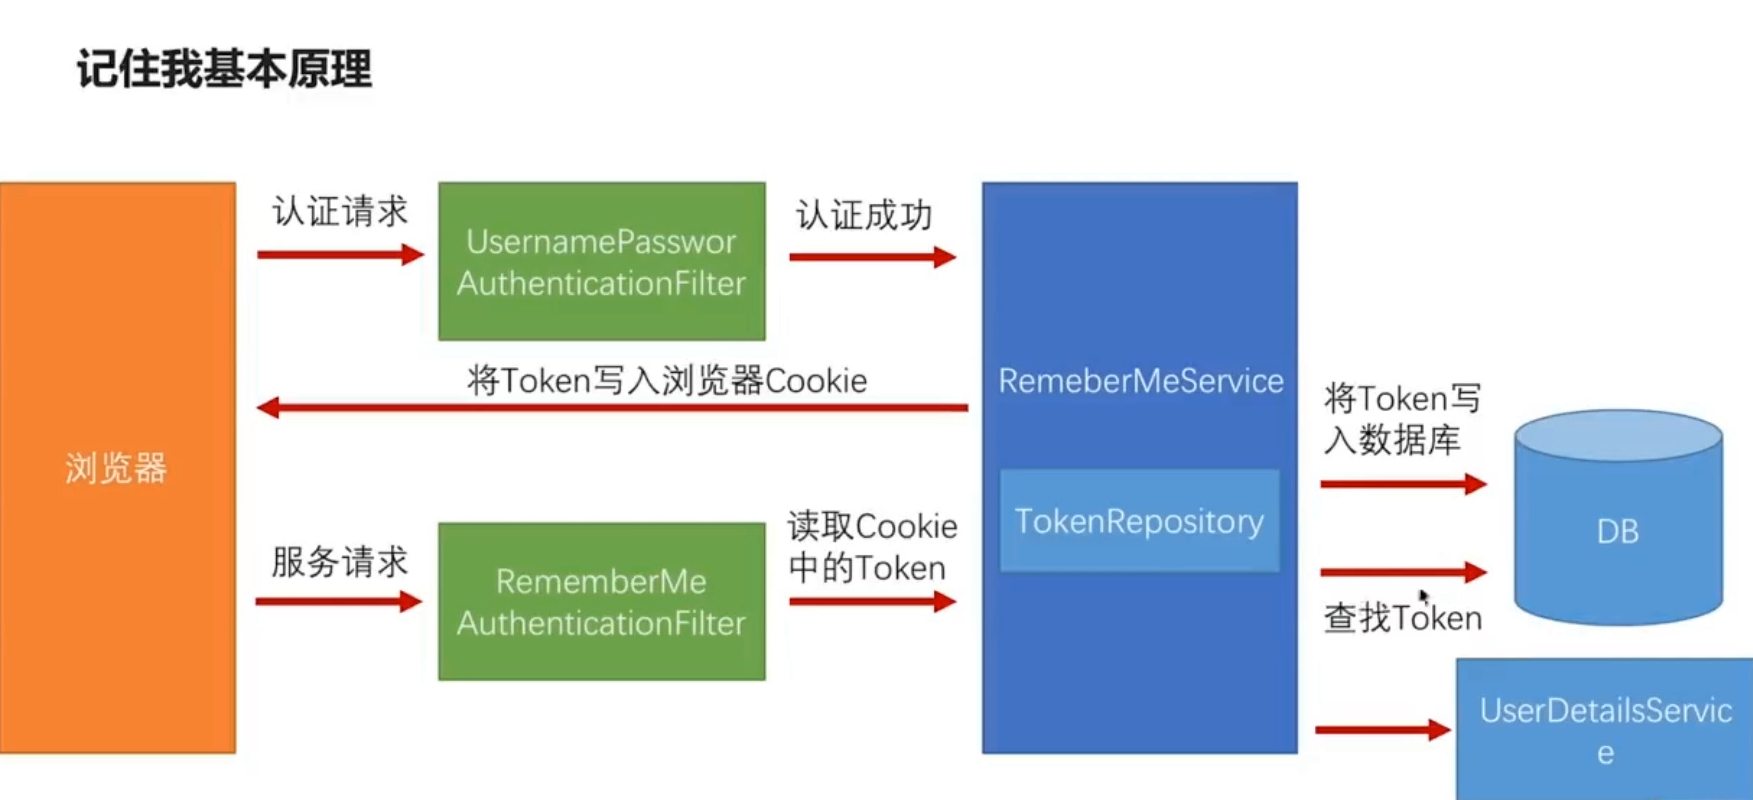
开篇一张图,道理全靠悟。

示例如下:
1. 新建Maven项目 remember_me
2. pom.xml
<project xmlns="http://maven.apache.org/POM/4.0.0"

    xmlns:xsi="http://www.w3.org/2001/XMLSchema-instance"

    xsi:schemaLocation="http://maven.apache.org/POM/4.0.0

        http://maven.apache.org/xsd/maven-4.0.0.xsd">

    <modelVersion>4.0.0</modelVersion>

    <groupId>com.java</groupId>

    <artifactId>remember_me</artifactId>

    <version>1.0.0</version>

    <parent>

        <groupId>org.springframework.boot</groupId>

        <artifactId>spring-boot-starter-parent</artifactId>

        <version>2.0.5.RELEASE</version>

    </parent>

    <dependencies>

        <!-- Spring Boot -->

        <dependency>

            <groupId>org.springframework.boot</groupId>

            <artifactId>spring-boot-starter-web</artifactId>

        </dependency>

        <dependency>

            <groupId>org.springframework.cloud</groupId>

            <artifactId>spring-cloud-starter-oauth2</artifactId>

            <version>2.0.0.RELEASE</version>

        </dependency>

        <dependency>

            <groupId>org.springframework.boot</groupId>

            <artifactId>spring-boot-starter-jdbc</artifactId>

        </dependency>

        <dependency>

            <groupId>com.alibaba</groupId>

            <artifactId>druid</artifactId>

            <version>1.1.11</version>

        </dependency>

        <dependency>

            <groupId>mysql</groupId>

            <artifactId>mysql-connector-java</artifactId>

        </dependency>

        <!-- 热部署 -->

        <dependency>

            <groupId>org.springframework</groupId>

            <artifactId>springloaded</artifactId>

            <version>1.2.8.RELEASE</version>

            <scope>provided</scope>

        </dependency>

        <dependency>

            <groupId>org.springframework.boot</groupId>

            <artifactId>spring-boot-devtools</artifactId>

            <scope>provided</scope>

        </dependency>

    </dependencies>

    <build>

        <finalName>${project.artifactId}</finalName>

        <plugins>

            <plugin>

                <groupId>org.apache.maven.plugins</groupId>

                <artifactId>maven-compiler-plugin</artifactId>

                <configuration>

                    <source>1.8</source>

                    <target>1.8</target>

                    <encoding>UTF-8</encoding>

                </configuration>

            </plugin>

            <plugin>

                <groupId>org.springframework.boot</groupId>

                <artifactId>spring-boot-maven-plugin</artifactId>

                <executions>

                    <execution>

                        <goals>

                            <goal>repackage</goal>

                        </goals>

                    </execution>

                </executions>

            </plugin>

        </plugins>

    </build>

</project>
3. RememberMeStarter.java
package com.java;

import org.springframework.boot.SpringApplication;

import org.springframework.boot.autoconfigure.SpringBootApplication;

/**

 * <blockquote><pre>

 *

 * 主启动类

 *

 * </pre></blockquote>

 *

 * @author Logan

 *

 */

@SpringBootApplication

public class RememberMeStarter {

    public static void main(String[] args) {

        SpringApplication.run(RememberMeStarter.class, args);

    }

}
4. ApplicationContextConfig.java
package com.java.config;

import org.springframework.context.annotation.Bean;

import org.springframework.context.annotation.Configuration;

import org.springframework.security.crypto.bcrypt.BCryptPasswordEncoder;

import org.springframework.security.crypto.password.PasswordEncoder;

/**

 * 配置文件类

 *

 * @author Logan

 *

 */

@Configuration

public class ApplicationContextConfig {

    /**

     * <blockquote><pre>

     *

     * 配置密码编码器,Spring Security 5.X必须配置,否则登录时报空指针异常

     *

     * </pre></blockquote>

     *

     * @return

     */

    @Bean

    public PasswordEncoder passwordEncoder() {

        return new BCryptPasswordEncoder();

    }

}
5. RepositoryConfig.java
package com.java.config;

import javax.sql.DataSource;

import org.springframework.context.annotation.Bean;

import org.springframework.context.annotation.Configuration;

import org.springframework.security.web.authentication.rememberme.JdbcTokenRepositoryImpl;

import org.springframework.security.web.authentication.rememberme.PersistentTokenRepository;

/**

 * 数据库相关配置

 *

 * @author Logan

 *

 */

@Configuration

public class RepositoryConfig {

    @Bean

    public PersistentTokenRepository tokenRepository(DataSource dataSource) {

        JdbcTokenRepositoryImpl tokenRepository = new JdbcTokenRepositoryImpl();

        tokenRepository.setDataSource(dataSource);

        // tokenRepository.setCreateTableOnStartup(true); // 第一次启动时可使用此功能自动创建表,第二次要关闭,否则表已存在会启动报错

        return tokenRepository;

    }

}
6. SecurityUserDetailsService.java
package com.java.service;

import org.springframework.beans.factory.annotation.Autowired;

import org.springframework.security.core.authority.AuthorityUtils;

import org.springframework.security.core.userdetails.User;

import org.springframework.security.core.userdetails.UserDetails;

import org.springframework.security.core.userdetails.UserDetailsService;

import org.springframework.security.core.userdetails.UsernameNotFoundException;

import org.springframework.security.crypto.password.PasswordEncoder;

import org.springframework.stereotype.Component;

/**

 * UserDetailsService实现类

 *

 * @author Logan

 *

 */

@Component

public class SecurityUserDetailsService implements UserDetailsService {

    @Autowired

    private PasswordEncoder passwordEncoder;

    @Override

    public UserDetails loadUserByUsername(String username) throws UsernameNotFoundException {

        // 数据库存储密码为加密后的密文(明文为123456)

        String password = passwordEncoder.encode("123456");

        System.out.println("username: " + username);

        System.out.println("password: " + password);

        // 模拟查询数据库,获取属于Admin和Normal角色的用户

        User user = new User(username, password, AuthorityUtils.commaSeparatedStringToAuthorityList("Admin,Normal"));

        return user;

    }

}
7. LoginConfig.java
package com.java.config;

import org.springframework.beans.factory.annotation.Autowired;

import org.springframework.context.annotation.Configuration;

import org.springframework.security.config.annotation.web.builders.HttpSecurity;

import org.springframework.security.config.annotation.web.configuration.WebSecurityConfigurerAdapter;

import org.springframework.security.core.userdetails.UserDetailsService;

import org.springframework.security.web.authentication.rememberme.PersistentTokenRepository;

/**

 * 登录相关配置

 *

 * @author Logan

 *

 */

@Configuration

public class LoginConfig extends WebSecurityConfigurerAdapter {

    @Autowired

    private PersistentTokenRepository tokenRepository;

    @Autowired

    private UserDetailsService userDetailsService;

    @Override

    protected void configure(HttpSecurity http) throws Exception {

        http.authorizeRequests()

                // 设置不需要授权的请求

                .antMatchers("/js/*", "/login.html").permitAll()

                // 其它任何请求都需要验证权限

                .anyRequest().authenticated()

                // 设置自定义表单登录页面

                .and().formLogin().loginPage("/login.html")

                // 设置登录验证请求地址为自定义登录页配置action ("/login/form")

                .loginProcessingUrl("/login/form")

                // 设置默认登录成功跳转页面

                .defaultSuccessUrl("/main.html")

                // 添加记住我功能

                .and().rememberMe().tokenRepository(tokenRepository)

                // 有效期为两周

                .tokenValiditySeconds(3600 * 24 * 14)

                // 设置UserDetailsService

                .userDetailsService(userDetailsService)

                // 暂时停用csrf,否则会影响验证

                .and().csrf().disable();

    }

}
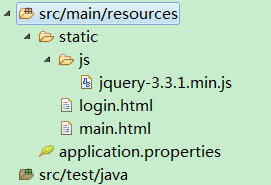
8. src/main/resources 下文件如下

9. application.properties
spring.datasource.driver-class-name=com.mysql.jdbc.Driver

spring.datasource.url=jdbc:mysql://192.168.32.10:3306/security?useUnicode=true&characterEncoding=UTF-8

spring.datasource.username=root

spring.datasource.password=123456

spring.datasource.type=com.alibaba.druid.pool.DruidDataSource
10. login.html
<!DOCTYPE html>

<html>

    <head>

        <title>登录</title>

        <meta http-equiv="content-type" content="text/html; charset=UTF-8" />

    </head>

    <body>

        <!--登录框-->

        <div align="center">

            <h2>用户自定义登录页面</h2>

            <fieldset style="width: 300px;">

                <legend>登录框</legend>

                <form action="/login/form" method="post">

                    <table>

                        <tr>

                            <th>用户名:</th>

                            <td><input name="username" /> </td>

                        </tr>

                        <tr>

                            <th>密码:</th>

                            <td><input type="password" name="password" /> </td>

                        </tr>

                        <tr>

                            <th>记住我:</th>

                            <td><input type="checkbox" name="remember-me" value="true" checked="checked" /></td>

                        </tr>

                        <tr>

                            <th></th>

                            <td></td>

                        </tr>

                        <tr>

                            <td colspan="2" align="center"><button type="submit">登录</button></td>

                        </tr>

                    </table>

                </form>

            </fieldset>

        </div>

    </body>

</html>
11. main.html
<!DOCTYPE html>

<html>

    <head>

        <title>首页</title>

        <meta http-equiv="content-type" content="text/html; charset=UTF-8" />

        <script type="text/javascript" src="js/jquery-3.3.1.min.js"></script>

        <script>

            function getHostMessage() {

                $.ajax({

                    type: "get",

                    url: "/getHostMessage",

                    async: true,

                    success: function(data) {

                        $("#msg").val(JSON.stringify(data));

                    }

                });

            }

        </script>

    </head>

    <body>

        <div>

            <h2>首页</h2>

            <table>

                <tr>

                    <td><button onclick="getHostMessage()">获取主机信息</button></td>

                </tr>

            </table>

        </div>

        <!--响应内容-->

        <div>

            <textarea id="msg" style="width: 800px;height: 800px;"></textarea>

        </div>

    </body>

</html>
12. js/jquery-3.3.1.min.js 可在官网下载
https://code.jquery.com/jquery-3.3.1.min.js
13. 创建数据库
DROP DATABASE IF EXISTS security;

CREATE DATABASE security;

USE security;

create table persistent_logins (

    username varchar(64) not null,

    series varchar(64) primary key,

    token varchar(64) not null,

    last_used timestamp not null

);
14. 运行 RememberMeStarter.java , 启动测试
浏览器输入首页 http://localhost:8080/main.html
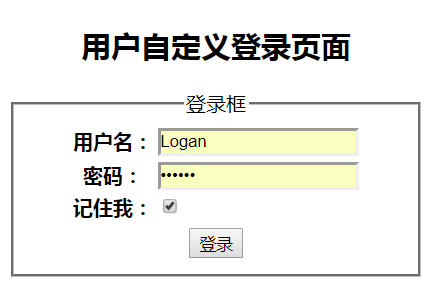
地址栏自动跳转到登录页面,如下:

输入如下信息:
User:Logan
Password:123456
单击【登录】按钮,自动跳转到首页。
观察数据库,此时自动生成一条记录,username字段值为登录时使用用户名,记住我Token信息已生成。
如下所示:

测试【记住我】 功能是否生效
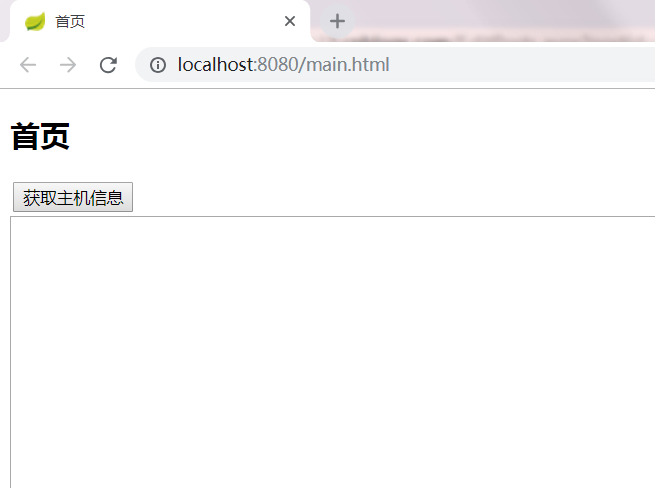
关闭浏览器重新打开,或者关闭系统重新启动,再次访问首页,页面不再跳转到登录页,直接显示首页信息。
如下所示:

.
Spring Security 实现记住我的更多相关文章
- spring security实现记住我下次自动登录功能
目录 spring security实现记住我下次自动登录功能 一.原理分析 二.实现方式 2.1 简单实现方式 2.2 数据库实现方式 三.区分是密码登录还是rememberme登录 spring ...
- spring security实现记录用户登录时间等信息
目录 spring security实现记录用户登录时间等信息 一.原理分析 二.实现方式 2.1 自定义AuthenticationSuccessHandler实现类 2.2 在spring-sec ...
- Spring Security构建Rest服务-0900-rememberMe记住我
Spring security记住我基本原理: 登录的时候,请求发送给过滤器UsernamePasswordAuthenticationFilter,当该过滤器认证成功后,会调用RememberMeS ...
- Spring Security框架下实现两周内自动登录"记住我"功能
本文是Spring Security系列中的一篇.在上一篇文章中,我们通过实现UserDetailsService和UserDetails接口,实现了动态的从数据库加载用户.角色.权限相关信息,从而实 ...
- spring security remember me实现自动登录
1 默认策略 在我们自定义的login中增加一个选择框 <input type="submit" value="Login" /> <br/& ...
- 第一章 Spring Security是什么?
1. 介绍 1.1 Spring Security是什么? Spring Security是一个强大的和高度可定制的身份验证和访问控制框架. 它是保证基于spring的应用程序安全的实际标准. 1.2 ...
- 使用 Spring Security 保护 Web 应用的安全
安全一直是 Web 应用开发中非常重要的一个方面.从安全的角度来说,需要考虑用户认证和授权两个方面.为 Web 应用增加安全方面的能力并非一件简单的事情,需要考虑不同的认证和授权机制.Spring S ...
- 【Spring】关于Boot应用中集成Spring Security你必须了解的那些事
Spring Security Spring Security是Spring社区的一个顶级项目,也是Spring Boot官方推荐使用的Security框架.除了常规的Authentication和A ...
- Spring Security 入门详解(转)
1.Spring Security介绍 Spring Security是基于spring的应用程序提供声明式安全保护的安全性框架,它提供了完整的安全性解决方案,能够在web请求级别和方法调用级别 处理 ...
随机推荐
- 17-----BBS论坛
BBS论坛(十七) 17.首页导航条实现和代码抽离 (1)temlates/common/_head.html <meta name="csrf-token" content ...
- 持久层框架---jdbc
1.JDBC编程步骤: 1.1 加载数据库驱动: 1.2 获取数据库连接: 1.3 通过Connection对象创建Statement对象: 1.4 使用Statement对象执行SQL语句: 1.5 ...
- JavaSE---反射(未完待续)
1.概述 1.1 Java程序中许多对象在运行时会出现2种类型:编译时类型.运行时类型: eg:Person person=new Student(); 这行代码在编译时为Person类型,运行时为 ...
- python set_index与reset_index的妙用
- 在oracle RAC 环境下用 PL/SQL Developer debug procedure 出现 hang 的情况
现象描述: 用plsql developer 连接编译procedure 的时候都很正常.一旦开始Test进入Debug模式的时候就Hang住了. 初步猜测是没有权限,可是是DBA角色呀,如果没有权限 ...
- contiki源码阅读之mmem.c
上次我们说了list,这次我们就借着mmem.c的代码来用一下这个链表. 代码目录是./core/lib/mmem.c 结构体定义如下 struct mmem { struct mmem *next; ...
- 文本框只允许输入数字.net/javascript
<input type="text" name="test" onKeyUp="test1.value=(this.value=this.val ...
- 解决MyEclipse报errors running builder ‘javascript validator’ on project
今天导入项目的时候,报了以下错误 MyEclipse测到功能代码变化(保存动作触发)就报错: errors running builder ‘javascript validator’ on proj ...
- 保护REST API/Web服务的最佳实践
在设计REST API或服务时,是否存在处理安全性(身份验证,授权,身份管理)的最佳实践? 在构建SOAP API时,您可以使用WS-Security作为指导,有关该主题的文献很多.我发现了有关保护R ...
- MemoryCache缓存 ---缓存时效
MemoryCache缓存 ---缓存时效测试 var cachePool = new MyCachePool(); //Thread.Sleep(1000); var value = cachePo ...
