自定义View的实现流程

import android.content.Context;
import android.content.res.TypedArray;
import android.graphics.Canvas;
import android.graphics.Paint;
import android.util.AttributeSet;
import android.view.View; /**
* Example of how to write a custom subclass of View. LabelView is used to draw
* simple text views. Note that it does not handle styled text or right-to-left
* writing systems.
*
*/
public class LabelView extends View {
private Paint mTextPaint;
private String mText;
private int mAscent; /**
* Constructor. This version is only needed if you will be instantiating the
* object manually (not from a layout XML file).
*
* @param context
*/
public LabelView(Context context) {
super(context);
initLabelView();
} /**
* Construct object, initializing with any attributes we understand from a
* layout file. These attributes are defined in
* SDK/assets/res/any/classes.xml.
*
* @see android.view.View#View(android.content.Context,
* android.util.AttributeSet)
*/
public LabelView(Context context, AttributeSet attrs) {
super(context, attrs);
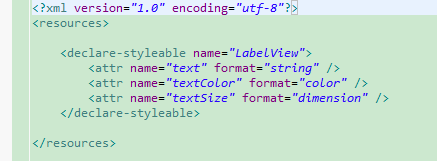
initLabelView(); TypedArray a = context.obtainStyledAttributes(attrs,
R.styleable.LabelView); CharSequence s = a.getString(R.styleable.LabelView_text);
if (s != null) {
setText(s.toString());
} // Retrieve the color(s) to be used for this view and apply them.
// Note, if you only care about supporting a single color, that you
// can instead call a.getColor() and pass that to setTextColor().
setTextColor(a.getColor(R.styleable.LabelView_textColor, 0xFF000000)); int textSize = a.getDimensionPixelOffset(
R.styleable.LabelView_textSize, 0);
if (textSize > 0) {
setTextSize(textSize);
} a.recycle();
} private final void initLabelView() {
mTextPaint = new Paint();
mTextPaint.setAntiAlias(true);
// Must manually scale the desired text size to match screen density
mTextPaint.setTextSize(16 * getResources().getDisplayMetrics().density);
mTextPaint.setColor(0xFF000000);
setPadding(3, 3, 3, 3);
} /**
* Sets the text to display in this label
*
* @param text
* The text to display. This will be drawn as one line.
*/
public void setText(String text) {
mText = text;
requestLayout();
invalidate();
} /**
* Sets the text size for this label
*
* @param size
* Font size
*/
public void setTextSize(int size) {
// This text size has been pre-scaled by the getDimensionPixelOffset
// method
mTextPaint.setTextSize(size);
requestLayout();
invalidate();
} /**
* Sets the text color for this label.
*
* @param color
* ARGB value for the text
*/
public void setTextColor(int color) {
mTextPaint.setColor(color);
invalidate();
} /**
* @see android.view.View#measure(int, int)
*/
@Override
protected void onMeasure(int widthMeasureSpec, int heightMeasureSpec) {
setMeasuredDimension(measureWidth(widthMeasureSpec),
measureHeight(heightMeasureSpec));
} /**
* Determines the width of this view
*
* @param measureSpec
* A measureSpec packed into an int
* @return The width of the view, honoring constraints from measureSpec
*/
private int measureWidth(int measureSpec) {
int result = 0;
int specMode = MeasureSpec.getMode(measureSpec);
int specSize = MeasureSpec.getSize(measureSpec); if (specMode == MeasureSpec.EXACTLY) {
// We were told how big to be
result = specSize;
} else {
// Measure the text
result = (int) mTextPaint.measureText(mText) + getPaddingLeft()
+ getPaddingRight();
if (specMode == MeasureSpec.AT_MOST) {
// Respect AT_MOST value if that was what is called for by
// measureSpec
result = Math.min(result, specSize);
}
} return result;
} /**
* Determines the height of this view
*
* @param measureSpec
* A measureSpec packed into an int
* @return The height of the view, honoring constraints from measureSpec
*/
private int measureHeight(int measureSpec) {
int result = 0;
int specMode = MeasureSpec.getMode(measureSpec);
int specSize = MeasureSpec.getSize(measureSpec); mAscent = (int) mTextPaint.ascent();
if (specMode == MeasureSpec.EXACTLY) {
// We were told how big to be
result = specSize;
} else {
// Measure the text (beware: ascent is a negative number)
result = (int) (-mAscent + mTextPaint.descent()) + getPaddingTop()
+ getPaddingBottom();
if (specMode == MeasureSpec.AT_MOST) {
// Respect AT_MOST value if that was what is called for by
// measureSpec
result = Math.min(result, specSize);
}
}
return result;
} /**
* Render the text
*
* @see android.view.View#onDraw(android.graphics.Canvas)
*/
@Override
protected void onDraw(Canvas canvas) {
super.onDraw(canvas);
canvas.drawText(mText, getPaddingLeft(), getPaddingTop() - mAscent,
mTextPaint);
}
}
自定义View的实现流程的更多相关文章
- 自定义View分类与流程
自定义View分类与流程(进阶篇)## 转载出处: http://www.gcssloop.com/customview/CustomViewProcess/ 自定义View绘制流程函数调用链(简化版 ...
- Android查缺补漏(View篇)--自定义 View 的基本流程
View是Android很重要的一部分,常用的View有Button.TextView.EditView.ListView.GridView.各种layout等等,开发者通过对这些View的各种组合以 ...
- 自定义View的基本流程
1.明确需求,确定你想实现的效果2.确定是使用组合控件的形式还是全新自定义的形式,组合控件即使用多个系统控件来合成一个新控件,你比如titilebar,这种形式相对简单,参考:http://blog. ...
- 从一个简洁的进度刻度绘制中了解自定义View的思路流程
先看效果(原谅我的渣像素),进度的刻度.宽度.颜色可以随意设定: [项目github地址: https://github.com/zhangke3016/CircleLoading] 实现起来并不难, ...
- 自定义View(1)简单流程及示例模板
1,继承View , ViewGroup,或TextView等等 2,绘制相关的api, canvas 画布, paint 画笔 2,重写重要的函数(注意这个顺序) onMeasure 属于View的 ...
- 自定义控件(视图)2期笔记01:自定义控件之自定义View的步骤
1. 根据Android Developers官网的介绍,自定义控件你需要以下的步骤: (1)创建View (2)处理View的布局 (3)绘制View (4)与用户进行交互 (5)优化已定义的Vie ...
- Android -- 自定义view实现keep欢迎页倒计时效果
1,最近打开keep的app的时候,发现它的欢迎页面的倒计时效果还不错,所以打算自己来写写,然后就有了这篇文章. 2,还是老规矩,先看一下我们今天实现的效果 相较于我们常见的倒计时,这次实现的效果是多 ...
- Android查缺补漏(View篇)--自定义View利器Canvas和Paint详解
上篇文章介绍了自定义View的创建流程,从宏观上给出了一个自定义View的创建步骤,本篇是上一篇文章的延续,介绍了自定义View中两个必不可少的工具Canvas和Paint,从细节上更进一步的讲解自定 ...
- 自定义View实战--实现一个清新美观的加载按钮
本篇文章已授权微信公众号 guolin_blog (郭霖)独家发布 在 Dribble 上偶然看到了一组交互如下: 当时在心里问自己能不能做,答案肯定是能做的,不过我比较懒,觉得中间那个伸缩变化要编写 ...
随机推荐
- iOS-cocoapods使用方法
1.CocoaPods的安装及使用: http://code4app.com/article/cocoapods-install-usage http://objccn.io/issue-6-4/ h ...
- 【week2】四人小组项目(WBS、NABCD)
项目选题:东北师范大学论坛 小组名称:nice! 项目组长:李权 组员:于淼 刘芳芳 杨柳 本周任务:要求给出需求概述.功能列表.痛点或亮点.NABCD及WBS模型在此项目中的应用. 作为东北师范大学 ...
- Dubbo分享
1. Dubbo是什么? Dubbo是一个分布式服务框架,致力于提供高性能和透明化的RPC远程服务调用方案,以及SOA服务治理方案.简单的说,dubbo就是个服务框架,如果没有分布式的需求,其实是不需 ...
- 【log4net】- 非常完善的Log4net详细说明
1.概述 log4net是.Net下一个非常优秀的开源日志记录组件.log4net记录日志的功能非常强大.它可以将日志分不同的等级,以不同的格式,输出到不同的媒介.本文主要是介绍如何在Visual S ...
- C#的垃圾回收
C#中垃圾回收 GC.Collect();强制进行内存回收.
- SpringBoot2.0(二) 配置文件多环境
在SpringBoot中,多环节的配置文件名基于application-{profile}.properties的格式,其中{profile}对应环境标识,比如: application-daily. ...
- placeholder 颜色
/* placeholder颜色 */::-webkit-input-placeholder { /* WebKit browsers */color: #ccc;}:-moz-placeholder ...
- 从一个ListBox中的元素点击导入另一个ListBox元素中
先看效果图:
- Python替换字符串中的反斜杠\
s = 'cdp\nd' result = eval(repr(s).replace('\\', '@')) print(result) repr() 函数可以将字符串转换为python的原始字符串( ...
- JS详细图解作用域链与闭包
JS详细图解作用域链与闭包 攻克闭包难题 初学JavaScript的时候,我在学习闭包上,走了很多弯路.而这次重新回过头来对基础知识进行梳理,要讲清楚闭包,也是一个非常大的挑战. 闭包有多重要?如果你 ...