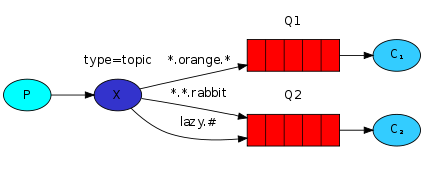
Rabbitmq(6) 主题模式

* 匹配1个
# 匹配所有
发送者:
package com.aynu.bootamqp.service;

import com.aynu.bootamqp.commons.utils.Amqp;

import com.rabbitmq.client.Channel;

import com.rabbitmq.client.Connection;

import java.io.IOException;

import java.util.concurrent.TimeoutException;

public class Send {

    private final static String Exchange_NAME ="hello";

    public static void main(String[] args) throws IOException, TimeoutException {

            Connection connection = Amqp.getConnection();

            Channel channel = connection.createChannel();

            //声明交换机

            channel.exchangeDeclare(Exchange_NAME,"topic");

            //在手动确认机制之前

            //一次只发送一条消息,给不同的消费者

            channel.basicQos(1);

            String message = "hello ps";

            String routingKey ="goods.delete";

            channel.basicPublish(Exchange_NAME,routingKey,null,message.getBytes("utf-8"));

            System.out.println(message);

            channel.close();

            connection.close();

    }

}
接受者1
package com.aynu.bootamqp.service;

import com.aynu.bootamqp.commons.utils.Amqp;

import com.rabbitmq.client.*;

import java.io.IOException;

import java.util.concurrent.TimeoutException;

@SuppressWarnings("all")

public class Receive {

    private final static String QUEUE_NAME ="hello";

    private final static String Exchange_NAME ="hello";

    public static void main(String[] args) throws IOException, TimeoutException {

        Connection connection = Amqp.getConnection();

        Channel channel = connection.createChannel();

        channel.queueDeclare(QUEUE_NAME,false,false,false,null);

        //绑定队列


        channel.queueBind(QUEUE_NAME,Exchange_NAME,"goods.add");

       // 一次只处理一个消息

        channel.basicQos(1);

        DefaultConsumer consumer = new DefaultConsumer(channel) {

            @Override

            public void handleDelivery(String consumerTag, Envelope envelope,

                                       AMQP.BasicProperties properties, byte[] body) throws IOException {

                super.handleDelivery(consumerTag, envelope, properties, body);

                String msg = new String(body,"utf-8");

                System.out.println("receive"+msg);

                try {

                    Thread.sleep(1000*2);

                } catch (InterruptedException e) {

                    e.printStackTrace();

                }finally {

                    // 手动发送消息确认机制

                    channel.basicAck(envelope.getDeliveryTag(),false);

                }

            }

        };

        // 自动应答

        boolean autoAck = false;

        channel.basicConsume(QUEUE_NAME,autoAck,consumer);

    }

}
接受者2
package com.aynu.bootamqp.service;

import com.aynu.bootamqp.commons.utils.Amqp;

import com.rabbitmq.client.*;

import java.io.IOException;

import java.util.concurrent.TimeoutException;

@SuppressWarnings("all")

public class Receive2 {

    private final static String QUEUE_NAME ="hello1";

    private final static String Exchange_NAME ="hello";

    public static void main(String[] args) throws IOException, TimeoutException {

        Connection connection = Amqp.getConnection();

        Channel channel = connection.createChannel();

        channel.queueDeclare(QUEUE_NAME,false,false,false,null);

        channel.queueBind(QUEUE_NAME,Exchange_NAME,"goods.#");

        channel.basicQos(1);

        DefaultConsumer consumer = new DefaultConsumer(channel) {

            @Override

            public void handleDelivery(String consumerTag, Envelope envelope,

                                       AMQP.BasicProperties properties, byte[] body) throws IOException {

                super.handleDelivery(consumerTag, envelope, properties, body);

                String msg = new String(body,"utf-8");

                System.out.println("receive2222"+msg);

                try {

                    Thread.sleep(1000);

                } catch (InterruptedException e) {

                    e.printStackTrace();

                }finally {

                    // 手动发送消息确认机制

                    channel.basicAck(envelope.getDeliveryTag(),false);

                }

            }

        };

        boolean autoAck = false;

        channel.basicConsume(QUEUE_NAME,autoAck,consumer);

    }

}
Rabbitmq(6) 主题模式的更多相关文章
- RabbitMQ消息队列(八)-通过Topic主题模式分发消息(.Net Core版)
前两章我们讲了RabbitMQ的direct模式和fanout模式,本章介绍topic主题模式的应用.如果对direct模式下通过routingkey来匹配消息的模式已经有一定了解那fanout也很好 ...
- RabbitMQ (七) 订阅者模式之主题模式 ( topic )
主题模式和路由模式很像 路由模式是精确匹配 主题模式是模糊匹配 依然先通过管理后台添加一个交换机. 生产者 public class Producer { private const string E ...
- (八)RabbitMQ消息队列-通过Topic主题模式分发消息
原文:(八)RabbitMQ消息队列-通过Topic主题模式分发消息 前两章我们讲了RabbitMQ的direct模式和fanout模式,本章介绍topic主题模式的应用.如果对direct模式下通过 ...
- RabbitMQ六种队列模式-主题模式
前言 RabbitMQ六种队列模式-简单队列RabbitMQ六种队列模式-工作队列RabbitMQ六种队列模式-发布订阅RabbitMQ六种队列模式-路由模式RabbitMQ六种队列模式-主题模式 [ ...
- 队列模式&主题模式
# RabbitMQ 消息中间件 **Advanced Message Queuing Protocol (高级消息队列协议** The Advanced Message Queuing Protoc ...
- 【RabbitMQ】工作模式介绍
一.前言 之前,笔者写过< CentOS 7.2 安装 RabbitMQ> 这篇文章,今天整理一下 RabbitMQ 相关的笔记便于以后复习. 二.模式介绍 在 RabbitMQ 官网上提 ...
- RabbitMQ六种队列模式-简单队列模式
前言 RabbitMQ六种队列模式-简单队列 [本文]RabbitMQ六种队列模式-工作队列RabbitMQ六种队列模式-发布订阅RabbitMQ六种队列模式-路由模式RabbitMQ六种队列模式-主 ...
- RabbitMQ六种队列模式-工作队列模式
前言 RabbitMQ六种队列模式-简单队列RabbitMQ六种队列模式-工作队列 [本文]RabbitMQ六种队列模式-发布订阅RabbitMQ六种队列模式-路由模式RabbitMQ六种队列模式-主 ...
- RabbitMQ六种队列模式-发布订阅模式
前言 RabbitMQ六种队列模式-简单队列RabbitMQ六种队列模式-工作队列RabbitMQ六种队列模式-发布订阅 [本文]RabbitMQ六种队列模式-路由模式RabbitMQ六种队列模式-主 ...
随机推荐
- Fragment跳转至Activity片段随笔
首先需要了解Fragment的生命周期 @Override public View onCreateView(LayoutInflater inflater, ViewGroup container, ...
- 第二章:深入分析java I/O的工作机制
.2.1 java的I/O类库的基本架构 I/O的机器获取和交换信息的主要渠道,在当今数据大爆炸时代,I/O问题尤其突出,很容易成为一个性能瓶颈,Java在I/O上也一直做持续的优化,现在也引入了NI ...
- freckles
题目描述: In an episode of the Dick Van Dyke show, little Richie connects the freckles on his Dad's back ...
- python3 基础整理
基础语法 1.python中区分大小写 2.查看关键字用 import keyword print (keyword.kwlist) 3.注释 # 单行注释,多行注释的快捷键是ctr+/,取消注释的 ...
- CentOS6.5安装mysql5.7
CentOS6.5安装mysql5.7 查看mysql的安装路径: [root@bogon ~]# whereis mysql mysql: /usr/bin/mysql /usr/lib/mysql ...
- freebsd安装python2
第一步 cd /usr/ports/lang/python27 第二步 输入以下命令(需要联网) make make install 到此如果输入python无效 继续 第三步 cd /usr/ ...
- mysql连接拍错总结
1. ERROR 2003 (HY000): Can't connect to MySQL server on 'localhost' (10060) ? 关闭网络防火墙.
- 【python接口自动化-requests库】【一】requests库安装
1.概念 requests 是用Python语言编写,基于 urllib,采用 Apache2 Licensed 开源协议的 HTTP 库.它比 urllib 更加方便,可以节约我们大量的工作,完全满 ...
- 嵌入式Linux内核tasklet机制(附实测代码)
Linux 中断编程分为中断顶半部,中断底半部 中断顶半部: 做紧急,耗时短的事情,同时还启动中断底半部. 中断底半部: 做耗时的事件,这个事件在执行过程可以被中断. 中断底半部实现方法: taskl ...
- Java图片验证码学习
