Kubernetes: kube-apiserver 之认证
kubernetes:kube-apiserver 系列文章:
- Kubernetes:kube-apiserver 之 scheme(一)
- Kubernetes:kube-apiserver 之 scheme(二)
- Kubernetes:kube-apiserver 之启动流程(一)
- Kubernetes:kube-apiserver 之启动流程(二)
- Kubernetes:kube-apiserver 和 etcd 的交互
0. 前言
kube-apiserver 不仅负责 RESTful API 路由的建立,也负责请求的认证,授权和准入。如下图所示:
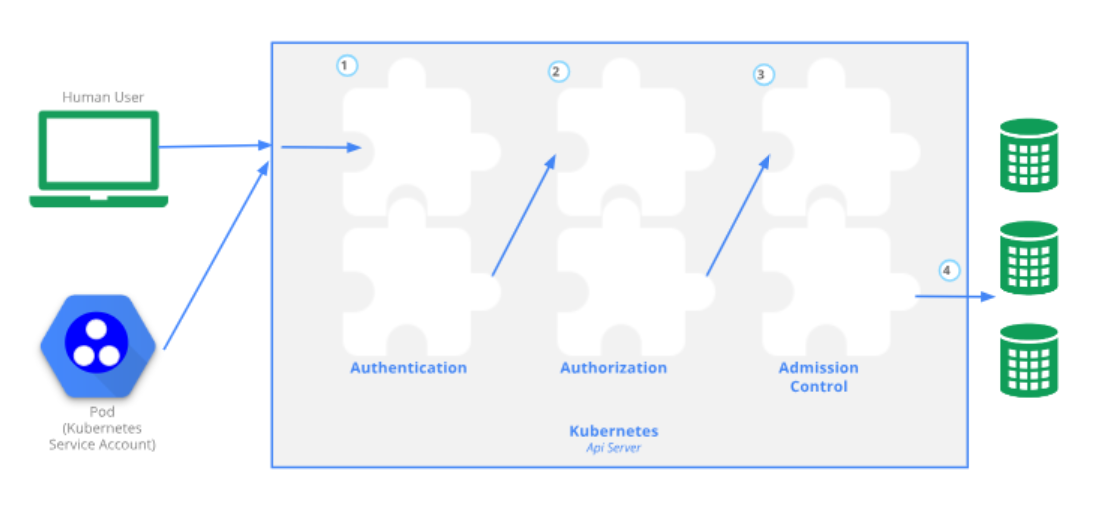
本篇文章将介绍 kube-apiserver 的认证机制。
1. 认证 Authentication
认证是对请求的认证,确认请求是否具有访问 Kubernetes 集群的权限。在 kube-apiserver 中,通过 handler 处理请求的认证,所有请求都将通过认证 handler 进行认证。可以把它理解成 Gin 框架的中间件。
1.1 认证 handler
首先,从认证 handler 的创建过程入手。
# kubernetes/vendor/k8s.io/apiserver/pkg/server/config.go

// 进入 GenericAPIServer 的创建函数 New

func (c completedConfig) New(name string, delegationTarget DelegationTarget) (*GenericAPIServer, error) {

	handlerChainBuilder := func(handler http.Handler) http.Handler {

		return c.BuildHandlerChainFunc(handler, c.Config)

	}

	apiServerHandler := NewAPIServerHandler(name, c.Serializer, handlerChainBuilder, delegationTarget.UnprotectedHandler())

    ...

}

# kubernetes/vendor/k8s.io/apiserver/pkg/server/config.go

func NewAPIServerHandler(name string, s runtime.NegotiatedSerializer, handlerChainBuilder HandlerChainBuilderFn, notFoundHandler http.Handler) *APIServerHandler {

	...

	director := director{

		name:               name,

		goRestfulContainer: gorestfulContainer,

		nonGoRestfulMux:    nonGoRestfulMux,

	}

	return &APIServerHandler{

        // 创建 FullHandlerChain

		FullHandlerChain:   handlerChainBuilder(director),

		GoRestfulContainer: gorestfulContainer,

		NonGoRestfulMux:    nonGoRestfulMux,

		Director:           director,

	}

}
这里 FullHandlerChain 内装有认证 handler。继续看哪里定义 handlerChainBuilder 函数的。
# kubernetes/vendor/k8s.io/apiserver/pkg/server/config.go

func NewConfig(codecs serializer.CodecFactory) *Config {

	return &Config{

        ...

		BuildHandlerChainFunc:          DefaultBuildHandlerChain,

    }

}

# kubernetes/vendor/k8s.io/apiserver/pkg/server/config.go

func DefaultBuildHandlerChain(apiHandler http.Handler, c *Config) http.Handler {

    handler = genericapifilters.WithAuthentication(handler, c.Authentication.Authenticator, failedHandler, c.Authentication.APIAudiences, c.Authentication.RequestHeaderConfig)

    return handler

}

# kubernetes/vendor/k8s.io/apiserver/pkg/endpoints/filters/authentication.go

func WithAuthentication(handler http.Handler, auth authenticator.Request, failed http.Handler, apiAuds authenticator.Audiences, requestHeaderConfig *authenticatorfactory.RequestHeaderConfig) http.Handler {

	return withAuthentication(handler, auth, failed, apiAuds, requestHeaderConfig, recordAuthenticationMetrics)

}
在创建配置 Config 时,将 DefaultBuildHandlerChain 赋值给 BuildHandlerChainFunc。DefaultBuildHandlerChain 内的 genericapifilters.WithAuthentication 创建了认证 handler。
接着往下走,进入 genericapifilters.WithAuthentication。
func withAuthentication(handler http.Handler, auth authenticator.Request, failed http.Handler, apiAuds authenticator.Audiences, requestHeaderConfig *authenticatorfactory.RequestHeaderConfig, metrics authenticationRecordMetricsFunc) http.Handler {

	return http.HandlerFunc(func(w http.ResponseWriter, req *http.Request) {

		resp, ok, err := auth.AuthenticateRequest(req)

		// authorization header is not required anymore in case of a successful authentication.

		req.Header.Del("Authorization")

		req = req.WithContext(genericapirequest.WithUser(req.Context(), resp.User))

		handler.ServeHTTP(w, req)

	})

}

type Request interface {

	AuthenticateRequest(req *http.Request) (*Response, bool, error)

}
可以看到,认证 handler 中通过 auth.AuthenticateRequest(req) 对 RESTful API 请求进行认证。这里 auth 是一个实现 Request 接口的实例。
那么,auth 实例是在哪里创建的呢,调用的 AuthenticateRequest 方法具体做的是什么呢?带着这个问题我们看下一节认证实例。
1.2 认证实例
通过层层回溯找到调用点。
handler = genericapifilters.WithAuthentication(handler, c.Authentication.Authenticator, failedHandler, c.Authentication.APIAudiences, c.Authentication.RequestHeaderConfig)
这里 c.Authentication.Authenticator 即为 auth 的实例。我们看 c.Authentication.Authenticator 是在哪里创建的。
# kubernetes/pkg/controlplane/apiserver/config.go

func BuildGenericConfig(

	s controlplaneapiserver.CompletedOptions,

	schemes []*runtime.Scheme,

	getOpenAPIDefinitions func(ref openapicommon.ReferenceCallback) map[string]openapicommon.OpenAPIDefinition,

) (

	genericConfig *genericapiserver.Config,

	versionedInformers clientgoinformers.SharedInformerFactory,

	storageFactory *serverstorage.DefaultStorageFactory,

	lastErr error,

) {

    // Authentication.ApplyTo requires already applied OpenAPIConfig and EgressSelector if present

	if lastErr = s.Authentication.ApplyTo(&genericConfig.Authentication, genericConfig.SecureServing, genericConfig.EgressSelector, genericConfig.OpenAPIConfig, genericConfig.OpenAPIV3Config, clientgoExternalClient, versionedInformers); lastErr != nil {

		return

	}

}

# kubernetes/pkg/kubeapiserver/options/authentication.go

func (o *BuiltInAuthenticationOptions) ApplyTo(authInfo *genericapiserver.AuthenticationInfo, secureServing *genericapiserver.SecureServingInfo, egressSelector *egressselector.EgressSelector, openAPIConfig *openapicommon.Config, openAPIV3Config *openapicommon.Config, extclient kubernetes.Interface, versionedInformer informers.SharedInformerFactory) error {

	authenticatorConfig, err := o.ToAuthenticationConfig()

	if err != nil {

		return err

	}

    ...

	authInfo.Authenticator, openAPIConfig.SecurityDefinitions, err = authenticatorConfig.New()

}
c.Authentication.Authenticator 实际是 authenticatorConfig.New() 创建的 authInfo.Authenticator 认证器。进入 authenticatorConfig.New() 看创建认证器过程。
# kubernetes/pkg/controlplane/apiserver/config.go

func (config Config) New() (authenticator.Request, *spec.SecurityDefinitions, error) {

	var authenticators []authenticator.Request

	var tokenAuthenticators []authenticator.Token

	securityDefinitions := spec.SecurityDefinitions{}

	// front-proxy, BasicAuth methods, local first, then remote

	// Add the front proxy authenticator if requested

	if config.RequestHeaderConfig != nil {

		requestHeaderAuthenticator := headerrequest.NewDynamicVerifyOptionsSecure(

			config.RequestHeaderConfig.CAContentProvider.VerifyOptions,

			config.RequestHeaderConfig.AllowedClientNames,

			config.RequestHeaderConfig.UsernameHeaders,

			config.RequestHeaderConfig.GroupHeaders,

			config.RequestHeaderConfig.ExtraHeaderPrefixes,

		)

		authenticators = append(authenticators, authenticator.WrapAudienceAgnosticRequest(config.APIAudiences, requestHeaderAuthenticator))

	}

	// X509 methods

	if config.ClientCAContentProvider != nil {

		certAuth := x509.NewDynamic(config.ClientCAContentProvider.VerifyOptions, x509.CommonNameUserConversion)

		authenticators = append(authenticators, certAuth)

	}

    ...

    authenticator := union.New(authenticators...)

	authenticator = group.NewAuthenticatedGroupAdder(authenticator)

    return authenticator, &securityDefinitions, nil

}

# kubernetes/vendor/k8s.io/apiserver/pkg/authentication/request/union/union.go

func New(authRequestHandlers ...authenticator.Request) authenticator.Request {

	if len(authRequestHandlers) == 1 {

		return authRequestHandlers[0]

	}

	return &unionAuthRequestHandler{Handlers: authRequestHandlers, FailOnError: false}

}

# kubernetes/vendor/k8s.io/apiserver/pkg/authentication/group/authenticated_group_adder.go

func NewAuthenticatedGroupAdder(auth authenticator.Request) authenticator.Request {

	return &AuthenticatedGroupAdder{auth}

}
可以看到,认证器是一系列认证器的组合。每个认证器包括组合的认证器都实现了 authenticator.Request 接口的 AuthenticateRequest 方法。
回头看在 handler 中定义的 auth.AuthenticateRequest(req) 方法,实际执行的是 authenticator.AuthenticateRequest(req)。
# kubernetes/vendor/k8s.io/apiserver/pkg/authentication/group/authenticated_group_adder.go

func (g *AuthenticatedGroupAdder) AuthenticateRequest(req *http.Request) (*authenticator.Response, bool, error) {

	r, ok, err := g.Authenticator.AuthenticateRequest(req)

	if err != nil || !ok {

		return nil, ok, err

	}

}

# kubernetes/vendor/k8s.io/apiserver/pkg/authentication/request/union/union.go

func (authHandler *unionAuthRequestHandler) AuthenticateRequest(req *http.Request) (*authenticator.Response, bool, error) {

	var errlist []error

	for _, currAuthRequestHandler := range authHandler.Handlers {

		resp, ok, err := currAuthRequestHandler.AuthenticateRequest(req)

		if err != nil {

			if authHandler.FailOnError {

				return resp, ok, err

			}

			errlist = append(errlist, err)

			continue

		}

		if ok {

			return resp, ok, err

		}

	}

	return nil, false, utilerrors.NewAggregate(errlist)

}
通过层层调用,最终执行到 unionAuthRequestHandler.AuthenticateRequest。该方法中循环执行各个认证器的 AuthenticateRequest 方法,直到认证成功。
各认证器的认证方式不同,这里就不过多介绍了,具体涉及到各种认证方式的时候可详细看相应认证器的 AuthenticateRequest 方法。
2. 总结
通过本篇文章介绍了 kube-apiserver 中的 Authentication 认证流程,下一篇将继续介绍 kube-apiserver 的 Authorization 授权流程。
Kubernetes: kube-apiserver 之认证的更多相关文章
- Kubernetes 学习17 dashboard认证及分级授权
一.概述 1.我们前面介绍了kubernetes的两个东西,认证和授权 2.在kubernetes中我们对API server的一次访问大概会包含哪些信息?简单来讲它是restfule风格接口,也就是 ...
- kubernetes集群的认证、授权、准入控制
一.kubernetes集群安全架构 用户使用kubectl.客户机或通过REST请求访问API.可以授权用户和Kubernetes服务帐户进行API访问.当一个请求到达API时,它会经历几个阶段,如 ...
- kubernetes 身份与权限认证 (ServiceAccount && RBAC)
Kubernetes中提供了良好的多租户认证管理机制,如RBAC.ServiceAccount还有各种Policy等. ServiceAccount Service Account为Pod中的进程 ...
- 浅入Kubernetes(6):CKAD认证中的部署教程
目录 预设网络 kubeadm 安装 k8s 配置 calico 自动补全工具 状态描述 目前为止,笔者已经写了 5 篇关于 k8s 的文章,这一篇笔者将介绍 CKAD 认证官方课程中,如何部署 k8 ...
- kubernetes的apiserver
1. API Server简介 k8s API Server提供了k8s各类资源对象(pod,RC,Service等)的增删改查及watch等HTTP Rest接口,是整个系统的数据总线和数据中心. ...
- Kubernetes Dashboard 安装与认证
1.安装dashboard $ kubectl apply -f https://raw.githubusercontent.com/kubernetes/dashboard/v1.10.1/src/ ...
- 【云原生 · Kubernetes】apiserver高可用
个人名片: 因为云计算成为了监控工程师 个人博客:念舒_C.ying CSDN主页️:念舒_C.ying 7.1 高可用选型 ipvs+keepalived nginx+keepalived hap ...
- kubernetes认证和serviceaccount
Service Account 为 Pod 提供必要的身份认证.所有的 kubernetes 集群中账户分为两类,Kubernetes 管理的 serviceaccount(服务账户) 和 usera ...
- kubernetes Dashboard 使用RBAC 权限认证控制
kubernetes RBAC实战 环境准备 先用kubeadm安装好kubernetes集群,[包地址在此](https://market.aliyun.com/products/56014009/ ...
- kubernetes对接第三方认证
kubernetes对接第三方认证 kubernetes离线安装包地址 概述 本文介绍如何使用github账户去关联自己kubernetes账户.达到如下效果: 使用github用户email作为ku ...
随机推荐
- Git SSH 认证配置
[前言] 我们在开发过程中,经常会和github,gitlab或者gitee打交道,一般临时克隆(clone)其他人的项目学习参考时,我们大多采用 https 的方式进行 clone 但如果在参与多个 ...
- MYSQL中JSON类型介绍
1 json对象的介绍 在mysql未支持json数据类型时,我们通常使用varchar.blob或text的数据类型存储json字符串,对mysql来说,用户插入的数据只是序列化后的一个普通的字符串 ...
- PoW是什么?
PoW是什么? 工作量证明(proof of work,PoW)是一种用于确认和验证区块链交易和新区块有效性的共识算法.区块链中常见的工作量证明算法包括比特币的SHA-256.以太坊的Ethash.莱 ...
- spring多数据源动态切换的实现原理及读写分离的应用
简介 AbstractRoutingDataSource是Spring框架中的一个抽象类,可以实现多数据源的动态切换和路由,以满足复杂的业务需求和提高系统的性能.可扩展性.灵活性. 应用场景 多租户支 ...
- .NET5从零基础到精通:全面掌握.NET5开发技能【第二章】
章节: 第一章:https://www.cnblogs.com/kimiliucn/p/17613434.html 第二章:https://www.cnblogs.com/kimiliucn/p/17 ...
- 带你读论文丨S&P21 Survivalism: Living-Off-The-Land 经典离地攻击
本文分享自华为云社区<[论文阅读] (21)S&P21 Survivalism: Living-Off-The-Land经典离地攻击>,作者: eastmount . 摘要 随着恶 ...
- VScode软件的安装以及C/C++环境配置的方法
今天和大家分享一下VScode软件的安装以及C/C++环境配置的方法.手把手教大家入门. 1,下载VScode编译器 (1) 官网下载链接:https://code.visualstudio.c ...
- 《Kali渗透基础》15. WEB 渗透
@ 目录 1:WEB 技术 1.1:WEB 攻击面 1.2:HTTP 协议基础 1.3:AJAX 1.4:WEB Service 2:扫描工具 2.1:HTTrack 2.2:Nikto 2.3:Sk ...
- 深入理解Linux内核——内存管理(2)
提要:本系列文章主要参考MIT 6.828课程以及两本书籍<深入理解Linux内核> <深入Linux内核架构>对Linux内核内容进行总结. 内存管理的实现覆盖了多个领域: ...
- 使用PIL为图片添加水印
使用pillow库为图片添加文件或者图片水印 下面是我们想要添加水印的图片: 图片水印: 效果图如下: ps:对图片添加字体时,需指定字体文件,如 simsun.ttc windows中在 C:\Wi ...