memcached随笔练习
实验环境:
RHEL 6.5 (已关闭selinux,iptables)
首先部署LNMP环境,该步骤采用源码编译安装
安装Nginx-1.8.0
准备软件包:nginx-1.8.0.tar.gz
下载地址:
http://nginx.org/en/download.html官方网址
http://mirrors.sohu.com/nginx/(搜狐开源镜像站)
[root@slave-147 ~]# mkdir tar //存放tar包文件
[root@slave-147 ~]# cd tar/
安装依赖包
[root@slave- ~]# yum install -y gcc gcc-c++ autoconf automake zlib zlib-devel openssl openssl-devel -y

[root@slave- ~]# cd tar

[root@slave- tar]# tar -xf pcre-8.37.tar.bz2     //只需要解压出来就好

[root@slave- tar]# tar -xf nginx-1.8..tar.gz        //解压

[root@slave- tar]# cd nginx-1.8.

[root@slave- nginx-1.8.]# ./configure --prefix=/usr/local/nginx \

--with-http_dav_module \

--with-http_stub_status_module \

--with-http_addition_module \

--with-http_sub_module \

--with-http_flv_module \

--with-http_mp4_module \

--with-pcre=/root/tar/pcre-8.37

[root@slave- nginx-1.8.]# make -j  && make install

配置nginx

[root@slave- nginx-1.8.]# vim /usr/local/nginx/conf/nginx.conf

将#user  nobody;

改为 user  nginx nginx;

然后将

location ~ \.php$ {

             root           html;

             fastcgi_pass   127.0.0.1:;

             fastcgi_index  index.php;

             fastcgi_param  SCRIPT_FILENAME  /script$fastcgi_script_name;

             include        fastcgi_params;

         }

改为

location ~ \.php$ {

             root           html;

             fastcgi_pass   127.0.0.1:;

             fastcgi_index  index.php;

             fastcgi_param  SCRIPT_FILENAME  /usr/local/nginx/html$fastcgi_script_name;

             include        fastcgi_params;

         }

保存退出!

[root@slave- nginx-1.8.]# /usr/local/nginx/sbin/nginx   //启动测试

[root@slave- nginx-1.8.]# yum install -y elinks

[root@slave- nginx-1.8.]# elinks 127.1 --dump   //看到如下信息证明nginx没问题

                                Welcome to nginx!

   If you see this page, the nginx web server is successfully installed and

    working. Further configuration is required.

   For online documentation and support please refer to []nginx.org.

    Commercial support is available at []nginx.com.

   Thank you for using nginx.

References

   Visible links

    . http://nginx.org/

    . http://nginx.com
安装mysql
准备软件包:mysql-5.6.26.tar.gz
下载地址:
http://ftp.ntu.edu.tw/MySQL/Downloads/MySQL-5.6/ //以前下载还有5.6.26,现在没有了
http://dev.mysql.com/get/Downloads/MySQL-5.6/mysql-5.6.26.tar.gz // 官网下载地址
http://mirrors.sohu.com/mysql/MySQL-5.6/ //搜狐之前也有的,现在没有了
开始解压安装
[root@slave- tar]# tar -xf mysql-5.6..tar.gz

[root@slave- tar]# cd mysql-5.6.

[root@slave- mysql-5.6.]# useradd -M -u  -s /sbin/nologin mysql

[root@slave- mysql-5.6.]# cmake \

-DMAKE_INSTALL_PREFIX=/usr/local/mysql \

-DMYSQL_UNIX_ADDR=/tmp/mysql.sock \

-DDEFAULT_CHARSET=utf8 \

-DDEFAULT_COLLATION=utf8_general_ci \

-DWITH_EXTRA_CHARSETS=all \

-DWITH_MYISAM_STORAGE_ENGINE= \

-DWITH_INNOBASE_STORAGE_ENGINE= \

-DWITH_MEMORY_STORAGE_ENGINE= \

-DWITH_READLINE= \

-DENABLED_LOCAL_INFILE= \

-DMYSQL_DATADIR=/usr/local/mysql/data \

-DMYSQL_USER=mysql

[root@slave- mysql-5.6.]# make -j  && make install

[root@slave- mysql-5.6.]# chown -R mysql:mysql /usr/local/mysql/
开始配置MySQL
[root@slave-147 mysql-5.6.26]# cd /usr/local/mysql/support-files/

[root@slave-147 mysql-5.6.26]# mv /etc/my.cnf /etc/my.cnf.bak

[root@slave-147 mysql-5.6.26]# cp my-default.cnf /etc/my.cnf

[root@slave-147 mysql-5.6.26]# cp mysql.server /etc/init.d/mysql5.6

[root@slave-147 mysql-5.6.26]# vim /etc/init.d/mysql5.6   //找到basedir和datadir修改为日如下(路径要根据自己的实际情况而定)
basedir=/usr/local/mysql

datadir=/usr/local/mysql/data

[root@slave-147 mysql-5.6.26]# ./mysql_install_db --defaults-file=/etc/my.cnf --basedir=/usr/local/mysql --datadir=/usr/local/mysql/data/ --user=mysql

[root@slave- mysql-5.6.]# ln -s /usr/local/mysql/bin/* /bin/

[root@slave-147 mysql-5.6.26]# service mysql5.6 start

[root@slave-147 mysql-5.6.26]# vim /usr/local/mysql/bin/mysql_secure_installation

[root@slave-147 mysql-5.6.26]# mkdir /var/lib/mysql

[root@slave-147 mysql-5.6.26]# mysql_secure_installation                         //安全初始化,设置数据库root密码及其相关选项,按照自己需求而定,可以输入123456,回车,再次输入123456,然后接下来的选项直接输入yes回车

[root@slave-147 mysql-5.6.26]# ln -s /tmp/mysql.sock /var/lib/mysql/mysql.sock

[root@slave-147 mysql-5.6.26]# mysql -uroot -p123456                           //弹出如下信息,证明数据库正常

Welcome to the MySQL monitor.  Commands end with ; or \g.

Your MySQL connection id is 1

Server version: 5.6.26 Source distribution

Copyright (c) 2000, 2013, Oracle and/or its affiliates. All rights reserved.

Oracle is a registered trademark of Oracle Corporation and/or its

affiliates. Other names may be trademarks of their respective

owners.

Type 'help;' or '\h' for help. Type '\c' to clear the current input statement.

mysql> \q

Bye
安装PHP
[root@slave- mysql-5.6.]# cd /root/tar/

[root@slave- tar]# tar -xf libmcrypt-2.5..tar.bz2

[root@slave- tar]# cd libmcrypt-2.5.

[root@slave- libmcrypt-2.5.]# ./configure --prefix=/usr/local/libmcrypt

[root@slave- libmcrypt-2.5.]# make -j

[root@slave- libmcrypt-2.5.]# make install
解决依赖:
[root@slave- libmcrypt-2.5.]#yum install -y php-pear

[root@slave- libmcrypt-2.5.]#vim /etc/ld.so.conf     //添加如下两行内容

/usr/local/libmcrypt/lib

/usr/local/mysql/lib

[root@slave- libmcrypt-2.5.]# ldconfig

[root@slave- libmcrypt-2.5.]# yum install -y libxml2-devel libcurl-devel libjpeg-devel libpng-devel freetype freetype-devel

[root@slave- libmcrypt-2.5.]# tar -xf php-5.6..tar.bz2

[root@slave- libmcrypt-2.5.]# cd php-5.6.

[root@slave- php-5.6.]#./configure \

--prefix=/usr/local/php \

--with-config-file-path=/usr/local/php \

--with-mysql=/usr/local/mysql \

--with-mysqli=/usr/local/mysql/bin/mysql_config \

--with-iconv-dir \

--with-freetype-dir \

--with-jpeg-dir \

--with-png-dir \

--with-zlib \

--with-libxml-dir=/usr \

--enable-xml \

--disable-rpath \

--enable-bcmath \

--enable-shmop \

--enable-sysvsem \

--enable-inline-optimization \

--with-curl \

--enable-mbregex \

--enable-fpm \

--enable-mbstring \

--with-gd \

--enable-gd-native-ttf \

--with-openssl \

--with-mhash \

--enable-pcntl \

--enable-sockets \

--with-xmlrpc \

--enable-zip \

--enable-soap \

--with-mcrypt=/usr/local/libmcrypt

[root@slave- php-5.6.]# make -j  && make install

[root@slave- php-5.6.]# cd /usr/local/php/etc/

[root@slave- php-5.6.]# cp php-fpm.conf.default php-fpm.conf

[root@slave- php-5.6.]# cd /root/tar/php-5.6.

[root@slave- php-5.6.]# cp sapi/fpm/init.d.php-fpm /etc/init.d/php-fpm

[root@slave- php-5.6.]# cp php.ini-production /usr/local/php/php.ini

[root@slave- php-5.6.]# chmod +x /etc/init.d/php-fpm

[root@slave- php-5.6.]# echo "<?php phpinfo(); ?>" > /usr/local/nginx/html/index.php //创建测试页面

[root@slave- php-5.6.]# /etc/init.d/php-fpm start

[root@slave- php-5.6.]# /usr/local/nginx/sbin/nginx -s reload

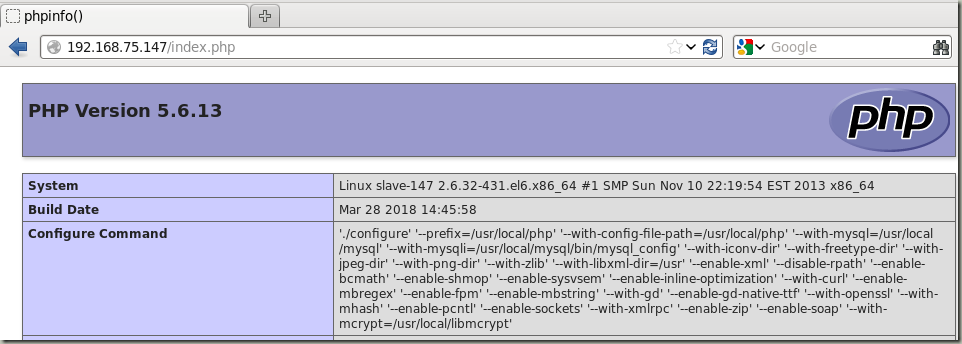
[root@slave- php-5.6.]# firefox 192.168.75.147/index.php  //弹出如下页面证明php正常

安装libevent
[root@slave- php-5.6.]# cd ../

[root@slave- tar]# tar -xf libevent-2.0.-stable.tar.g

[root@slave- tar]# cd libevent-2.0.-stable

[root@slave- libevent-2.0.-stable]# ./configure --prefix=/usr/local/libevent

[root@slave- libevent-2.0.-stable]# make -j  && make install
安装memcached
准备软件包:
memcache-2.2.7.tgz
memcached-1.4.25.tar.tar
相关软件下载地址:
http://pecl.php.net/package/memcache // memcached-1.4.25.tar.tar
http://libevent.org/ // libevent-2.0.22-stable.tar.gz
http://www.memcached.org/ // memcache-2.2.7.tgz
http://php.net/downloads.php // php-5.6.13.tar.bz2
http://mcrypt.hellug.gr/index.html // libmcrypt-2.5.8.tar.bz2
http://pcre.org/ // pcre-8.37.tar.bz2
[root@slave- libevent-2.0.-stable]# cd ../

[root@slave- tar]# tar -xf memcache-2.2..tgz

[root@slave- tar]# cd memcached-1.4.

[root@slave- memcached-1.4.]# ./configure \

--prefix=/usr/local/memcached \

--with-libevent=/usr/local/libevent/

[root@slave- memcached-1.4.]# make -j  && make install

[root@slave- memcached-1.4.]# /usr/local/memcached/bin/memcached \                                                        //-m 内存缓存大小 ;-c 最大并发 ; -d 作为守护进程在后台启动

-u root -p  -l 192.168.75.147 -P /var/run/memcached.pid -m 128m -c  -d

[root@slave- memcached-1.4.]# echo "/usr/local/memcached/bin/memcached -u root -p 11211 -l       //设置开机启动

192.168.75.147 -P /var/run/memcached.pid -m 128m -c  -d" >> /etc/rc.local

[root@slave- memcached-1.4.]# netstat -antup | grep

tcp               192.168.75.147:        0.0.0.0:*                   LISTEN      /memcached

udp               192.168.75.147:        0.0.0.0:*                               /memcached

[root@slave- memcached-1.4.]# yum install -y telnet

测试:(第一次测试的时候,晕圈了,没有按照设置的字符串长度来设值,所以报错了)

[root@slave- ~]# telnet 192.168.75.147

Trying 192.168.75.147...

Connected to 192.168.75.147.

Escape character is '^]'.

set name                                    #赋值格式:set key flag exptime bytes,这里设置name的值为Mkkkkkkkkkkkk,过期时间为300秒,字符串长度6,flag是一个无符号整数标记,这里可以随便给值

Mkkkkkkkkkkkk

CLIENT_ERROR bad data chunk

ERROR

set sishen

STORED                                   //STORED表示存储成功

get sishen

VALUE sishen

END

get sishen                              //时间超过设置期限值时,就会自动删除,所以get不到值

END

quit                                         //退出

[root@slave- ~]# /usr/local/memcached/bin/memcached –h    可以查看memcached的帮助信息
安装memcache-2.2.7
[root@slave- memcached-1.4.]# cd ..

[root@slave- tar]# tar -xf memcache-2.2..tgz

[root@slave- tar]# cd memcache-2.2.

[root@slave- memcache-2.2.]# /usr/local/php/bin/phpize

Configuring for:

PHP Api Version:

Zend Module Api No:

Zend Extension Api No:

[root@slave- memcache-2.2.]# ./configure \

> --enable-memcache \

> --with-php-config=/usr/local/php/bin/php-config

[root@slave- memcache-2.2.]# make && make install

[root@slave- memcache-2.2.]# ls /usr/local/php/lib/php/extensions/no-debug-non-zts-/

memcache.so  opcache.a  opcache.so                                                                           //编译出来的模块

[root@slave- memcache-2.2.]# vim /usr/local/php/php.ini

 ; extension_dir = "./"                             //在734行下面添加如下两行内容

   ;       extension_dir='/usr/local/php/lib/php/extensions/no-debug-non-zts-2     0131226/'

   extension=memcache.so

[root@slave- memcache-2.2.]# /etc/init.d/php-fpm restart

Gracefully shutting down php-fpm  done

Starting php-fpm  done

[root@slave- memcache-2.2.]# /usr/local/nginx/sbin/nginx -s reload

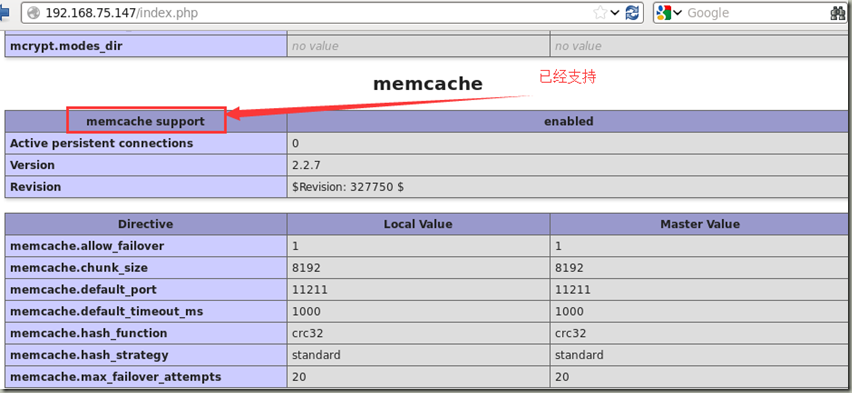
[root@slave- memcache-2.2.]# firefox 192.168.75.147/index.php

测试memcache连接memcached
[root@slave- memcache-2.2.]# cd

[root@slave- ~]# vim /usr/local/nginx/html/mem.php

<?php

$memcache = memcache_connect('192.168.75.147',);

$memcache->set('test','hello world !',,);

$val = $memcache->get('test');

echo $val;

?>

测试memcached缓存数据库
[root@slave- ~]# service mysql5. restart

Shutting down MySQL.                                       [  OK  ]

Starting MySQL.                                            [  OK  ]

[root@slave- ~]# seq   > /tmp/sum   //seq命令,用于产生一组连续的有序数列

[root@slave- ~]# cat /tmp/sum

………………

[root@slave- ~]# mysql -uroot -p123456 -e "create database db01"

[root@slave- ~]# mysql -uroot -p123456 -e "use db01;create table T1(ID int)ENGINE=innodb"

[root@slave- ~]# mysql -uroot -p123456 -e "use db01;load data infile '/tmp/sum' into table T1"

创建测试页面:

[root@slave- html]# vim test.html

<html>

<head>

<title> Memcache study test </title>

</head>

<body>

<h1 align="center"> Welcome to sishen.xueji.com </h1>

<br />

<br />

<a href=./read.html>Read Test</a>

<br /> <br />

<a href=./write.html> Write test</a>

</body>

</html>

[root@slave- html]# vim read.html

<html>

<head>

<title> Memcached Read Test </title>

</head>

<body>

<h1 align="center"> Memcached Read Test Page </h1>

<br />

<br />

<h3>please input a number</h3>

<form action="read.php" method="post">

NUM:

<input type="text" name="num" />

<input type="submit" value="Submit" />

</form>

</body>

</html>

[root@slave- html]# vim write.html

<html>

<head>

<title> Memcached Wead Test </title>

</head>

<body>

<h1 align="center"> Memcached Write Test Page </h1>

<br />

<br />

<h3>please input a number and click submit</h3>

<form action="write.php" method="post">

NUM:

<input type="text" name="num" />

<input type="submit" value="Submit" />

</form>

</body>

</html

[root@slave- html]# vim read.php

<?php

$memcachehost = '192.168.75.147';

$memcacheport = ;

$memcachelife = ;

$memcache = new Memcache;

$memcache->connect($memcachehost,$memcacheport) or die ("Could not connect");

$num=$_POST["num"];

$db=db01;

$tb=T1;

$query="select * from $tb where ID=$num";

#$key=md5($query);

$key=md5($num);

if(!$memcache->get($key))

{

$conn=mysql_connect("127.0.0.1","root","");

mysql_select_db($db);

$result=mysql_query($query);

# echo "mysql $num";

while ($row=mysql_fetch_assoc($result))

{

$arr[]=$row;

}

$f = 'mysql';

$memcache->add($key,serialize($arr),,); //mysql 查询后,插入 memcached

$data = $arr ;

}

else{

$f = 'memcache';

$data_mem=$memcache->get($key);

$data = unserialize($data_mem);

}

echo "$f $num";

echo "key is $key";

echo "<br>";

?>

[root@slave- html]# vim write.php

<?php

$memcachehost = '192.168.75.147';

$memcacheport = ;

$memcachelife = ;

$memcache = new Memcache;

$memcache->connect($memcachehost,$memcacheport) or die ("Could not connect");

$num=$_POST["num"];

$db=db01;

$tb=T1;

$query="insert into $tb values($num)";

#$key=md5($query);

$key=md5($num);

if(!$memcache->get($key))

{

$conn=mysql_connect("192.168.75.147","root","");

mysql_select_db($db);

$result=mysql_query($query);

while ($row=mysql_fetch_assoc($result))

{

$arr[]=$row;

}

$f = 'mysql';

$memcache->add($key,serialize($arr),,); //mysql 插入成功后,插入 memcached

$data = $arr ;

#}

#else{

$f1 = 'memcache';

$data_mem=$memcache->get($key);

$data = unserialize($data_mem);

}

echo "$f $f1 $num";

echo "<br>";

?>

[root@slave- html]# /usr/local/nginx/sbin/nginx -s reload

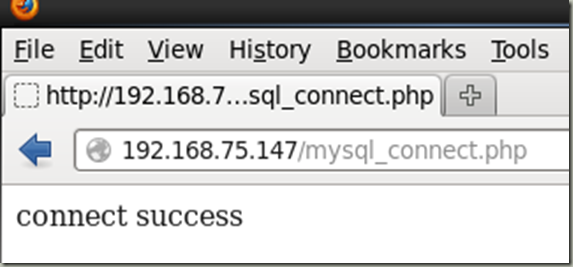
[root@slave- html]# firefox 192.168.75.147/mysql_connect.php

测试memcache
[root@slave-147 html]# firefox 192.168.75.147/test.html

点击Read Test输入一个存在的字段查询

点击Submit,结果如下

写测试:
输入一个测试值:


去数据库查看插入的数据

查询成功~
memcached随笔练习的更多相关文章
- 《构建高性能web站点》随笔 无处不在的性能问题
前言– 追寻大牛的足迹,无处不在的“性能”问题. 最近在读郭欣大牛的<构建高性能Web站点>,读完收益颇多.作者从HTTP.多级缓存.服务器并发策略.数据库.负载均衡.分布式文件系统多个方 ...
- Redis集群服务器-高可用调研随笔[转]
今天改了一天的Bug,本想下午开始专研Redis命令集,结果也泡汤了.只能在下班的路上考虑下Redis集群服务器的高可用方案.随笔而已,尚未成型,仅作记录. 当然,我说的可能比较片面,欢迎拍砖.斧正. ...
- Memcached缓存入门篇
Asp.Net中使用Couchbase——Memcached缓存入门篇 前言 本文的主要目的就是简单的进行使用Memcached.这是Memchahed的官网http://memcached.org/ ...
- RDMA调研报告&一点随笔
计算所科研实践随笔 被淹没在论文海里的两个星期. 早上7:10分起床,草草洗漱,7:30出发,开始漫长的1小时通勤.从地铁站的安检口起,队便排的极长,让人看得头皮发麻.下到了轨道旁稍好,但每趟呼啸而来 ...
- memcached set命令的大致处理逻辑笔记
这次记录状态机的主要逻辑,跟踪set命令的执行流程,暂不涉及到内存申请这一块,下面内容基本都是代码注释 首先还是补充了解下客户连接在发送数据到数据被处理并返回过程中conn的各种状态的表示 enum ...
- Java缓存相关memcached、redis、guava、Spring Cache的使用
随笔分类 - Java缓存相关 主要记录memcached.redis.guava.Spring Cache的使用 第十二章 redis-cluster搭建(redis-3.2.5) 摘要: redi ...
- 构建LNMP+memcached服务
通过PHP页面实现对memcached服务器的数据操作,实现以下目标: - 为PHP安装memcache扩展 - 创建PHP页面,并编写PHP代码,实现对memcached的数据操作 环境:部署LNM ...
- 支持 .NET Core 的 Memcached 客户端 EnyimMemcachedCore
1. 介绍 EnyimMemcachedCore 是一个支持 .NET Core 的 Memcached 客户端,是从 EnyimMemcached 迁移至 .NET Core的,源代码托管在 Git ...
- Key/Value之王Memcached初探:二、Memcached在.Net中的基本操作
一.Memcached ClientLib For .Net 首先,不得不说,许多语言都实现了连接Memcached的客户端,其中以Perl.PHP为主. 仅仅memcached网站上列出的语言就有: ...
随机推荐
- 倒排索引 获取指定单词的文档集合 使用hash去重单词term 提高数据压缩率的方法
倒排索引源于实际应用中需要根据属性的值来查找记录.这种索引表中的每一项都包括一个属性值和具有该属性值的各记录的地址.由于不是由记录来确定属性值,而是由属性值来确定记录的位置,因而称为倒排索引(inve ...
- nodejs 实战
使用 Koa + MongoDB + Redis 搭建论坛系统 「新手向」koa2从起步到填坑 基于koa2和react的PC端脚手架 一键生成koa/koa2项目: nodejs原生,express ...
- js数据类型简单介绍
JS数据类型 ECMAScript中有5种简单的数据类型:Undefined,Null,Boolean,Number,String.还有一种复杂的数据类型--Object(本质上是由一组无序的名值对组 ...
- 设置label的字体
label.font = [UIFont fontWithName:@"Arial-BoldItalicMT" size:24]; 字体名如下: Font Family: Amer ...
- (C)strcpy ,strncpy与strlcpy
1. 背景 好多人已经知道利用strncpy替代strcpy来防止缓冲区越界. 但是如果还要考虑运行效率的话,也许strlcpy是一个更好的方式. 2. strcpy strcpy 是依据 /0 作为 ...
- 织梦CMS首页、列表页文章如何调出该文章TAG标签?
1.如果是dedecms v5.7版本直接使用标签 [field:id function=GetTags(@me)/] 就可以调用出来了.只不过不带连接的. 2.如果需要连接请注释掉include/h ...
- 关于布局(Layout)的一切
之前在布局中有很多问题也有很多经验,遗憾都没记下来.现在一点点记下一些东西. 1.外层用LinearLayout的话,常常把orientation设成vertical, android:orienta ...
- Java泛型和反射总结
A a = (A)Class.forName(“pacage.A”).newInstance(); 这和你 A a = new A(): 是一样的效果. String className = “Exa ...
- 单选框 复选框 隐藏之后,绑定的change事件在ie中失效的问题
有时候需要对单选框和复选框进行美化,就需要在<input type="radio">和<input type="checkbox">元素 ...
- 【208】CentOS 下安装 Wine
参考:centos6.5安装wine 参考:用FreeGate自-由-门软件在Linux上更新Android SDK 参考:CentOS 5.3 使用wine装QQ
