vuex源码分析3.0.1(原创)
前言
chapter1 store构造函数
1.constructor
2.get state和set state
3.commit
4.dispatch
5.subscribe和subscribeAction
6.watch和replaceState
7.registerModule和unregisterModule
8.hotUpdate和_withCommit
chapter2 export install
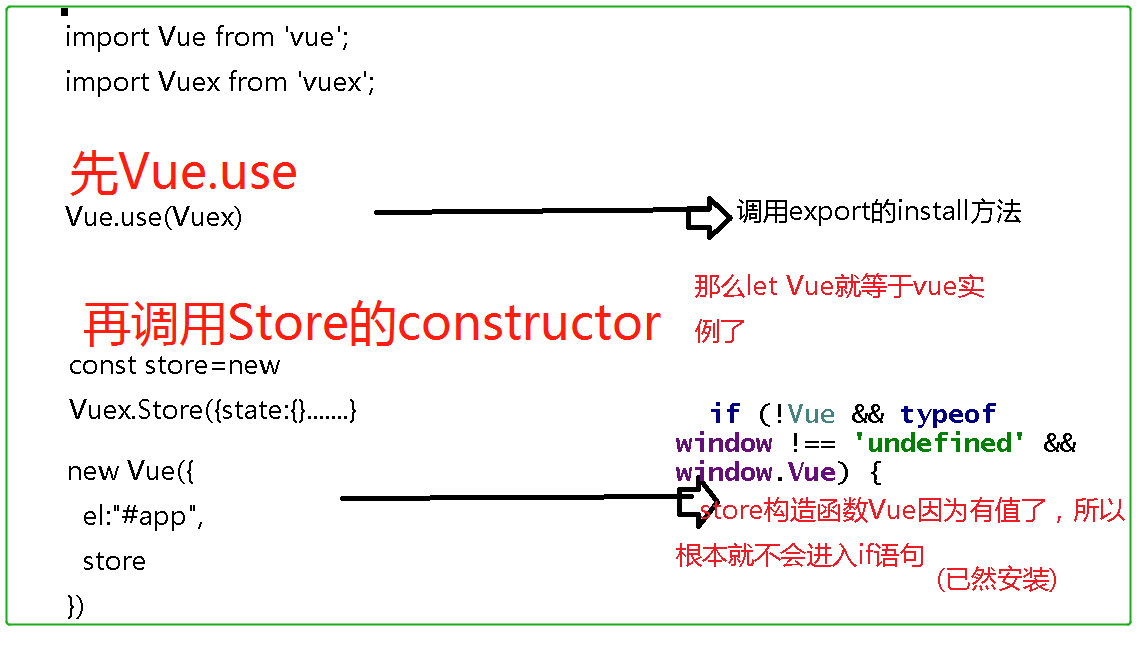
Q:Vuex如何实现装载的?
chapter3 辅助函数
1.registerMutation、registerAction、registerGetter
2.enableStrictMode、getNestedState
3.unifyObjectStyle(type, payload, options)
1.store构造函数 /part1
1.constructor
源码分析
 constructor (options = {}) {

    //安装Vue对象

    if (!Vue && typeof window !== 'undefined' && window.Vue) {

      console.log("window.vue");

      install(window.Vue)

    }

   //开发环境对Vue、Promise和Store的判断

    if (process.env.NODE_ENV !== 'production') {

      assert(Vue, `must call Vue.use(Vuex) before creating a store instance.`)

      assert(typeof Promise !== 'undefined', `vuex requires a Promise polyfill in this browser.`)

      assert(this instanceof Store, `store must be called with the new operator.`)

    }

    //options包括插件选项、严格模式选项

    const {

      plugins = [],

      strict = false

    } = options

    // 存储内部的状态

    this._committing = false

    this._actions = Object.create(null)

    this._actionSubscribers = []

    this._mutations = Object.create(null)

    this._wrappedGetters = Object.create(null)

    this._modules = new ModuleCollection(options)

    this._modulesNamespaceMap = Object.create(null)

    this._subscribers = []

    this._watcherVM = new Vue()

    // 绑定commit和dispatch

    const store = this

    const { dispatch, commit } = this

    this.dispatch = function boundDispatch (type, payload) {

      return dispatch.call(store, type, payload)

    }

    this.commit = function boundCommit (type, payload, options) {

      return commit.call(store, type, payload, options)

    }

    // 严格模式

    this.strict = strict

    const state = this._modules.root.state

    // 初始化根模块,或者安装子模块

    installModule(this, state, [], this._modules.root)

    //初始化vm

    resetStoreVM(this, state)

    // 应用插件

    plugins.forEach(plugin => plugin(this))

    if (Vue.config.devtools) {

      devtoolPlugin(this)

    }

  }
2.get state和set state
ES6的get和set是取值和存值的函数,这是是对属性state拦截存取行为。
示例1
E:\vuex>node

//类的声明,属性prop进行存取拦截

> class MyClass {

...     constructor() {

.....           // ...

.....   }

...     get prop() {

.....           return 'getter';

.....   }

...     set prop(value) {

.....           console.log('setter: ' + value);

.....   }

... }

undefined

> let inst = new MyClass();

undefined

//设置prop时,根据程序逻辑会console.log

> inst.prop = ;

setter:

//获取prop,根据return返回"getter"字符串

> inst.prop

'getter'
源码1
//取值返回的是this属性

get state () {

    return this._vm._data.$$state

  }

//如果在非生产环境,那么修改state就会使用assert打印错误信息

  set state (v) {

    if (process.env.NODE_ENV !== 'production') {

      assert(false, `use store.replaceState() to explicit replace store state.`)

    }

  }
3.commit
 commit (_type, _payload, _options) {

    // check object-style commit检查对象风格提交

    const {

      type,

      payload,

      options

    } = unifyObjectStyle(_type, _payload, _options)

  //mutation的type判断,也就是entry,如果不存在,那么打印错误信息“不存在的mutation type”

    const mutation = { type, payload }

    const entry = this._mutations[type]

    if (!entry) {

      if (process.env.NODE_ENV !== 'production') {

        console.error(`[vuex] unknown mutation type: ${type}`)

      }

      return;

    }

  //处理entry并订阅它

    this._withCommit(() => {

      entry.forEach(function commitIterator (handler) {

        handler(payload)

      })

    })

    this._subscribers.forEach(sub => sub(mutation, this.state))

//开发模式下的silent判断

    if (

      process.env.NODE_ENV !== 'production' &&

      options && options.silent

    ) {

      console.warn(

        `[vuex] mutation type: ${type}. Silent option has been removed. ` +

        'Use the filter functionality in the vue-devtools'

      )

    }

  }
(1)const { type, payload,options}=unify..........这是ES6的解构赋值。(node环境执行的哦)
示例2
E:\vuex>node

> const person = {

...   name: 'little bear',

...   age: ,

...   sex: '男'

... }

undefined

> let { name,age,sex } = person

undefined

> name

'little bear'
(2)this._withCommit(...)小括号内的部分总体上说是_withCommit的fn参数。
this._withCommit()中有对this._committing进行设置,首先this._committing = false赋值给中间变量,接下来提交前设为true,fn调用结束后再通过中间变量设为初始值。
接下来说说entry。entry就是mutations的type也就是某个函数。可是明明forEach方法是数组啊。其实通过this._mutations[type]获取到就是一个数组。那么对数组的元素handler进行调用。entry
类似如下内容:

(3)this._subscribers.forEach(sub => sub(mutation, this.state))是_subscribers遍历收集来的actions并执行。我们要注意到actions的使用也有commit提交,不过是异步的。所以这里的actions执行是为了补充刚刚同步提交的方式。
图示1

(4)process.env.NODE_ENV !== 'production' &&options && options.silent
检查选项,silent是静默选项,如果使用了silent,那么告知"silent已经被移除,请在dev-tool中使用过滤器功能。
4,dispatch
dispatch (_type, _payload) {

    // 检查数组风格的分发

    const {

      type,

      payload

    } = unifyObjectStyle(_type, _payload)

    const action = { type, payload }

   //从this._actions拿到type对应的事件类型

    const entry = this._actions[type]

  //如果entry也就是事件类型不存在,那么打印信息"vuex不知道的action类型"

    if (!entry) {

      if (process.env.NODE_ENV !== 'production') {

        console.error(`[vuex] unknown action type: ${type}`)

      }

      return

    }

    //_actionSubscribers遍历每个订阅

    this._actionSubscribers.forEach(sub => sub(action, this.state))

    //如果entry.length大于1,那么返回promise

    return entry.length >

      ? Promise.all(entry.map(handler => handler(payload)))

      : entry[](payload)

  }
5.subscribe和subscribeAction
subscribe订阅store的mutation。回调函数会在每个mutaion完成时触发。
示例
const myPlugin = store => {

            // 当 store 初始化后订阅

            store.subscribe((mutation, state) => {

           //回调函数在每次mutation完成之后调用

                state.count++;

            })

        }

const store = new Vuex.Store({

            state:{

                count:

            },

            mutations:{

                increment(state,payload){

                    state.count=state.count*payload;

                }

            },

            plugins: [myPlugin]

})

 //提交"increment"事件

store.commit("increment",)

//最终store.state.count等于5*20+1=101。
subscribeAction订阅action。回调函数会在每个action完成时触发。
const myPlugin2 = store => {

            // 当 store 初始化后订阅

            store.subscribeAction((action, state) => {

           //每次action完成后回调函数都会被触发

                state.huge--;

            })

        }

 const store = new Vuex.Store({

            state:{

                huge:

            },

            mutations:{

                REDUCE(state,payload){

                    state.huge=state.huge-payload

                }

            },

            actions:{

                reduce({commit,state},payload){

                    commit("REDUCE",payload)

                }

            },

            plugins: [myPlugin2]

        })

store.dispatch("reduce",)

//store.state.huge结果2000-500-1等于1499
源码分析
subscribe (fn) {

//fn即刚才说的每次mutation之后的回调函数

    return genericSubscribe(fn, this._subscribers)

  }

  subscribeAction (fn) {

    return genericSubscribe(fn, this._actionSubscribers)

  }

//subscribe和subscribeAction返回的是一个箭头函数

function genericSubscribe (fn, subs) {

//订阅fn,那么会push到this._subscribers或者this._actionSubscribers数组

  if (subs.indexOf(fn) < ) {

    subs.push(fn)

  }

  return () => {

//箭头函数在需要回调的时候再从数组里裁剪出fn元素

    const i = subs.indexOf(fn)

    if (i > -) {

      subs.splice(i, )

    }

  }

}
可以看出,genericSubscribe功能是对订阅数组的处理,先存进数组,需要的时候再取出来。
6.watch和replaceState
源码分析
watch (getter, cb, options) {

//如果传入的getter不是function,那么打印信息"store.watch只接受一个函数"

    if (process.env.NODE_ENV !== 'production') {

      assert(typeof getter === 'function', `store.watch only accepts a function.`)

    }

//返回Vue.$watch方法,响应式监听() => getter(this.state, this.getters)返回的值

//如果发生变化,那么cb回调函数触发

//options包括选项:deep,选项:immediate

    return this._watcherVM.$watch(() => getter(this.state, this.getters), cb, options)

  }
示例
<!--Vue API中$watch的用法-->

<div  id="app">

       <button @click="addOne">加一</button>

    </div>

    <script>

       let vm= new Vue({

            el:"#app",

            data:{

                a:0

            },

           created:function(){

              //$watch监听第一个函数返回的只,一旦发生变化,那么执行回调函数

               this.$watch(function(){

                   return this.a;

               },function(newValue,oldValue){

                   console.log(newValue)

               })

           },

            methods:{

                addOne(){

                   this.a=1;

                }

            }

        })

    </script>
示例
//replaceState整体替换state,变化引起回调发生

const store=new Vuex.Store({

           state:{

               count:0

           }

       })

       store.watch(function(){

           return store.state;

       },function(){

           console.log(store.state.count)//

       })

store.replaceState({count:20})
示例
//通过mutation改变state,触发watch回调

const store2=new Vuex.Store({

    state:{

        count:100

    },

    mutations:{

        ADDONE(state){

            state.count++;

        }

    }

})

store2.watch(function(){

    return store2.state.count

    },function(){

        console.log(store2.state.count)

        //

    }

)

store2.commit("ADDONE");
源码分析
replaceState (state) {

    this._withCommit(() => {

      this._vm._data.$$state = state

    })

  }
通过传入一个新state对象,替换旧state。
示例
const store=new Vuex.Store({

              state:{

                  count:,

                  num:

              }

 })

 store.replaceState({count:});

//通过替换,旧的state不存在,只有更新后的state

store.state.count//等于0

store.state.num//undefined
7.registerModule和unregisterModule
示例
源码分析
registerModule (path, rawModule, options = {}) {

   //传入的第一个参数要么是数组,要么是字符串,字符串会转化为字符串为元素的数组

    if (typeof path === 'string') path = [path]

   //开发环境下的调试信息

    if (process.env.NODE_ENV !== 'production') {

   //如果path不能转为数组或者不是数组,那么打印"模块path必须是字符串或者数组"

      assert(Array.isArray(path), `module path must be a string or an Array.`)

   //如果传入的path为[]空数组,那么打印"不能使用registerModule来注册根模块"

      assert(path.length > , 'cannot register the root module by using registerModule.')

    }

    //在store._modules上注册模块

    this._modules.register(path, rawModule)

   //安装模块

    installModule(this, this.state, path, this._modules.get(path), options.preserveState)

    // reset store to update getters...

    //以当前state更新store.getters

    resetStoreVM(this, this.state)

  }
源码分析
function installModule (store, rootState, path, module, hot) {

  const isRoot = !path.length

  const namespace = store._modules.getNamespace(path)

  // 注册命名空间的映射数组_modulesNamespaceMap

  if (module.namespaced) {

    store._modulesNamespaceMap[namespace] = module

  }

  //hot,即options 可以包含 preserveState: true 以允许保留之前的 state。用于服务端渲染。

  if (!isRoot && !hot) {

    const parentState = getNestedState(rootState, path.slice(, -))

    const moduleName = path[path.length - ]

    store._withCommit(() => {

      Vue.set(parentState, moduleName, module.state)

    })

  }

  const local = module.context = makeLocalContext(store, namespace, path)

 //遍历mutation并注册mutation,会因为namespaced而不同

  module.forEachMutation((mutation, key) => {

    const namespacedType = namespace + key

    registerMutation(store, namespacedType, mutation, local)

  })

//遍历action并注册action

  module.forEachAction((action, key) => {

    //如果action.root为true,那么type等于key索引值,

    //即全局action,无论是子模块还是子模块的子模块都如此

   //如果action.root为false,那么type直接取namespacType

    const type = action.root ? key : namespace + key

    const handler = action.handler || action

    registerAction(store, type, handler, local)

  })

//遍历getter并注册getterts,会因为namespaced而不同

  module.forEachGetter((getter, key) => {

    const namespacedType = namespace + key

    registerGetter(store, namespacedType, getter, local)

  })

 //遍历子模块,并递归调用installModule

  module.forEachChild((child, key) => {

    installModule(store, rootState, path.concat(key), child, hot)

  })

}
源码分析
 unregisterModule (path) {

    if (typeof path === 'string') path = [path]

    //如果传入参数不能转为数组,那么打印"模块路径必须是字符串或者数组"

    if (process.env.NODE_ENV !== 'production') {

      assert(Array.isArray(path), `module path must be a string or an Array.`)

    }

   //取消注册,那么store._modules.root._children就不会定义myModule属性了

    this._modules.unregister(path)

    this._withCommit(() => {

   //getNestedState获取到父级state

      const parentState = getNestedState(this.state, path.slice(0, -1))

   //Vue删除相应的module内容

      Vue.delete(parentState, path[path.length - 1])

    })

   //以当前的this重置store

    resetStore(this)

  }
8.hotUpdate和_withCommit
源码分析
//热重载

hotUpdate (newOptions) {

    this._modules.update(newOptions)

    resetStore(this, true)

  }
Vuex 支持在开发过程中热重载 mutation、module、action 和 getter。
 _withCommit (fn) {

   //每次提交的时候,内部代码都会传进来一个箭头函数

    const committing = this._committing

    this._committing = true

    fn()

    this._committing = committing

  }
2.export install
示例
<script src="js/vue.js"></script>

    <!--这行语句安装了window.Vue-->

    <script>

        let Vue;

        if (!Vue && typeof window !== 'undefined' && window.Vue) {

            console.log("window.vue");

            install(window.Vue)

        }

        function  install (_Vue) {

            Vue = _Vue

            console.log(Vue);

            //applyMixin(Vue)是为了在Vue初始化之前(beforeCreate)来完成vuex的初始化

            //因为2版本才提供了beforeCreate这个钩子函数

            //applyMixin主要逻辑:if (version >= 2) {Vue.mixin({ beforeCreate: vuexInit })} else {}

        }

    </script>
从中可以看出vuex的初始化过程,以Vue2版本为为例:

源码分析
export function install (_Vue) {

//那么问题来了,为什么要使用let Vue这个文件一个全局变量呢?主要是为了避免重复安装

  if (Vue && _Vue === Vue) {

    if (process.env.NODE_ENV !== 'production') {

      //如果已经安装过,那么Vue就等于window.Vue为什么呢?

      //Vue.use(plugin)方法会调用export的install方法,那么调用中使用Vue=_Vue赋值语句

      console.error(

        '[vuex] already installed. Vue.use(Vuex) should be called only once.'

      )

    }

    return

  }

  Vue = _Vue

  applyMixin(Vue)

}
install调用逻辑分析:

3.辅助函数
1.registerMutation、registerAction、registerGetter
function registerMutation (store, type, handler, local) {

  //将type属性添加到_mutations对象,其初始值为空数组[]

  const entry = store._mutations[type] || (store._mutations[type] = [])

 //我们应该记得mutation是一个函数,那么function.call做一个继承,local.state和payload都应用于store对象

  entry.push(function wrappedMutationHandler (payload) {

    handler.call(store, local.state, payload)

  })

}

........

registerMutation(store, namespacedType, mutation, local)
function registerAction (stobre, type, handler, local) {

  //_actions具有type属性,其初始值为一个数组

  const entry = store._actions[type] || (store._actions[type] = [])

  entry.push(function wrappedActionHandler (payload, cb) {

  //继承于store对象

    let res = handler.call(store, {

      dispatch: local.dispatch,

      commit: local.commit,

      getters: local.getters,

      state: local.state,

      rootGetters: store.getters,

      rootState: store.state

    }, payload, cb)

    //如果res不是一个promise,那么相当于直接返回含有res内容的promise对象

    if (!isPromise(res)) {

      res = Promise.resolve(res)

    }

    //_devtoolHook判断

    if (store._devtoolHook) {

      //拦截promise错误

      return res.catch(err => {

        store._devtoolHook.emit('vuex:error', err)

        throw err

      })

    } else {

     //返回res

      return res

    }

  })

}

.........

registerAction(store, type, handler, local)
我们应该还记得action是可以写异步操作的。
function registerGetter (store, type, rawGetter, local) {

  //如果对应已getter存在,进入分支,打印说"vuex重复的getter键"

  if (store._wrappedGetters[type]) {

    if (process.env.NODE_ENV !== 'production') {

      console.error(`[vuex] duplicate getter key: ${type}`)

    }

    return

  }

  store._wrappedGetters[type] = function wrappedGetter (store) {

//通过当前local和store返回rawGetter对象

    return rawGetter(

      local.state, // local state

      local.getters, // local getters

      store.state, // root state

      store.getters // root getters

    )

  }

}
2.enableStrictMode、getNestedState
if (store.strict) {

    enableStrictMode(store)

  }

//enableStrictMode功能是允许new vm的严格模式
function enableStrictMode (store) {

 //侦听this._data.$$state也就是state

  store._vm.$watch(function () { return this._data.$$state }, () => {

 //state变化,回调函数触发

 //store._committing为False,那么打印"不要在mutation处理器外部提交state

 if (process.env.NODE_ENV !== 'production') {

      assert(store._committing, `do not mutate vuex store state outside mutation handlers.`)

    }

  //deep:true,跟踪对象内部属性的变化,sync:true,同步

  }, { deep: true, sync: true })

}
首先,getNestedState的功能是父级state对象。
function getNestedState (state, path) {

  return path.length

     //state为初始值,接下来遍历path数组,并以state[key]取得state对象

    ? path.reduce((state, key) => state[key], state)

    : state

}
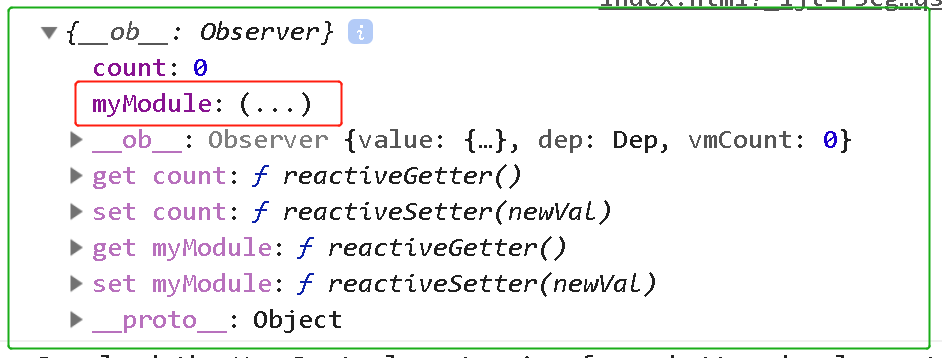
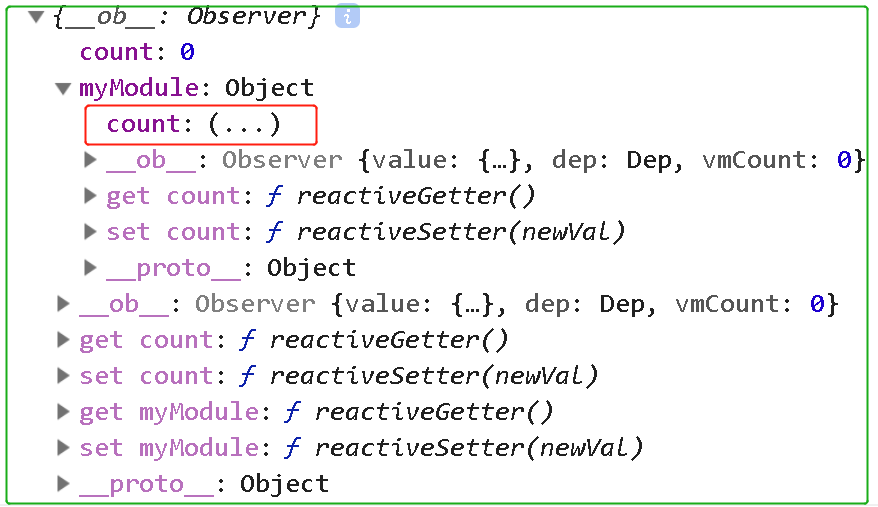
那么为什么这个key比如state["myModule"]的索引就能拿到对应的state呢?这是因为state对象长这个样子。

示例
let vm= new Vue({

            el:"#app",

        })

       const store=new Vuex.Store({

           state:{

               count:

           }

       })

       function getNestedState (state, path) {

           return path.length

               ? path.reduce((state, key) => state[key], state)

               : state

       }

       let myModule={

           state:{

               count:

           }

       }

       store.registerModule("myModule",myModule)

       //找到父级state对象

      //["myModule"].slice(0,-1)等于[]

       let parentState=getNestedState(store.state,["myModule"].slice(,-))

        console.log(parentState)
结果如下:

3.unifyObjectStyle(type, payload, options)
首先运行一下这个函数,它可以传入3个参数(payload)。由于process是nodejs环境的变量,那么在nodejs环境中运行。
它的功能是把提交数据对象风格化。
//nodejs环境输入function代码

E:\vuex>node

> function isObject (obj) {

...   return obj !== null && typeof obj === 'object'

... }function unifyObjectStyle (type, payload, options) {

...   if (isObject(type) && type.type) {

.....     options = payload

.....     payload = type

.....     type = type.type

.....   }

...

...  if (process.env.NODE_ENV !== 'production') {

...     assert(typeof type === 'string', `expects string as the type, but found ${typeof type}.`)

...

...   }

...

...   return { type, payload, options }

... }

undefined

//nodejs环境中调用刚刚定义的unifyObjectStyle。

> unifyObjectStyle("login",{name:"vicky",password:""})

{ type: 'login',

  payload: { name: 'vicky', password: '' },

  options: undefined }
> unifyObjectStyle({type:"login",payload:{name:"vicky",password:""}})

{ type: 'login',

  payload: { type: 'login', payload: { name: 'vicky', password: '' } },

  options: undefined }
它讨论了两种情况。(1)如果type.type不存在,那么就是以参数风格的提交,按照最终的对象格式return。(2)如果type.type存在,也就是对象风格的提交,那么就让对象的type和payload重新赋值。然后return。以最终实现对象风格的统一。
而process的部分是对type的值进行判断,如果不是string,那么assert一个报错信息。
写作不易,欢迎打赏!微信哦。

vuex源码分析3.0.1(原创)的更多相关文章
- VueX源码分析(5)
VueX源码分析(5) 最终也是最重要的store.js,该文件主要涉及的内容如下: Store类 genericSubscribe函数 resetStore函数 resetStoreVM函数 ins ...
- VueX源码分析(3)
VueX源码分析(3) 还剩余 /module /plugins store.js /plugins/devtool.js const devtoolHook = typeof window !== ...
- VueX源码分析(4)
VueX源码分析(4) /module store.js /module/module.js import { forEachValue } from '../util' // Base data s ...
- VueX源码分析(1)
VueX源码分析(1) 文件架构如下 /module /plugins helpers.js index.esm.js index.js store.js util.js util.js 先从最简单的 ...
- 逐行粒度的vuex源码分析
vuex源码分析 了解vuex 什么是vuex vuex是一个为vue进行统一状态管理的状态管理器,主要分为state, getters, mutations, actions几个部分,vue组件基于 ...
- VueX源码分析(2)
VueX源码分析(2) 剩余内容 /module /plugins helpers.js store.js helpers要从底部开始分析比较好.也即先从辅助函数开始再分析那4个map函数mapSta ...
- vuex 源码分析(七) module和namespaced 详解
当项目非常大时,如果所有的状态都集中放到一个对象中,store 对象就有可能变得相当臃肿. 为了解决这个问题,Vuex允许我们将 store 分割成模块(module).每个模块拥有自己的 state ...
- vuex 源码分析(六) 辅助函数 详解
对于state.getter.mutation.action来说,如果每次使用的时候都用this.$store.state.this.$store.getter等引用,会比较麻烦,代码也重复和冗余,我 ...
- vuex 源码分析(五) action 详解
action类似于mutation,不同的是Action提交的是mutation,而不是直接变更状态,而且action里可以包含任意异步操作,每个mutation的参数1是一个对象,可以包含如下六个属 ...
随机推荐
- ASP.NET MVC学习笔记(二)登陆验证
书上的验证时在配置文件中直接声明用户名和密码,想改成从数据验证账号和密码,搞了一下午都没高出来,不断的调试,发现 var table = userInfo.Tables.FirstOrDefault( ...
- python全栈开发_day31_OSI七层协议和c/s架构
一:OSI七层协议 应用层 =>表示层 =>会话层 =>传输层 =>网络层 =>数据链路层 =>物理连接层 二:c/s架构 b/s的本质也是c/s 手机端:好像cs ...
- 详解sizeof与strlen
一,sizeof是C语言的一种单目运算符,与C语言的其他运算符++,--一样,它并不是函数:sizeof()以字节为单位给出了操作数的大小:sizeof的值是无符号int. strlen是一个函数,只 ...
- Linux安装yum的痛苦路程(失败,慎入)
1,在网上下载了一个yum 的 rpm文件(yum-3.2.29-81.el6.centos.noarch.rpm),我在 http://www.rpmfind.net/linux/rpm2html/ ...
- 如何在CentOS 7安装Node.js
最近,我一直对学习Node.js比较感兴趣.这是一个Java平台的服务器端编程 ,它允许开发人员在服务器编写Java代码,并且有许多CentOS的用户正努力学习这个语言的开发环境.这正是我想做这个教程 ...
- ElasticSearch5.0——IK词库加载
Dictionary ConfigurationIKAnalyzer.cfg.xml can be located at {conf}/analysis-ik/config/IKAnalyzer.cf ...
- AWS 推出长期支持的 OpenJDK 免费分发版本 —— Amazon Corretto
简评:听说 Oracle JDK 要收费了,Oracle 要限制 Java 的商业或生产用途,针对这个问题,AWS 将会推出 Amazon Corretto. Java 是 AWS 用户使用的最流行的 ...
- select子句排列顺序与聚集函数
selcet 要返回的列或表达式 from 从中检索数据的表 where 行级过滤 group by 分组说明 having 组级过滤 order by 输出排列顺序 ASC正序排 ...
- Python中 '==' 与'is' 以及它们背后的故事
摘要 比较判断逻辑是在代码中经常使用的,在Python中常用 '==' 和 is 来做比较判断. == : 双等号是用来比较变量所指向内存单元中的值是否相等,它只关心值,并不在意值的内存地址,也就 ...
- HDU - 3085 Nightmare Ⅱ
HDU - 3085 Nightmare Ⅱ 双向BFS,建立两个队列,让男孩女孩一起走 鬼的位置用曼哈顿距离判断一下,如果该位置与鬼的曼哈顿距离小于等于当前轮数的两倍,则已经被鬼覆盖 #includ ...
