Tensorflow:DCGAN生成手写数字
参考地址:https://blog.csdn.net/miracle_ma/article/details/78305991
使用DCGAN(deep convolutional GAN):深度卷积GAN
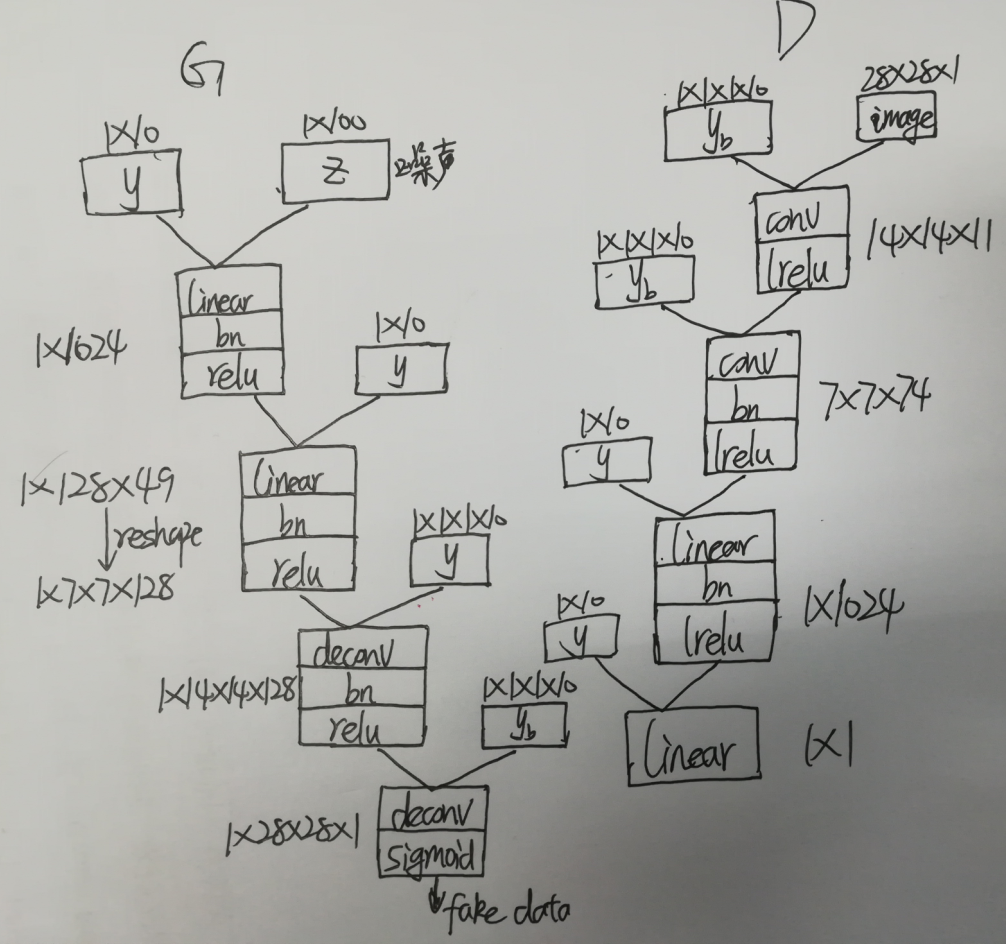
网络结构如下:

代码分成四个文件:
- 读入文件 read_data.py
- 配置线性层,卷积层,反卷积层 ops.py
- 构建生成器和判别器模型 model.py
- 训练模型 train.py
使用的layer种类有:
- conv(卷积层)
- deconv(反卷积层)
- linear(线性层)
- batch_norm(批量归一化层)
- lrelu/relu/sigmoid(非线性函数层)
一、读入文件(read_data.py)
import os

import numpy as np

import tensorflow as tf

def read_data():

    data_dir = "data\mnist"

    #read training data

    fd = open(os.path.join(data_dir,"train-images.idx3-ubyte"))

    loaded = np.fromfile(file = fd, dtype = np.uint8)

    trainX = loaded[16:].reshape((60000, 28, 28, 1)).astype(np.float)

    fd = open(os.path.join(data_dir,"train-labels.idx1-ubyte"))

    loaded = np.fromfile(file = fd, dtype = np.uint8)

    trainY = loaded[8:].reshape((60000)).astype(np.float)

    #read test data

    fd = open(os.path.join(data_dir,"t10k-images.idx3-ubyte"))

    loaded = np.fromfile(file = fd, dtype = np.uint8)

    testX = loaded[16:].reshape((10000, 28, 28, 1)).astype(np.float)

    fd = open(os.path.join(data_dir,"t10k-labels.idx1-ubyte"))

    loaded = np.fromfile(file = fd, dtype = np.uint8)

    testY = loaded[8:].reshape((10000)).astype(np.float)

    # 将两个集合合并成70000大小的数据集

    X = np.concatenate((trainX, testX), axis = 0)

    y = np.concatenate((trainY, testY), axis = 0)

    print(X[:2])

    #set the random seed

    seed = 233

    np.random.seed(seed)

    np.random.shuffle(X)

    np.random.seed(seed)

    np.random.shuffle(y)

    return X/255, y
新建一个data文件夹,存放mnist数据集。读入训练集和测试集,将两个集合合并成一个70000的数据集,设置相同的随机种子,保证两个集合随机成相同的顺序。最后把X归一化到 [0, 1] 之间
二、配置线性层,卷积层,反卷积层 (ops.py)
import tensorflow as tf

from tensorflow.contrib.layers.python.layers import batch_norm as batch_norm

def linear_layer(value, output_dim, name = 'linear_connected'):

    with tf.variable_scope(name):

        try:

            # 线性层的权重

                # 名称:weights

                # shape = [int(value.get_shape()[1]), output_dim], 我们需要传入最后输出多少维,也即是output_dim的值

                # 初始化:使用标准正态截断函数 标准差是0.02

            weights = tf.get_variable('weights',

                [int(value.get_shape()[1]), output_dim],

                initializer = tf.truncated_normal_initializer(stddev = 0.02))

            # 线性层的偏置

                # 名称:biases

                # shape = [output_dim], 偏置与输出的维度相同

                # 初始化:使用常量初始化  初始化为0

            biases = tf.get_variable('biases',

                [output_dim], initializer = tf.constant_initializer(0.0))

        except ValueError:

            tf.get_variable_scope().reuse_variables()

            weights = tf.get_variable('weights',

                [int(value.get_shape()[1]), output_dim],

                initializer = tf.truncated_normal_initializer(stddev = 0.02))

            biases = tf.get_variable('biases',

                [output_dim], initializer = tf.constant_initializer(0.0))

        return tf.matmul(value, weights) + biases

def conv2d(value, output_dim, k_h = 5, k_w = 5, strides = [1,1,1,1], name = "conv2d"):

    with tf.variable_scope(name):

        try:

            # 反卷积层的权重

                # 名称:weights

                # [5, 5, 输入的维度, 输出的维度]

                # 初始化:使用标准正态截断函数 标准差是0.02

            weights = tf.get_variable('weights',

                [k_h, k_w, int(value.get_shape()[-1]), output_dim],

                initializer = tf.truncated_normal_initializer(stddev = 0.02))

            # 线性层的偏置

                # 名称:biases

                # shape = [output_shape[-1]], 偏置与输出的维度相同

                # 初始化:使用常量初始化  初始化为0

            biases = tf.get_variable('biases',

                [output_dim], initializer = tf.constant_initializer(0.0))

        except ValueError:

            tf.get_variable_scope().reuse_variables()

            weights = tf.get_variable('weights',

                [k_h, k_w, int(value.get_shape()[-1]), output_dim],

                initializer = tf.truncated_normal_initializer(stddev = 0.02))

            biases = tf.get_variable('biases',

                [output_dim], initializer = tf.constant_initializer(0.0))

        conv = tf.nn.conv2d(value, weights, strides = strides, padding = "SAME")

        conv = tf.reshape(tf.nn.bias_add(conv, biases), conv.get_shape())

        return conv

def deconv2d(value, output_shape, k_h = 5, k_w = 5, strides = [1,1,1,1], name = "deconv2d"):

    with tf.variable_scope(name):

        try:

            # 反卷积层的权重

            # filter : [height, width, output_channels, in_channels]

                # 名称:weights

                # [5, 5, 输出的维度, 输入的维度]

                # 初始化:使用标准正态截断函数 标准差是0.02

            weights = tf.get_variable('weights',

                [k_h, k_w, output_shape[-1], int(value.get_shape()[-1])],

                initializer = tf.truncated_normal_initializer(stddev = 0.02))

            # 线性层的偏置

                # 名称:biases

                # shape = [output_shape[-1]], 偏置与输出的维度相同

                # 初始化:使用常量初始化  初始化为0

            biases = tf.get_variable('biases',

                [output_shape[-1]], initializer = tf.constant_initializer(0.0))

        except ValueError:

            tf.get_variable_scope().reuse_variables()

            weights = tf.get_variable('weights',

                [k_h, k_w, output_shape[-1], int(value.get_shape()[-1])],

                initializer = tf.truncated_normal_initializer(stddev = 0.02))

            biases = tf.get_variable('biases',

                [output_shape[-1]], initializer = tf.constant_initializer(0.0))

        deconv = tf.nn.conv2d_transpose(value, weights, output_shape, strides = strides)

        deconv = tf.reshape(tf.nn.bias_add(deconv, biases), deconv.get_shape())

        return deconv

def conv_cond_concat(value, cond, name = 'concat'):

    value_shapes = value.get_shape().as_list()

    cond_shapes = cond.get_shape().as_list()

    with tf.variable_scope(name):

        return tf.concat([value, cond * tf.ones(value_shapes[0:3] + cond_shapes[3:])], 3, name = name)

# 批量归一化层

def batch_norm_layer(value, is_train = True, name = 'batch_norm'):

    with tf.variable_scope(name) as scope:

        if is_train:

            return batch_norm(value, decay = 0.9, epsilon = 1e-5, scale = True,

                                is_training = is_train, updates_collections = None, scope = scope)

        else :

            return batch_norm(value, decay = 0.9, epsilon = 1e-5, scale = True,

                            is_training = is_train, reuse = True,

                            updates_collections = None, scope = scope)

def lrelu(x, leak = 0.2, name = 'lrelu'):

    with tf.variable_scope(name):

        return tf.maximum(x, x*leak, name = name)
主要就是配置各个层的权重和参数,conv_cond_concat是为了用于卷积层计算的四维数据[batch_size, w, h, c]和约束条件y连接起来的操作,需要把两个数据的前三维转化到一样大小才能使用tf.concat(拼接函数)
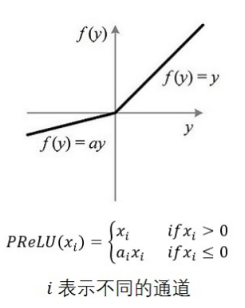
lrelu是relu的改良版。代码中a = 0.2

三、构建生成器和判别器模型(model.py)
import tensorflow as tf

from ops import *

BATCH_SIZE = 64

# 生成器模型

def generator(z, y,train = True):

    with tf.variable_scope('generator', reuse=tf.AUTO_REUSE):

        # 生成器的输入,z是 1 * 100 维的噪声

        yb = tf.reshape(y, [BATCH_SIZE, 1, 1, 10], name = 'g_yb')

        # 将噪声 z 和 y 拼接起来

        z_y = tf.concat([z,y], 1, name = 'g_z_concat_y')

        # 经过线性层,z_y 变成1024维

        linear1 = linear_layer(z_y, 1024, name = 'g_linear_layer1')

        # 先批量归一化,然后经过relu层,得 bn1

        bn1 = tf.nn.relu(batch_norm_layer(linear1, is_train = True, name = 'g_bn1'))

        # 将 bn1 与 y 拼接在一起

        bn1_y = tf.concat([bn1, y], 1 ,name = 'g_bn1_concat_y')

        # 经过线性层,变成128 * 49

        linear2 = linear_layer(bn1_y, 128*49, name = 'g_linear_layer2')

        # 先批量归一化,然后经过relu层,得 bn2

        bn2 = tf.nn.relu(batch_norm_layer(linear2, is_train = True, name = 'g_bn2'))

        # reshape成 7 * 7 * 128

        bn2_re = tf.reshape(bn2, [BATCH_SIZE, 7, 7, 128], name = 'g_bn2_reshape')

        # 将 bn2_re 与 yb 连接起来

        bn2_yb = conv_cond_concat(bn2_re, yb, name = 'g_bn2_concat_yb')

        # 经过反卷积 步长设为2,height和width 都翻倍

        deconv1 = deconv2d(bn2_yb, [BATCH_SIZE, 14, 14, 128], strides = [1, 2, 2, 1], name = 'g_deconv1')

        # 先批量归一化,然后经过relu层,得 bn3

        bn3 = tf.nn.relu(batch_norm_layer(deconv1, is_train = True, name = 'g_bn3'))

        # 将 bn2_re 与 yb 连接起来

        bn3_yb = conv_cond_concat(bn3, yb, name = 'g_bn3_concat_yb')

        # 经过反卷积 步长设为2,height和width 都翻倍

        deconv2 = deconv2d(bn3_yb, [BATCH_SIZE, 28, 28, 1], strides = [1, 2, 2, 1], name = 'g_deconv2')

        # 经过sigmoid层

        return tf.nn.sigmoid(deconv2)

# 判别器模型

def discriminator(image, y, reuse=tf.AUTO_REUSE, train = True):

    with tf.variable_scope('discriminator', reuse=tf.AUTO_REUSE):

        # 判别器有两个输入,一个是真实图片,另一个是生成的图片,都是 28 * 28

        yb = tf.reshape(y, [BATCH_SIZE, 1, 1, 10], name = 'd_yb')

        # 将 image 与 yb 连接起来

        image_yb = conv_cond_concat(image, yb, name = 'd_image_concat_yb')

        # 卷积:步长为2   14 * 14 * 11

        conv1 = conv2d(image_yb, 11, strides = [1, 2, 2, 1], name = 'd_conv1')

        # 经过 lrelu 层

        lr1 = lrelu(conv1, name = 'd_lrelu1')

        # 将 lr1 与 yb 连接起来

        lr1_yb = conv_cond_concat(lr1, yb, name = 'd_lr1_concat_yb')

        # 卷积:步长为2   7 * 7 * 74

        conv2 = conv2d(lr1_yb, 74, strides = [1, 2, 2, 1], name = 'd_conv2')

        # 批量归一化

        bn1 = batch_norm_layer(conv2, is_train = True, name = 'd_bn1')

        # 经过 lrelu 层

        lr2 = lrelu(bn1, name = 'd_lrelu2')

        lr2_re = tf.reshape(lr2, [BATCH_SIZE, -1], name = 'd_lr2_reshape')

        # 将 lr2_re 与 y 连接起来

        lr2_y = tf.concat([lr2_re, y], 1, name = 'd_lr2_concat_y')

        # 经过线性层 变成 1 * 1024

        linear1 = linear_layer(lr2_y, 1024, name = 'd_linear_layer1')

        # 批量归一化

        bn2 = batch_norm_layer(linear1, is_train = True, name = 'd_bn2')

        # 经过 lrelu 层

        lr3 = lrelu(bn2, name = 'd_lrelu3')

        lr3_y = tf.concat([lr3, y], 1, name = 'd_lr3_concat_y')

        linear2 = linear_layer(lr3_y, 1, name = 'd_linear_layer2')

        return linear2

def sampler(z, y, train = True):

    tf.get_variable_scope().reuse_variables()

    return generator(z, y, train = train)
按照模型图实现生成器G,返回时用到了sigmoid,将输出值规范到(0, 1)与前面输入图像的范围一致。
判别器D:
1、 设置reuse变量(变量重复使用)。判别器有两个输入。对于同一个D,先喂给它real data(真实的图像),然后喂给它fake data(生成器生成的假图像)。在一次train_step里涉及到了两次D变量的重复使用,所以需要设置变量共享。
2、返回值没有使用sigmoid,因为训练中使用了sigmoid_cross_entropy_with_logits来计算loss
四、训练模型
import scipy.misc

import numpy as np

import tensorflow as tf

import os

from read_data import *

from ops import *

from model import *

BATCH_SIZE = 64

# 保存图片,将图片拼接在一起

def save_images(images, size, path):

    img = (images + 1.0)/2.0

    h, w = img.shape[1], img.shape[2]

    merge_img = np.zeros((h * size[0], w * size[1], 3))

    for idx, image in enumerate(images):

        i = idx % size[1]

        j = idx // size[1]

        merge_img[j*h:j*h+h,i*w:i*w+w,:] = image

    return scipy.misc.imsave(path, merge_img)

def train():

    #read data

    X, Y = read_data()

    #global_step to record the step of training

    global_step = tf.Variable(0, name = 'global_step', trainable = True)

    # 创建placeholder

    y = tf.placeholder(tf.int32, [BATCH_SIZE], name = 'y')

    _y = tf.one_hot(y, depth = 10, on_value=None, off_value=None, axis=None, dtype=None, name='one_hot')

    z = tf.placeholder(tf.float32, [BATCH_SIZE, 100], name = 'z')

    images = tf.placeholder(tf.float32, [BATCH_SIZE, 28, 28, 1], name = 'images')

    # 用噪声生成图片

    G = generator(z, _y)

    # 用真实图片训练判别器

    D = discriminator(images, _y)

    # 用生成的加图片G训练判别器

    _D = discriminator(G, _y)

    # 计算损失值,使用 sigmoid_cross_entropy_with_logits

    # 真实图片在判别器里产生的loss,我们希望真实图片在判别器里的label趋向于1

    d_loss_real = tf.reduce_mean(tf.nn.sigmoid_cross_entropy_with_logits(logits = D, labels = tf.ones_like(D)))

    # 假图片在判别器里产生的loss,我们希望假图片在判别器里的label趋向于0

    d_loss_fake = tf.reduce_mean(tf.nn.sigmoid_cross_entropy_with_logits(logits = _D, labels = tf.zeros_like(_D)))

    # 假图片在判别器上的结果,我们希望它以假乱真,希望它尽可能接近于1

    g_loss = tf.reduce_mean(tf.nn.sigmoid_cross_entropy_with_logits(logits = _D, labels = tf.ones_like(_D)))

    # 判别器的总 loss

    d_loss = d_loss_real + d_loss_fake

    t_vars = tf.trainable_variables()

    d_vars = [var for var in t_vars if 'd_' in var.name]

    g_vars = [var for var in t_vars if 'g_' in var.name]

    with tf.variable_scope(tf.get_variable_scope(), reuse = False):

        # 优化判别器的 loss

        d_optim = tf.train.AdamOptimizer(0.0002, beta1 = 0.5).minimize(d_loss, var_list = d_vars, global_step = global_step)

        # 优化生成器的 loss

        g_optim = tf.train.AdamOptimizer(0.0002, beta2 = 0.5).minimize(g_loss, var_list = g_vars, global_step = global_step)

    #tensorborad

    train_dir = 'logs'

    z_sum = tf.summary.histogram("z",z)

    d_sum = tf.summary.histogram("d",D)

    d__sum = tf.summary.histogram("d_",_D)

    g_sum = tf.summary.histogram("g", G)

    d_loss_real_sum = tf.summary.scalar("d_loss_real", d_loss_real)

    d_loss_fake_sum = tf.summary.scalar("d_loss_fake", d_loss_fake)

    g_loss_sum = tf.summary.scalar("g_loss", g_loss)

    d_loss_sum = tf.summary.scalar("d_loss", d_loss)

    g_sum = tf.summary.merge([z_sum, d__sum, g_sum, d_loss_fake_sum, g_loss_sum])

    d_sum = tf.summary.merge([z_sum, d_sum, d_loss_real_sum, d_loss_sum])

    #initial

    init = tf.global_variables_initializer()

    sess = tf.InteractiveSession()

    writer = tf.summary.FileWriter(train_dir, sess.graph)

    #save

    saver = tf.train.Saver()

    # 保存模型

    check_path = "./save/model.ckpt"

    #sample

    sample_z = np.random.uniform(-1, 1, size = (BATCH_SIZE, 100))

    sample_labels = Y[0:BATCH_SIZE]

    #make sample

    sample = sampler(z, _y)

    #run

    sess.run(init)

    #saver.restore(sess.check_path)

    #train

    for epoch in range(10):

        batch_idx = int(70000/64)

        for idx in range(batch_idx):

            batch_images = X[idx*64:(idx+1)*64]

            batch_labels = Y[idx*64:(idx+1)*64]

            batch_z = np.random.uniform(-1, 1, size = (BATCH_SIZE, 100))

            _, summary_str = sess.run([d_optim, d_sum],

                                    feed_dict = {images: batch_images,

                                                 z: batch_z,

                                                 y: batch_labels})

            writer.add_summary(summary_str, idx+1)

            _, summary_str = sess.run([g_optim, g_sum],

                                    feed_dict = {images: batch_images,

                                                 z: batch_z,

                                                 y: batch_labels})

            writer.add_summary(summary_str, idx+1)

            d_loss1 = d_loss_fake.eval({z: batch_z, y: batch_labels})

            d_loss2 = d_loss_real.eval({images: batch_images, y:batch_labels})

            D_loss = d_loss1 + d_loss2

            G_loss = g_loss.eval({z: batch_z, y: batch_labels})

            #every 20 batch output loss

            if idx % 20 == 0:

                print("Epoch: %d [%4d/%4d] d_loss: %.8f, g_loss: %.8f" % (epoch, idx, batch_idx, D_loss, G_loss))

            #every 100 batch save a picture

            if idx % 100 == 0:

                sap = sess.run(sample, feed_dict = {z: sample_z, y: sample_labels})

                samples_path = './sample/'

                save_images(sap, [8,8], samples_path+'test_%d_epoch_%d.png' % (epoch, idx))

            #every 500 batch save model

            if idx % 500 == 0:

                saver.save(sess, check_path, global_step = idx + 1)

    sess.close()

if __name__ == '__main__':

    train()
模型的训练顺序是先generator生成fake data,然后real data喂给D训练,再把fake data喂给D训练
分别计算生成器和判别器的loss,其中判别器的loss = real loss + fake loss
一个batch中,训练一次D训练一次G。按理说应该训练k次D,训练一次G(为了方便就没有这么做了)
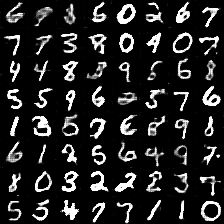
生成的效果图如下:

Tensorflow:DCGAN生成手写数字的更多相关文章
- Android+TensorFlow+CNN+MNIST 手写数字识别实现
Android+TensorFlow+CNN+MNIST 手写数字识别实现 SkySeraph 2018 Email:skyseraph00#163.com 更多精彩请直接访问SkySeraph个人站 ...
- 基于tensorflow的MNIST手写数字识别(二)--入门篇
http://www.jianshu.com/p/4195577585e6 基于tensorflow的MNIST手写字识别(一)--白话卷积神经网络模型 基于tensorflow的MNIST手写数字识 ...
- GAN实战笔记——第三章第一个GAN模型:生成手写数字
第一个GAN模型-生成手写数字 一.GAN的基础:对抗训练 形式上,生成器和判别器由可微函数表示如神经网络,他们都有自己的代价函数.这两个网络是利用判别器的损失记性反向传播训练.判别器努力使真实样本输 ...
- 基于TensorFlow的MNIST手写数字识别-初级
一:MNIST数据集 下载地址 MNIST是一个包含很多手写数字图片的数据集,一共4个二进制压缩文件 分别是test set images,test set labels,training se ...
- 卷积生成对抗网络(DCGAN)---生成手写数字
深度卷积生成对抗网络(DCGAN) ---- 生成 MNIST 手写图片 1.基本原理 生成对抗网络(GAN)由2个重要的部分构成: 生成器(Generator):通过机器生成数据(大部分情况下是图像 ...
- Tensorflow之MNIST手写数字识别:分类问题(1)
一.MNIST数据集读取 one hot 独热编码独热编码是一种稀疏向量,其中:一个向量设为1,其他元素均设为0.独热编码常用于表示拥有有限个可能值的字符串或标识符优点: 1.将离散特征的取值扩展 ...
- Tensorflow可视化MNIST手写数字训练
简述] 我们在学习编程语言时,往往第一个程序就是打印“Hello World”,那么对于人工智能学习系统平台来说,他的“Hello World”小程序就是MNIST手写数字训练了.MNIST是一个手写 ...
- GAN——生成手写数字
<Generative Adversarial Nets>是 GAN 系列的鼻祖.在这里通过 PyTorch 实现 GAN ,并且用于手写数字生成. 摘要: 我们提出了一个新的框架,通过对 ...
- TensorFlow(四):手写数字识别
一:数据集 采用MNIST数据集:-->官网 数据集被分成两部分:60000行的训练数据集和10000行的测试数据集. 其中每一张图片包含28*28个像素,我们把这个数组展开成一个向量,长度为2 ...
随机推荐
- ASP.NET Core中使用Unity5
⒈添加相关依赖 Install-Package Unity Install-Package Unity.RegistrationByConvention ⒉扫描项目接口实现类 using System ...
- ESD总结
设计人员完全可以让系统在经过ESD事件后不发生故障并仍能继续运行.将这个目标谨记在心,下面让我们更好地理解ESD冲击时到底发生了什么,然后介绍如何设计正确的系统架构来应对ESD. 简单模型 将一个电容 ...
- RefineDet网络简介(转载)
转载链接:https://blog.csdn.net/u014380165/article/details/79502308 思想:框架建立在FPN上,只不过在提取特征层(down-top)的时候就加 ...
- 【转】C++标准转换运算符const_cast
const_cast转换符是用来移除变量的const或volatile限定符. 对于const变量,我们不能修改它的值,这是这个限定符最直接的表现.但是我们就是想违背它的限定希望修改其内容怎么办呢? ...
- Css样式压缩、美化、净化工具 源代码
主要功能如下: /* 美化:格式化代码,使之容易阅读 */ /* 净化:将代码单行化,并去除注释 */ /* 压缩:将代码最小化,加快加载速度 */ /* 以下是演示代码 */ /*reset beg ...
- mariadb:分区自动创建与删除
参考文章:https://blog.csdn.net/xlxxcc/article/details/52486426 1.以日自动创建与删除分区 调用示例:CALL proc_day_partitio ...
- 转载:UML学习(一)-----用例图 (silent)
原文:http://www.cnblogs.com/silent2012/archive/2011/09/07/2169518.html 1.什么是用例图 用例图源于Jacobson的OOSE方法,用 ...
- __dict__(字典的另一种用法)
class Foo(): def __init__(self): self.name=None self.age=19 self.addr='上海' @property def dict(self): ...
- Confluence 6 数据收集隐私策略
为什么 Confluence 收集使用数据? 针对 Confluence 我们很自豪 Confluence 是这个星球上最高效和强大的协作工具,我们也计划继续保持这个特性,尽我们最大的努力提供更新的 ...
- Confluence 6 为登录失败编辑,禁用和配置验证码
在默认的情况下,验证码将会在失败登录次数达到的时候显示. 如果为登录失败编辑,禁用和配置验证码: 在屏幕的右上角单击 控制台按钮 ,然后选择 General Configuration 链接. 在左侧 ...
