【vue】使用vue构建多页面应用
先了解一些单页面和多页面的区别
| mm | 多页应用模式MPA | 单页应用模式SPA |
|---|---|---|
| 应用构成 | 由多个完整页面构成 | 一个外壳页面和多个页面片段构成 |
| 跳转方式 | 页面之间的跳转是从一个页面跳转到另一个页面 | 页面片段之间的跳转是把一个页面片段删除或隐藏,加载另一个页面片段并显示出来。这是片段之间的模拟跳转,并没有开壳页面 |
| 跳转后公共资源是否重新加载 | 是 | 否 |
| URL模式 | http://xxx/page1.html http://xxx/page1.html | http://xxx/shell.html#page1 http://xxx/shell.html#page2 |
| 用户体验 | 页面间切换加载慢,不流畅,用户体验差,特别是在移动设备上 | 页面片段间的切换快,用户体验好,包括在移动设备上 |
| 能否实现转场动画 | 无法实现 | 容易实现(手机app动效) |
| 页面间传递数据 | 依赖URL、cookie或者localstorage,实现麻烦 | 因为在一个页面内,页面间传递数据很容易实现 |
| 搜索引擎优化(SEO) | 可以直接做 | 需要单独方案做,有点麻烦 |
| 特别适用的范围 | 需要对搜索引擎友好的网站 | 对体验要求高的应用,特别是移动应用 |
| 搜索引擎优化(SEO) | 可以直接做 | 需要单独方案做,有点麻烦 |
| 开发难度 | 低一些,框架选择容易 | 高一些,需要专门的框架来降低这种模式的开发难度 |
为什么用Vue写多页面
vue只是一个工具,把他当做一个操作dom的工具来用写多页面,有单页面的优势同时是多页面的表现形式(具体要看需求)
构建多页面应用
准备工作
新建一个项目,项目需要一个"glob":"^7.0.3"的依赖
修改webpack的配置
我们需要更改的文件
- utils.js
- webpack.base.conf.js
- webpack.dev.conf.js
- webpack.prod.conf.js
utils.js在最后添加
// utils.js文件

/* 这里是添加的部分 ---------------------------- 开始 */

// glob是webpack安装时依赖的一个第三方模块,还模块允许你使用 *等符号, 例如lib/*.js就是获取lib文件夹下的所有js后缀名的文件

var glob = require('glob')

// 页面模板

var HtmlWebpackPlugin = require('html-webpack-plugin')

// 取得相应的页面路径,因为之前的配置,所以是src文件夹下的pages文件夹

var PAGE_PATH = path.resolve(__dirname, '../src/pages')

// 用于做相应的merge处理

var merge = require('webpack-merge')

//多入口配置

// 通过glob模块读取pages文件夹下的所有对应文件夹下的js后缀文件,如果该文件存在

// 那么就作为入口处理

exports.entries = function () {

    var entryFiles = glob.sync(PAGE_PATH + '/*/*.js')

    var map = {}

    entryFiles.forEach((filePath) => {

        var filename = filePath.substring(filePath.lastIndexOf('\/') + 1, filePath.lastIndexOf('.'))

        map[filename] = filePath

    })

    return map

}

//多页面输出配置

// 与上面的多页面入口配置相同,读取pages文件夹下的对应的html后缀文件,然后放入数组中

exports.htmlPlugin = function () {

    let entryHtml = glob.sync(PAGE_PATH + '/*/*.html')

    let arr = []

    entryHtml.forEach((filePath) => {

        let filename = filePath.substring(filePath.lastIndexOf('\/') + 1, filePath.lastIndexOf('.'))

        let conf = {

            // 模板来源

            template: filePath,

            // 文件名称

            filename: filename + '.html',

            // 页面模板需要加对应的js脚本,如果不加这行则每个页面都会引入所有的js脚本

            chunks: ['manifest', 'vendor', filename],

            inject: true

        }

        if (process.env.NODE_ENV === 'production') {

            conf = merge(conf, {

                minify: {

                    removeComments: true,

                    collapseWhitespace: true,

                    removeAttributeQuotes: true

                },

                chunksSortMode: 'dependency'

            })

        }

        arr.push(new HtmlWebpackPlugin(conf))

    })

    return arr

}

/* 这里是添加的部分 ---------------------------- 结束 */
webpack.base.conf.js 文件
module.exports = {

  /* 修改部分 ---------------- 开始 */

  entry: utils.entries(),

  /* 修改部分 ---------------- 结束 */

  output: {

    path: config.build.assetsRoot,
webpack.dev.conf.js 文件
    // https://github.com/glenjamin/webpack-hot-middleware#installation--usage

    new webpack.HotModuleReplacementPlugin(),

    new webpack.NoEmitOnErrorsPlugin(),

    // https://github.com/ampedandwired/html-webpack-plugin

    /* 注释这个区域的文件 ------------- 开始 */

    // new HtmlWebpackPlugin({

    //   filename: 'index.html',

    //   template: 'index.html',

    //   inject: true

    // }),

    /* 注释这个区域的文件 ------------- 结束 */

    new FriendlyErrorsPlugin()

    /* 添加 .concat(utils.htmlPlugin()) ------------------ */

  ].concat(utils.htmlPlugin())

})
webpack.prod.conf.js 文件
    new OptimizeCSSPlugin({

      cssProcessorOptions: {

        safe: true

      }

    }),

    // generate dist index.html with correct asset hash for caching.

    // you can customize output by editing /index.html

    // see https://github.com/ampedandwired/html-webpack-plugin

    /* 注释这个区域的内容 ---------------------- 开始 */

    // new HtmlWebpackPlugin({

    //   filename: config.build.index,

    //   template: 'index.html',

    //   inject: true,

    //   minify: {

    //     removeComments: true,

    //     collapseWhitespace: true,

    //     removeAttributeQuotes: true

    //     // more options:

    //     // https://github.com/kangax/html-minifier#options-quick-reference

    //   },

    //   // necessary to consistently work with multiple chunks via CommonsChunkPlugin

    //   chunksSortMode: 'dependency'

    // }),

    /* 注释这个区域的内容 ---------------------- 结束 */

    // split vendor js into its own file

    new webpack.optimize.CommonsChunkPlugin({

      name: 'vendor',

      minChunks: function (module, count) {

        // any required modules inside node_modules are extracted to vendor

        return (

          module.resource &&

          /\.js$/.test(module.resource) &&

          module.resource.indexOf(

            path.join(__dirname, '../node_modules')

          ) === 0

        )

      }

    }),

    // extract webpack runtime and module manifest to its own file in order to

    // prevent vendor hash from being updated whenever app bundle is updated

    new webpack.optimize.CommonsChunkPlugin({

      name: 'manifest',

      chunks: ['vendor']

    }),

    // copy custom static assets

    new CopyWebpackPlugin([{

      from: path.resolve(__dirname, '../static'),

      to: config.build.assetsSubDirectory,

      ignore: ['.*']

    }])

    /* 该位置添加 .concat(utils.htmlPlugin()) ------------------- */

  ].concat(utils.htmlPlugin())

})

if (config.build.productionGzip) {

  var CompressionWebpackPlugin = require('compression-webpack-plugin')

  webpackConfig.plugins.push(

    new CompressionWebpackPlugin({

      asset: '[path].gz[query]',

      algorithm: 'gzip',

      test: new RegExp(

        '\\.(' +

        config.build.productionGzipExtensions.join('|') +

        ')$'

      ),

      threshold: 10240,

      minRatio: 0.8

    })

  )

}

if (config.build.bundleAnalyzerReport) {

  var BundleAnalyzerPlugin = require('webpack-bundle-analyzer').BundleAnalyzerPlugin

  webpackConfig.plugins.push(new BundleAnalyzerPlugin())

}

module.exports = webpackConfig
src是我使用的工程文件,asset,components,pages分别是静态资源文件,组件文件,页面文件
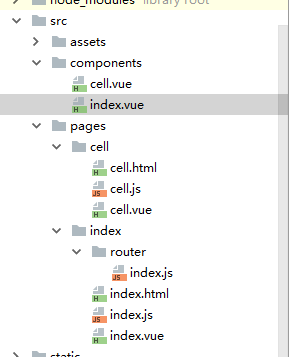
pages是按照项目的模块分的文件夹,每个模块都有三个内容:vue文件,js文件,html文件。这三个文件的作用相当于做SPA单页面应用时,根目录的index.html页面模板,src文件下的main.js和app.vue的功能。
原先,入口文件只有一个Main.js,但现在由于是多页面,因此入口也没多了,我目前就是两个:index和cell,之后如果打包,就会在dist文件夹下生成两个html文件:index.html和cell.html(可以参考一下单页面应用时,打包只会生成一个Index.html)
参考:https://segmentfault.com/a/1190000011265006
【vue】使用vue构建多页面应用的更多相关文章
- 借助 Vue 来构建单页面应用
原文: https://github.com/MeCKodo/vue-tutorial 主题 Vue.js (1/2)Vue构建单页应用最佳实战 前言 我们将会选择使用一些vue周边的库 1.使用no ...
- 用vue构建多页面应用
最近一直在研究使用vue做出来一些东西,但都是SPA的单页面应用,但实际工作中,单页面并不一定符合业务需求,所以这篇我就来说说怎么开发多页面的Vue应用,以及在这个过程会遇到的问题. 准备工作 在本地 ...
- 使用Vue和djangoframwork完成登录页面构建 001
使用Vue和djangoframwork完成登录页面构建 001 环境的搭建 首先,我在我的电脑的F盘创建了一个文件夹 forNote,进入到这个文件夹中 F:\forNote> vue环境的搭 ...
- 新手vue构建单页面应用实例
本人写的小程序,功能还在完善中,欢迎扫一扫提出宝贵意见! 步骤: 1.使用vue-cli创建项目2.使用vue-router实现单页路由3.用vuex管理我们的数据流4.使用vue-resource请 ...
- vue+vuecli+webapck2实现多页面应用
准备工作 在本地用vue-cli新建一个项目,首先安装vue-cil,命令: npm install -g vue-cli 新建一个vue项目,创建一个基于"webpack"的项目 ...
- 用 vue cli 脚手架搭建单页面 Vue 应用(进阶2)
1.配置 Node 环境. 自行百度吧. 安装好了之后,打开 cmd .运行 node -v .显示版本号,就是安装成功了. 注:不要安装8.0.0以上的版本,和 vue-cli 不兼容. 我使用的 ...
- [Vue 牛刀小试]:第十七章 - 优化 Vue CLI 3 构建的前端项目模板(1)- 基础项目模板介绍
一.前言 在上一章中,我们开始通过 Vue CLI 去搭建属于自己的前端 Vue 项目模板,就像我们 .NET 程序员在使用 asp.net core 时一样,我们更多的会在框架基础上按照自己的开发习 ...
- 使用 Flask 和 Vue.js 来构建全栈单页应用
在这个教程中,我将向你展示如何将 Vue 的单页面应用和 Flask 后端连接起来. 简单的来说,如果想在 Flask 中使用 Vue 框架是没有什么问题的. 但在实际中存在一个明显的问题就是 Fla ...
- 8种Vue中数据更新了但页面没有更新的情况
目录 1.Vue 无法检测实例被创建时不存在于 data 中的 属性 2. Vue 无法检测'对象属性'的添加或移除 3.Vue 不能检测利用数组索引直接修改一个数组项 4.Vue 不能监测直接修改数 ...
随机推荐
- Robot Framework - 4 - 创建和扩展测试库的示例
创建和扩展Library的示例 示例:Check status on Linux OS 创建与使用library的基本步骤: 1--- library实现的内容和实现的方式 ...
- 使用线程统计信息(Thread Statistics)
可在session log中使用线程统计信息来判断source,target或组的性能瓶颈 默认情况下,Integration Service在运行session时,使用一个reader thread ...
- linux audit工具
一个不错的博客,可以吸收营养,等读完后再决定写什么? https://www.cnblogs.com/bldly1989/p/7204358.html changelog -------------- ...
- 3,linux入门到上手-文件权限管理与配置
linux入门-文件权限管理与配置 一.关于linux的操作命令一般格式如下: 1,一行指令中第一个输入的部分绝对是"指令(command)"或"可可执行文件案(例如批次 ...
- 【python35小工具】b站弹幕保存
后面有时间学习弹框,加个弹框 效果图: 原理: 原理简单不繁琐 1 根据设置的参数去post请求json参数 2 json提取出用户名和时间以及弹幕内容 (其中值得注意的时,页面默认会保存10个弹幕, ...
- Chapter 4 Invitations——8
"So," Mike said, looking at the floor, "Jessica asked me to the spring dance." “ ...
- vue.js响应式原理解析与实现—实现v-model与{{}}指令
上一节我们已经分析了vue.js是通过Object.defineProperty以及发布订阅模式来进行数据劫持和监听,并且实现了一个简单的demo.今天,我们就基于上一节的代码,来实现一个MVVM类, ...
- paramiko之ssh登录,执行cmd,下载文件
一.paramiko远程登录及执行命令 1.1:exec_command(cmd)远程执行命令 client = paramiko.SSHClient() client.set_missing_hos ...
- ASP.NET Core中的Startup类
ASP.NET Core程序要求有一个启动类.按照惯例,启动类的名字是 "Startup" .Startup类负责配置请求管道,处理应用程序的所有请求.你可以指定在Main方法中使 ...
- 从零开始学安全(三)●黑客常用的windows端口
端口可选1-65536 1-1024 预保留端口 留给windows系统服务的 下面是常见的端口对应的服务 1 TCP Port Service Multiplexer 传输控制协议端口服务多路开关选 ...