OAuth2简易实战(一)-四种模式
1. OAuth2简易实战(一)-四种模式
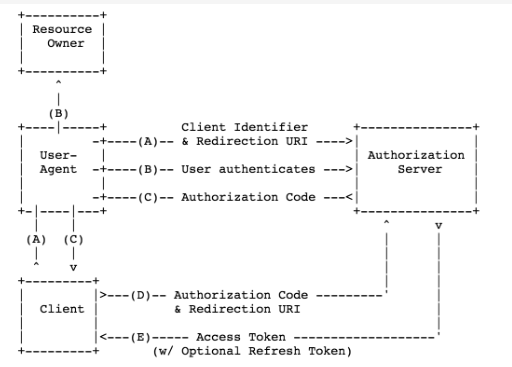
1.1. 授权码授权模式(Authorization code Grant)
1.1.1. 流程图
1.1.2. 授权服务器配置
- 配置授权服务器中 client,secret,redirectUri,授权模式,权限配置
//授权服务器配置

@Configuration

@EnableAuthorizationServer

public class OAuth2AuthorizationServer extends

        AuthorizationServerConfigurerAdapter {

    @Override

    public void configure(ClientDetailsServiceConfigurer clients)

            throws Exception {

        clients.inMemory()

            .withClient("clientapp")

            .secret("112233")

            .redirectUris("http://localhost:9001/callback")

            // 授权码模式

            .authorizedGrantTypes("authorization_code")

            .scopes("read_userinfo", "read_contacts");

    }

}
1.1.3. 资源服务器配置
- 配置需要资源授权的接口地址
//资源服务配置

@Configuration

@EnableResourceServer

public class OAuth2ResourceServer extends ResourceServerConfigurerAdapter {

    @Override

    public void configure(HttpSecurity http) throws Exception {

        http.authorizeRequests()

            .anyRequest()

            .authenticated()

        .and()

            .requestMatchers()

            .antMatchers("/api/**");

    }

}
1.1.4. 操作步骤
- 浏览器请求下列地址,获取授权code,请求参数client_id,redirect_uri回调地址,response_type响应类型,scope权限
http://localhost:8080/oauth/authorize?client_id=clientapp&redirect_uri=http://localhost:9001/callback&response_type=code&scope=read_userinfo
- 输入用户名密码,该密码为Spring Security的登路密码,application.properties里配置
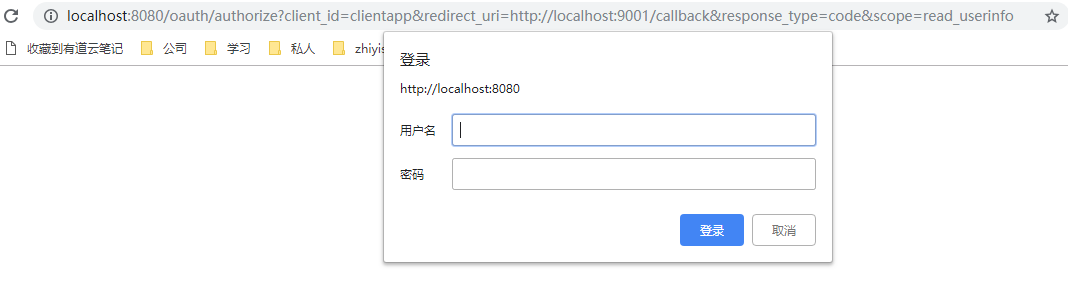
# Spring Security Setting

security.user.name=bobo

security.user.password=xyz
- 登陆后显示
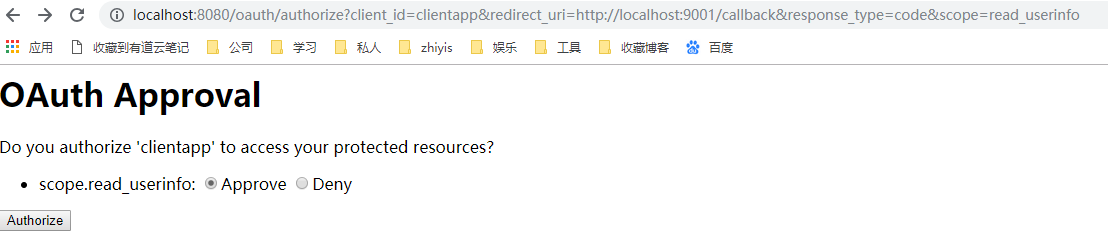
- 选择Approve,点击Authorize,会调用回调地址并返回code参数

- 在获得授权码后,接下去获取访问令牌,访问
http://localhost:8080/oauth/token?code=ghN0hF&grant_type=authorization_code&redirect_uri=http://localhost:9001/callback&scope=read_userinfo

注意:需要在headers里添加认证
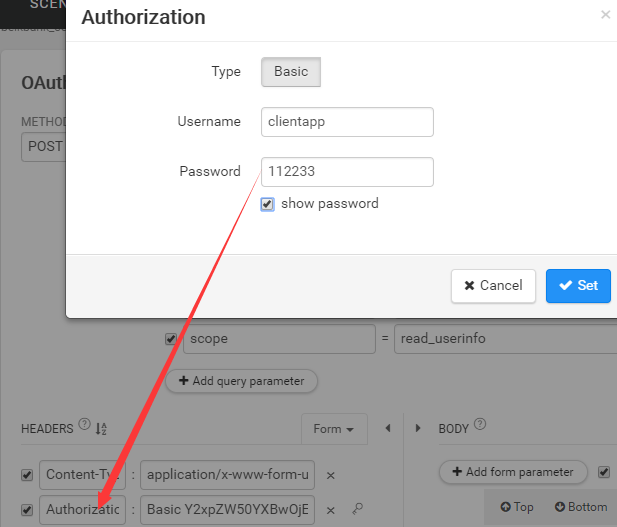
认证参数就是授权服务器配置的client和secret
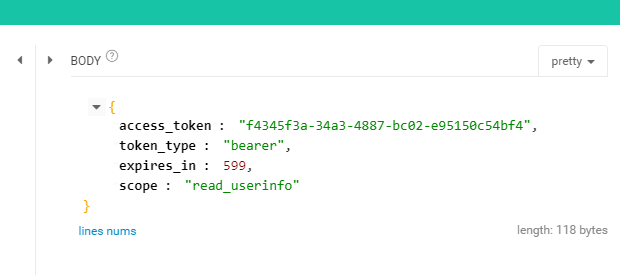
6. 获取token后访问
http://localhost:8080/api/userinfo?access_token=f4345f3a-34a3-4887-bc02-e95150c54bf4
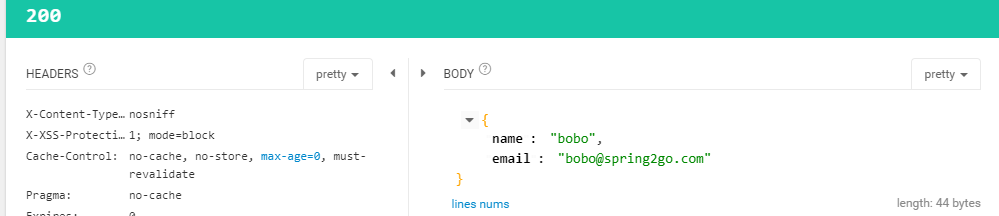
如果token错误,则

1.1.5. 使用场景
- 授权码模式是最常见的一种授权模式,在oauth2.0内是最安全和最完善的。
- 适用于所有有Server端的应用,如Web站点、有Server端的手机客户端。
- 可以得到较长期限授权。
1.2. 隐式授权模式(Implicit Grant)
1.2.1. 流程图

1.2.2. 改动 authorizedGrantTypes
@Configuration

@EnableAuthorizationServer

public class OAuth2AuthoriationServer extends AuthorizationServerConfigurerAdapter{

    @Override

    public void configure(ClientDetailsServiceConfigurer clients) throws Exception {

        clients.inMemory()

                .withClient("clientapp")

                .secret("112233")

                .accessTokenValiditySeconds(60)

                .redirectUris("http://localhost:9001/callback")

                .authorizedGrantTypes("implicit")

                .scopes("admin", "visitor");

    }

}
1.2.3. 操作步骤
- 申请授权token,参数和申请授权码类似,client_id,redirect_uri回调地址,response_type有变动,改为直接获取token,scope权限,state用于认证标记,传过去什么回调时传回来什么
http://localhost:8080/oauth/authorize?client_id=clientapp&redirect_uri=http://localhost:9001/callback&response_type=token&scope=admin&state=abc
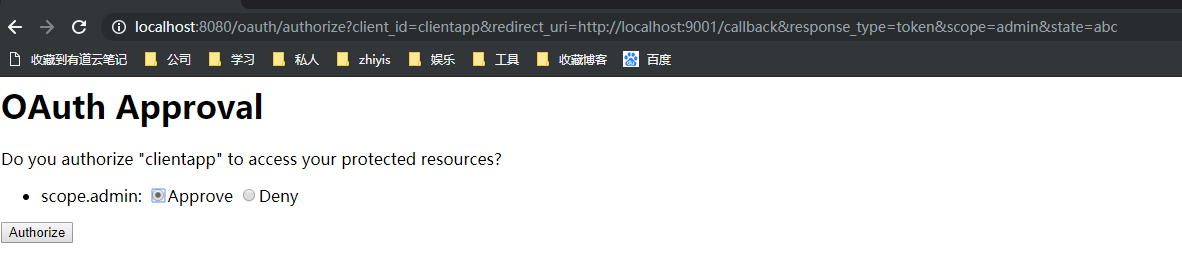
- 操作同上,输入密码跳转认证确认,选Approve后点Authorize,跳转

3. 可以看到直接返回了access_token,state也是原样返回
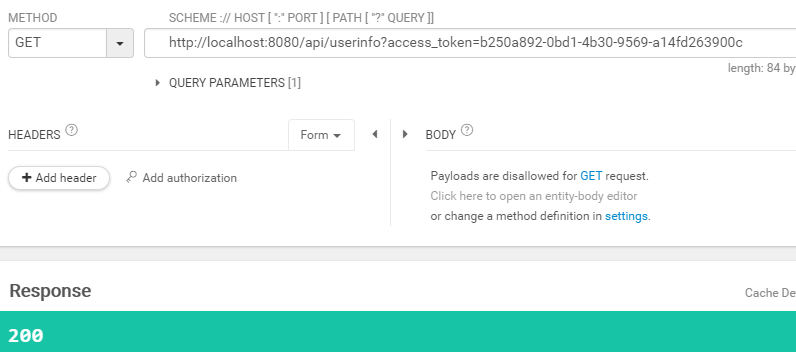
4. 之后按授权码模式第六步操作,把access_token参数带上,进行接口调用就可以了
1.2.4. 使用场景
- 适用于所有无Server端配合的应用
- 如手机/桌面客户端程序、浏览器插件。
- 基于JavaScript等脚本客户端脚本语言实现的应用。
注意:因为Access token是附着在 redirect_uri 上面被返回的,所以这个 Access token就可能会暴露给资源所有者或者设置内的其它方(对资源所有者来说,可以看到redirect_uri,对其它方来说,可以通过监测浏览器的地址变化来得到 Access token)。
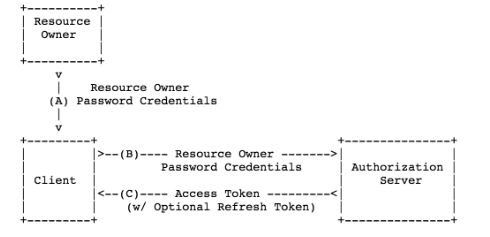
1.3. 密码模式(Resource Owner Password Credentials Grant)
1.3.1. 流程图
1.3.2. 改动
- 授权服务器配置,需要添加用户认证管理端点authenticationManager,修改模式authorizedGrantTypes为password
// 授权服务器配置

@Configuration

@EnableAuthorizationServer

public class OAuth2AuthoriationServer extends AuthorizationServerConfigurerAdapter{

    @Autowired

    private AuthenticationManager authenticationManager;

    @Override

    public void configure(AuthorizationServerEndpointsConfigurer endpoints) throws Exception {

        endpoints.authenticationManager(authenticationManager);

    }

    @Override

    public void configure(ClientDetailsServiceConfigurer clients) throws Exception {

        clients.inMemory()

                .withClient("clientapp")

                .secret("112233")

                .accessTokenValiditySeconds(60)

                .redirectUris("http://localhost:9001/callback")

                .authorizedGrantTypes("password")

                .scopes("admin", "visitor");

    }

}
1.3.3. 操作步骤
- 调用以下链接,向客户端和服务器提供用户名密码
http://localhost:8080/oauth/token?password=123456&grant_type=password&username=lll&scope=admin
注意:和授权码模式一样,需要在headers里添加认证
2. 结果:
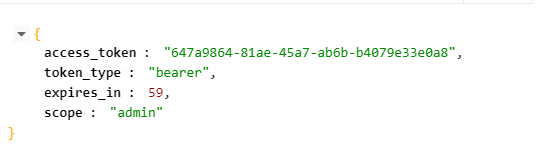
- 获取token后,步骤同1.1和1.2模式
1.3.4. 使用场景
- 这种模式适用于用户对应用程序高度信任的情况。比如是用户操作系统的一部分。
- 认证服务器只有在其他授权模式无法执行的情况下,才能考虑使用这种模式。
1.4. 客户端凭证模式(Client Credentials Grant)
1.4.1. 流程图

1.4.2. 改动
- 只需修改授权服务器,authorizedGrantTypes类型client_credentials
1.4.3. 操作步骤
http://localhost:8080/oauth/token?grant_type=client_credentials&scope=admin
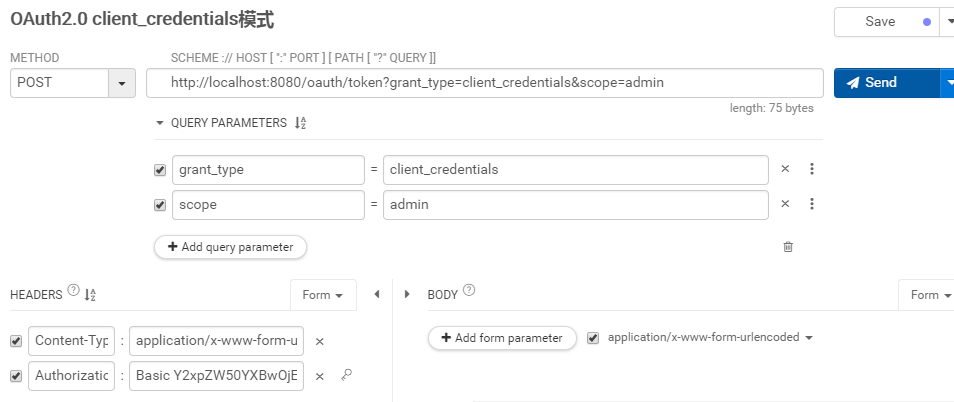
- 可以看到客户端凭证模式也需要在header里添加认证账户密码
- 获得token后操作同上
1.4.4. 使用场景
- 客户端模式应用于应用程序想要以自己的名义与授权服务器以及资源服务器进行互动。
- 例如使用了第三方的静态文件服务
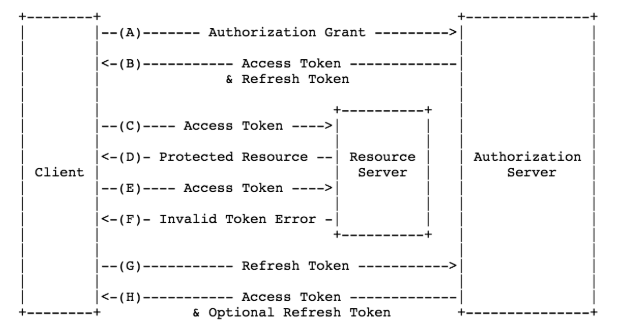
1.5. 刷新TOKEN
1.5.1. 流程图
1.5.2. 改动
1.5.3. 操作步骤
- 以授权码模式为例,步骤同授权码模式,取得授权码后,去取token时,返回
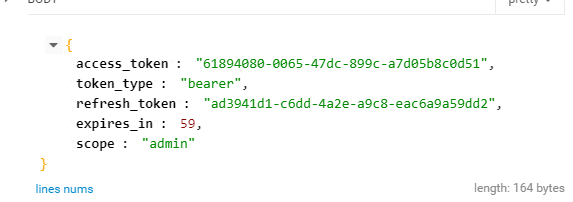
- 在token过期后,调用
http://localhost:8080/oauth/token?grant_type=refresh_token&refresh_token=ad3941d1-c6dd-4a2e-a9c8-eac6a9a59dd2

- 返回
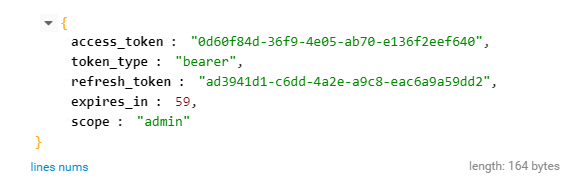
- 就可以拿新的access_token继续调用了
- 建议将access_token和refresh_token的过期时间保存下来,每次调用平台方的业务api前先对access_token和refresh_token进行一下时间判断,如果过期则执行刷新access_token或重新授权操作。refersh_token如果过期就只能让用户重新授权。
OAuth2简易实战(一)-四种模式的更多相关文章
- OAuth2简易实战(四)-Github社交联合登录
1. OAuth2简易实战(四)-Github社交联合登录 1.1. 用到的第三方插件 https://github.com/spring-projects/spring-social-github ...
- IdentityServer4 实现OAuth2.0四种模式之密码模式
接上一篇:IdentityServer4 实现OAuth2.0四种模式之客户端模式,这一篇讲IdentityServer4 使用密码模式保护API访问. 一,IdentityServer配置 1,添加 ...
- IdentityServer4实现Oauth2.0四种模式之隐藏模式
接上一篇:IdentityServer4实现OAuth2.0四种模式之密码模式,密码模式将用户的密码暴露给了客户端,这无疑是不安全的,隐藏模式可以解决这个问题,由用户自己在IdentityServ ...
- IdentityServer4实现OAuth2.0四种模式之授权码模式
接上一篇:IdentityServer4实现OAuth2.0四种模式之隐藏模式 授权码模式隐藏码模式最大不同是授权码模式不直接返回token,而是先返回一个授权码,然后再根据这个授权码去请求token ...
- gRPC四种模式、认证和授权实战演示,必赞~~~
前言 上一篇对gRPC进行简单介绍,并通过示例体验了一下开发过程.接下来说说实际开发常用功能,如:gRPC的四种模式.gRPC集成JWT做认证和授权等. 正文 1. gRPC四种模式服务 以下案例演示 ...
- Android 文件访问权限的四种模式
Linux文件的访问权限* 在Android中,每一个应用是一个独立的用户* drwxrwxrwx* 第1位:d表示文件夹,-表示文件* 第2-4位:rwx,表示这个文件的拥有者(创建这个文件的应用) ...
- OAuth2简易实战(三)-JWT
1. OAuth2简易实战(三)-JWT 1.1. 与OAuth2授权码模式差别 授权服务器代码修改 @Configuration @EnableAuthorizationServer public ...
- OAuth2简易实战(二)-模拟客户端调用
1. OAuth2简易实战(二) 1.1. 目标 模拟客户端获取第三方授权,并调用第三方接口 1.2. 代码 1.2.1. 核心流程 逻辑就是从数据库读取用户信息,封装成UserDetails对象,该 ...
- Hibernate 查询MatchMode的四种模式
Hibernate 查询MatchMode的四种模式 MatchMode.START:字符串在最前面的位置.相当于"like 'key%'" MatchMode.END:字符串在最 ...
随机推荐
- es5的语法学习
1. strict模式 严格模式,限制一些用法,'use strict'; 2. Array增加方法 增加了every.some .forEach.filter .indexOf.lastIndexO ...
- VUE(相关简介及初始)
1.什么是vue Vue.js(读音 /vjuː/, 类似于 view) 是一套构建用户界面的 渐进式框架.与其他重量级框架不同的是,Vue 采用自底向上增量开发的设计.Vue 的核心库只关注视图层, ...
- php实现仿百度分页
本文主要和大家分享php实现仿百度分页的实例,先来看一下效果图. 基本策略 1, 首先要查询总记录数 2, 设置每页显示的数量并计算总页数 3, 增加一个get传值num代表当前访问的是哪一页,如果没 ...
- spark2.0源码学习
[Spark2.0源码学习]-1.概述 [Spark2.0源码学习]-2.一切从脚本说起 [Spark2.0源码学习]-3.Endpoint模型介绍 [Spark2.0源码学习]-4.Master启动 ...
- VB编程中的“Abs”是什么意思?
c = Val(Text1.Text) '将Text1中的值赋给cIf c = Abs(a - b) Then 'Abs(a - b)是a和b间的差(正数),判断c是否等于该差值f = f + 10 ...
- win10下使用powershell来获取文件MD5的命令
Get-FileHash 文件路径 -Algorithm MD5| Format-List
- 在Java中使用Socket模拟客户端和服务端(多线程)
1:Socket与ServerSocket的交互 2.Socket和ServerSocket介绍 Socket 构造函数 Socket() Socket(InetAddress address, in ...
- python循环解压rar文件
python循环解压rar文件 C:. │ main.py │ ├─1_STL_算法简介 │ STL_算法简介.rar │ └─2_STL_算法_填充新值 STL_算法_填充新值.rar 事情是这样的 ...
- maven + eclipse + tomcat热部署 引自:http://jingpin.jikexueyuan.com/article/23068.html
方案二: 1.修改tomcat的server.xml配置文件,在host结点下添加如下代码 Xml代码 <Context docBase="F:\eclipse_workspace ...
- 关于http与https的注意点
背景:在一次项目生产上线中遇到地址在IOS版本的app中打不开或者接口请求不返回的情况,在安卓机和PC上表现正常,经排查,问题出在http请求上,原因详解 在早期PC上和安卓手机上比较不严格,在htt ...