docker环境搭建
参考地址:https://www.imooc.com/article/details/id/25228
操作系统Centos7
1、替换yum源为阿里云yum源;
//备份yum源

mv /etc/yum.repos.d/CentOS-Base.repo /etc/yum.repos.d/CentOS-Base.repo.backup

//下载阿里yunyum源

wget -O /etc/yum.repos.d/CentOS-Base.repo http://mirrors.aliyun.com/repo/Centos-7.repo

//清除yum缓存

yum clean all

//生成yum缓存

yum makecache
2、安装docker
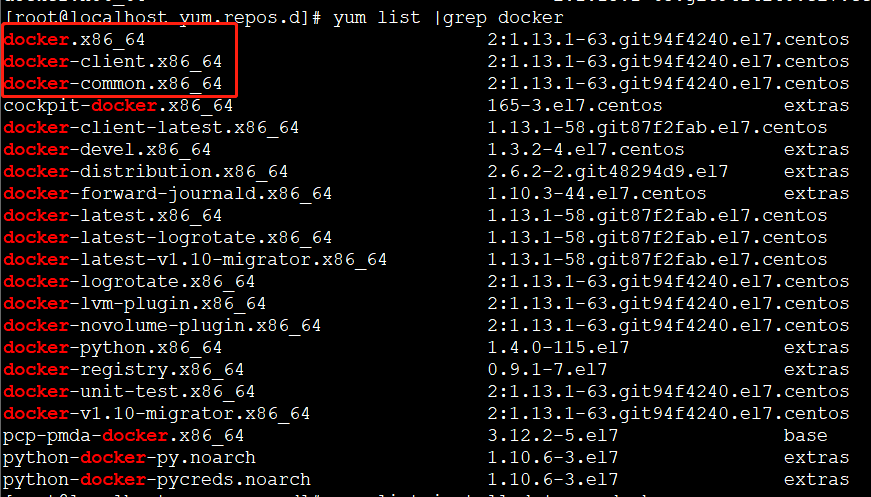
查看yum可以安装的docker,命令:yum list |grep docker
执行安装命令:yum install docker
安装完成之后,查看已经安装的docker,命令:yum list installed |grep docker

可以看出,安装docker需要三个包,见上图
3、添加开机启动
命令:systemctl enable docker.service
4、启动docker
命令:systemctl start docker.service
启动失败,报错信息,查看命令:journalctl -xe,具体错误信息见下图:

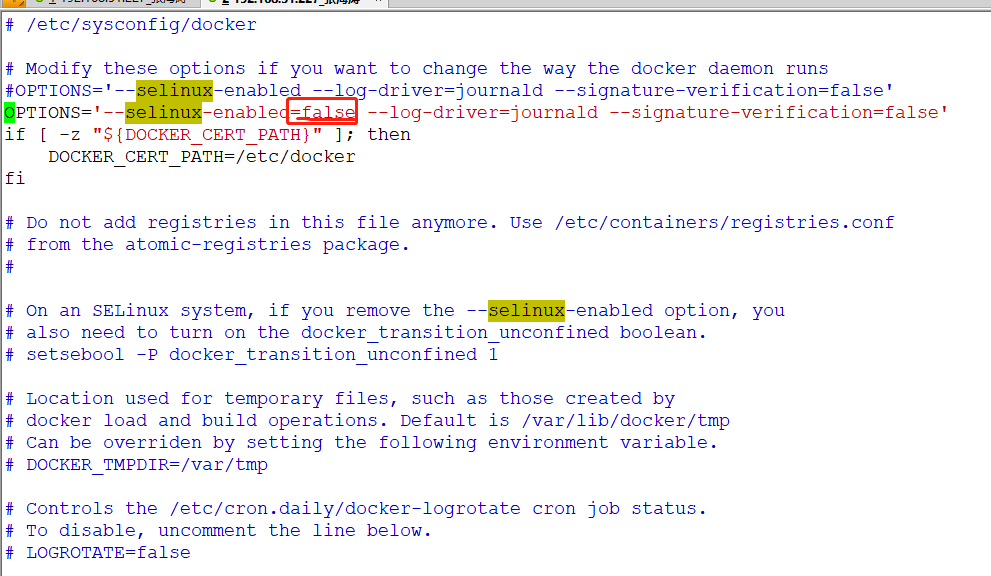
此linux的内核中的SELinux不支持 overlay2 graph driver ,解决方法有两个,要么启动一个新内核,要么就在docker里禁用selinux,--selinux-enabled=false
修改文件,/etc/sysconfig/docker,在--selinux-enabled后面添加=false即可!具体修改见下图
重启docker,命令:systemctl restart docker.service

查看docker信息,命令:docker info
[root@localhost ~]# docker info

Containers:

 Running:

 Paused:

 Stopped:

Images:

Server Version: 1.13.

Storage Driver: overlay2

 Backing Filesystem: xfs

 Supports d_type: true

 Native Overlay Diff: false

Logging Driver: journald

Cgroup Driver: systemd

Plugins:

 Volume: local

 Network: bridge host macvlan null overlay

Swarm: inactive

Runtimes: docker-runc runc

Default Runtime: docker-runc

Init Binary: /usr/libexec/docker/docker-init-current

containerd version:  (expected: aa8187dbd3b7ad67d8e5e3a15115d3eef43a7ed1)

runc version: e9c345b3f906d5dc5e8100b05ce37073a811c74a (expected: 9df8b306d01f59d3a8029be411de015b7304dd8f)

init version: 5b117de7f824f3d3825737cf09581645abbe35d4 (expected: 949e6facb77383876aeff8a6944dde66b3089574)

Security Options:

 seccomp

  WARNING: You're not using the default seccomp profile

  Profile: /etc/docker/seccomp.json

Kernel Version: 3.10.-.el7.x86_64

Operating System: CentOS Linux  (Core)

OSType: linux

Architecture: x86_64

Number of Docker Hooks:

CPUs:

Total Memory: 2.731 GiB

Name: localhost.localdomain

ID: NDA4:FMH4:OVC2:HARD:3Q4V:ZWIE:UTJU:YVR3:AFEE:FOBN:54NL:GXGU

Docker Root Dir: /var/lib/docker

Debug Mode (client): false

Debug Mode (server): false

Registry: https://index.docker.io/v1/

Experimental: false

Insecure Registries:

 127.0.0.0/

Live Restore Enabled: false

Registries: docker.io (secure)
Hello World
下面,我们通过最简单的 image 文件"hello world",感受一下 Docker。
因为国内连接 Docker 的官方仓库很慢,因此我们在日常使用中会使用Docker 中国加速器。通过 Docker 官方镜像加速,中国区用户能够快速访问最流行的 Docker 镜像。该镜像托管于中国大陆,本地用户现在将会享受到更快的下载速度和更强的稳定性,从而能够更敏捷地开发和交付 Docker 化应用。
Docker 中国官方镜像加速可通过registry.docker-cn.com访问。该镜像库只包含流行的公有镜像,私有镜像仍需要从美国镜像库中拉取。
修改系统中docker对应的配置文件即可,如下:
vi  /etc/docker/daemon.json

#添加后

{    "registry-mirrors": ["https://registry.docker-cn.com"],    "live-restore": true}
也可以替换成网易的镜像地址
{

  "registry-mirrors": ["http://hub-mirror.c.163.com"]

}
我们选择用网易的镜像地址。
运行下面的命令,将 image 文件从仓库抓取到本地。
docker pull library/hello-world
上面代码中,docker image pull是抓取 image 文件的命令。library/hello-world是 image 文件在仓库里面的位置,其中library是 image 文件所在的组,hello-world是 image 文件的名字。
抓取成功以后,就可以在本机看到这个 image 文件了。
查看下载的镜像,命令:docker images
[root@localhost docker]# docker images

REPOSITORY              TAG                 IMAGE ID            CREATED             SIZE

docker.io/hello-world   latest              e38bc07ac18e         weeks ago         1.85 kB
运行hello-world镜像,命令:docker run hello-world
[root@localhost docker]# docker run hello-world

Hello from Docker!

This message shows that your installation appears to be working correctly.

To generate this message, Docker took the following steps:

 . The Docker client contacted the Docker daemon.

 . The Docker daemon pulled the "hello-world" image from the Docker Hub.

    (amd64)

 . The Docker daemon created a new container from that image which runs the

    executable that produces the output you are currently reading.

 . The Docker daemon streamed that output to the Docker client, which sent it

    to your terminal.

To try something more ambitious, you can run an Ubuntu container with:

 $ docker run -it ubuntu bash

Share images, automate workflows, and more with a free Docker ID:

 https://hub.docker.com/

For more examples and ideas, visit:

 https://docs.docker.com/engine/userguide/
常用命令
除过以上我们使用的Docker命令外,Docker还有一些其它常用的命令
拉取docker镜像
docker pull image_name
查看宿主机上的镜像,Docker镜像保存在/var/lib/docker目录下:
docker images
删除镜像
docker rmi docker.io/tomcat:7.0.77-jre7 或者 docker rmi b39c68b7af30
查看当前有哪些容器正在运行
docker ps
查看所有容器
docker ps -a
启动、停止、重启容器命令:
docker start container_name/container_iddocker stop container_name/container_iddocker restart container_name/container_id
后台启动一个容器后,如果想进入到这个容器,可以使用attach命令:
docker attach container_name/container_id
删除容器的命令:
docker rm container_name/container_id
查看当前系统Docker信息
docker info
从Docker hub上下载某个镜像:
docker pull centos:latestdocker pull centos:latest
执行docker pull centos会将Centos这个仓库下面的所有镜像下载到本地repository。
docker环境搭建的更多相关文章
- centos7系统下 docker 环境搭建
运行环境: VMware Workstation Pro 在虚拟机中安装centos7系统, 选择最小安装, 网络连接方式选择的桥接(与宿主机在同一IP段)centos7一定要安装64位, docke ...
- win7下docker环境搭建nginx+php-fpm+easyswoole+lavarel+mysql开发环境
win7环境基础在上一篇win7下docker环境搭建nginx+php-fpm+easyswoole开发环境中已经详细叙述搭建完成 本篇文章将叙述如何在上述基础上搭建laravel开发环境,这个其实 ...
- Docker环境搭建以及基本操作
Docker环境搭建以及基本操作 Docker环境基本搭建: 基础环境:Centos 7.4 IP:192.168.30.117 [root@docker ~]# cat /etc/re ...
- Docker 环境搭建(RedHat 7)
Docker 环境搭建(RedHat 7): CentOS7 下载 http://mirrors.sohu.com/centos/7/isos/x86_64/ 装载镜像文件 安装Linux 7, 参考 ...
- 【架构】docker环境搭建mysql主从
序 本文主要研究怎么在docker上搭建mysql的主从.因为在单机搭建mysql多实例然后再配主从,感觉太痛苦了,环境各有不同,配置各不大相 同,从网上找搭建方法,试了半天也没成功,最后也没耐心调试 ...
- ClusterControl docker 环境搭建
ClusterControl 是一款比较强大的数据库管理平台,包含了丰富的数据库管理功能. 我们可以用来方便的进行数据管理 测试使用docker-compose 管理 环境准备 docker-comp ...
- docker环境搭建centos+jdk+tomcat_CENTOS篇
前言 (1)写在前面的话,鉴于在linux或类unix系统中安装jdk+tomcat等环境,没有什么经验,所以选择在docker容器中安装之,以防止安装失败无法恢复系统 (2)需要下载对应的系统的do ...
- win7下docker环境搭建nginx+php-fpm+easyswoole开发环境
基础的环境已在文章nginx.php-fpm.swoole HTTP/TCP压测对比中搭建了,现在是在这个基础上在搭建easyswoole开发环境 主要要修改的地方是dnmp包里面的docker-co ...
- Mesos+Zookeeper+Marathon+Docker环境搭建
相关理论请参考:https://www.cnblogs.com/Bourbon-tian/p/7155054.html,本文基于https://www.cnblogs.com/Bourbon-tian ...
- 【Docker】Windows下docker环境搭建及解决使用非官方终端时的连接问题
背景 时常有容器方面的需求,经常构建调试导致测试环境有些混乱,所以想在本地构建一套环境,镜像调试稳定后再放到测试环境中. Windows Docker 安装 安装docker toolbox 博主的电 ...
随机推荐
- HanLP汉语言分析框架
HanLP(Han Language Processing)是由一系列模型与算法组成的Java工具包,目标是普及自然语言处理在生产环境中的应用. HanLP具备功能完善.性能高效.架构清晰.语料时新. ...
- sublime text 3 优化配置
目录 1. sublime text 3 模板插件 SublimeTmpl 配置 修改模板内容格式 修改快捷键 2. 设置sublime text的 TAB 为4个空格 3. 添加markdown支持 ...
- MySQL 授予普通用户PROCESS权限
在MySQL中如何给普通用户授予查看所有用户线程/连接的权限,当然,默认情况下show processlist是可以查看当前用户的线程/连接的. mysql> grant process on ...
- spring4笔记----“零配置”:spring提供的几个Annotation标注
@Component :标注一个普通的Spring Bean类 @Controller :标注一个控制器组件器 @Service :标注一个业务逻辑组件器 @Repository ...
- sqlserver waitfor time 延迟函数的用法
SQL有定时执行的语句 WaitFor,可以写到一个存储过程中再执行一次 语法:WaitFor{Delay 'time'|Time 'time} Delay后面的时间为延迟多少时间执行 Time后面的 ...
- 信号量的基本概念与使用semget,semop
1.信号量的基本概念 信号量是一个计数器,常用于处理进程或线程的同步问题,特别是对临界资源的同步访问. 临界资源可以简单的理解为在某一时刻只能由一个进程或线程进行操作的资源,这里的资源 可以是一段代码 ...
- 关于Numba开源库(Python语法代码加速处理,看过一个例子,速度可提高6倍)
关于Numba你可能不了解的七个方面 https://yq.aliyun.com/articles/222523 Python GPU加速 (很详细,有代码练习)https://blog.csdn.n ...
- JavaSe: 不要小看了 Serializable
Java中,一个类要支持序列化,我们通常实现Serializable.在使用Serializable,应当制定一个SerialVersionUID,用于代表类的版本.如果不指定会有什么影响呢?在了解这 ...
- spring cloud 实践之hystrix注意事项
当我们写类似下面代码时 package demo1.demo1; import org.slf4j.Logger; import org.slf4j.LoggerFactory; import org ...
- K-means算法的matlab程序
K-means算法的matlab程序 在“K-means算法的matlab程序(初步)”这篇文章中已经用matlab程序对iris数据库进行简单的实现,下面的程序最终的目的是求准确度. 作者:凯鲁嘎吉 ...