CMake入门指南-编译教程
通过编写CMakeLists.txt,可以控制生成的Makefile,从而控制编译过程。CMake自动生成的Makefile不仅可以通过make命令构建项目生成目标文件,还支持安装(make install)、测试安装的程序是否能正确执行(make test,或者ctest)、生成当前平台的安装包(make package)、生成源码包(make package_source)、产生Dashboard显示数据并上传等高级功能,只要在CMakeLists.txt中简单配置,就可以完成很多复杂的功能,包括写测试用例。
CMake使用步骤:
cmake-2.8.1-win32-x86\bin\cmake-gui.exe
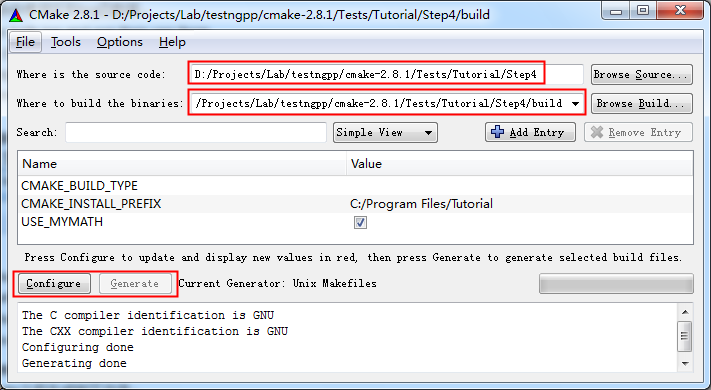
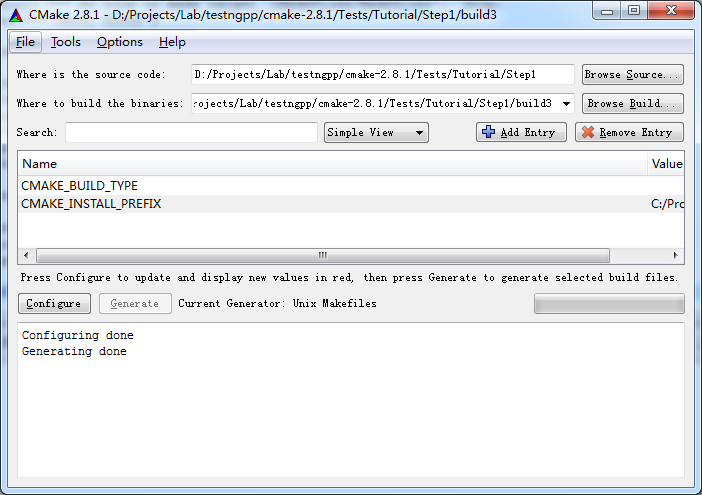
执行Configure:
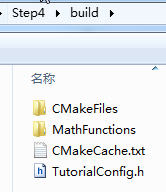
运行之后,生成了如下文件:
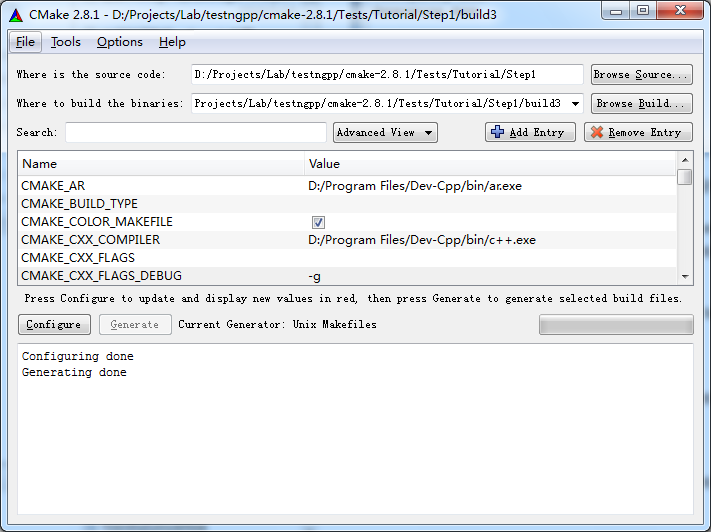
生成Makefile:
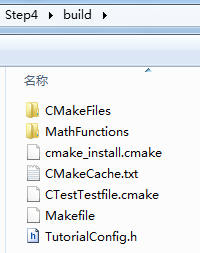
执行Generate之后生成如下文件:

http://www.cmake.org/cmake/help/cmake_tutorial.html
简单的程序编译。
D:\Projects\Lab\testngpp\cmake-2.8.1\Tests\Tutorial\Step1\build3>make
Linking CXX executable Tutorial.exe
[100%] Built target Tutorial
D:\Projects\Lab\testngpp\cmake-2.8.1\Tests\Tutorial\Step1\build3>Tutorial.exe
Tutorial.exe Version 1.0
Usage: Tutorial.exe number
D:\Projects\Lab\testngpp\cmake-2.8.1\Tests\Tutorial\Step1\build3>Tutorial.exe 4
The square root of 4 is 2
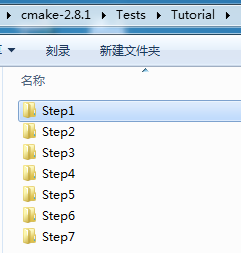
2、Step2
把子目录编译为库,并且链接到最终的可执行文件。
add_subdirectory (MathFunctions) # 使得子目录MathFunctions也能被编译
# add the executable
add_executable (Tutorial tutorial.cxx)
target_link_libraries (Tutorial MathFunctions)
产生makefile:
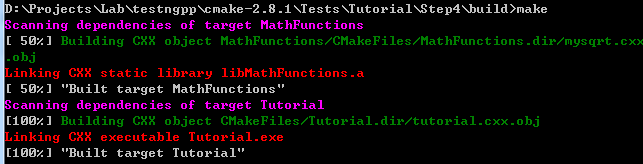
D:\Projects\Lab\testngpp\cmake-2.8.1\Tests\Tutorial\Step2\build>make
[ 50%] Building CXX object MathFunctions/CMakeFiles/MathFunctions.dir/mysqrt.cxx
.obj
Linking CXX static library libMathFunctions.a
[ 50%] Built target MathFunctions
Linking CXX executable Tutorial.exe
[100%] Built target Tutorial
3、Step3
macro (do_test arg result)
add_test (TutorialComp${arg} Tutorial ${arg})
set_tests_properties (TutorialComp${arg}
PROPERTIES PASS_REGULAR_EXPRESSION ${result})
endmacro (do_test)
do_test (25 "25 is 5")
do_test (-25 "-25 is 0")
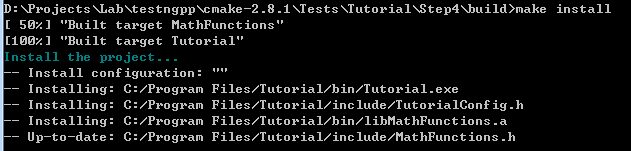
执行make install:
D:\Projects\Lab\testngpp\cmake-2.8.1\Tests\Tutorial\Step3\build>make install
[ 50%] "Built target MathFunctions"
[100%] "Built target Tutorial"
Install the project...
-- Install configuration: ""
-- Installing: C:/Program Files/Tutorial/bin/Tutorial.exe
-- Installing: C:/Program Files/Tutorial/include/TutorialConfig.h
-- Installing: C:/Program Files/Tutorial/bin/libMathFunctions.a
-- Installing: C:/Program Files/Tutorial/include/MathFunctions.h
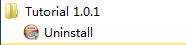
安装结果:
C:\Program Files\Tutorial>tree /f
C:.
├─bin
│ libMathFunctions.a
│ Tutorial.exe
│
└─include
MathFunctions.h
TutorialConfig.h
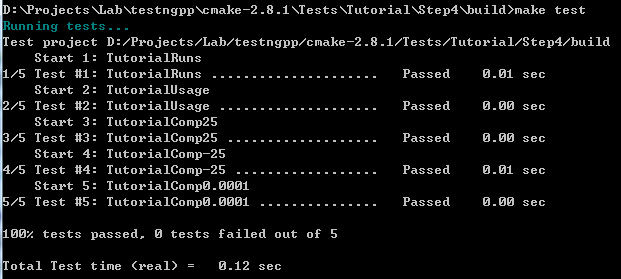
执行make test:
D:\Projects\Lab\testngpp\cmake-2.8.1\Tests\Tutorial\Step3\build>make test
Running tests...
Test project D:/Projects/Lab/testngpp/cmake-2.8.1/Tests/Tutorial/Step3/build
Start 1: TutorialRuns
1/5 Test #1: TutorialRuns ..................... Passed 0.01 sec
Start 2: TutorialComp25
2/5 Test #2: TutorialComp25 ................... Passed 0.01 sec
Start 3: TutorialNegative
3/5 Test #3: TutorialNegative ................. Passed 0.01 sec
Start 4: TutorialSmall
4/5 Test #4: TutorialSmall .................... Passed 0.00 sec
Start 5: TutorialUsage
5/5 Test #5: TutorialUsage .................... Passed 0.00 sec
修改一个测试用例,让它不过:
修改顶层CMakeLists.txt,然后重新Configure和Generate,然后make test即可看到结果。
D:\Projects\Lab\testngpp\cmake-2.8.1\Tests\Tutorial\Step3\build>make test
Running tests...
Test project D:/Projects/Lab/testngpp/cmake-2.8.1/Tests/Tutorial/Step3/build
Start 1: TutorialRuns
1/5 Test #1: TutorialRuns ..................... Passed 0.01 sec
Start 2: TutorialComp25
2/5 Test #2: TutorialComp25 ...................***Failed Required regular expre
ssion not found.Regex=[25 is 3
] 0.01 sec
Start 3: TutorialNegative
3/5 Test #3: TutorialNegative ................. Passed 0.01 sec
Start 4: TutorialSmall
4/5 Test #4: TutorialSmall .................... Passed 0.01 sec
Start 5: TutorialUsage
5/5 Test #5: TutorialUsage .................... Passed 0.01 sec
2 - TutorialComp25 (Failed)
Errors while running CTest
make: *** [test] Error 8
4、Step4
检查方法:
# does this system provide the log and exp functions?
include (CheckFunctionExists.cmake)
check_function_exists (log HAVE_LOG)
check_function_exists (exp HAVE_EXP)
(2)修改.in文件,定义宏。(修改TutorialConfig.h.in,cmake执行中会把宏定义为合适的值,生成TurorialConfig.h,供编译时使用)
// does the platform provide exp and log functions?
#cmakedefine HAVE_LOG
#cmakedefine HAVE_EXP
#if defined (HAVE_LOG) && defined (HAVE_EXP)
result = exp(log(x)*0.5);
#else // otherwise use an iterative approach
D:\Projects\Lab\testngpp\cmake-2.8.1\Tests\Tutorial\Step5\build>make
Scanning dependencies of target MakeTable
[ 25%] Building CXX object MathFunctions/CMakeFiles/MakeTable.dir/MakeTable.cxx.
obj
Linking CXX executable MakeTable.exe
[ 25%] "Built target MakeTable"
[ 50%] Generating Table.h
'.' 不是内部或外部命令,也不是可运行的程序
或批处理文件。
make[2]: *** [MathFunctions/Table.h] Error 1
make[1]: *** [MathFunctions/CMakeFiles/MathFunctions.dir/all] Error 2
make: *** [all] Error 2
问题分析:
MakeTable: cmake_check_build_system
$(MAKE) -f CMakeFiles/Makefile2 MakeTable
.PHONY : MakeTable
再看Makefile2文件,找到出错时正在编译的目标。
MathFunctions/CMakeFiles/MakeTable.dir/all:
$(MAKE) -f MathFunctions/CMakeFiles/MakeTable.dir/build.make MathFunctions/CMakeFiles/MakeTable.dir/depend
$(MAKE) -f MathFunctions/CMakeFiles/MakeTable.dir/build.make MathFunctions/CMakeFiles/MakeTable.dir/build
$(CMAKE_COMMAND) -E cmake_progress_report D:/Projects/Lab/testngpp/cmake-2.8.1/Tests/Tutorial/Step5/build/CMakeFiles 1
@echo "Built target MakeTable"
.PHONY : MathFunctions/CMakeFiles/MakeTable.dir/all
Make规则的执行顺序是按照命令的先后顺序:
echo "First line."
echo "Second line."
那么make结果:
D:\Users\Desktop>make
echo "First line."
First line.
echo "Second line."
Second line.
D:\Projects\Lab\testngpp\cmake-2.8.1\Tests\Tutorial\Step6\build>make package
[ 50%] "Built target MathFunctions"
[100%] "Built target Tutorial"
Run CPack packaging tool...
CPack Error: Cannot find NSIS registry value. This is usually caused by NSIS not
being installed. Please install NSIS from http://nsis.sourceforge.net
CPack Error: Cannot initialize the generator NSIS
make: *** [package] Error 1
D:\Projects\Lab\testngpp\cmake-2.8.1\Tests\Tutorial\Step6\build>make package
[ 50%] "Built target MathFunctions"
[100%] "Built target Tutorial"
Run CPack packaging tool...
CPack: Create package using NSIS
CPack: Install projects
CPack: - Run preinstall target for: Tutorial
CPack: - Install project: Tutorial
CPack: Compress package
CPack: Finalize package
CPack: Package D:/Projects/Lab/testngpp/cmake-2.8.1/Tests/Tutorial/Step6/build/T
utorial-1.0.1-win32.exe generated.

D:\Projects\Lab\testngpp\cmake-2.8.1\Tests\Tutorial\Step6\build>make package_sou
rce
Run CPack packaging tool for source...
CPack Error: Cannot find a suitable ZIP program
CPack Error: Cannot initialize the generator ZIP
make: *** [package_source] Error 1
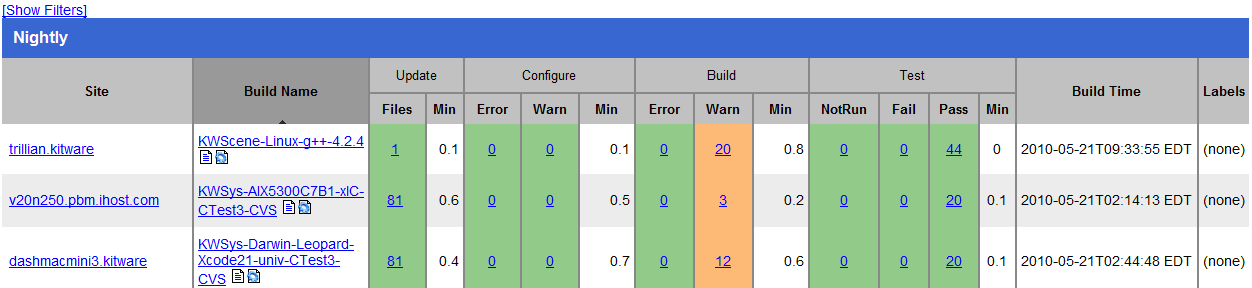

ental
Site: JELLY-PC2
Build name: Win32-make
Create new tag: 20100521-1833 - Experimental
Configure project
Each . represents 1024 bytes of output
. Size of output: 0K
Build project
Each symbol represents 1024 bytes of output.
'!' represents an error and '*' a warning.
. Size of output: 0K
0 Compiler errors
0 Compiler warnings
Test project D:/Projects/Lab/testngpp/cmake-2.8.1/Tests/Tutorial/Step7/build
Start 1: TutorialRuns
1/9 Test #1: TutorialRuns ..................... Passed 0.01 sec
Start 2: TutorialUsage
2/9 Test #2: TutorialUsage .................... Passed 0.01 sec
Start 3: TutorialComp4
3/9 Test #3: TutorialComp4 .................... Passed 0.01 sec
Start 4: TutorialComp9
4/9 Test #4: TutorialComp9 .................... Passed 0.01 sec
Start 5: TutorialComp5
5/9 Test #5: TutorialComp5 .................... Passed 0.01 sec
Start 6: TutorialComp7
6/9 Test #6: TutorialComp7 .................... Passed 0.01 sec
Start 7: TutorialComp25
7/9 Test #7: TutorialComp25 ................... Passed 0.01 sec
Start 8: TutorialComp-25
8/9 Test #8: TutorialComp-25 .................. Passed 0.01 sec
Start 9: TutorialComp0.0001
9/9 Test #9: TutorialComp0.0001 ............... Passed 0.01 sec
100% tests passed, 0 tests failed out of 9
Total Test time (real) = 0.19 sec
Performing coverage
Cannot find any coverage files. Ignoring Coverage request.
Submit files (using http)
Using HTTP submit method
Drop site:http://
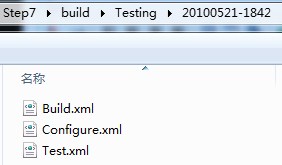
Error when uploading file: D:/Projects/Lab/testngpp/cmake-2.8.1/Tests/Tutoria
l/Step7/build/Testing/20100521-1833/Build.xml
Error message was: couldn't connect to host
Problems when submitting via HTTP
Errors while running CTest
CMake入门指南-编译教程的更多相关文章
- CMake入门指南
原文地址:http://www.cnblogs.com/sinojelly/archive/2010/05/22/1741337.html CMake是一个比make更高级的编译配置工具,它可以根据不 ...
- Win32编程API 基础篇 -- 1.入门指南 根据英文教程翻译
入门指南 本教程是关于什么的 本教程的目的是向你介绍使用win32 API编写程序的基础知识(和通用的写法).使用的语言是C,但大多数C++编译器也能成功编译,事实上,教程中的绝大多数内容都适用于任何 ...
- Asp.Net MVC4.0 官方教程 入门指南之五--控制器访问模型数据
Asp.Net MVC4.0 官方教程 入门指南之五--控制器访问模型数据 在这一节中,你将新创建一个新的 MoviesController类,并编写代码,实现获取影片数据和使用视图模板在浏览器中展现 ...
- Asp.Net MVC4.0 官方教程 入门指南之三--添加一个视图
Asp.Net MVC4.0 官方教程 入门指南之三--添加一个视图 在本节中,您需要修改HelloWorldController类,从而使用视图模板文件,干净优雅的封装生成返回到客户端浏览器HTML ...
- mxGraph进阶(一)mxGraph教程-开发入门指南
mxGraph教程-开发入门指南 概述 mxGraph是一个JS绘图组件适用于需要在网页中设计/编辑Workflow/BPM流程图.图表.网络图和普通图形的Web应用程序.mxgraph下载包中包括用 ...
- 【转】mxGraph教程-开发入门指南
原文:https://blog.csdn.net/sunhuaqiang1/article/details/51289580 mxGraph教程-开发入门指南 概述 mxGraph是一个JS绘图组件适 ...
- CMake入门教程(转帖)
本文转自:https://www.cnblogs.com/never--more/p/6921837.html CMake入门教程 参考文献:http://www.ibm.com/developerw ...
- yii2实战教程之新手入门指南-简单博客管理系统
作者:白狼 出处:http://www.manks.top/document/easy_blog_manage_system.html 本文版权归作者,欢迎转载,但未经作者同意必须保留此段声明,且在文 ...
- Asp.Net MVC4.0 官方教程 入门指南之四--添加一个模型
Asp.Net MVC4.0 官方教程 入门指南之四--添加一个模型 在这一节中,你将添加用于管理数据库中电影的类.这些类是ASP.NET MVC应用程序的模型部分. 你将使用.NET Framewo ...
随机推荐
- 网站中的专题页或者tag聚合页的权重不错
一.据最近的一些观察,觉得网站中的专题页或者tag聚合页的权重不错,因此多给网站制作一些专题页面,不仅有利于聚合站内的文章,更是绝对的原创内容,应该会受到百度的青睐.简评:关于权重的讨论,这篇无疑是很 ...
- Tomcat性能参数设置
Tomcat性能参数设置 Tomcat性能参数设置 博客分类: Java LinuxTomcat网络应用多线程Socket 默认参数不适合生产环境使用,因此需要修改一些参数 1.修改启动时内存参数.并 ...
- MyEclipse运行很慢的原因
myEclipse以其丰富的功能博得程序员的热爱,但是其速度确实有问题,jsp文 件打开会不停的校验,甚至出现卡死,分析原因,原来是 validation在做怪. 好,既然找到了原因,那就把问题解决, ...
- hibernate学习笔记--可选的配置属性
3.4. 可选的配置属性 有大量属性能用来控制Hibernate在运行期的行为. 它们都是可选的, 并拥有适当的默认值. 警告: 其中一些属性是"系统级(system-level)的&qu ...
- bzoj 2761 平衡树
裸地平衡树,只需要用到find操作 /************************************************************** Problem: U ...
- JSP页面动态联动
效果如图: 页面用法: body部分: 注意:控制层Controller中:
- java 解决JFrame不能设置背景色的问题 分类: Java Game 2014-08-15 09:48 119人阅读 评论(0) 收藏
这段时间比较多,于是写一写JAVA的一些IT技术文章.如有JAVA高手请加QQ:314783246,互相讨论. 在Java的GUI设计中,Frame和JFrame两者之间有很大差别,上次刚学时编一个窗 ...
- Nodejs Express 4.X 中文API 4--- Router篇
相关阅读: Express 4.X API 翻译[一] -- Application篇 Express4.XApi 翻译[二] -- Request篇 Express4.XApi 翻译[三] -- ...
- python开发中常用的框架
以下是15个最受欢迎的Python开源框架.这些框架包括事件I/O,OLAP,Web开发,高性能网络通信,测试,爬虫等. Django: Python Web应用开发框架 Django 应该是最出名的 ...
- Selenium获取input输入框中值的三种方法
第一种用jQuery的val方法: js = "return $('input').val();" driver.execute_script(js) 第二种用jQuery的att ...