idea设置springboot项目热部署
转自:
https://www.cnblogs.com/zhukf/p/12672180.html
一、什么是热部署?
热部署,就是在应用正在运行的时候升级软件,却不需要重新启动应用。
二、什么是SpringBoot热部署?
SpringBoot热部署就是在项目正在运行的时候修改代码, 却不需要重新启动项目。
有了SpringBoot热部署后大大提高了开发效率,因为频繁的重启项目,势必会浪费很多时间, 有了热部署后,妈妈再也不用担心我修改代码重启项目了~~~
三、SpringBoot热部署的流程
1.pom文件中导入 spring-boot-devtools 依赖:
|
1
2
3
4
5
6
|
<!--SpringBoot热部署配置 --><br><dependency> <groupId>org.springframework.boot</groupId> <artifactId>spring-boot-devtools</artifactId> <scope>runtime</scope> <optional>true</optional></dependency> |
2.继续在pom.xml中添加插件:
|
1
2
3
4
5
6
7
8
9
10
11
12
|
<build> <plugins> <plugin> <groupId>org.springframework.boot</groupId> <artifactId>spring-boot-maven-plugin</artifactId> <configuration> <fork>true</fork> <addResources>true</addResources> </configuration> </plugin> </plugins></build> |
3.设置application.properties
|
1
2
|
#配置项目热部署spring.devtools.restart.enabled=true |
4.在idea中设置自动编译:
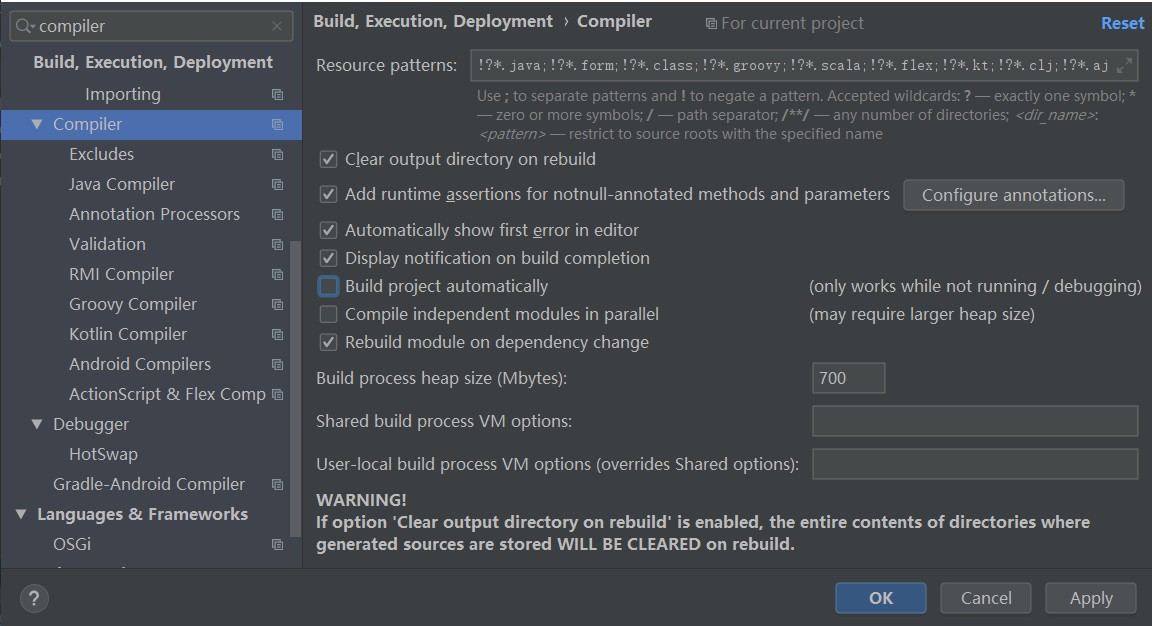
首先ctrl+alt+s打开设置(Other Settings 的设置是对整个工作空间项目都启作用,而Settings…的设置是对整个项目启作用),搜索Compliler,勾选Build project automatically,如下图所示:

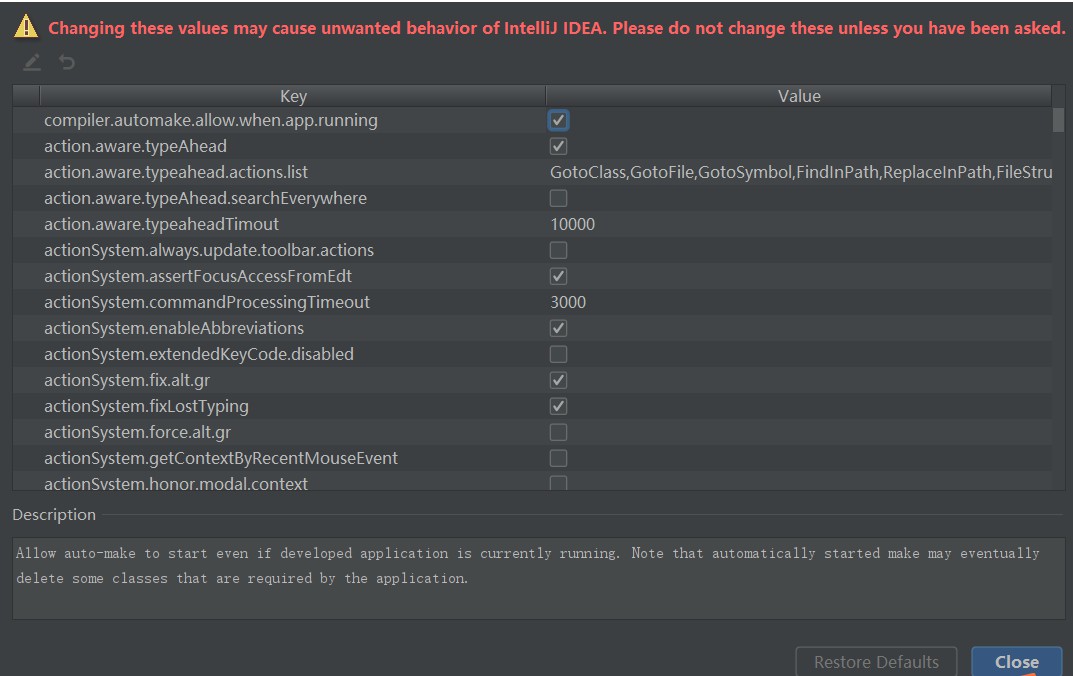
5.按住ctrl + shift + alt + /,出现如下图所示界面,点击Registry...,如下图:

点击进入后,勾选compiler.automake.allow.when.app.running后关闭即可

通过以上步骤,就完成了SpringBoot项目的热部署功能!!!
6.对热部署测试是否成功:
|
1
2
3
4
5
6
7
8
9
10
11
12
13
14
15
|
package com.devtoolsDemo.devtoolsDemo.controller;import org.springframework.web.bind.annotation.RequestMapping;import org.springframework.web.bind.annotation.RestController;@RestController@RequestMapping("/hello")public class HelloDemo { @RequestMapping("/index") public String index() { return "helloworld!"; } } |
启动项目,通过浏览器输入地址:http://localhost:8080/hello/index
结果如下:

新加请求,在不重新启动项目的情况下测试热部署是否配置成功~~~
|
1
2
3
4
5
6
7
8
9
10
11
12
13
14
15
16
17
18
19
20
|
package com.devtoolsDemo.devtoolsDemo.controller;import org.springframework.web.bind.annotation.RequestMapping;import org.springframework.web.bind.annotation.RestController;@RestController@RequestMapping("/hello")public class HelloDemo { @RequestMapping("/index") public String index() { return "helloworld!"; } @RequestMapping("/say") public String say(){ return "I love Java!"; }} |
测试新加请求是否成功,浏览器输入http://localhost:8080/hello/say后结果如下:

说明我们的热部署配置生效啦~~~
idea设置springboot项目热部署的更多相关文章
- spring-boot项目热部署以及spring-devtools导致同类不能转换
<dependency> <groupId>org.springframework.boot</groupId> <artifactId>spring- ...
- IDEA 配置Springboot项目热部署
实现的方式概述 注意以下的热部署方式在IDEA是默认没有打开自动编译的,手动编译需要快捷键(Ctrl+Shift+F9),自动编译的修改配置如下:(注意刷新不要太快,会有1-2秒延迟) File-Se ...
- idea中gradle的springboot的项目热部署
1:在build.gradle中添加热部署依赖(我gradle版本是5.5.1) // 添加 热部署依赖implementation 'org.springframework.boot:spring- ...
- Springboot静态文件不更新的解决办法,以及Springboot实现热部署
Springboot静态文件不更新的解决办法,以及Springboot实现热部署 原文链接:https://www.cnblogs.com/blog5277/p/9271882.html 原文作者:博 ...
- idea+spring-boot+devtools热部署
idea+spring-boot+devtools热部署 标签: spring-boot 2017-03-20 14:45 2635人阅读 评论(1) 收藏 举报 分类: spring-boot m ...
- SpringBoot工程+热部署进行远程调试
本文转载自:https://blog.csdn.net/qq_31868349/article/details/78553901 SpringBoot工程+热部署进行远程调试 本地端添加配置 在pom ...
- SpringBoot工程热部署
SpringBoot工程热部署 1.在pom文件中添加热部署依赖 <!-- 热部署配置 --> <dependency> <groupId>org.springfr ...
- SpringBoot SpringCloud 热部署 热加载 热调试
疯狂创客圈 Java 高并发[ 亿级流量聊天室实战]实战系列 [博客园总入口 ] 架构师成长+面试必备之 高并发基础书籍 [Netty Zookeeper Redis 高并发实战 ] Crazy-Sp ...
- springBoot开启热部署
springBoot开启热部署 这里使用devtools工具开启热部署 〇.搭建springbboot基础环境 一.添加依赖 <dependency> <groupId>org ...
- Eclipse中使用JRebel实现项目热部署(Maven插件版)
JRebel实现项目热部署(Maven插件版) 热部署,就是在应用运行过程中不进行重启,可直接进行软件升级. 在开发过程中,热部署就是在项目运行过程中变更代码,无需重启服务器即可使代码生效. tomc ...
随机推荐
- rest-assured:外部数据驱动之通过CsvFile数据源来使用外部数据源(org.junit.platform.commons.PreconditionViolationException: Classpath resource [repo.csv] does not exist)
代码: package ghcdgj.restful.framework;import static io.restassured.RestAssured.given;import static io ...
- 跨时钟域之异步FIFO
参考:https://www.cnblogs.com/aslmer/p/6114216.html 文章:Simulation and Synthesis Techniques for Asynchro ...
- rust在windows上编译成liunx可执行程序
一.rust编译文件 cargo build 或 cargo build --release 发布构建 二.安装 x86_64-unknown-liunx-musl target rustup tar ...
- CH340N串口无法检测问题的解决
问题原因: type-C有好几种类型,其中包括能传输数据的,也有不能传输数据.只能供电的.(本质差别就是引脚数目不同) 问题解决:只要将原来的type-C转USB的充电线换成数据线,电脑就能识别CH3 ...
- yolov4 编译
参考教程:https://blog.csdn.net/weixin_45102257/article/details/108872951 问题: 