新手之:SpringBoot ——Reids主从哨兵整合(CentOS7)
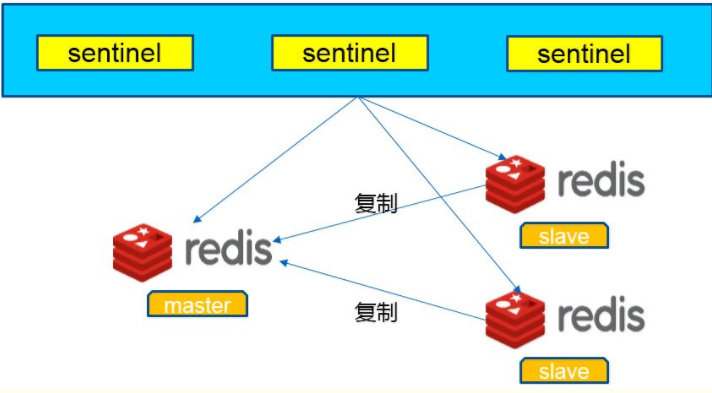
一、Redis主从搭建(一台服务器模拟多个端口)
结构图:)
1.确保安装了Redis,我装在了/opt/redis目录下。可通过"whereis redis-cli"命令查看是否安装。
2.在/opt/redis目录中创建一个文件夹用于存放redis的主从配置文件。"mkdir /opt/redis/mss"

3.我们将复制3个redis配置文件到mss目录下分别代表master_6379.conf(主库)、slave_6380.conf(从库)、slave_6381.conf(从库)
 sudo cp /opt/redis/etc/redis.conf /opt/redis/mss/master_6379.conf

 sudo cp /opt/redis/etc/redis.conf /opt/redis/mss/slave_6380.conf

 sudo cp /opt/redis/etc/redis.conf /opt/redis/mss/slave_6381.conf
4.修改主库配置文件(master_6379.conf):
 vim /opt/redis/mss/master_6379.conf

 daemonize yes

 pidfile /var/run/redis_6379.pid

 port

 logfile “/opt/redis/log/master_6379.log” # 该项可不设置,默认输出到/dev/null

 slave-read-only yes # 表示从库只读,如果设置成no,表示从库也是可以写入的
5.修改从库配置文件
slave_6380.conf:
daemonize yes

pidfile /var/run/redis_6380.pid

port

logfile “/opt/redis/log/slave_6380.log” # 该项可不设置,默认输出到/dev/null

slave-read-only yes # 表示从库只读,如果设置成no,表示从库也是可以写入的

slaveof 127.0.0.1  #指向主库服务器IP和端口。(这里的127.0.0.1只是示例,实际中填写自己服务器ip地址,不然项目调用会出问题)
slave_6381.conf:
daemonize yes

pidfile /var/run/redis_6381.pid

port

logfile “/opt/redis/log/slave_6380.log” # 该项可不设置,默认输出到/dev/null

slave-read-only yes # 表示从库只读,如果设置成no,表示从库也是可以写入的

slaveof 127.0.0.1  #指向主库服务器IP和端口。(这里的127.0.0.1只是示例,实际中填写自己服务器ip地址,不然项目调用会出问题)
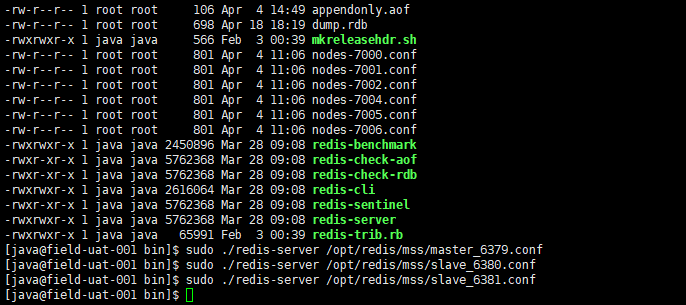
6.启动reids
启动master和两个slave:用redis-server:启动master_6379.conf,slave_6380.conf,slave_6381.conf
查看启动状态:
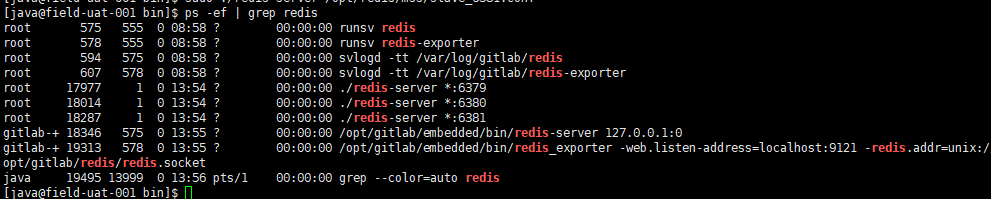
从上面看出三个reids服务以及启动成功了。
这里我们就不在做相关测试了,测试可以参考:https://www.2cto.com/database/201704/630874.html
————————————————————————————————分割线———————————————————————————————————————————
二、搭建Redis哨兵模式
在redis目录下创建'sentinel'文件夹方便管理配置文件
sudo mkdir /opt/redis/sentinel
将原有的reids哨兵配置文件拷贝到sentinel目录中。分别命名为:
sudo cp/opt/redis/etc/sentinel.conf/opt/redis/sentinel/sentinel_26379.conf

sudo cp /opt/redis/etc/sentinel.conf /opt/redis/sentinel/sentinel_26380.conf

sudo cp /opt/redis/etc/sentinel.conf /opt/redis/sentinel/sentinel_26381.conf
修改配置文件:sentinel_26379.conf
sudo vim /opt/redis/sentinel/sentinel_26379.conf
protected-mode no #关闭保护模式

port   #端口

sentinel monitor mymaster [服务器IP]   #指向redis主机服务器

sentinel auth-pass mymaster [redis密码]  #如果有设置密码需要配置此项
修改配置文件:sentinel_26380.conf
sudo vim /opt/redis/sentinel/sentinel_26380.conf

protected-mode no #关闭保护模式

port   #端口

sentinel monitor mymaster [服务器IP]   #指向redis主机服务器

sentinel auth-pass mymaster [redis密码]  #如果有设置密码需要配置此项
修改配置文件:sentinel_26381.conf
sudo vim /opt/redis/sentinel/sentinel_26381.conf
protected-mode no #关闭保护模式

port   #端口

sentinel monitor mymaster [服务器IP]   #指向redis主机服务器

sentinel auth-pass mymaster [redis密码]  #如果有设置密码需要配置此项
启动redis哨兵:首先进入redis bin目录中
cd /opt/redis/bin

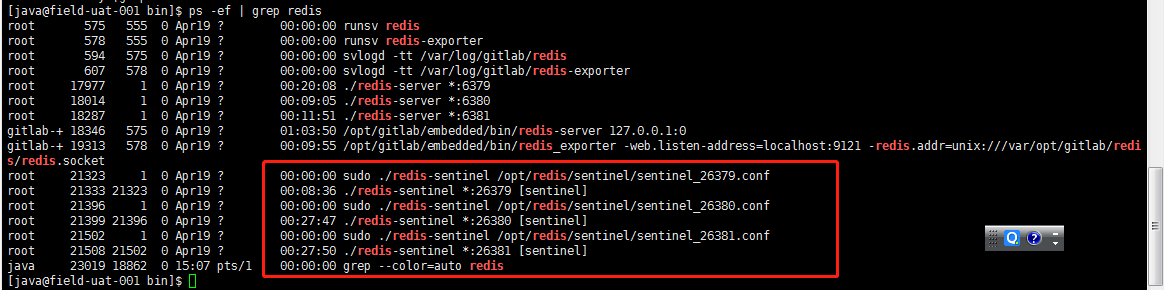
我们用redis-sentinel服务来启动哨兵:
sudo ./redis-sentinel /opt/redis/sentinel/sentinel_26379.conf

sudo ./redis-sentinel /opt/redis/sentinel/sentinel_26380.conf

sudo ./redis-sentinel /opt/redis/sentinel/sentinel_26381.conf
查看启动状态:
详细步骤可以查阅相关资料哦。
————————————————————————————————分割线———————————————————————————————————————————
三、使用Springboot整合redis主从哨兵模式。
pom.xml:
<?xml version="1.0" encoding="UTF-8"?>

<project xmlns="http://maven.apache.org/POM/4.0.0"

         xmlns:xsi="http://www.w3.org/2001/XMLSchema-instance"

         xsi:schemaLocation="http://maven.apache.org/POM/4.0.0 http://maven.apache.org/xsd/maven-4.0.0.xsd">

    <modelVersion>4.0.0</modelVersion>

    <parent>

        <groupId>org.springframework.boot</groupId>

        <artifactId>spring-boot-starter-parent</artifactId>

        <version>1.5.10.RELEASE</version>

        <relativePath/>

    </parent>

    <properties>

        <jedis.version>2.9.0</jedis.version>

    </properties>

    <dependencies>

        <dependency>

            <groupId>org.springframework.boot</groupId>

            <artifactId>spring-boot-starter-redis</artifactId>

            <version>1.4.7.RELEASE</version>

        </dependency>

        <dependency>

            <groupId>org.springframework.boot</groupId>

            <artifactId>spring-boot-starter-data-rest</artifactId>

        </dependency>

        <dependency>

            <groupId>org.springframework.boot</groupId>

            <artifactId>spring-boot-starter</artifactId>

        </dependency>

    </dependencies>

    <build>

        <plugins>

            <plugin>

                <groupId>org.springframework.boot</groupId>

                <artifactId>spring-boot-maven-plugin</artifactId>

                <configuration>

                    <classifier>exec</classifier>

                </configuration>

            </plugin>

        </plugins>

    </build>

</project>
application.yml:
spring:

  redis:

      database: 0

      host: [redis服务器IP地址]

      port: 6379

      password: [redis密码]

      pool:

        max-active: 8

        max-wait: -1

        max-idle: 8

        min-idle: 0

      timeout: 10000

      sentinel:

        master: mymaster #主机名称

        nodes: 127.0.0.1:26379,127.0.0.1:26380,127.0.0.1:26381   #多哨兵ip地址和端口
springboot RedisConfig配置文件:
package com.eqs.framework.common.util.cache;

import org.springframework.beans.factory.annotation.Value;

import org.springframework.boot.autoconfigure.EnableAutoConfiguration;

import org.springframework.cache.annotation.CachingConfigurerSupport;

import org.springframework.cache.annotation.EnableCaching;

import org.springframework.context.annotation.Bean;

import org.springframework.context.annotation.Configuration;

import redis.clients.jedis.JedisPoolConfig;

import redis.clients.jedis.JedisSentinelPool;

import java.util.Arrays;

import java.util.HashSet;

import java.util.List;

import java.util.Set;

/**

 * @Author: PittZhang

 */

@Configuration

@EnableAutoConfiguration

@EnableCaching

public class RedisConfig extends CachingConfigurerSupport{

    @Value("${spring.redis.host}")

    private String host;

    @Value("${spring.redis.port}")

    private int port;

    @Value("${spring.redis.timeout}")

     private int timeout;

    @Value("${spring.redis.database}")

    private int database;

    @Value("${spring.redis.password}")

    private String password;

    @Value("${spring.redis.pool.max-idle}")

    private int maxIdle;

    @Value("${spring.redis.pool.max-active}")

    private int maxActive;

    @Value("${spring.redis.pool.min-idle}")

    private int minIdle;

    @Value("${spring.redis.pool.max-wait}")

    private long maxWaitMillis;

    @Value("${spring.redis.sentinel.nodes}")

    private String redisNodes;

    @Value("${spring.redis.sentinel.master}")

    private String master;

    @Bean

    public JedisPoolConfig jedisPoolConfig(){

        JedisPoolConfig jedisPoolConfig = new JedisPoolConfig();

        jedisPoolConfig.setMaxIdle(maxIdle);

        jedisPoolConfig.setMaxWaitMillis(maxWaitMillis);

        jedisPoolConfig.setMinIdle(minIdle);

        return jedisPoolConfig;

    }

    @Bean

    public JedisSentinelPool jedisSentinelPool(){

        String[] arrNodes = redisNodes.split(",");

        List<String> listNodes = Arrays.asList(arrNodes);

        Set sentinels = new HashSet(listNodes);

        JedisSentinelPool jedisSentinelPool = new JedisSentinelPool(master,sentinels,jedisPoolConfig(),password);

        return  jedisSentinelPool;

    }

}
整合一个通用的redis工具类
RedisCacheClient:
package com.eqs.framework.common.util.cache;

import org.apache.commons.lang3.SerializationUtils;

import org.springframework.beans.factory.annotation.Autowired;

import org.springframework.stereotype.Component;

import redis.clients.jedis.Jedis;

import redis.clients.jedis.JedisSentinelPool;

import java.io.Serializable;

import java.util.Set;

/**

 * @Author: PittZhang

 */

@Component

public class RedisCacheClient {

    @Autowired

    private JedisSentinelPool jedisPool;

    /**

     * 设置key对应的value值

     * @param key

     * @param value

     */

    public void set(String key, Serializable value) {

        Jedis jedis=null;

        try{jedis=jedisPool.getResource();

            byte[] b= SerializationUtils.serialize(value);

//            logger.info("redis-cache-client.set key is:"+key+",value is:"+value+",  bytes.length:"+b.length);

            jedis.set(key.getBytes(), b);

        }finally{

            if(jedis != null){

                jedis.close();

            }

        }

    }

    /**

     * 设置key对应的value值

     * @param key

     * @param value

     * @param seconds

     * 将 key 的值设为 value ,当且仅当 key 不存在。

     * 若给定的 key 已经存在,则 SETNX 不做任何动作。

     */

    public long setnx(String key, Serializable value,Integer seconds) {

        Jedis jedis=null;

        try{jedis=jedisPool.getResource();

            long i=jedis.setnx(key.getBytes(), SerializationUtils.serialize(value));

            if(1==i){

                jedis.expire(key.getBytes(), seconds);

            }

            return i;

        }finally{

            if(jedis != null){

                jedis.close();

            }

        }

    }

    public long setnx(String key, Serializable value){

        Jedis jedis=null;

        try{jedis=jedisPool.getResource();

            long i=jedis.setnx(key.getBytes(), SerializationUtils.serialize(value));

            return i;

        }finally{

            if(jedis != null){

                jedis.close();

            }

        }

    }

    public String timeGetZero(){

        Jedis jedis=null;

        try{jedis=jedisPool.getResource();

            String time = jedis.time().get(0);

            return time;

        }finally{

            if(jedis != null){

                jedis.close();

            }

        }

    }

    /**

     * 设置key对应的value值

     * @param key

     * @param value

     * @param seconds 过期时间,以秒为单位

     */

    public void set(String key, Serializable value, Integer seconds) {

        Jedis jedis = jedisPool.getResource();

        try {

            byte[] b=SerializationUtils.serialize(value);

//            logger.info("redis-cache-client.set bytes.length:::"+b.length);

            jedis.set(key.getBytes(), b);

            if (seconds != null) {

                jedis.expire(key.getBytes(), seconds);

            }

        } finally {

            if(jedis != null){

                jedis.close();

            }

        }

    }

    /**

     * 设置key对应的value值

     * @param key

     * @param value

     * @param timestamp 过期时间戳 ———— UNIX时间戳

     */

    public void set(String key, Serializable value, Long timestamp ) {

        Jedis jedis=null;

        try{jedis=jedisPool.getResource();

//            logger.info("redis-cache-client.set key is:"+key+",value is:"+value);

            jedis.set(key.getBytes(), SerializationUtils.serialize(value));

            if(timestamp != null){

                jedis.expireAt(key.getBytes(), timestamp);

            }

        }finally{

            if(jedis != null){

                jedis.close();

            }

        }

    }

    /**

     * 获取key的对应的value

     * @param key

     * @return

     */

    public <T>T get(String key) {

        Jedis jedis=null;

        try {

            jedis = jedisPool.getResource();

            byte[] v = jedis.get(key.getBytes());

            if (v != null && v.length > 0) {

//                logger.info("redis-cache-client.get,key is:" + key + ", return bytes.length: " + v.length);

                return SerializationUtils.deserialize(v);

            }

            return null;

        } finally {

            if (jedis != null) {

                jedis.close();

            }

        }

    }

    /**

     * 失效

     * @param key

     * @param seconds

     */

    public void expire(String key,Integer seconds){

        Jedis jedis=null;

        try{jedis=jedisPool.getResource();

            jedis.expire(key.getBytes(), seconds);

        }finally{

            if(jedis != null){

                jedis.close();

            }

        }

    }

    /**

     * 删除key

     * @param key

     */

    public void delete(String key) {

        Jedis jedis=null;

        try{jedis=jedisPool.getResource();

            jedis.del(key.getBytes());

        }finally{

            if(jedis != null){

                jedis.close();

            }

        }

    }

    /**

     * 向名称为key的hash中添加元素field

     * @param key

     * @param field

     * @param value

     */

    public void hset(String key,String field,Serializable value){

        Jedis jedis=null;

        try{jedis=jedisPool.getResource();

            jedis.hset(key.getBytes(), field.getBytes(), SerializationUtils.serialize(value));

        }finally{

            if(jedis != null){

                jedis.close();

            }

        }

    }

    /**

     * 获取key的hash中field域对应的value

     * @param key

     * @param field

     * @return

     */

    public <T>T hget(String key,String field){

        Jedis jedis=null;

        try{jedis=jedisPool.getResource();

            byte[] v=jedis.hget(key.getBytes(), field.getBytes());

            return v==null?null:(T)SerializationUtils.deserialize(v);

        }finally{

            if(jedis != null){

                jedis.close();

            }

        }

    }

    /**

     * 确认一个key是否存在

     * @param key

     * @return

     */

    public boolean exists(String key) {

        Jedis jedis=null;

        try{jedis=jedisPool.getResource();

            return jedis.exists(key.getBytes());

        }finally{

            if(jedis != null){

                jedis.close();

            }

        }

    }

    /**

     *  key 中储存的数字加上指定的增量值。

     *  如果 key 不存在,那么 key 的值会先被初始化为 0 ,然后再执行 INCRBY 命令

     * @param key

     * @param num

     * @return

     */

    public long incrby(String key,long num){

        Jedis jedis=null;

        try{jedis=jedisPool.getResource();

            return jedis.incrBy(key, num);

        }finally{

            if(jedis != null){

                jedis.close();

            }

        }

    }

    /**

     * Redis Decrby 命令将 key 所储存的值减去指定的减量值。

     *    如果 key 不存在,那么 key 的值会先被初始化为 0 ,然后再执行 DECRBY 操作。

     * @param key

     * @param num

     * @return

     */

    public long decrby(String key,long num){

        Jedis jedis=null;

        try{jedis=jedisPool.getResource();

            return jedis.decrBy(key, num);

        }finally{

            if(jedis != null){

                jedis.close();

            }

        }

    }

    /**

     * 在名称为key的list头添加一个值为value的 元素

     * @param key

     * @param value

     * @return 返回添加后的list的长度

     */

    public long lpush(String key, Serializable value) {

        Jedis jedis=null;

        try{jedis=jedisPool.getResource();

            return jedis.lpush(key.getBytes(),SerializationUtils.serialize(value));

        }finally{

            if(jedis != null){

                jedis.close();

            }

        }

    }

    /**

     * 返回并删除名称为key的list中的尾元素

     * @param key

     * @return

     */

    public <T>T rpop(String key){

        Jedis jedis=null;

        try{jedis=jedisPool.getResource();

            byte[] v=jedis.rpop(key.getBytes());

            return v==null?null:(T)SerializationUtils.deserialize(v);

        }finally{

            if(jedis != null){

                jedis.close();

            }

        }

    }

    public String getSet(String key,String value){

        Jedis jedis=null;

        try{jedis=jedisPool.getResource();

            return jedis.getSet(key, value);

        }finally{

            if(jedis != null){

                jedis.close();

            }

        }

    }

    public Set<String> keys(String pattern){

        Jedis jedis=null;

        try{jedis=jedisPool.getResource();

            return jedis.keys(pattern);

        }finally{

            if(jedis != null){

                jedis.close();

            }

        }

    }

}
最后通过注入RedisCacheClient就可以使用了。如果对您有帮助的话,点个推荐吧~
新手之:SpringBoot ——Reids主从哨兵整合(CentOS7)的更多相关文章
- springboot+jpa+mysql+swagger整合
Springboot+jpa+MySQL+swagger整合 创建一个springboot web项目 <dependencies> <dependency> < ...
- Springboot 2.0.4 整合Mybatis出现异常Property 'sqlSessionFactory' or 'sqlSessionTemplate' are required
在使用Springboot 2.0.4 整合Mybatis的时候出现异常Property 'sqlSessionFactory' or 'sqlSessionTemplate' are require ...
- redis主从+哨兵模式
主从模式配置分为手动和配置文件两种方式进行配置,我现在有192.168.238.128(CentOS1).192.168.238.131(CentOS3).192.168.238.132(CentOS ...
- SpringBoot+SpringMVC+MyBatis快速整合搭建
作为开发人员,大家都知道,SpringBoot是基于Spring4.0设计的,不仅继承了Spring框架原有的优秀特性,而且还通过简化配置来进一步简化了Spring应用的整个搭建和开发过程.另外Spr ...
- SpringBoot与PageHelper的整合示例详解
SpringBoot与PageHelper的整合示例详解 1.PageHelper简介 PageHelper官网地址: https://pagehelper.github.io/ 摘要: com.gi ...
- redis主从+ 哨兵模式(sentinel)+漂移VIP实现高可用系统
原文:https://www.jianshu.com/p/c2ab606b00b7 客户端程序 客户端程序(如PHP程序)连接redis时需要ip和port,但redis-server进行故障转移时, ...
- redis 安装 集群 主从 哨兵 docker
安装redis 官方文档 docker run -d --net host -v /opt/myconfig/redis/redis.conf:/usr/local/etc/redis/redis.c ...
- SpringBoot学习- 4、整合JWT
SpringBoot学习足迹 1.Json web token(JWT)是为了网络应用环境间传递声明而执行的一种基于JSON的开发标准(RFC 7519),该token被设计为紧凑且安全的,特别适用于 ...
- SpringBoot学习- 3、整合MyBatis
SpringBoot学习足迹 1.下载安装一个Mysql数据库及管理工具,同类工具很多,随便找一个都可以,我在windows下做测试项目习惯使用的是haosql 它内部集成了MySql-Front管理 ...
随机推荐
- Java回顾之I/O
这篇文章主要回顾Java中和I/O操作相关的内容,I/O也是编程语言的一个基础特性,Java中的I/O分为两种类型,一种是顺序读取,一种是随机读取. 我们先来看顺序读取,有两种方式可以进行顺序读取,一 ...
- Looper.loop() android线程中的消息循环
Looper用于封装了android线程中的消息循环,默认情况下一个线程是不存在消息循环(message loop)的,需要调用Looper.prepare()来给线程创建一个消息循环,调用Loope ...
- DWZ 框架详解
这是一个智障的框架,能别用就别用.
- C# 使用Dictionary、linq实现根据集合里面的字符串进行分组
//对下面集合里面的字符串按照“_”进行分组. List<string> list = new List<string>() { "1_32", " ...
- Java网络编程和NIO详解4:浅析NIO包中的Buffer、Channel 和 Selector
Java网络编程与NIO详解4:浅析NIO包中的Buffer.Channel 和 Selector 转自https://www.javadoop.com/post/nio-and-aio 本系列文章首 ...
- codeforce——因数筛
题目大意:给你一个 n 和 k 求 n 的第 k 个因数. #include<iostream> #include <algorithm> #include <queue ...
- linux自建git仓库
一 安装git,设置git用户(当前操作是root用户) 1.安装git yum install git 2.创建git用户 groupadd git useradd git -g git 3.创建证 ...
- MIPS 汇编指令学习
MIPS 寄存器 MIPS comes with 32 general purpose registers named $0. . . $31Registers also have symbolic ...
- LNMP架构下Discuz论坛的搭建
在上一节中,我们对lnmp架构下的mysql.php.nginx进行源码的安装,并设置了相关的安装参数.现在我们将在上一节的基础上,把三者联系起来进行一个论坛的部署. 一.首先进行Discuz(社区论 ...
- input输入框外联式样式控制不了字体
1.问题背景 在做项目过程中,发现input输入框利用外联样式,控制不了输入框的样式 2.问题原因 (1)HTML代码 <!DOCTYPE html> <html> <h ...