Spring Boot+CXF搭建WebService
Spring Boot WebService开发

需要依赖Maven的Pom清单
<?xml version="1.0" encoding="UTF-8"?>

<project xmlns="http://maven.apache.org/POM/4.0.0" xmlns:xsi="http://www.w3.org/2001/XMLSchema-instance"

         xsi:schemaLocation="http://maven.apache.org/POM/4.0.0 http://maven.apache.org/xsd/maven-4.0.0.xsd">

    <modelVersion>4.0.</modelVersion>

    <parent>

        <groupId>org.springframework.boot</groupId>

        <artifactId>spring-boot-starter-parent</artifactId>

        <version>2.0..RELEASE</version>

        <relativePath/>

    </parent>

    <groupId>com.mracale</groupId>

    <artifactId>webservice</artifactId>

    <version>0.0.-SNAPSHOT</version>

    <name>webservice</name>

    <description>Demo project for Spring Boot</description>

    <properties>

        <java.version>1.8</java.version>

    </properties>

    <dependencies>

        <dependency>

            <groupId>org.springframework.boot</groupId>

            <artifactId>spring-boot-starter-web</artifactId>

        </dependency>

        <dependency>

            <groupId>org.springframework.boot</groupId>

            <artifactId>spring-boot-starter-web-services</artifactId>

        </dependency>

        <dependency>

            <groupId>org.springframework.boot</groupId>

            <artifactId>spring-boot-starter-test</artifactId>

            <scope>test</scope>

        </dependency>

        <!--WerbService CXF依赖-->

        <dependency>

            <groupId>org.apache.cxf</groupId>

            <artifactId>cxf-rt-frontend-jaxws</artifactId>

            <version>3.2.</version>

        </dependency>

        <dependency>

            <groupId>org.apache.cxf</groupId>

            <artifactId>cxf-rt-transports-http</artifactId>

            <version>3.2.</version>

        </dependency>

        <dependency>

            <groupId>commons-io</groupId>

            <artifactId>commons-io</artifactId>

        </dependency>

    </dependencies>

    <build>

        <plugins>

            <plugin>

                <groupId>org.springframework.boot</groupId>

                <artifactId>spring-boot-maven-plugin</artifactId>

            </plugin>

        </plugins>

    </build>

</project>
3. 开始编写webService服务端
3.1 实体类entity
package com.mracale.springboot.Entity;

import java.io.Serializable;

/**

 *用户实体类

 */

public class User implements Serializable {

    private static final long serialVersionUID = -3628469724795296287L;

    private String userId;

    private String userName;

    private String email;

    public String getUserId() {

        return userId;

    }

    public void setUserId(String userId) {

        this.userId = userId;

    }

    public String getUserName() {

        return userName;

    }

    public void setUserName(String userName) {

        this.userName = userName;

    }

    public String getEmail() {

        return email;

    }

    public void setEmail(String email) {

        this.email = email;

    }

    @Override

    public String toString() {

        return "User{" +

                "userId='" + userId + '\'' +

                ", userName='" + userName + '\'' +

                ", email='" + email + '\'' +

                '}';

    }

}
3.2 服务接口
package com.mracale.springboot.Service;

import com.mracale.springboot.Entity.User;

import javax.jws.WebMethod;

import javax.jws.WebParam;

import javax.jws.WebResult;

import javax.jws.WebService;

//@WebService(targetNamespace="http://service.springboot.mracale.com")如果不添加的话,动态调用invoke的时候,会报找不到接口内的方法,具体原因未知.

@WebService(targetNamespace="http://service.springboot.mracale.com")

public interface UserService {

    @WebMethod//标注该方法为webservice暴露的方法,用于向外公布,它修饰的方法是webservice方法,去掉也没影响的,类似一个注释信息。

    public User getUser(@WebParam(name = "userId") String userId);

    @WebMethod

    @WebResult(name="String",targetNamespace="")

    public String getUserName(@WebParam(name = "userId") String userId);

}
3.3 服务接口的实现类
package com.mracale.springboot.Service.impl;

import java.util.HashMap;

import java.util.Map;

import java.util.UUID;

import javax.jws.WebService;

import com.mracale.springboot.Entity.User;

import com.mracale.springboot.Service.UserService;

import org.springframework.stereotype.Component;

/**

 * @ClassName:UserServiceImpl

 * @Description:测试服务接口实现类

 */

@WebService(serviceName="UserService",//对外发布的服务名

        targetNamespace="http://service.springboot.mracale.com",//指定你想要的名称空间,通常使用使用包名反转

        endpointInterface="com.mracale.springboot.Service.UserService")//服务接口全路径, 指定做SEI(Service EndPoint Interface)服务端点接口

@Component

public class UserServiceImpl implements UserService {

    private Map<String, User> userMap = new HashMap<String, User>();

    public UserServiceImpl() {

        System.out.println("向实体类插入数据");

        User user = new User();

        user.setUserId(UUID.randomUUID().toString().replace("-", ""));

        user.setUserName("mracale01");

        user.setEmail("mracale01@163.xom");

        userMap.put(user.getUserId(), user);

        user = new User();

        user.setUserId(UUID.randomUUID().toString().replace("-", ""));

        user.setUserName("mracale02");

        user.setEmail("mracale02@163.xom");

        userMap.put(user.getUserId(), user);

        user = new User();

        user.setUserId(UUID.randomUUID().toString().replace("-", ""));

        user.setUserName("mracale03");

        user.setEmail("mracale03@163.xom");

        userMap.put(user.getUserId(), user);

    }

    @Override

    public String getUserName(String userId) {

        return "userId为:" + userId;

    }

    @Override

    public User getUser(String userId) {

        System.out.println("userMap是:"+userMap);

        return userMap.get(userId);

    }

}
3.4 发布webService的配置
package com.mracale.springboot.config;

import com.mracale.springboot.Service.UserService;

import com.mracale.springboot.Service.impl.UserServiceImpl;

import org.apache.cxf.Bus;

import org.apache.cxf.bus.spring.SpringBus;

import org.apache.cxf.jaxws.EndpointImpl;

import org.apache.cxf.transport.servlet.CXFServlet;

import org.springframework.boot.web.servlet.ServletRegistrationBean;

import org.springframework.context.annotation.Bean;

import org.springframework.context.annotation.Configuration;

import javax.xml.ws.Endpoint;

@Configuration

public class CxfConfig {

    /**

     * 此方法作用是改变项目中服务名的前缀名,此处127.0.0.1或者localhost不能访问时,请使用ipconfig查看本机ip来访问

     * 此方法被注释后:wsdl访问地址为http://127.0.0.1:8080/services/user?wsdl

     * 去掉注释后:wsdl访问地址为:http://127.0.0.1:8080/soap/user?wsdl

     * @return

     */

    @SuppressWarnings("all")

    @Bean

    public ServletRegistrationBean dispatcherServlet() {

        return new ServletRegistrationBean(new CXFServlet(), "/soap/*");

    }

    @Bean(name = Bus.DEFAULT_BUS_ID)

    public SpringBus springBus()

    {

        return  new SpringBus();

    }

    @Bean

    public UserService userService()

    {

        return  new UserServiceImpl();

    }

    @Bean

    public Endpoint endpoint() {

        EndpointImpl endpoint=new EndpointImpl(springBus(), userService());//绑定要发布的服务

        endpoint.publish("/user"); //显示要发布的名称

        return endpoint;

    }

}
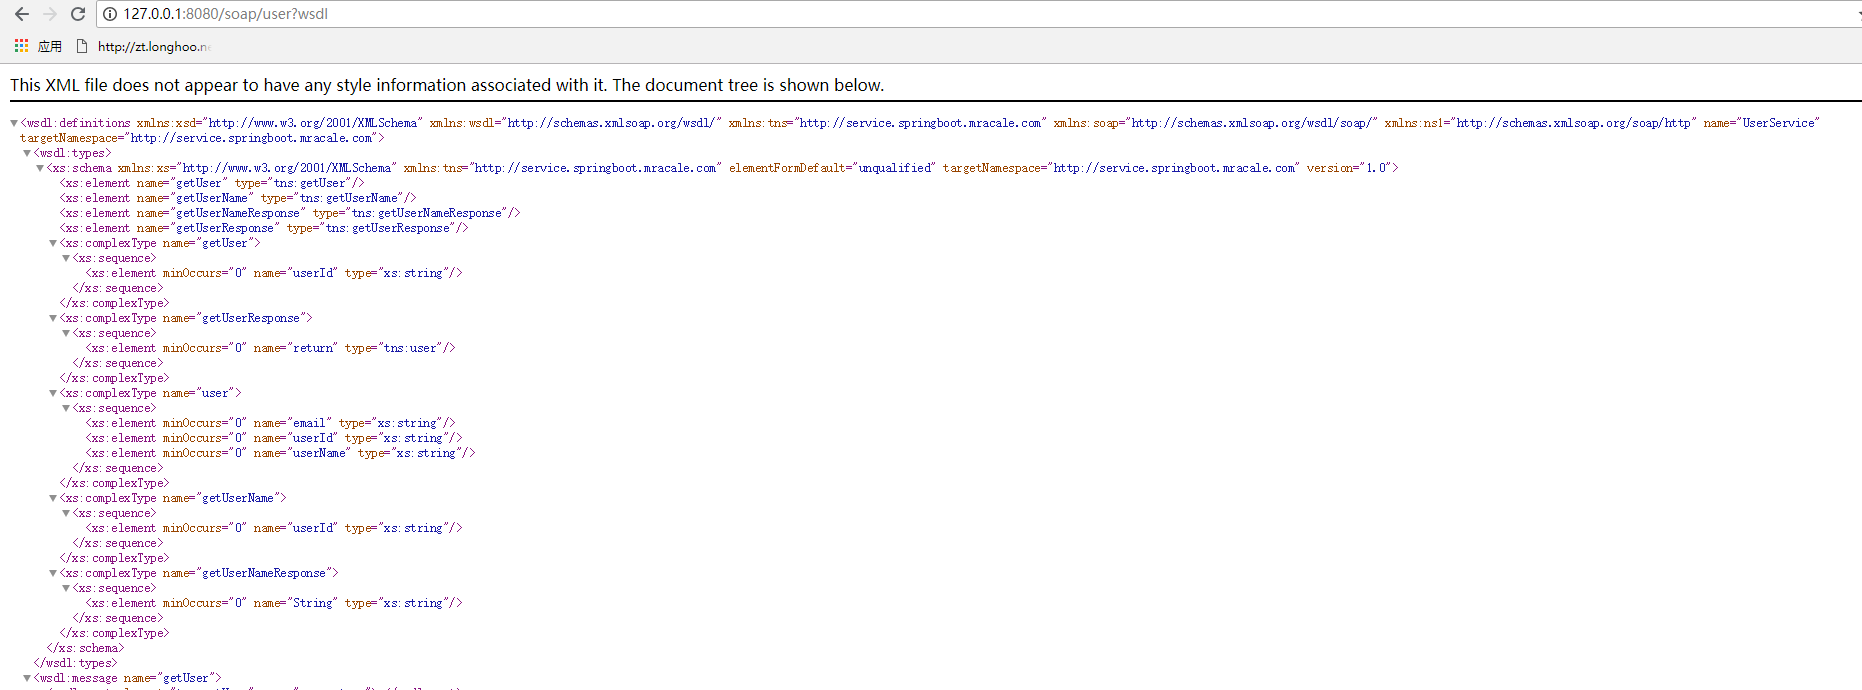
4. 项目启动后的wsdl信息
5. 两种调用方式
package com.mracale.springboot.client;

import com.mracale.springboot.Service.UserService;

import org.apache.cxf.endpoint.Client;

import org.apache.cxf.jaxws.JaxWsProxyFactoryBean;

import org.apache.cxf.jaxws.endpoint.dynamic.JaxWsDynamicClientFactory;

/**

 * @ClassName:CxfClient

 * @Description:webservice客户端:

 *                 该类提供两种不同的方式来调用webservice服务

 *              1:代理工厂方式

 *              2:动态调用webservice

 */

public class CxfClient {

    public static void main(String[] args) {

//        CxfClient.main1();

        CxfClient.main2();

    }

    /**

     * 1.代理类工厂的方式,需要拿到对方的接口地址

     */

    public static void main1() {

        try {

            // 接口地址

            String address = "http://127.0.0.1:8080/soap/user?wsdl";

            // 代理工厂

            JaxWsProxyFactoryBean jaxWsProxyFactoryBean = new JaxWsProxyFactoryBean();

            // 设置代理地址

            jaxWsProxyFactoryBean.setAddress(address);

            // 设置接口类型

            jaxWsProxyFactoryBean.setServiceClass(UserService.class);

            // 创建一个代理接口实现

            UserService us = (UserService) jaxWsProxyFactoryBean.create();

            // 数据准备

            String userId = "maple";

            // 调用代理接口的方法调用并返回结果

            String result = us.getUserName(userId);

            System.out.println("返回结果:" + result);

        } catch (Exception e) {

            e.printStackTrace();

        }

    }

    /**

     * 2:动态调用

     */

    public static void main2() {

        // 创建动态客户端

        JaxWsDynamicClientFactory dcf = JaxWsDynamicClientFactory.newInstance();

        Client client = dcf.createClient("http://127.0.0.1:8080/soap/user?wsdl");

        // 需要密码的情况需要加上用户名和密码

        // client.getOutInterceptors().add(new ClientLoginInterceptor(USER_NAME, PASS_WORD));

        Object[] objects = new Object[];

        try {

            // invoke("方法名",参数1,参数2,参数3....);

            objects = client.invoke("getUserName", "maple");

            System.out.println("返回数据:" + objects[]);

        } catch (java.lang.Exception e) {

            e.printStackTrace();

        }

    }

}
6. 注意点.
诚如之前所说,如果接口的注解上不加targetNamespace的话,动态调用的时候,会报如下的错误。

Spring Boot+CXF搭建WebService的更多相关文章
- Spring Boot+CXF搭建WebService(转)
概述 最近项目用到在Spring boot下搭建WebService服务,对Java语言下的WebService了解甚少,而今抽个时间查阅资料整理下Spring Boot结合CXF打架WebServi ...
- Spring Boot+CXF搭建WebService服务参考资料
pom.xml文件引入包: <!--WerbService CXF依赖--> <dependency> <groupId>org.apache.cxf</gr ...
- Spring boot+CXF开发WebService
最近工作中需要用到webservice,而且结合spring boot进行开发,参照了一些网上的资料,配置过程中出现的了一些问题,于是写了这篇博客,记录一下我这次spring boot+cxf开发的w ...
- Spring boot+CXF开发WebService Demo
最近工作中需要用到webservice,而且结合spring boot进行开发,参照了一些网上的资料,配置过程中出现的了一些问题,于是写了这篇博客,记录一下我这次spring boot+cxf开发的w ...
- struts1+spring+myeclipse +cxf 开发webservice以及普通java应用调用webservice的实例
Cxf + Spring+ myeclipse+ cxf 进行 Webservice服务端开发 使用Cxf开发webservice的服务端项目结构 Spring配置文件applicationCont ...
- Spring Boot 项目学习 (三) Spring Boot + Redis 搭建
0 引言 本文主要介绍 Spring Boot 中 Redis 的配置和基本使用. 1 配置 Redis 1. 修改pom.xml,添加Redis依赖 <!-- Spring Boot Redi ...
- Spring boot项目搭建及简单实例
Spring boot项目搭建 Spring Boot 概述 Build Anything with Spring Boot:Spring Boot is the starting point for ...
- spring boot+mybatis搭建项目
一.创建spring boot项目 1.File->New->Project 2.选择 Spring Initializr ,然后选择默认的 url 点击[Next]: 3.修改项目信息 ...
- Spring集成CXF发布WebService并在客户端调用
Spring集成CXF发布WebService 1.导入jar包 因为官方下载的包里面有其他版本的sprring包,全导入会产生版本冲突,所以去掉spring的部分,然后在项目根目录下新建了一个CXF ...
随机推荐
- Java精选笔记_Tomcat开发Web站点
Tomcat开发Web站点 Web开发的相关知识 B/S架构和C/S架构 C/S架构是Client/Server的简写,也就是客户机/服务器端的交互.常见应用 : QQ. 迅雷. 360. 旺旺等 B ...
- ios开发之--判断奇偶数
==) {//如果是偶数 }else{//如果是奇数 } 记录下!
- GIS-003-在线地图下载及应用
目前在线地图有谷歌.高德.百度.Bing.soso.天地图.OpenStreet.ArcGIS Online等.在企业应用中,一般需要物理网络隔绝,就有必要下载地图数据之后模拟发布,可以选择下载谷歌影 ...
- 常用hive的CLI命令
1.show tables --查看所有表 2.desc tabname --查看表信息 3.dfs -ls 目录 查看hdfs上面的文件 dfs -lsr /user 递归显示目录/user ...
- 在联网时,两台linux服务器传输文件方法
登陆服务器root用户命令:su - root 传输文件命令:scp +需要传输linux系统文件+空格+目标linux服务器的用户名@服务器ip地址:+传输的文件路径:例:scp /mnt/work ...
- PHP虚拟主机的配置
今天配置了一下虚拟目录,以下是我的配置方法. 1 编辑httpd.conf,查找Include conf/extra/httpd-vhosts.conf,把前面注释符号“#”删掉. 2 编辑htt ...
- c++11——基于范围的for循环
c++11中有基于范围的for循环,基于范围的for循环可以不再关心迭代器的概念,只需要关系容器中的元素类型即可,同时也不必显式的给出容器的开头和结尾. int arr[] = {1, 2, 3, 4 ...
- VC6IDE环境宏辅助添加移除注释
VC6很老了(15年),当年的IDE功能不如现在的各种IDE功能丰富. 比如自动添加注释,就需要借助第三方插件或自己动手实现. 最近做些code试验,新装上了VC6,但是改代码时不能自动添加注释,很不 ...
- Uni2D —— 入门(全)
Uni2D 入门 Uni2D 入门 -- Atlas Uni2D 入门 -- Animation Clip 和 Animation API Uni2D 入门 -- Skeletal Animation ...
- 在MacOS上搭建Vulhub漏洞平台环境
一.安装python3和docker brew install python3 brew cask install docker sudo pip3 install docker-compose 二. ...