Cobbler自动装机--1
cobbler介绍
cobbler官网:http://cobbler.github.io/
用个人的话来说就是cobbler就是一款通过网络快速安装Linux操作系统的产品。
cobbler可以配置,管理DNS和DHCP,包括软件包的更新,电源管理,配置管理流程等,类似于PXE+Kickstart。
系统实验环境介绍和准备
系统环境介绍
- [root@linux-node1 ~]# cat /etc/redhat-release
- CentOS Linux release 7.1.1503 (Core)
- [root@linux-node1 ~]# uname -rm
- 3.10.0-229.el7.x86_64 x86_64
- [root@linux-node1 ~]#
关闭selinux和iptables,这里不做叙述
1、下载epel源
Cobbler的包在epel源中

复制下面下载地址
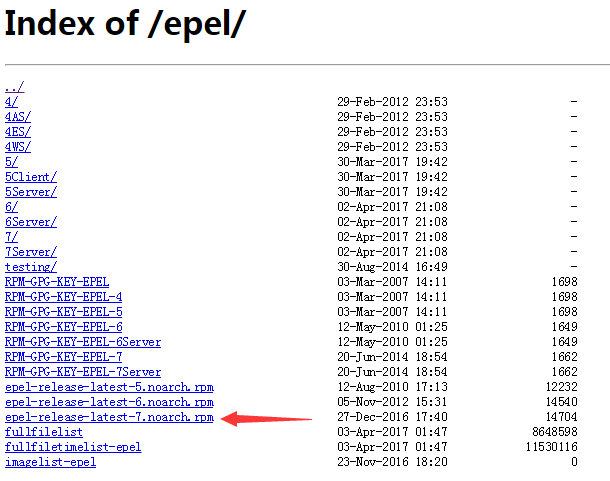
2、安装epel源
- [root@linux-node1 ~]# rpm -ivh https://mirrors.aliyun.com/epel/epel-release-latest-7.noarch.rpm
- Retrieving https://mirrors.aliyun.com/epel/epel-release-latest-7.noarch.rpm
- warning: /var/tmp/rpm-tmp.cm5Tmb: Header V3 RSA/SHA256 Signature, key ID 352c64e5: NOKEY
- Preparing... ################################# [100%]
- Updating / installing...
- 1:epel-release-7-9 ################################# [100%]
- [root@linux-node1 ~]# ll /etc/yum.repos.d/epel
- epel.repo epel-testing.repo
安装cobbler环境所需的包
其中cobbler-web能让通过浏览器关闭cobbler,其实前面所需组件dhcp和tftp也都是kickstart+pxe装机时所需。cobbler功能更多。但是大体原理和kickstart一致
cobber是python语言开发的(同样由python开发的有yum和saltstack等)
- [root@linux-node1 ~]# yum install -y httpd dhcp tftp cobbler cobbler-web pykickstart
- Loaded plugins: fastestmirror
- Loading mirror speeds from cached hostfile
- * base: mirrors.aliyun.com
- * epel: mirrors.ustc.edu.cn
- * extras: mirrors.zju.edu.cn
- * updates: mirrors.163.com
- Package httpd-2.4.6-45.el7.centos.x86_64 already installed and latest version
- Package 12:dhcp-4.2.5-47.el7.centos.x86_64 already installed and latest version
- Package tftp-5.2-13.el7.x86_64 already installed and latest version
- Package cobbler-2.8.0-4.el7.x86_64 already installed and latest version
- Package cobbler-web-2.8.0-4.el7.noarch already installed and latest version
- Package pykickstart-1.99.66.10-1.el7.noarch already installed and latest version
- Nothing to do
- [root@linux-node1 ~]#
安装并启动xinetd(这一段是前面遗漏补充的,放到了这里,应该在上面包一起安装的)
- [root@linux-node1 ~]# yum install xinetd -y
- Loaded plugins: fastestmirror
- Loading mirror speeds from cached hostfile
- * base: mirrors.aliyun.com
- * epel: mirrors.ustc.edu.cn
- * extras: mirrors.cn99.com
- * updates: mirrors.163.com
- Package 2:xinetd-2.3.15-13.el7.x86_64 already installed and latest version
- Nothing to do
- [root@linux-node1 ~]# systemctl enable xinetd
- [root@linux-node1 ~]# systemctl start xinetd
- [root@linux-node1 ~]#
- [root@linux-node1 ~]# ll /etc/httpd/conf.d/
- total 36
- -rw-r--r-- 1 root root 2926 Nov 15 02:04 autoindex.conf
- -rw-r--r-- 1 root root 1087 Feb 1 07:25 cobbler.conf
- -rw-r--r-- 1 root root 1165 Feb 1 07:26 cobbler_web.conf
- -rw-r--r-- 1 root root 366 Nov 15 02:05 README
- -rw-r--r-- 1 root root 9438 Nov 15 00:53 ssl.conf
- -rw-r--r-- 1 root root 1252 Nov 15 00:53 userdir.conf
- -rw-r--r-- 1 root root 824 Nov 15 00:53 welcome.conf
- [root@linux-node1 ~]#
简单查看下cobbler.conf配置文件内容
- [root@linux-node1 ~]# head -20 /etc/httpd/conf.d/cobbler.conf
- # This configuration file allows cobbler data
- # to be accessed over HTTP.
- AliasMatch ^/cblr(?!/svc/)(.*)?$ "/var/www/cobbler$1"
- AliasMatch ^/cobbler_track(.*)?$ "/var/www/cobbler$1"
- #AliasMatch ^/cobbler(.*)?$ "/var/www/cobbler$1"
- Alias /cobbler /var/www/cobbler
- Alias /cobbler_webui_content /var/www/cobbler_webui_content
- WSGIScriptAliasMatch ^/cblr/svc/([^/]*) /var/www/cobbler/svc/services.py
- <Directory "/var/www/cobbler">
- SetEnv VIRTUALENV
- Options Indexes FollowSymLinks
- Order allow,deny
- Allow from all
- </Directory>
- ProxyRequests off
- [root@linux-node1 ~]#
还可以看到cobbler的api相关配置

启动httpd和cobbler,并设置开机启动
- [root@linux-node1 ~]# systemctl start httpd
- [root@linux-node1 ~]# systemctl start cobblerd
- [root@linux-node1 ~]# systemctl enable httpd
- Created symlink from /etc/systemd/system/multi-user.target.wants/httpd.service to /usr/lib/systemd/system/httpd.service.
- [root@linux-node1 ~]# systemctl enable cobblerd
- Created symlink from /etc/systemd/system/multi-user.target.wants/cobblerd.service to /usr/lib/systemd/system/cobblerd.service.
- [root@linux-node1 ~]#
cobbler check检查和配置
执行cobbler check命令,它会提示我们需要做一些配置
- [root@linux-node1 ~]# cobbler check
- The following are potential configuration items that you may want to fix:
- 1 : The 'server' field in /etc/cobbler/settings must be set to something other than localhost, or kickstarting features will not work.
- This should be a resolvable hostname or IP for the boot server as reachable by all machines that will use it.
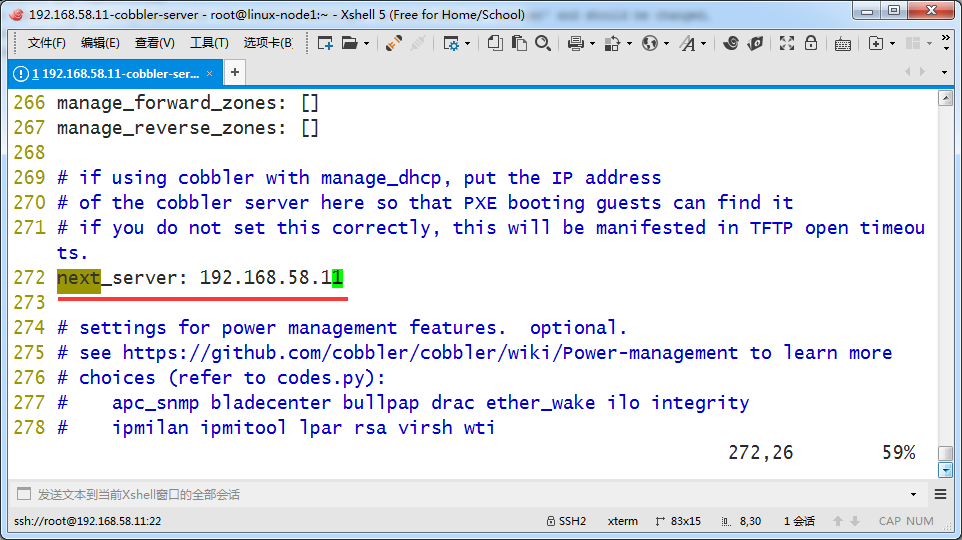
- 2 : For PXE to be functional, the 'next_server' field in /etc/cobbler/settings must be set to something other than 127.0.0.1,
- and should match the IP of the boot server on the PXE network.
- 3 : change 'disable' to 'no' in /etc/xinetd.d/tftp
- 4 : some network boot-loaders are missing from /var/lib/cobbler/loaders, you may run 'cobbler get-loaders' to download them, or,
- if you only want to handle x86/x86_64 netbooting, you may ensure that you have installed a *recent* version of the syslinux package installed and can ignore this message entirely.
- Files in this directory, should you want to support all architectures, should include pxelinux.0, menu.c32, elilo.efi,
- and yaboot. The 'cobbler get-loaders' command is the easiest way to resolve these requirements.
- 5 : enable and start rsyncd.service with systemctl
- 6 : debmirror package is not installed, it will be required to manage debian deployments and repositories
- 7 : The default password used by the sample templates for newly installed machines (default_password_crypted in /etc/cobbler/settings) is still set to 'cobbler' and should be changed,
- try: "openssl passwd -1 -salt 'random-phrase-here' 'your-password-here'" to generate new one
- 8 : fencing tools were not found, and are required to use the (optional) power management features.
- install cman or fence-agents to use them
- Restart cobblerd and then run 'cobbler sync' to apply changes.
- [root@linux-node1 ~]#
(1)需要设置cobbler服务器IP地址

(2)next-server地址
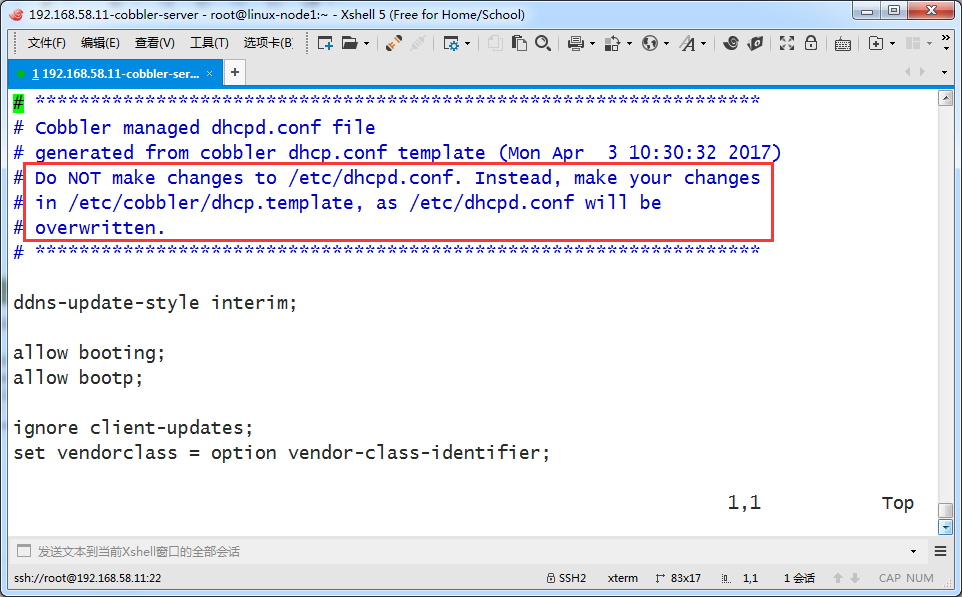
(3)修改tftp配置,启用tftp
vim /etc/xinetd.d/tftp

(4)下载一些boot-loaders
它会从网上下载
- [root@linux-node1 ~]# cobbler get-loaders
- task started: 2017-04-03_165813_get_loaders
- task started (id=Download Bootloader Content, time=Mon Apr 3 16:58:13 2017)
- downloading https://cobbler.github.io/loaders/README to /var/lib/cobbler/loaders/README
- downloading https://cobbler.github.io/loaders/COPYING.elilo to /var/lib/cobbler/loaders/COPYING.elilo
- downloading https://cobbler.github.io/loaders/COPYING.yaboot to /var/lib/cobbler/loaders/COPYING.yaboot
- downloading https://cobbler.github.io/loaders/COPYING.syslinux to /var/lib/cobbler/loaders/COPYING.syslinux
- downloading https://cobbler.github.io/loaders/elilo-3.8-ia64.efi to /var/lib/cobbler/loaders/elilo-ia64.efi
- downloading https://cobbler.github.io/loaders/yaboot-1.3.17 to /var/lib/cobbler/loaders/yaboot
- downloading https://cobbler.github.io/loaders/pxelinux.0-3.86 to /var/lib/cobbler/loaders/pxelinux.0
- downloading https://cobbler.github.io/loaders/menu.c32-3.86 to /var/lib/cobbler/loaders/menu.c32
- downloading https://cobbler.github.io/loaders/grub-0.97-x86.efi to /var/lib/cobbler/loaders/grub-x86.efi
- downloading https://cobbler.github.io/loaders/grub-0.97-x86_64.efi to /var/lib/cobbler/loaders/grub-x86_64.efi
- *** TASK COMPLETE ***
- [root@linux-node1 ~]#
(5)启动rsyncd服务并设置开机启动
- [root@linux-node1 ~]# systemctl start rsyncd
- [root@linux-node1 ~]# systemctl enable rsyncd
- Created symlink from /etc/systemd/system/multi-user.target.wants/rsyncd.service to /usr/lib/systemd/system/rsyncd.service.
- [root@linux-node1 ~]#
(6)
提示如果是deb系统需要安装debmirror,这里我们是centos,可以不做
(7)修改模板里的密码
第7步提示说默认模板里密码是cobbler,这样装出来的系统默认root密码就都是cobbler了,你需要自定义一个不一样的密码。通过openssl生成一个加密的密码
这里设置密码为123456 ,并用cobbler字符填充到加密后的字符串里
-1:用MD5基于BSD的密钥算法。
-salt string:用指定的字符串填充。当从终端读取一个密钥时,则填充它。
如下
- [root@linux-node1 ~]# openssl passwd -1 -salt 'cobbler' '123456'
- $1$cobbler$sqDDOBeLKJVmxTCZr52/11
- [root@linux-node1 ~]#
复制加密后的字符串到cobbler配置文件中替换原来的
vim /etc/cobbler/settings

重启cobblerd服务,看到配置已经完成了。下面1和2不用管
- [root@linux-node1 ~]# systemctl restart cobblerd
- [root@linux-node1 ~]# cobbler check
- The following are potential configuration items that you may want to fix:
- 1 : debmirror package is not installed, it will be required to manage debian deployments and repositories
- 2 : fencing tools were not found, and are required to use the (optional) power management features. install cman or fence-agents to use them
- Restart cobblerd and then run 'cobbler sync' to apply changes.
- [root@linux-node1 ~]#

vim /etc/cobbler/dhcp.template
$next_server这里不用修改,它会调用cobbler配置文件中之前设置的next_server的地址

- [root@linux-node1 ~]# systemctl restart cobblerd
- [root@linux-node1 ~]# cobbler sync
- task started: 2017-04-03_183031_sync
- task started (id=Sync, time=Mon Apr 3 18:30:31 2017)
- running pre-sync triggers
- cleaning trees
- removing: /var/lib/tftpboot/grub/images
- copying bootloaders
- trying hardlink /var/lib/cobbler/loaders/pxelinux.0 -> /var/lib/tftpboot/pxelinux.0
- trying hardlink /var/lib/cobbler/loaders/menu.c32 -> /var/lib/tftpboot/menu.c32
- trying hardlink /var/lib/cobbler/loaders/yaboot -> /var/lib/tftpboot/yaboot
- trying hardlink /usr/share/syslinux/memdisk -> /var/lib/tftpboot/memdisk
- trying hardlink /var/lib/cobbler/loaders/grub-x86.efi -> /var/lib/tftpboot/grub/grub-x86.efi
- trying hardlink /var/lib/cobbler/loaders/grub-x86_64.efi -> /var/lib/tftpboot/grub/grub-x86_64.efi
- copying distros to tftpboot
- copying images
- generating PXE configuration files
- generating PXE menu structure
- rendering DHCP files
- generating /etc/dhcp/dhcpd.conf
- rendering TFTPD files
- generating /etc/xinetd.d/tftp
- cleaning link caches
- running post-sync triggers
- running python triggers from /var/lib/cobbler/triggers/sync/post/*
- running python trigger cobbler.modules.sync_post_restart_services
- running: dhcpd -t -q
- received on stdout:
- received on stderr:
- running: service dhcpd restart
- received on stdout:
- received on stderr: Redirecting to /bin/systemctl restart dhcpd.service
- running shell triggers from /var/lib/cobbler/triggers/sync/post/*
- running python triggers from /var/lib/cobbler/triggers/change/*
- running python trigger cobbler.modules.scm_track
- running shell triggers from /var/lib/cobbler/triggers/change/*
- *** TASK COMPLETE ***
- [root@linux-node1 ~]#
查看dhcp的配置文件,已经变化了
vim /etc/dhcp/dhcpd.conf

前面的注释也可以看到提示

挂载
- [root@linux-node1 ~]# mount /dev/cdrom /mnt
- mount: /dev/sr0 is write-protected, mounting read-only
- [root@linux-node1 ~]#
导入镜像到cobbler中
先查看下cobbler默认存储系统的目录,现在是没有系统镜像的状态
- [root@linux-node1 ~]# ll /var/www/cobbler/ks_mirror/
- total 0
- drwxr-xr-x 2 root root 6 Feb 1 07:25 config
- [root@linux-node1 ~]#
导入系统
从哪里导入,名称是什么,架构是什么
- [root@linux-node1 ~]# cobbler import --path=/mnt/ --name=CentOS-7-x86_64 --arch=x86_64
- task started: 2017-04-03_184305_import
- task started (id=Media import, time=Mon Apr 3 18:43:05 2017)
- Found a candidate signature: breed=redhat, version=rhel6
- Found a candidate signature: breed=redhat, version=rhel7
- Found a matching signature: breed=redhat, version=rhel7
- Adding distros from path /var/www/cobbler/ks_mirror/CentOS-7-x86_64:
- creating new distro: CentOS-7-x86_64
- trying symlink: /var/www/cobbler/ks_mirror/CentOS-7-x86_64 -> /var/www/cobbler/links/CentOS-7-x86_64
- creating new profile: CentOS-7-x86_64
- associating repos
- checking for rsync repo(s)
- checking for rhn repo(s)
- checking for yum repo(s)
- starting descent into /var/www/cobbler/ks_mirror/CentOS-7-x86_64 for CentOS-7-x86_64
- processing repo at : /var/www/cobbler/ks_mirror/CentOS-7-x86_64
- need to process repo/comps: /var/www/cobbler/ks_mirror/CentOS-7-x86_64
- looking for /var/www/cobbler/ks_mirror/CentOS-7-x86_64/repodata/*comps*.xml
- Keeping repodata as-is :/var/www/cobbler/ks_mirror/CentOS-7-x86_64/repodata
- *** TASK COMPLETE ***
- [root@linux-node1 ~]#
再次查看系统镜像的目录。
- [root@linux-node1 ~]# ll /var/www/cobbler/ks_mirror/
- total 4
- drwxr-xr-x 8 root root 4096 Apr 1 2015 CentOS-7-x86_64
- drwxr-xr-x 2 root root 33 Apr 3 18:45 config
再次导入centos6.6的系统。
重新挂载centos6.6的系统盘
- [root@linux-node1 ~]# mount /dev/cdrom /mnt
- mount: /dev/sr0 is write-protected, mounting read-only
- [root@linux-node1 ~]#
导入centos6.6系统到cobbler中
- [root@linux-node1 ~]# cobbler import --path=/mnt/ --name=CentOS-6-x86_64 --arch=x86_64
- task started: 2017-04-03_185814_import
- task started (id=Media import, time=Mon Apr 3 18:58:14 2017)
- Found a candidate signature: breed=redhat, version=rhel6
- Found a matching signature: breed=redhat, version=rhel6
- Adding distros from path /var/www/cobbler/ks_mirror/CentOS-6-x86_64:
- creating new distro: CentOS-6-x86_64
- trying symlink: /var/www/cobbler/ks_mirror/CentOS-6-x86_64 -> /var/www/cobbler/links/CentOS-6-x86_64
- creating new profile: CentOS-6-x86_64
- associating repos
- checking for rsync repo(s)
- checking for rhn repo(s)
- checking for yum repo(s)
- starting descent into /var/www/cobbler/ks_mirror/CentOS-6-x86_64 for CentOS-6-x86_64
- processing repo at : /var/www/cobbler/ks_mirror/CentOS-6-x86_64
- need to process repo/comps: /var/www/cobbler/ks_mirror/CentOS-6-x86_64
- looking for /var/www/cobbler/ks_mirror/CentOS-6-x86_64/repodata/*comps*.xml
- Keeping repodata as-is :/var/www/cobbler/ks_mirror/CentOS-6-x86_64/repodata
- *** TASK COMPLETE ***
- [root@linux-node1 ~]#
kickstart文件介绍
上传提前制作好的ks文件到系统上,下面这里是centos7的,这里如果实验的话,做好把交换分区改小点
- #Kickstart Configurator for cobbler by Jason Zhao
- #platform=x86, AMD64, or Intel EM64T
- #System language
- lang en_US
- #System keyboard
- keyboard us
- #Sytem timezone
- timezone Asia/Shanghai
- #Root password
- rootpw --iscrypted $default_password_crypted
- #Use text mode install
- text
- #Install OS instead of upgrade
- install
- #Use NFS installation Media
- url --url=$tree
- #System bootloader configuration
- bootloader --location=mbr
- #Clear the Master Boot Record
- zerombr
- #Partition clearing information
- clearpart --all --initlabel
- #Disk partitioning information
- part /boot --fstype xfs --size 1024 --ondisk sda
- part swap --size 16384 --ondisk sda
- part / --fstype xfs --size 1 --grow --ondisk sda
- #System authorization infomation
- auth --useshadow --enablemd5
- #Network information
- $SNIPPET('network_config')
- #network --bootproto=dhcp --device=em1 --onboot=on
- # Reboot after installation
- reboot
- #Firewall configuration
- firewall --disabled
- #SELinux configuration
- selinux --disabled
- #Do not configure XWindows
- skipx
- #Package install information
- %pre
- $SNIPPET('log_ks_pre')
- $SNIPPET('kickstart_start')
- $SNIPPET('pre_install_network_config')
- # Enable installation monitoring
- $SNIPPET('pre_anamon')
- %end
- %packages
- @ base
- @ core
- sysstat
- iptraf
- ntp
- lrzsz
- ncurses-devel
- openssl-devel
- zlib-devel
- OpenIPMI-tools
- mysql
- nmap
- screen
- %end
- %post
- systemctl disable postfix.service
- %end
下面挑一些重点说明下
- #Root password
- rootpw --iscrypted $default_password_crypted
- #Use NFS installation Media
- url --url=$tree
- #System bootloader configuration
- bootloader --location=mbr
磁盘分区信息
- #Disk partitioning information
- part /boot --fstype xfs --size 1024 --ondisk sda
- part swap --size 16384 --ondisk sda
- part / --fstype xfs --size 1 --grow --ondisk sda
下面是一些要求安装的系统包
- %packages
- @ base
- @ core
- sysstat
- iptraf
- ntp
- lrzsz
- ncurses-devel
- openssl-devel
- zlib-devel
- OpenIPMI-tools
- mysql
- nmap
- screen
- %end
下面是现网使用的centos6的kickstart文件,装完之后,做了优化,关闭很多不必要的服务
- #Kickstart Configurator for cobbler by Jason Zhao
- #platform=x86, AMD64, or Intel EM64T
- key --skip
- #System language
- lang en_US
- #System keyboard
- keyboard us
- #Sytem timezone
- timezone Asia/Shanghai
- #Root password
- rootpw --iscrypted $default_password_crypted
- #Use text mode install
- text
- #Install OS instead of upgrade
- install
- #Use NFS installation Media
- url --url=$tree
- #System bootloader configuration
- bootloader --location=mbr
- #Clear the Master Boot Record
- zerombr yes
- #Partition clearing information
- clearpart --all --initlabel
- #Disk partitioning information
- part /boot --fstype ext4 --size 1024 --ondisk sda
- part swap --size 16384 --ondisk sda
- part / --fstype ext4 --size 1 --grow --ondisk sda
- #System authorization infomation
- auth --useshadow --enablemd5
- #Network information
- $SNIPPET('network_config')
- #network --bootproto=dhcp --device=em1 --onboot=on
- #Reboot after installation
- reboot
- #Firewall configuration
- firewall --disabled
- #SELinux configuration
- selinux --disabled
- #Do not configure XWindows
- skipx
- #Package install information
- %packages
- @ base
- @ chinese-support
- @ core
- sysstat
- iptraf
- ntp
- e2fsprogs-devel
- keyutils-libs-devel
- krb5-devel
- libselinux-devel
- libsepol-devel
- lrzsz
- ncurses-devel
- openssl-devel
- zlib-devel
- OpenIPMI-tools
- mysql
- lockdev
- minicom
- nmap
- %post
- #/bin/sed -i 's/#Protocol 2,1/Protocol 2/' /etc/ssh/sshd_config
- /bin/sed -i 's/^ca::ctrlaltdel:/#ca::ctrlaltdel:/' /etc/inittab
- /sbin/chkconfig --level 3 diskdump off
- /sbin/chkconfig --level 3 dc_server off
- /sbin/chkconfig --level 3 nscd off
- /sbin/chkconfig --level 3 netfs off
- /sbin/chkconfig --level 3 psacct off
- /sbin/chkconfig --level 3 mdmpd off
- /sbin/chkconfig --level 3 netdump off
- /sbin/chkconfig --level 3 readahead off
- /sbin/chkconfig --level 3 wpa_supplicant off
- /sbin/chkconfig --level 3 mdmonitor off
- /sbin/chkconfig --level 3 microcode_ctl off
- /sbin/chkconfig --level 3 xfs off
- /sbin/chkconfig --level 3 lvm2-monitor off
- /sbin/chkconfig --level 3 iptables off
- /sbin/chkconfig --level 3 nfs off
- /sbin/chkconfig --level 3 ipmi off
- /sbin/chkconfig --level 3 autofs off
- /sbin/chkconfig --level 3 iiim off
- /sbin/chkconfig --level 3 cups off
- /sbin/chkconfig --level 3 openibd off
- /sbin/chkconfig --level 3 saslauthd off
- /sbin/chkconfig --level 3 ypbind off
- /sbin/chkconfig --level 3 auditd off
- /sbin/chkconfig --level 3 rdisc off
- /sbin/chkconfig --level 3 tog-pegasus off
- /sbin/chkconfig --level 3 rpcgssd off
- /sbin/chkconfig --level 3 kudzu off
- /sbin/chkconfig --level 3 gpm off
- /sbin/chkconfig --level 3 arptables_jf off
- /sbin/chkconfig --level 3 dc_client off
- /sbin/chkconfig --level 3 lm_sensors off
- /sbin/chkconfig --level 3 apmd off
- /sbin/chkconfig --level 3 sysstat off
- /sbin/chkconfig --level 3 cpuspeed off
- /sbin/chkconfig --level 3 rpcidmapd off
- /sbin/chkconfig --level 3 rawdevices off
- /sbin/chkconfig --level 3 rhnsd off
- /sbin/chkconfig --level 3 nfslock off
- /sbin/chkconfig --level 3 winbind off
- /sbin/chkconfig --level 3 bluetooth off
- /sbin/chkconfig --level 3 isdn off
- /sbin/chkconfig --level 3 portmap off
- /sbin/chkconfig --level 3 anacron off
- /sbin/chkconfig --level 3 irda off
- /sbin/chkconfig --level 3 NetworkManager off
- /sbin/chkconfig --level 3 acpid off
- /sbin/chkconfig --level 3 pcmcia off
- /sbin/chkconfig --level 3 atd off
- /sbin/chkconfig --level 3 sendmail off
- /sbin/chkconfig --level 3 haldaemon off
- /sbin/chkconfig --level 3 smartd off
- /sbin/chkconfig --level 3 xinetd off
- /sbin/chkconfig --level 3 netplugd off
- /sbin/chkconfig --level 3 readahead_early off
- /sbin/chkconfig --level 3 xinetd off
- /sbin/chkconfig --level 3 ntpd on
- /sbin/chkconfig --level 3 avahi-daemon off
- /sbin/chkconfig --level 3 ip6tables off
- /sbin/chkconfig --level 3 restorecond off
- /sbin/chkconfig --level 3 postfix off
Cobbler 常用命令
cobbler check #检查cobbler配置
cobbler sync #同步配置到dhcp/pxe和数据目录
cobbler list #列出所有的cobbler元素
cobbler import #导入安装的系统镜像
cobbler report #列出各元素的详细信息
cobbler distro #查看导入的发行版系统信息
cobbler profile #查看配置信息
cobbler system #查看添加的系统信息
cobbler reposync #同步yum仓库到本地
查看当前配置信息
- [root@linux-node1 ~]# cobbler profile
- usage
- =====
- cobbler profile add
- cobbler profile copy
- cobbler profile dumpvars
- cobbler profile edit
- cobbler profile find
- cobbler profile getks
- cobbler profile list
- cobbler profile remove
- cobbler profile rename
- cobbler profile report
- [root@linux-node1 ~]# cobbler profile list
- CentOS-6-x86_64
- CentOS-7-x86_64
- [root@linux-node1 ~]#
查看详细配置信息,这里把centos7和centos6的配置信息都显示了
- [root@linux-node1 ~]# cobbler profile report
- Name : CentOS-7-x86_64
- TFTP Boot Files : {}
- Comment :
- DHCP Tag : default
- Distribution : CentOS-7-x86_64
- Enable gPXE? : 0
- Enable PXE Menu? : 1
- Fetchable Files : {}
- Kernel Options : {}
- Kernel Options (Post Install) : {}
- Kickstart : /var/lib/cobbler/kickstarts/sample_end.ks
- Kickstart Metadata : {}
- Management Classes : []
- Management Parameters : <<inherit>>
- Name Servers : []
- Name Servers Search Path : []
- Owners : ['admin']
- Parent Profile :
- Internal proxy :
- Red Hat Management Key : <<inherit>>
- Red Hat Management Server : <<inherit>>
- Repos : []
- Server Override : <<inherit>>
- Template Files : {}
- Virt Auto Boot : 1
- Virt Bridge : xenbr0
- Virt CPUs : 1
- Virt Disk Driver Type : raw
- Virt File Size(GB) : 5
- Virt Path :
- Virt RAM (MB) : 512
- Virt Type : kvm
- Name : CentOS-6-x86_64
- TFTP Boot Files : {}
- Comment :
- DHCP Tag : default
- Distribution : CentOS-6-x86_64
- Enable gPXE? : 0
- Enable PXE Menu? : 1
- Fetchable Files : {}
- Kernel Options : {}
- Kernel Options (Post Install) : {}
- Kickstart : /var/lib/cobbler/kickstarts/sample_end.ks
- Kickstart Metadata : {}
- Management Classes : []
- Management Parameters : <<inherit>>
- Name Servers : []
- Name Servers Search Path : []
- Owners : ['admin']
- Parent Profile :
- Internal proxy :
- Red Hat Management Key : <<inherit>>
- Red Hat Management Server : <<inherit>>
- Repos : []
- Server Override : <<inherit>>
- Template Files : {}
- Virt Auto Boot : 1
- Virt Bridge : xenbr0
- Virt CPUs : 1
- Virt Disk Driver Type : raw
- Virt File Size(GB) : 5
- Virt Path :
- Virt RAM (MB) : 512
- Virt Type : kvm
- [root@linux-node1 ~]#
可以看到有一行指定了默认的ks文件位置,需要改成自己实际文件位置
- Kickstart : /var/lib/cobbler/kickstarts/sample_end.ks
把centos6和centos7的ks文件上传到下面目录下(文件内容和上面粘贴的一种,不过实验目的,建议虚拟内存可以改小点。这里我不更改虚拟内存了)
- [root@linux-node1 ~]# cd /var/lib/cobbler/kickstarts/
- [root@linux-node1 kickstarts]# rz -E
- rz waiting to receive.
- [root@linux-node1 kickstarts]# ls
- CentOS-6-x86_64.cfg esxi5-ks.cfg sample_autoyast.xml sample_esxi5.ks
- CentOS-7-x86_64.cfg install_profiles sample_end.ks sample.ks
- default.ks legacy.ks sample_esx4.ks sample_old.seed
- esxi4-ks.cfg pxerescue.ks sample_esxi4.ks sample.seed
- [root@linux-node1 kickstarts]#
更改centos6和centos7的ks文件位置
- [root@linux-node1 ~]# cobbler profile edit --name=CentOS-7-x86_64 --kickstart=/var/lib/cobbler/kickstarts/CentOS-7-x86_64.cfg
- [root@linux-node1 ~]# cobbler profile edit --name=CentOS-6-x86_64 --kickstart=/var/lib/cobbler/kickstarts/CentOS-6-x86_64.cfg
- [root@linux-node1 ~]#
更改centos7的内核参数,让安装后网卡显示eth0
通过看到有一行,关于设置内核参数的
- [root@linux-node1 ~]# cobbler profile report --name=CentOS-7-x86_64
- Name : CentOS-7-x86_64
- TFTP Boot Files : {}
- Comment :
- DHCP Tag : default
- Distribution : CentOS-7-x86_64
- Enable gPXE? : 0
- Enable PXE Menu? : 1
- Fetchable Files : {}
- Kernel Options : {}
- Kernel Options (Post Install) : {}
- Kickstart : /var/lib/cobbler/kickstarts/CentOS-7-x86_64.cfg
- Kickstart Metadata : {}
- Management Classes : []
- Management Parameters : <<inherit>>
- Name Servers : []
- Name Servers Search Path : []
- Owners : ['admin']
- Parent Profile :
- Internal proxy :
- Red Hat Management Key : <<inherit>>
- Red Hat Management Server : <<inherit>>
- Repos : []
- Server Override : <<inherit>>
- Template Files : {}
- Virt Auto Boot : 1
- Virt Bridge : xenbr0
- Virt CPUs : 1
- Virt Disk Driver Type : raw
- Virt File Size(GB) : 5
- Virt Path :
- Virt RAM (MB) : 512
- Virt Type : kvm
- [root@linux-node1 ~]#
这一行的是关于内核参数的配置
- Kernel Options : {}
添加内核参数和查看
- [root@linux-node1 ~]# cobbler profile edit --name=CentOS-7-x86_64 --kopts='net.ifnames=0 biosdevname=0'
- [root@linux-node1 ~]# cobbler profile report --name=CentOS-7-x86_64
- Name : CentOS-7-x86_64
- TFTP Boot Files : {}
- Comment :
- DHCP Tag : default
- Distribution : CentOS-7-x86_64
- Enable gPXE? : 0
- Enable PXE Menu? : 1
- Fetchable Files : {}
- Kernel Options : {'biosdevname': '0', 'net.ifnames': '0'}
- Kernel Options (Post Install) : {}
- Kickstart : /var/lib/cobbler/kickstarts/CentOS-7-x86_64.cfg
- Kickstart Metadata : {}
- Management Classes : []
- Management Parameters : <<inherit>>
- Name Servers : []
- Name Servers Search Path : []
- Owners : ['admin']
- Parent Profile :
- Internal proxy :
- Red Hat Management Key : <<inherit>>
- Red Hat Management Server : <<inherit>>
- Repos : []
- Server Override : <<inherit>>
- Template Files : {}
- Virt Auto Boot : 1
- Virt Bridge : xenbr0
- Virt CPUs : 1
- Virt Disk Driver Type : raw
- Virt File Size(GB) : 5
- Virt Path :
- Virt RAM (MB) : 512
- Virt Type : kvm
- [root@linux-node1 ~]#
同步更改后的配置信息
可以看到它删除了/var/www下面的一些文件,然后重新生成
- [root@linux-node1 ~]# cobbler sync
- task started: 2017-04-03_194659_sync
- task started (id=Sync, time=Mon Apr 3 19:46:59 2017)
- running pre-sync triggers
- cleaning trees
- removing: /var/www/cobbler/images/CentOS-7-x86_64
- removing: /var/www/cobbler/images/CentOS-6-x86_64
- removing: /var/lib/tftpboot/pxelinux.cfg/default
- removing: /var/lib/tftpboot/grub/images
- removing: /var/lib/tftpboot/grub/grub-x86.efi
- removing: /var/lib/tftpboot/grub/grub-x86_64.efi
- removing: /var/lib/tftpboot/grub/efidefault
- removing: /var/lib/tftpboot/images/CentOS-7-x86_64
- removing: /var/lib/tftpboot/images/CentOS-6-x86_64
- removing: /var/lib/tftpboot/s390x/profile_list
- copying bootloaders
- trying hardlink /var/lib/cobbler/loaders/grub-x86.efi -> /var/lib/tftpboot/grub/grub-x86.efi
- trying hardlink /var/lib/cobbler/loaders/grub-x86_64.efi -> /var/lib/tftpboot/grub/grub-x86_64.efi
- copying distros to tftpboot
- copying files for distro: CentOS-7-x86_64
- trying hardlink /var/www/cobbler/ks_mirror/CentOS-7-x86_64/images/pxeboot/vmlinuz -> /var/lib/tftpboot/images/CentOS-7-x86_64/vmlinuz
- trying hardlink /var/www/cobbler/ks_mirror/CentOS-7-x86_64/images/pxeboot/initrd.img -> /var/lib/tftpboot/images/CentOS-7-x86_64/initrd.img
- copying files for distro: CentOS-6-x86_64
- trying hardlink /var/www/cobbler/ks_mirror/CentOS-6-x86_64/images/pxeboot/vmlinuz -> /var/lib/tftpboot/images/CentOS-6-x86_64/vmlinuz
- trying hardlink /var/www/cobbler/ks_mirror/CentOS-6-x86_64/images/pxeboot/initrd.img -> /var/lib/tftpboot/images/CentOS-6-x86_64/initrd.img
- copying images
- generating PXE configuration files
- generating PXE menu structure
- copying files for distro: CentOS-7-x86_64
- trying hardlink /var/www/cobbler/ks_mirror/CentOS-7-x86_64/images/pxeboot/vmlinuz -> /var/www/cobbler/images/CentOS-7-x86_64/vmlinuz
- trying hardlink /var/www/cobbler/ks_mirror/CentOS-7-x86_64/images/pxeboot/initrd.img -> /var/www/cobbler/images/CentOS-7-x86_64/initrd.img
- Writing template files for CentOS-7-x86_64
- copying files for distro: CentOS-6-x86_64
- trying hardlink /var/www/cobbler/ks_mirror/CentOS-6-x86_64/images/pxeboot/vmlinuz -> /var/www/cobbler/images/CentOS-6-x86_64/vmlinuz
- trying hardlink /var/www/cobbler/ks_mirror/CentOS-6-x86_64/images/pxeboot/initrd.img -> /var/www/cobbler/images/CentOS-6-x86_64/initrd.img
- Writing template files for CentOS-6-x86_64
- rendering DHCP files
- generating /etc/dhcp/dhcpd.conf
- rendering TFTPD files
- generating /etc/xinetd.d/tftp
- processing boot_files for distro: CentOS-7-x86_64
- processing boot_files for distro: CentOS-6-x86_64
- cleaning link caches
- running post-sync triggers
- running python triggers from /var/lib/cobbler/triggers/sync/post/*
- running python trigger cobbler.modules.sync_post_restart_services
- running: dhcpd -t -q
- received on stdout:
- received on stderr:
- running: service dhcpd restart
- received on stdout:
- received on stderr: Redirecting to /bin/systemctl restart dhcpd.service
- running shell triggers from /var/lib/cobbler/triggers/sync/post/*
- running python triggers from /var/lib/cobbler/triggers/change/*
- running python trigger cobbler.modules.scm_track
- running shell triggers from /var/lib/cobbler/triggers/change/*
- *** TASK COMPLETE ***
- [root@linux-node1 ~]#
测试部分
客户端启动一个未安装系统的机器。并设置网络为nat(和cobbler在一个网络)

cobbler服务器上查看下日志,后面客户机请求的时候会有dhcp请求信息(不是本次试验的重点,但是可以帮你理解dhcp请求的过程)
- [root@linux-node1 ~]# > /var/log/messages
- [root@linux-node1 ~]# tail -f /var/log/messages

先选择安装centos7

选中,回车后显示如下,会下载kernel等安装

Cobbler服务器上查看系统日志,可以看到客户端一些请求过程
涉及dhcp和tftp
- [root@linux-node1 ~]# tail -f /var/log/messages
- Apr 3 20:00:01 linux-node1 systemd: Started Session 26 of user root.
- Apr 3 20:00:01 linux-node1 systemd: Starting Session 26 of user root.
- Apr 3 20:00:11 linux-node1 dhcpd: DHCPDISCOVER from 00:0c:29:c6:4f:61 via eth0
- Apr 3 20:00:12 linux-node1 dhcpd: DHCPOFFER on 192.168.58.130 to 00:0c:29:c6:4f:61 via eth0
- Apr 3 20:00:13 linux-node1 dhcpd: DHCPREQUEST for 192.168.58.130 (192.168.58.11) from 00:0c:29:c6:4f:61 via eth0
- Apr 3 20:00:13 linux-node1 dhcpd: DHCPACK on 192.168.58.130 to 00:0c:29:c6:4f:61 via eth0
- Apr 3 20:00:13 linux-node1 xinetd[4228]: START: tftp pid=4329 from=192.168.58.130
- Apr 3 20:00:14 linux-node1 in.tftpd[4330]: RRQ from 192.168.58.130 filename pxelinux.0
- Apr 3 20:00:14 linux-node1 in.tftpd[4330]: tftp: client does not accept options
- Apr 3 20:00:14 linux-node1 in.tftpd[4331]: RRQ from 192.168.58.130 filename pxelinux.0
- Apr 3 20:00:14 linux-node1 in.tftpd[4331]: Client 192.168.58.130 finished pxelinux.0
- Apr 3 20:00:14 linux-node1 in.tftpd[4332]: RRQ from 192.168.58.130 filename pxelinux.cfg/564d2e7e-ef72-685b-3635-3da2d1c64f61
- Apr 3 20:00:14 linux-node1 in.tftpd[4332]: Client 192.168.58.130 File not found pxelinux.cfg/564d2e7e-ef72-685b-3635-3da2d1c64f61
- Apr 3 20:00:14 linux-node1 in.tftpd[4333]: RRQ from 192.168.58.130 filename pxelinux.cfg/01-00-0c-29-c6-4f-61
- Apr 3 20:00:14 linux-node1 in.tftpd[4333]: Client 192.168.58.130 File not found pxelinux.cfg/01-00-0c-29-c6-4f-61
- Apr 3 20:00:14 linux-node1 in.tftpd[4334]: RRQ from 192.168.58.130 filename pxelinux.cfg/C0A83A82
- Apr 3 20:00:14 linux-node1 in.tftpd[4334]: Client 192.168.58.130 File not found pxelinux.cfg/C0A83A82
客户机系统安装完毕,登录

Cobbler自动装机--1的更多相关文章
- CentOS7中搭建cobbler自动装机服务
一.实验环境 一台centos7 epel源网址 https://fedoraproject.org/wiki/EPEL?rd=Epel 使用nat模式 二.实验步骤 1.下载epel源后进行文件夹挂 ...
- Cobbler自动装机试验
Cobbler自动装机简介:Cobbler是一个使用Python开发的开源项目,通过将部署系统所涉及的所有服务集中在一起,来提供一个全自动的批量快速建立Linux系统的网络安装环境.Cobbler提供 ...
- Cobbler自动装机--2
自动重装工具--koan 客户机已经通过cobbler安装centos7系统完毕. 安装koan,能实现重装,安装之前先安装epel源 koan是kickstart-over-a-network的缩 ...
- 1. 自动化运维系列之Cobbler自动装机
preface 我们之前批量安装操作系统的时候都是采用pxe来安装,pxe也是通过网络安装操作系统的,但是PXE依赖于DHCP,HTTP/TFTP,kicstart等支持.安装流程如下所示: 对于上面 ...
- Cobbler自动装机
preface 我们之前批量安装操作系统的时候都是采用pxe来安装,pxe也是通过网络安装操作系统的,但是PXE依赖于DHCP,HTTP/TFTP,kicstart等支持.安装流程如下所示: 对于上面 ...
- cobbler自动装机服务简介与配置
cobbler简介 Cobbler是一个Linux服务器安装的服务,可以通过网络启动(PXE)的方式来快速安装.重装物理服务器和虚拟机,同时还可以管理DHCP,DNS等. Cobbler可以使用命令行 ...
- Cobbler自动部署装机 轻松解决装机烦恼
Cobbler自动部署装机一.实验准备二.搭建步骤1.导入epel源2.安装Cobbler以及其相关服务软件包3.修改Cobbler 主配置文件4.启动相关服务并关闭防火墙和selinux5.使用co ...
- pxe+kickstart cobbler无人值守装机
环境准备: 一台服务器 [root@admin tftpboot]# cat /etc/redhat-release CentOS Linux release 7.2.1511 (Core) [roo ...
- Cobbler自动部署主机系统
Cobbler自动部署主机系统 简介: Cobbler由python语言开发,是对PXE和 Kickstart以及DHCP的封装.融合很多特性,提供了CLI和Web的管理形式.更加方便的实行网络安装. ...
随机推荐
- DevExpress v18.1新版亮点——CodeRush for VS篇(二)
用户界面套包DevExpress v18.1日前正式发布,本站将以连载的形式为大家介绍各版本新增内容.本文将介绍了CodeRush for Visual Studio v18.1 的新功能,快来下载试 ...
- 关于ArrayList中的iterator返回的事迭代器实例问题。
Arraylist是一个具体的类,它并没有定义它自己的iterator()方法,,它只是从AbstractList 这个抽象类中继承了iterator()这个方法,而AbstractList 中的it ...
- softmax与多分类
sotfmax 函数在机器学习和深度学习中有着广泛的应用, 主要用于多分类问题. softmax 函数 1. 定义 假定数组V,那么第i个元素的softmax值为 也就是该元素的指数 除以 所有元素的 ...
- Linux文件系统命令 cd
命令名:cd 功能:切换到某一个目录,后面可以跟相对路径和绝对路径. eg:cd /etc/ 表示的是进入到/etc/目录下 另外几个比较特俗的用法: cd - 切换到当前目录 cd ./ 还是当前路 ...
- Oracle function和procedure
1.返回值的区别 函数有1个返回值,而存储过程是通过参数返回的,可以有多个或者没有 2. 调用的区别,函数可以在查询语句中直接调用,而存储过程必须单独调用. 函数:一般情况下是用来计算并返回一个计算结 ...
- ubantu 安装git
1.安装git并配置 sudo add-apt-repository ppa:git-core/ppa sudo apt-get update sudo apt-get install git 可以使 ...
- ipv6地址管理
为了彻底解决IPv4存在的问题,国际互联网工程任务组从1995年开始,着手研究开发下一代IP协议,即IPv6.可彻底解决IPv4地址不足的问题,除此之外,IPv6还采用分级地址模式.高效IP包头.主机 ...
- Popover 弹出框 设置top,显示有时是向下的,解决方式
参数里面有个popper-options,官网给的值是{boundariesElement: 'body', gpuAcceleration: false },将这个加上问题就解决了.
- Non-technical Blog Recording on Day of Sep. 19th 2017 in Retrospection.
Unfortunately, I heard a resignation message verbally from ESU (her name is: Su Yi in Chinese, Su fr ...
- java通过配置文件(Properties类)连接Oracle数据库代码示例
import java.io.FileInputStream; import java.io.IOException; import java.io.InputStream; import java. ...