IIS 8.0 Using ASP.NET 3.5 and ASP.NET 4.5微软官方安装指导
from:https://www.iis.net/learn/get-started/whats-new-in-iis-8/iis-80-using-aspnet-35-and-aspnet-45
Step by Step Instructions
Prerequisites:
· IIS is installed on Windows Server 2012. To learn more about installing IIS 8, see Installing IIS 8 on Windows Server 2012.
SETTING UP IIS 8.0 WITH SUPPORT FOR ASP.NET 3.5 AND ASP.NET 4.5
In Windows Server 2012, both the .NET Framework 3.5 and .NET Framework 4.5 are natively recognized by the operating system. This means both UI-based and command-line driven setup can be used to turn on both versions of the .NET Framework, as well as enabling integration of both versions of ASP.NET with IIS 8.0.
For this walkthrough we will use the new Server Manager UI in Windows Server 2012 Server to demonstrate enabling both ASP.NET 3.5 and ASP.NET 4.5 on IIS 8.0.
1. When you first login to a new Windows Server 2012 machine, the new Server Manager UI will display. Click add roles as shown below: 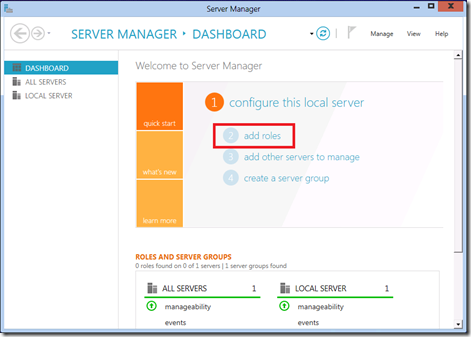
2. On the first screen of Add Roles and Features Wizard, click Next. This display a page where you select the desired installation type. Choose either Role-based or Feature-based installation as shown below: 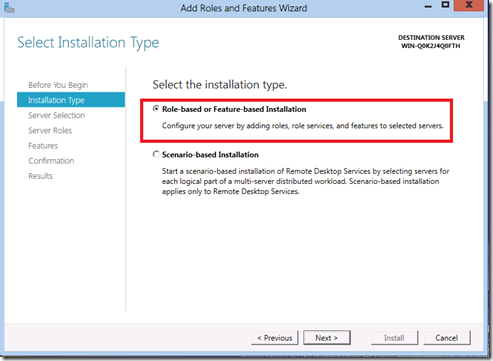
3. Click Next. The next screen of the wizard asks you to choose the server that you are configuring.
4. On the next wizard step you will be asked to select one or more server roles. Scroll down in the Roles list, and make sure to check the Web Server (IIS) checkbox as shown below: 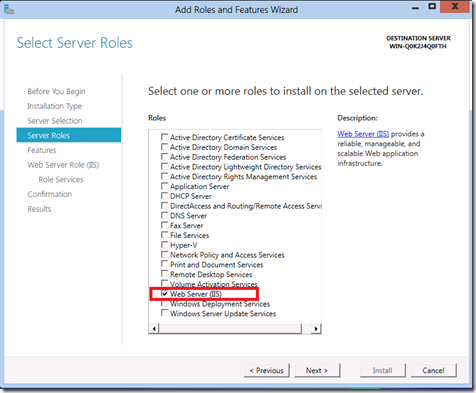
5. Click Next to proceed to the next step, which enables you to select additional specific features to install on the server. Click Next again and proceed to the next step.
6. The next wizard step displays some introductory information about the Web Server (IIS) role. Click Next again and proceed to the next step. Now you should be at a wizard step that looks like the following: 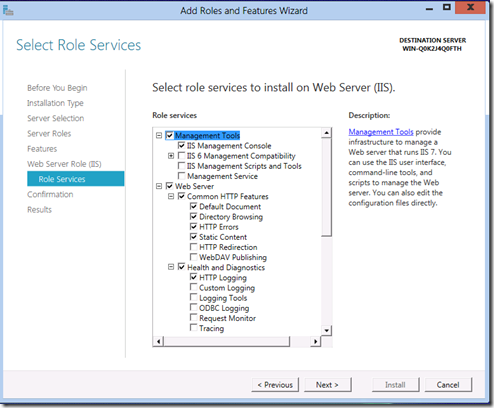
7. Note that a number of default sub-features for IIS have already been turned on because you selected the Web Server (IIS) server role earlier. However we want to enable both ASP.NET 3.5 and ASP.NET 4.5 to run on IIS 8.0, so we need to enable some additional IIS related features. Scroll down in the Role services list until the Application Development node is showing. This node is collapsed initially, click on the node and expand it so that its children are showing: 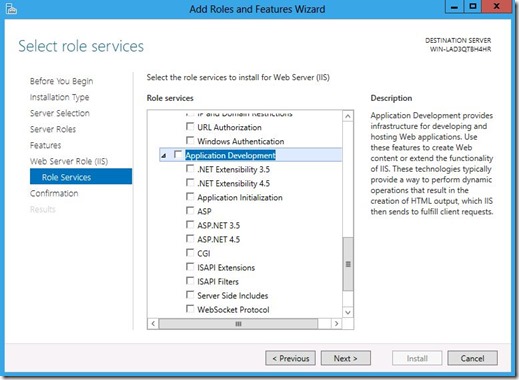
8. The Application Development node is where we enable ASP.NET integration with IIS. Note that there are a few checkboxes in the feature list with similar names. The pair of checkboxes that are of interest for this walkthrough are:
· ASP.NET 3.5 - This option enables ASP.NET 3.5 to run on IIS 8.0. Note that with Windows Server 2012, .NET Framework 3.5 is not available as a part of the base OS image. Instead, the payload is downloaded from the Internet and you need to connect to the Internet.
· ASP.NET 4.5 - This option enables ASP.NET 4.5 to run on IIS 8.0.
9. First click the ASP.NET 3.5 check box. When you do so an additional dialog box will popup as shown below: 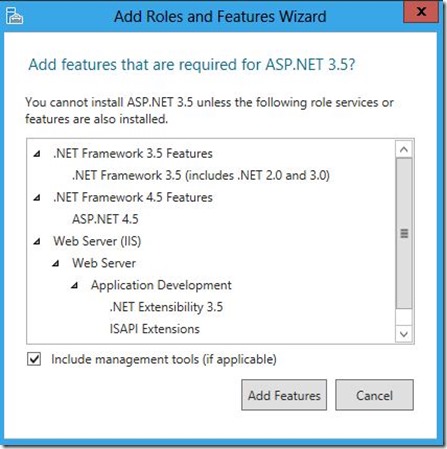
10. Since ASP.NET 3.5 is integrated into the Windows Server 2012 setup, Windows Server 2012 knows all of the related dependencies necessary to enable ASP.NET 3.5 on IIS 8.0. This popup dialog is just showing you what will be automatically pulled in and installed. Since we do want ASP.NET 3.5 enabled, click Add Required Features.
11. Next, click the ASP.NET 4.5 check box in the Role services feature list. The end result of clicking both ASP.NET related checkboxes is shown below: 
12. Even though you only directly selected the ASP.NET 3.5 and ASP.NET 4.5 features, the wizard automatically turned on a number of other items. This is done automatically so that developers do not have to explicitly choose the various component pieces needed to "assembly" of ASP.NET on Windows Server 2012. At this point click Next to accept the changes.
13. The Confirm installation selections step displays a list of all of features that are installed if you accept the changes. 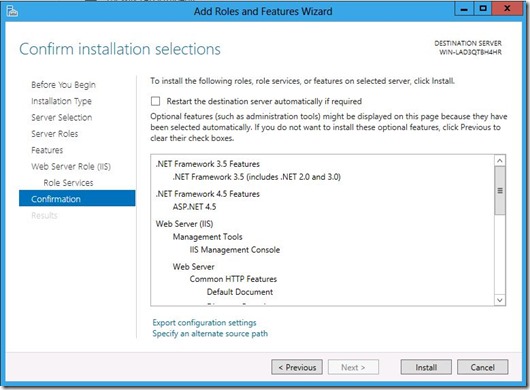
14. At this point, click Install to accept the changes and install full ASP.NET support on Windows Server 2012.
15. Since the installation will take a small amount of time to complete, the wizard displays a progress dialog while the installation progresses: 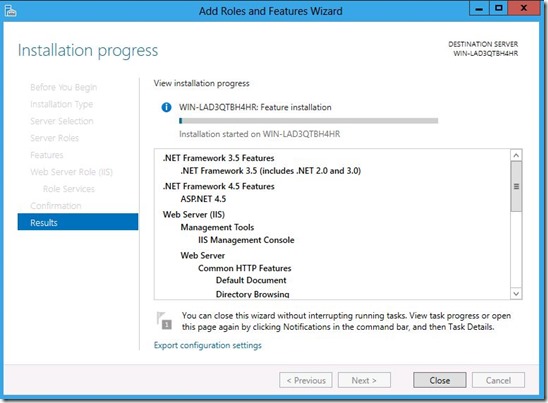
16. After a few minutes the wizard shows that the installation has completed: 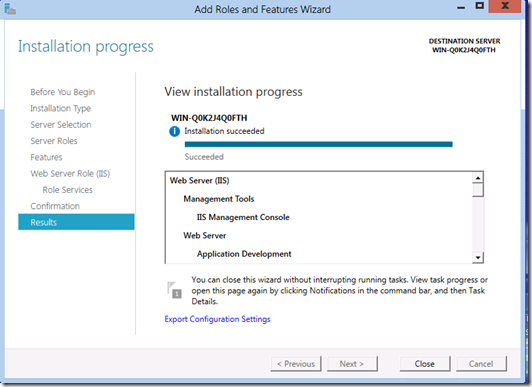
17. At this point, you can click Close and exit the wizard.
EXPLORING THE IIS 8.0 INSTALLATION
With both IIS 8.0 and ASP.NET integration installed we can take a look at the basic ASP.NET footprint for IIS 8.0.
1. From the Windows Start menu select All Programs and then expand the Administrative Tools menu. In the resulting list, find Internet Information Services (IIS) Manager and select it to launch the graphical IIS management tool: 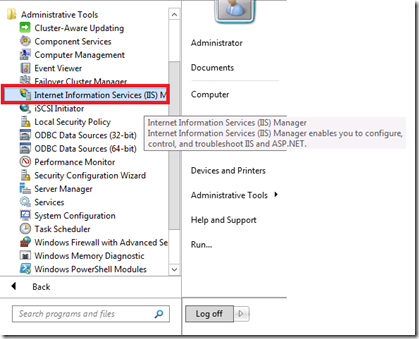
2. Once the IIS Manager starts up, expand the server node in the left-hand window so that both the Application Poolsnode and Sites node are showing. When you do this the IIS Manager will popup a dialog asking if you want to stay connected with the latest Web Platform Components. For this walkthrough, you can click No. However on real-world installations you will probably want to click Yes so that the Web Platform Installer is available for your use to download various IIS extensions such as the URL Rewrite Module. At this point the IIS Manager looks like the following picture: 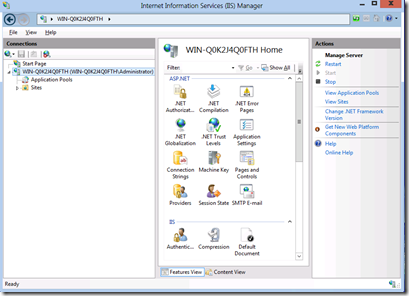
3. Click the Application Pools node to display the application pools that have now been installed for use by IIS 8.0: 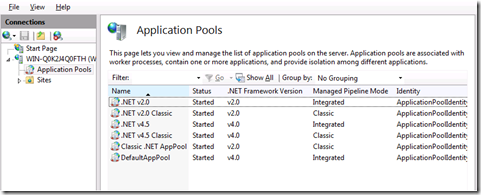
4. You can see that six different application pools are created by default when both ASP.NET 3.5 and ASP.NET 4.5 are enabled for IIS 8.0. Four of the applications are new for IIS 8.0, while two other application pools have been carried forward from previous Windows releases.
· Note that although the .NET Framework Version column shows "v2.0" and "v4.0" for .NET Framework versions, these equate to ASP.NET 3.5 and ASP.NET 4.5. Due to the internals of how application pools bind to .NET Framework versions, the actual version name written to configuration (and thus displayed in the tool) corresponds to the original .NET Framework file version.
· Classic .NET AppPool and DefaultAppPool existed in previous versions of Windows, and thus continue to be created for IIS 8.0. Note however that since .NET 4.5 is the default .NET Framework for use by Windows Server 2012, the "DefaultAppPool" on IIS 8.0 also defaults to using the newer version of the .NET Framework.
· The other four application pools are new in Windows Server 2012. There are two application pools for running .NET Framework 3.5 (.NET v2.0 and .NET v2.0 Classic), and two application pools for running .NET Framework 4.5 (.NET 4.5 and .NET 4.5 Classic).
· The difference between "classic" and "not classic" application pools is the managed pipeline mode supported in each application pool type. The two application pools ending in "Classic" support the older Windows Server 2003-era classic pipeline mode for ASP.NET, while the other two application pools use the newer integrated pipeline mode for ASP.NET introduced in Vista/IIS7.0.
5. Exploring a little bit further, expand the Sites node in the left-hand side of the screen so that the Default Web Site node is visible: 
6. Default installations of IIS always have a "Default Web Site" configured to listen for HTTP requests on port 80. Drill into the "Default Web Site" to see what version of ASP.NET it supports by default. Right-click Default Web Site, then selectManage Website, and select Advanced Settings as shown below: 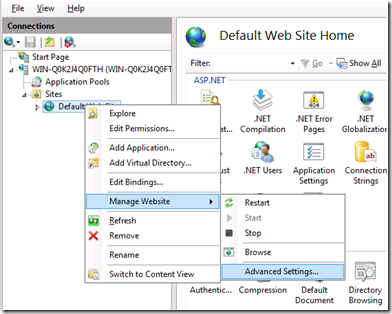
7. The Advanced Settings dialog pops up, showing (amongst other things) the application pool used to run the "Default Web Site". As shown in the picture below, the "Default Web Site" runs in the application pool called "DefaultAppPool": 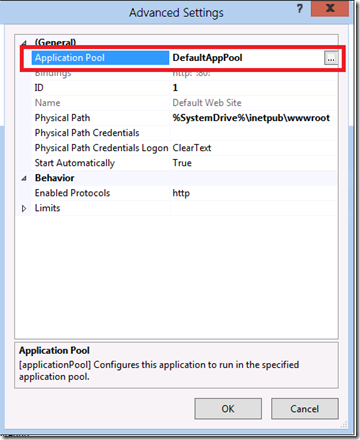
8. If you click the small ellipsis-button on the right-hand side of the application pool , an additional dialog pops up displaying more information about the "DefaultAppPool". As noted earlier the "DefaultAppPool" defaults to ASP.NET 4.5 for IIS 8.0, so ASP.NET 4.5 applications deployed in the "Default Web Site" will work without any further configuration. 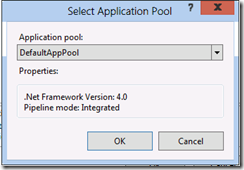
9. At this point, click Cancel to cancel both the Select Application Pool dialog, and the Advanced Settings dialog.
RUNNING BOTH ASP.NET 3.5 AND ASP.NET 4.5 APPLICATIONS
Now that you have explored the setup state of IIS 8.0, try running some sample ASP.NET code to confirm that both ASP.NET 3.5 and ASP.NET 4.5 applications can run simultaneously on a single IIS 8.0 installation.
Sample code for both ASP.NET 3.5 and ASP.NET 4.5 is contained in the following .zip:
First, set up a simple ASP.NET 3.5 application on IIS 8.0:
1. Open the "examples.zip" file.
2. In Windows Explorer on your Windows Server 2012 machine, navigate to the "wwwroot" directory for your IIS installation. For example if you installed IIS on the "C:\" drive, the "wwwroot" directory will be at "c:\inetpub\wwwroot".
3. Copy the folder "example35" from "examples.zip", and paste it into the directory "c:\inetpub\wwwroot". When you are done the directory structure should look like the following: 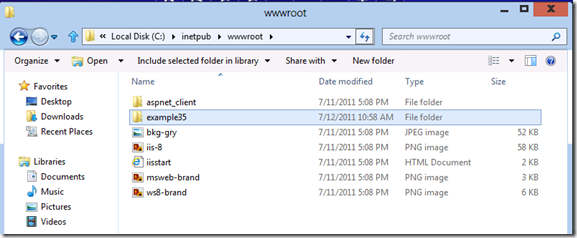
4. The newly created "example35" folder needs to be configured as an ASP.NET 3.5 application in the IIS Manager. Go back to the IIS Manager window, click on the Default Web Site node, and select Refresh. The treeview of child nodes under theDefault Web Site now shows the "example35" folder: 
5. Right-click the example35 folder and select Convert to Application: 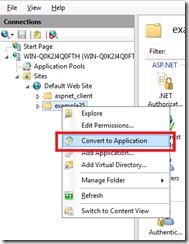
6. The Add Application dialog will pop up. By default all directories within Default Web Site are part of the application pool called DefaultAppPool. This means that newly created folders containing ASP.NET run as ASP.NET 4.5 applications by default. 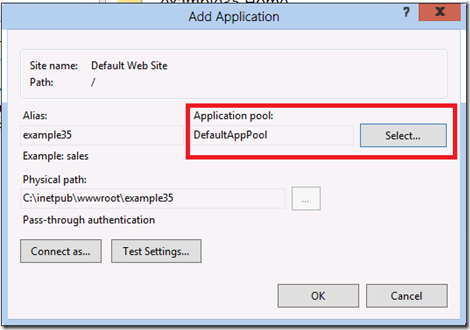
7. Since we want to run the example35 folder as an ASP.NET 3.5 application, the application pool needs to be changed. Click Select, and the Select Application Pool dialog that pops up. Change the application pool to .NET v2.0 as shown below: 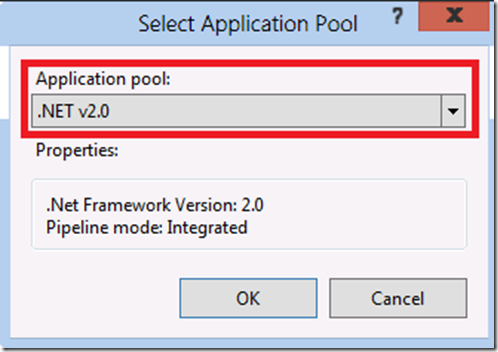
8. Click OK button to accept the application pool change, and then click OK again to commit the changes to IIS. The IIS Manager window appears again. In the treeview showing "Default Web Site", the icon for "example35" is changed to indicate it is now a separate ASP.NET application. 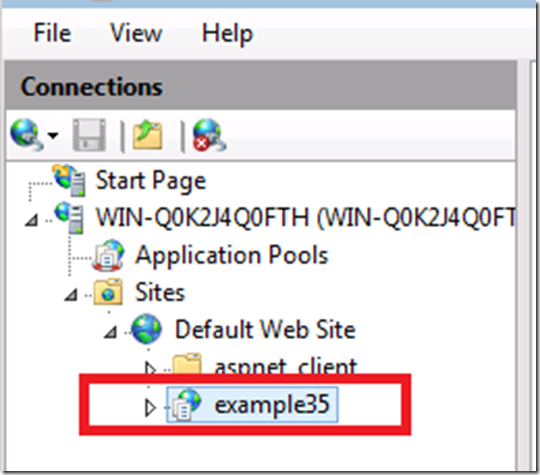
9. At this point start an instance of Internet Explorer and navigate to the following Url:
http://localhost/example35
After a short pause the application displays a list of .NET Framework features supported in this application.
10. in Windows Explorer, if you navigate to the "c:\inetpub\wwwroot\example35" directory, you can use notepad to look at the code for "default.aspx" and the information in "web.config". For example, the contents of web.config include directives that configure the .NET Framework compilers to run in "3.5" mode. The .NET Framework code in "default.aspx" demonstrates some C# constructs that were introduced in .NET 3.5 - specifically LINQ-to-Object queries.
Now that there is an ASP.NET 3.5 application running, you can create a second ASP.NET application, but this time configure it to use .NET 4.5.
1. Go back to the Windows Explorer window that has the .zip file "examples.zip" open.
2. Open up the contents of the "example45" folder.
3. In the second Windows Explorer window that you have open, navigate to "c:\inetpub\wwwroot".
4. Copy the "default.aspx" file from the .zip file and paste it directly into "c:\inetpub\wwwroot". The folder contents for "c:\inetpub\wwwroot" should now look like: 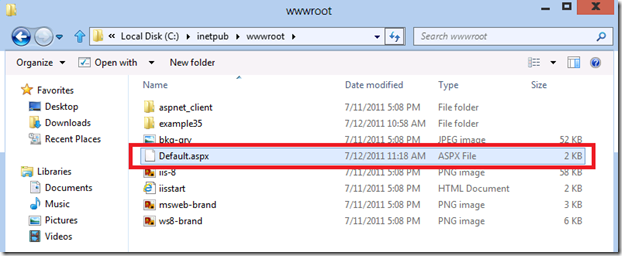
5. Now go back to Internet Explorer and navigate to the following Url:
http://localhost/default.aspx
After a short pause a second application pool will start running an ASP.NET 4.5 application for the "Default Web Site". The browser once again displays a list of .NET Framework features supported in this application with a new entry at the end of the list for dynamically typed variables (i.e. the dynamic keyword introduced in .NET 4.0/4.5). Notice that unlike the "example35" application that required special web.config entries, no web.config file was required to configure and run the "default.aspx" page in the "Default Web Site". This is because .NET Framework 4.5 is the default .NET Framework used by ASP.NET applications in IIS 8.0, and as a result no extra configuration is required.
6. If you use Notepad to open the "default.aspx" page that you just copied, you will also see a few changes compared to the version in the "example35" directory. There are no namespace directives at the top of the page since the .NET Framework 4.5 is the default on IIS 8.0. The code on the page demonstrates using a dynamic variable, which is a compiler concept introduced in .NET 4.0/4.5.
IIS 8.0 Using ASP.NET 3.5 and ASP.NET 4.5微软官方安装指导的更多相关文章
- Installing IIS 8 on Windows Server 2012微软官方安装指导
from: https://www.iis.net/learn/get-started/whats-new-in-iis-8/installing-iis-8-on-windows-server-20 ...
- IIS 7.0 的 ASP.NET 应用程序生命周期概述(转载)
IIS 7.0 的 ASP.NET 应用程序生命周期概述更新:2007 年 11 月本主题介绍在 IIS 7.0 集成模式下运行以及与 IIS 7.0 或更高版本一起运行的 ASP.NET 应用程序的 ...
- IIS 6.0上部署.NET 4.0网站
最近需要把VS2010开发的网站部署到Windows Server 2003的服务器上去, Windows Server 2003操作系统自带的为IIS 6.0,IIS 6.0一般只支持.NET 2. ...
- ASP.NET的运行原理与运行机制 如何:为 IIS 7.0 配置 <system.webServer> 节
https://technet.microsoft.com/zh-cn/sysinternals/bb763179.aspx 当一个HTTP请求到服务器并被IIS接收到之后,IIS首先通过客户端请求的 ...
- ASP.NET MVC3 系列教程 - 部署你的WEB应用到IIS 6.0
I:ASP.NET MVC3 部署的前期工作 1.确认部署的服务器操作系统环境 首先我们确认服务器的操作系统版本 可以从系统命令行工具里输入: systeminfo 获取相关操作系统信息例如 然后再确 ...
- IIS 7.0, ASP.NET, pipelines, modules, handlers, and preconditions
1.0 What is the IIS Pipeline Conceptually, the IIS pipeline is a state machine with the following st ...
- Local IIS 7.0 - CS0016: Could not write to output file / Microsoft.Net > Framework > v4.0.30319 > Temporary ASP.NET Files
This week I went nuts over my local IIS. I have never swore to a machine that much in my whole life. ...
- [整理]IIS 6.0 下部署 Asp.net MVC Web Api 后 HTTP PUT and DELETE 请求失败
http://guodong.me/?p=1560 ASP.NET MVC 4 has a new feature called WebAPI which makes it much easier t ...
- IIS 7.0 的 ASP.NET 应用程序生命周期概述
文章:IIS 7.0 的 ASP.NET 应用程序生命周期概述 地址:https://msdn.microsoft.com/zh-cn/library/bb470252(v=vs.100).aspx ...
随机推荐
- centos7安装zabbix3.4
一.系统环境 关闭防火墙及selinux systemctl stop firewalld.service systemctl disable firewalld.service sed -i 's/ ...
- [daily][samba] smbclient使用
用的也不是太明白,反正凑合用吧. 在用之前,只得到了两个信息,1:ip 192.168.30.9. 2:可以免密登录. 1. 用这个命令看一看,主要是找到这个目录:Anonymous ┬─[t ...
- [administrative][lvm] lvm 分区修改
默认安装的CentOS6.3操作系统,使用lvm分区.root挂载了50G,home挂载了1.5T. 由于需求要求,现在需要把home的1.5T全部移动到root下. 使用archiso启动,查看lv ...
- 使用XPath对象解析xml文件
使用XPath对象解析xml文件 1.DocumentBuilderFactory类 工厂API,使应用程序能从XML文档获取生成DOM对象树的解析器 其构造方法受保护,用newInstance() ...
- python time模块总结
常用函数: import time --------------------------------------------------time.time() ...
- JavaScript学习笔记--语法
代码风格: 每句结尾不用加分号: 单行注释用//,多行注释用/*...需要注释掉的代码....*/ 严格区分大小写 优雅的代码需要注意锁进 基础知识: Number:JavaScript不区分整数和浮 ...
- 如何暂停和继续运行Linux程序
我们通过shell窗口运行程序时,由于有的程序长时间运行,直到下班了都还没有返回运行结果.这个时候,我们又不能直接关闭shell窗口,不然前面的时间就白白运行了. 那有什么办法可以先暂停程序,明天再继 ...
- RN无限轮播以及ScrollView的大小调节问题
如果你的ScrollView的大小是全屏,height不能用,这种情况需要给ScrollView添加一个容器View,然后调节容器View的大小 无限轮播这里我使用的是一个第三方的插件react-na ...
- 20180310 KindEditor 富文本编辑器
问题: 如何判断富文本编辑器文本内容非空 错误的办法,采用js 对控件本身的txt ID 号抓取获取值,由于加载富文本编辑器时,界面的ID 已经经过了修改或者可以用转换来说,所以抓取是无效果的. 需要 ...
- jQuery UI 拖拽-拉伸
jquery-ui实现 官网:http://www.runoob.com/jqueryui/example-resizable.html layui实现 demo:http://www.jq22.co ...