转:pycharm community debug django projects
原文:https://automationpanda.com/2017/09/14/django-projects-in-pycharm-community-edition/comment-page-1/
注意“Creating Run Configurations”这一小节,这一节说明了如何利用pycharm community debug django项目
Django Projects in PyCharm Community Edition
JetBrains PyCharm is one of the best Python IDEs around. It’s smooth and intuitive – a big step up from Atom or Notepad++ for big projects. PyCharm is available as a standalone IDE or as a plugin for its big sister, IntelliJ IDEA. The free Community Edition provides basic features akin to IntelliJ, while the licensed Professional Edition provides advanced features such as web development and database tools. The Professional Edition isn’t cheap, though: a license for one user may cost up to $199 annually (though discounts and free licenses may be available).
This guide shows how to develop Django web projects using PyCharm Community Edition. Even though Django-specific features are available only in PyCharm Professional Edition, it is still possible to develop Django projects using the free version with help from the command line. Personally, I’ve been using the free version of PyCharm to develop a small web site for a side business of mine. This guide covers setup steps, basic actions, and feature limitations based on my own experiences. Due to the limitations in the free version, I recommend it only for small Django projects or for hobbyists who want to play around.
Prerequisites
This guide focuses specifically on configuring PyCharm Community Edition for Django development. As such, readers should be familiar with Python and the Django web framework. Readers should also be comfortable with the command line for a few actions, specifically for Django admin commands. Experience with JetBrains software like PyCharm and IntelliJ IDEA is helpful but not required.
Python and PyCharm Community Edition must be installed on the development machine. If you are not sure which version of Python to use, I strongly recommend Python 3. Any required Python packages (namely Django) should be installed via pip.
Creating Django Projects and Apps
Django projects and apps require a specific directory layout with some required settings. It is possible to create this content manually through PyCharm, but it is recommended to use the standard Django commands instead, as shown in Part 1 of the official Django tutorial.
> django-admin startproject newproject

> cd newproject

> django-admin startapp newapp
Then, open the new project in PyCharm. The files and directories will be visible in the Project Explorer view.

The project root directory should be at the top of Project Explorer. The .idea folder contains IDE-specific config files that are not relevant for Django.
Creating New Files and Directories
Creating new files and directories is easy. Simply right-click the parent directory in Project Explorer and select the appropriate file type under New. Files may be deleted using right-click options as well or by highlighting the file and typing the Delete or Backspace key.

Files and folders are easy to visually create, copy, move, rename, and delete.
Django projects require a specific directory structure. Make sure to put files in the right places with the correct names. PyCharm Community Edition won’t check for you.
Writing New Code
Double-click any file in Project Explorer to open it in an editor. The Python editor offers all standard IDE features like source highlighting, real-time error checking, code completion, and code navigation. This is the main reason why I use PyCharm over a simpler editor for Python development. PyCharm also has many keyboard shortcuts to make actions easier.

Nice.
Editors for other file types, such as HTML, CSS, or JavaScript, may require additional plugins not included with PyCharm Community Edition. For example, Django templates must be edited in the regular HTML editor because the special editor is available only in the Professional Edition.

Workable, but not as nice.
Running Commands from the Command Line
Django admin commands can be run from the command line. PyCharm automatically refreshes any file changes almost immediately. Typically, I switch to the command line to add new apps, make migrations, and update translations. I also created a few aliases for easier file searching.
> python manage.py makemigrations

> python manage.py migrate

> python manage.py makemessages -l zh

> python manage.py compilemessages

> python manage.py test

> python manage.py collectstatic

> python manage.py runserver
Creating Run Configurations
PyCharm Community Edition does not include the Django manage.py utility feature. Nevertheless, it is possible to create Run Configurations for any Django admin command so that they can be run in the IDE instead of at the command line.
First, make sure that a Project SDK is set. From the File menu, select Project Structure…. Verify that a Project SDK is assigned on the Project tab. If not, then you may need to create a new one – the SDK should be the Python installation directory or a virtual environment. Make sure to save the new Project SDK setting by clicking the OK button.

Don’t leave that Project SDK blank!
Then from the Run menu, select Edit Configurations…. Click the plus button in the upper-left corner to add a Python configuration. Give the config a good name (like “Django: <command>”). Then, set Script to “manage.py” and Script parameters to the name and options for the desired Django admin command (like “runserver”). Set Working directory to the absolute path of the project root directory. Make sure the appropriate Python SDK is selected and the PYTHONPATH settings are checked. Click the OK button to save the config. The command can then be run from Run menu options or from the run buttons in the upper-right corner of the IDE window.

Run configurations should look like this. Anything done at the command line can also be done here.

When commands are run, the Run view appears at the bottom of the IDE window to show console output.
Special run configurations are particularly useful for the “test” and “runserver” commands because they enable rudimentary debugging. You can set breakpoints, run the command with debugging, and step through the Python code. If you need to interact with a web page to exercise the code, PyCharm will take screen focus once a breakpoint is hit. Even though debugging Django templates is not possible in the free version, debugging the Python code can help identify most problems. Be warned that debugging is typically a bit slower than normal execution.

Debugging makes Django development so much easier.
I typically use the command line instead of run configurations for other Django commands just for simplicity.
Version Control Systems
PyCharm has out-of-the-box support for version control systems like Git and Subversion. VCS actions are available under the VCS menu or when right-clicking a file in Project Explorer. PyCharm can directly check out projects from a repository, add new projects to a repository, or automatically identify the version control system being used when opening a project. Any VCS commands entered at the command line will be automatically reflected in PyCharm.

PyCharm’s VCS menu is initially generic. Once you select a VCS for your project, the options will be changed to reflect the chosen VCS. For example, Git will have options for “Fetch”, “Pull”, and “Push”.
Personally, I use Git with either GitHub or Atlassian Bitbucket. I prefer to do most Git actions like graphically through PyCharm, but occasionally I drop to the command line when I need to do more advanced operations (like checking commit IDs or forcing hard resets). PyCharm also has support for .gitignore files.
Python Virtual Environments
Creating virtual environments is a great way to manage Python project dependencies. Virtual environments are especially useful when deploying Django web apps. I strongly recommend setting up a virtual environment for every Python project you develop.
PyCharm can use virtual environments to run the project. If a virtual environment already exists, then it can be set as the Project SDK under Project Structure as described above. Select New… > Python SDK > Add Local, and set the path. Otherwise, new virtual environments can be created directly through PyCharm. Follow the same process to add a virtual environment, but under Python SDK, select Create VirtualEnv instead of Add Local. Give the new virtual environment an appropriate name and path. Typically, I put my virtual environments either all in one common place or one level up from my project root directory.
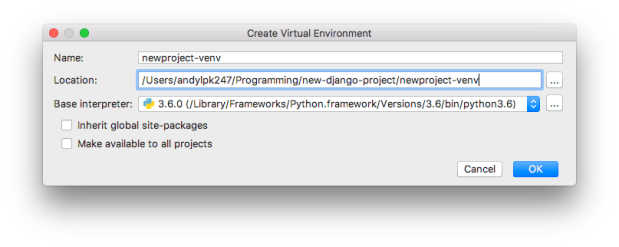
Creating a new virtual environment is pretty painless.
Databases
Out of the box, PyCharm Community Edition won’t give you database tools. You’re stuck with third-party plugins, the command line, or external database tools. This isn’t terrible, though. Since Django abstracts data into the Model layer, most developers rarely need to directly interact with the underlying database. Nevertheless, the open-source Database Navigator plugin provides support in PyCharm for the major databases (Oracle, MySQL, SQLite, PostgreSQL).
Limitations
The sections above show that PyCharm Community Edition can handle Django projects just like any other Python projects. This is a blessing and a curse, because advanced features are available only in the Professional Edition:
- Django template support
- Inter-project navigation (view to template)
- Better code completion
- Identifier resolution (especially class-to-instance fields)
- Model dependency graphs
- manage.py utility console
- Database tools
The two features that matter most to me are the template support and the better code completion. With templates, I sometimes make typos or forget closing tags. With code completion, not all options are available because Django does some interesting things with model fields and dynamically-added attributes. However, all these missing features are “nice-to-have” but not “need-to-have” for me.
Conclusion
I hope you found this guide useful! Feel free to enter suggestions for better usage in the comments section below. You may also want to look at alternative IDEs, such as PyDev.
转:pycharm community debug django projects的更多相关文章
- 如何使用pycharm调试(debug) django的测试用例?
一.django应用或者flask应用的调试: 结合debug模式,在代码处添加断点,即可实现断点调试功能 二. django应用或者flask应用测试用例的调试: 一般django应用的测试用例执行 ...
- Python之道1-环境搭建与pycharm的配置django安装及MySQL数据库配置
近期做那个python的开发,今天就来简单的写一下开发路线的安装及配置, 开发路线 Python3.6.1+Pycharm5.0.6+Django1.11+MySQL5.7.18 1-安装Python ...
- pycharm配置运行django项目步骤
1:在django项目的跟目录下执行:这是直接在Linux系统中直接运行 python manage.py runserver 0:8000 然后在浏览器中输入IP端口即可访问 pycharm配置运行 ...
- (转载)Python之道1-环境搭建与pycharm的配置django安装及MySQL数据库配置
近期做那个python的开发,今天就来简单的写一下开发路线的安装及配置, 开发路线 Python3.6.1+Pycharm5.0.6+Django1.11+MySQL5.7.18 1-安装Python ...
- NetBeans issues and solutions.(build.xml and debug multiple projects)
Copy a directory to another directory when building the .jar in NetBeans in the build.xml file. Solu ...
- PyCharm社区版+Django搭建web开发环境-2
接上一篇:PyCharm社区版+Django搭建web开发环境-1 1. 创建好django项目并建立app应用:web 2. setting.py:配置app应用 INSTALLED_APPS = ...
- How to import Django DB operations out of Django projects
i am not familiar with DB opertions. usually i stroe data to txt and other formats. as DB is more an ...
- 在PyCharm上创建Django项目
声明:此Django分类下的教程是追梦人物所有,地址http://www.jianshu.com/u/f0c09f959299,本人写在此只是为了巩固复习使用 首先我们在Pycharm上新建一个Dja ...
- Pycharm:debug调试时使用参数
一种操作方法: 文章链接:MAC下使用Pycharm,debug调试时怎样带参数 今天在网上找了一个例子敲代码,因为我使用的是PyCharm,例子运行时需要带参数,开始不知道怎么带参数,网上搜了大半天 ...
随机推荐
- 解决linux下“XX不在 sudoers 文件中。此事将被报告"的问题
在使用sudo命令时,经常性会提示出“不在 sudoers 文件中.此事将被报告”的错误信息. 这是因为当前登录的账号不在sudo权限里面. sudo命令可以让你以root身份执行命令,来完成一些我们 ...
- JAVA编码 —— 字符串关键字内容替换
前言 工作中,我们可能遇到字符串内容替换的场景.例如:我们需要将一个字符串凡是 “#” 标注的,分别替换为不同的内容,那我们应该怎么做呢? 分析,一个字符串可能含有多个“#”,每个 “#”又对应不同的 ...
- C# 列出进程
Process[] processes = Process.GetProcesses(); StringBuilder sb = new StringBuilder(); ; i < proce ...
- WinForm中DataGridView导出为Excel(快速版)
public static void ExportExcel(DataGridView myDGV, string fileName) { string saveFileName = fileName ...
- 获取BT节点信息bittorrent-discovery
获取BT节点信息bittorrent-discovery BT/磁力都是常见的P2P下载方式.用户作为一个节点node从其他用户node或者peer获取文件数据,以完成下载.bittorren-d ...
- android studio git 将项目分享到github,推送到其他平台 码云 等。
android studio git 将项目分享到github,推送到其他平台 码云 等. 作者:韩梦飞沙 Author:han_meng_fei_sha 邮箱:313134555@qq.com E- ...
- CODEVS.1228 苹果树(DFS序)
To CODEVS.1228 苹果树 To poj 3321 Description 在卡卡的房子外面,有一棵苹果树.每年的春天,树上总会结出很多的苹果.卡卡非常喜欢吃苹果,所以他一直都精心的呵护这 ...
- CocosCreator编辑器界面
1,资源管理器[参考来源:官方文档] 资源管理器 里显示了项目资源文件夹(assets)中的所有资源.这里会以树状结构显示文件夹并自动同步在操作系统中对项目资源文件夹内容的修改.您可以将文件从项目外面 ...
- Kaggle Titanic solution 纯规则学习
其实就是把train.csv拿出来看了看,找了找规律,调了调参数而已. 找到如下规律: 1.男的容易死,女的容易活 2.一等舱活,三等舱死 3.老人死,小孩活 4.兄弟姐妹多者死 5.票价高的活 6. ...
- Netbeans异常之cannet locate java installation in specified jdkhome
原因:更改了jdk安装版本 方法:修改netbeans安装目录下ect下netbeans文件, 详细代码位置: # Default location of JDK: # (set by install ...